
A targeting campaign in Personyze shows different content, layouts, offers, or entire experiences to specific segments of your visitors — anyone from “returning customers on the pricing page” to “cart abandoners who added a discounted item” to “high-intent visitors from a specific paid campaign.” The platform tracks 70+ real-time signals about every visitor and evaluates your audience rules on the fly, so a matching visitor sees the personalized experience the moment they qualify.
Every targeting campaign follows the same flow: Target (define the audience), Content (design what they see), A/B testing (optional — compare multiple variations), and then the Performance report once it’s live. Every step is inside the same campaign editor.
New here? This quick walkthrough shows the whole flow. The full detail — with every screen — is below.
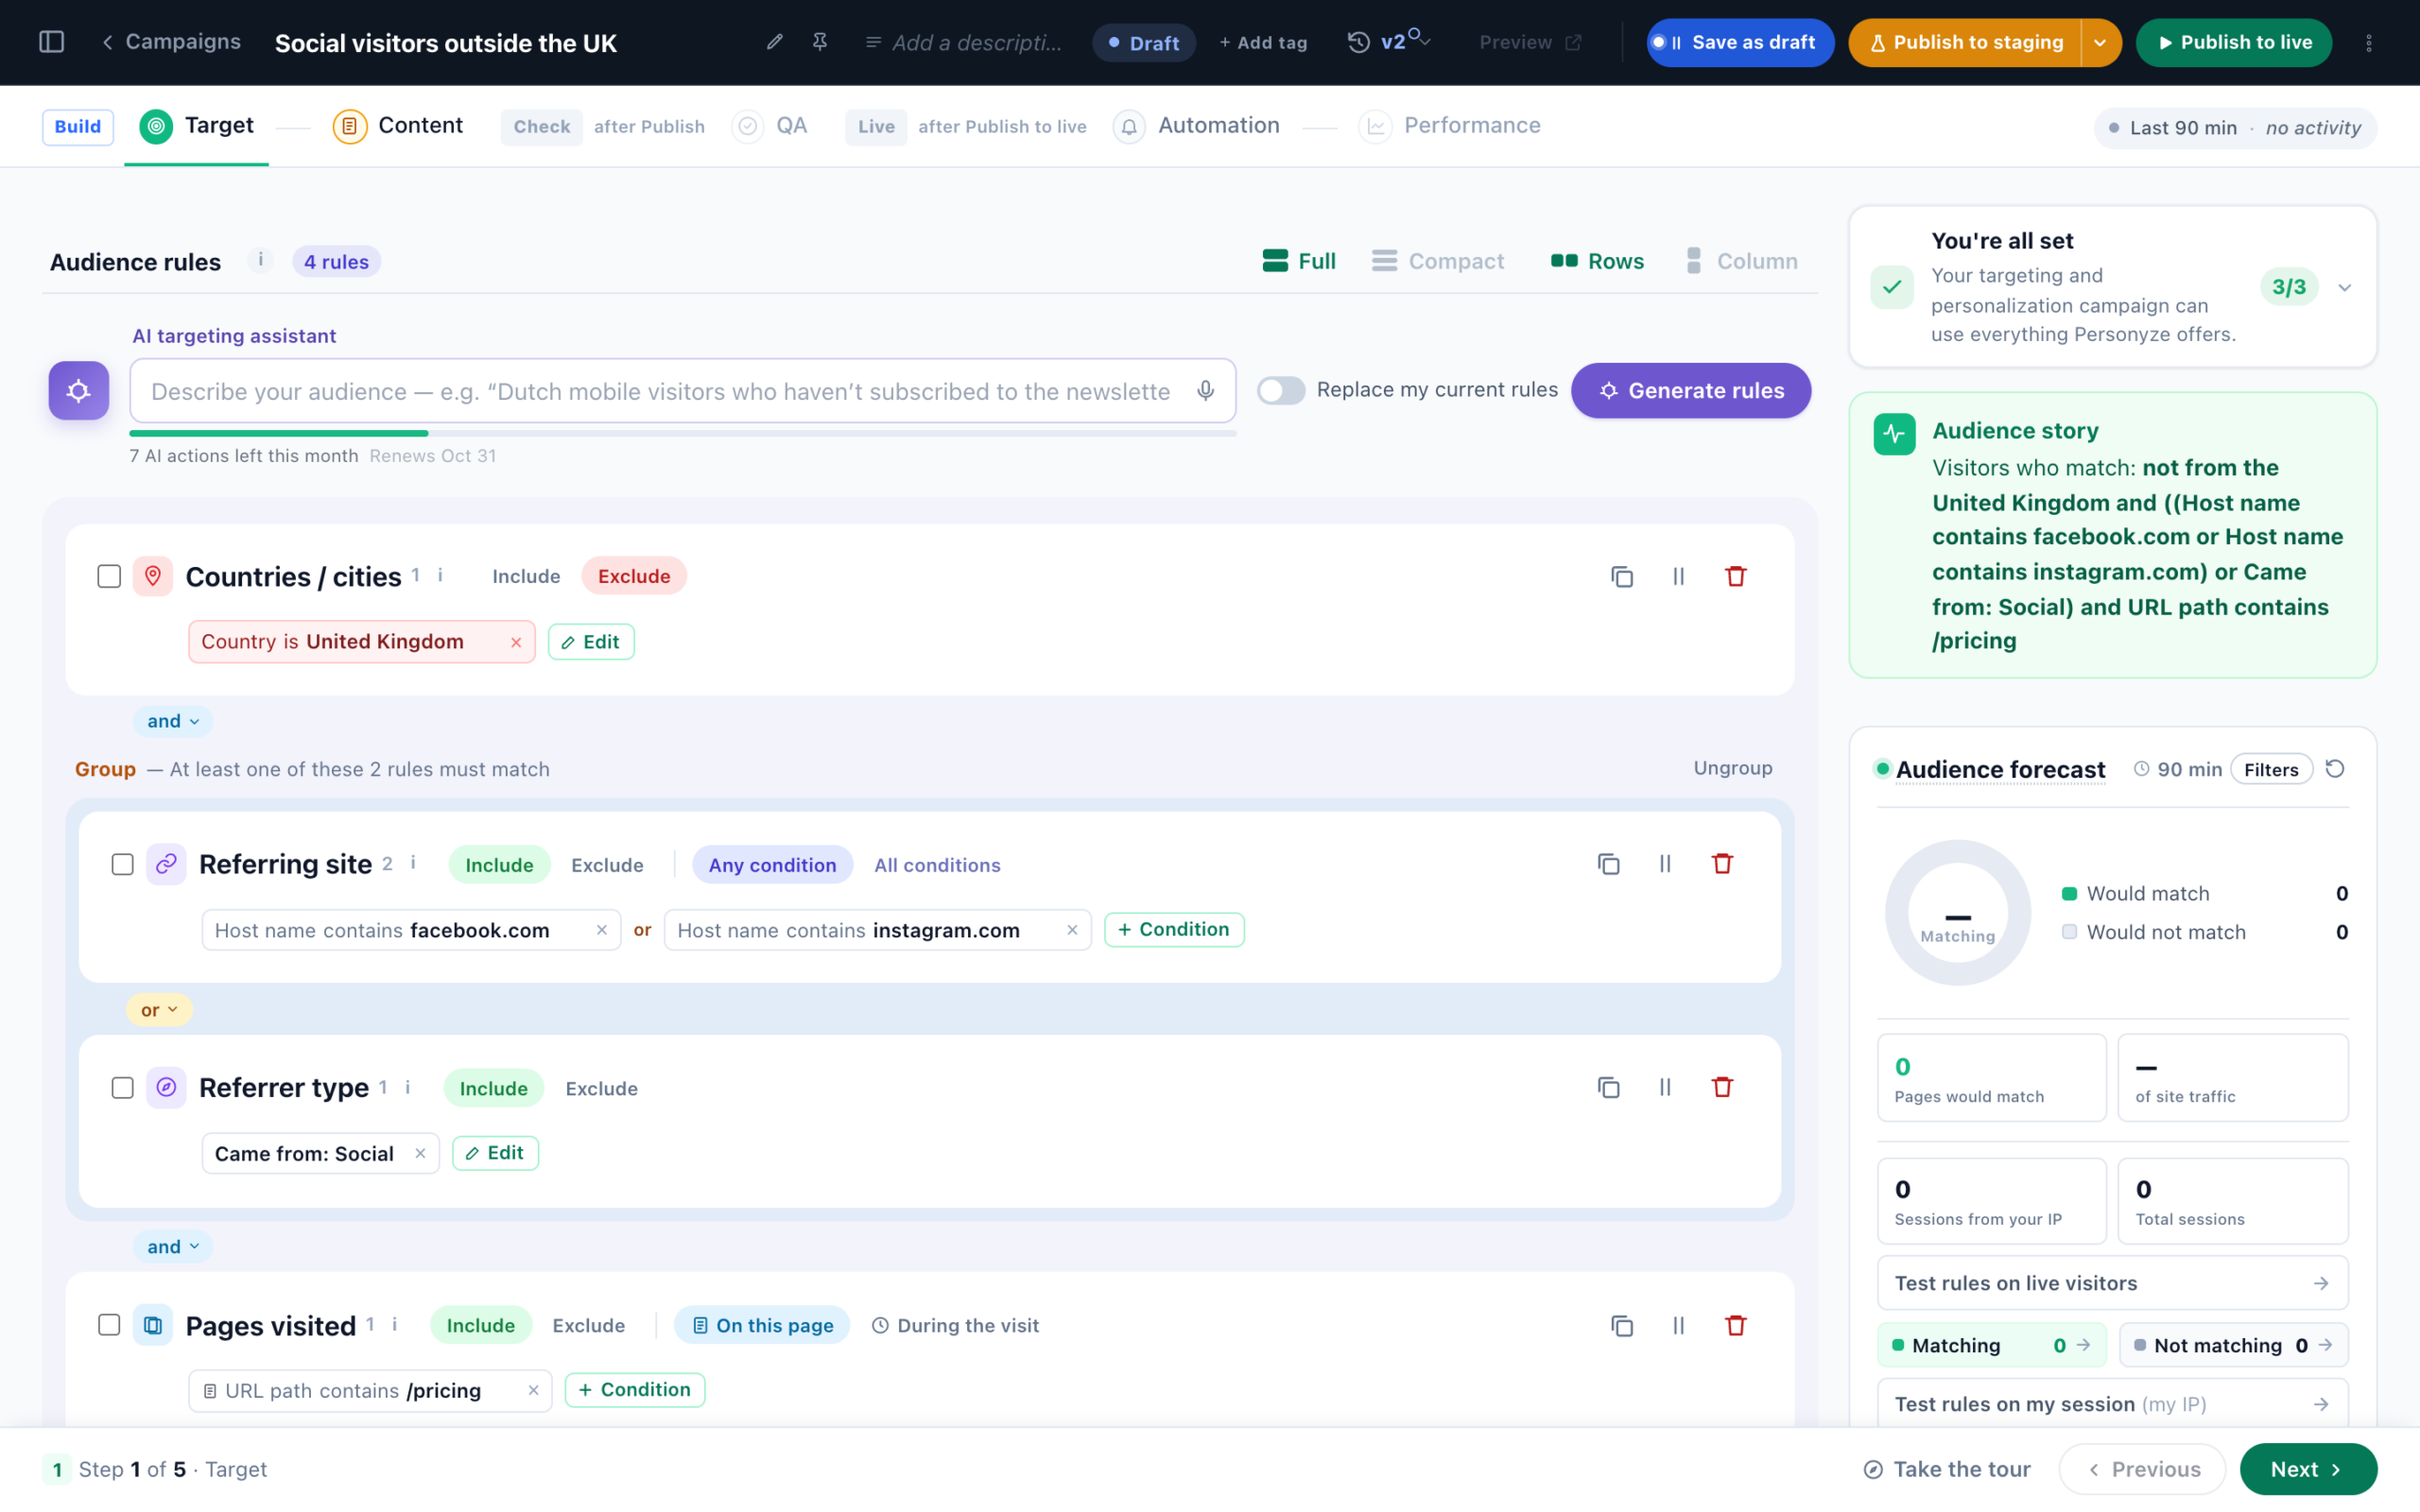
Target — build the audience
On the Target step, you define who sees this campaign. Each rule narrows the audience; join rules with and / or / only one, group them, and set each rule to Include or Exclude. The live Audience Forecast on the right updates as you build, showing how many visitors would match and what share of traffic that is.
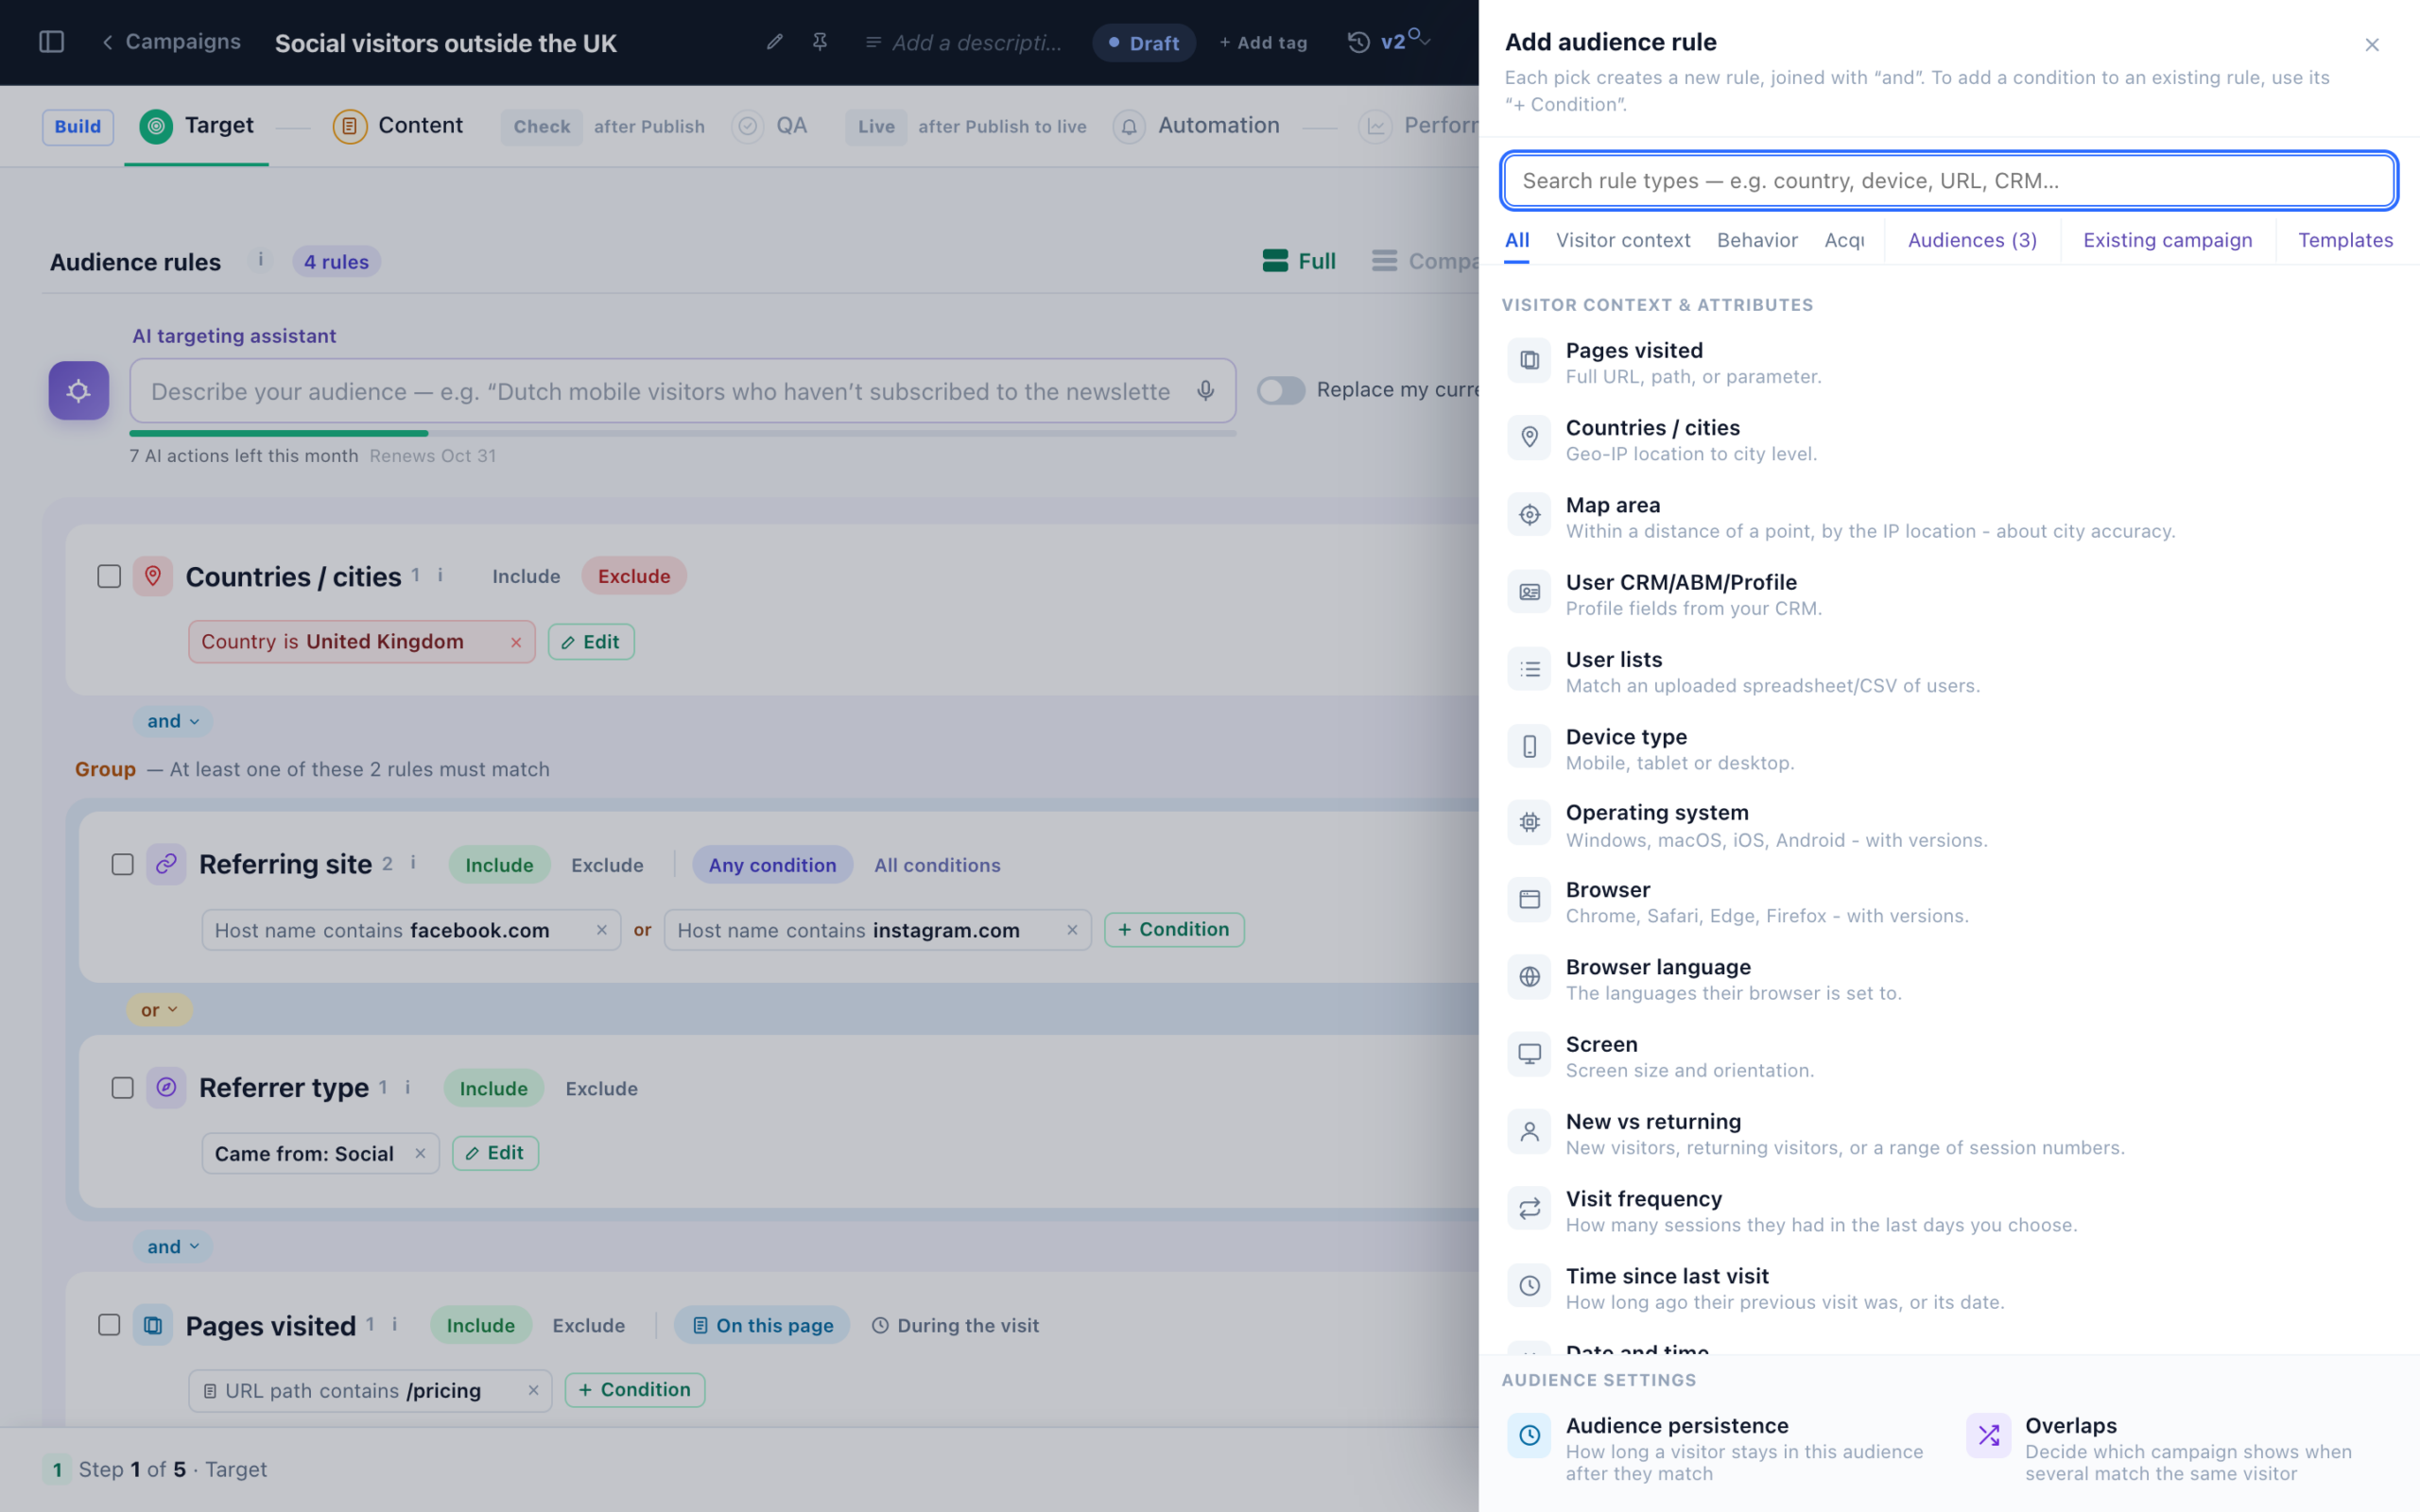
Add an audience rule
Click Add audience rule to open the rule picker. Personyze offers dozens of rule types across categories: visitor context (location, device, language, weather), behavior (pages viewed, clicks, time on site, cart contents), traffic source (referrer, UTM, campaign), and integrations (HubSpot, 6sense, Clearbit, and more).
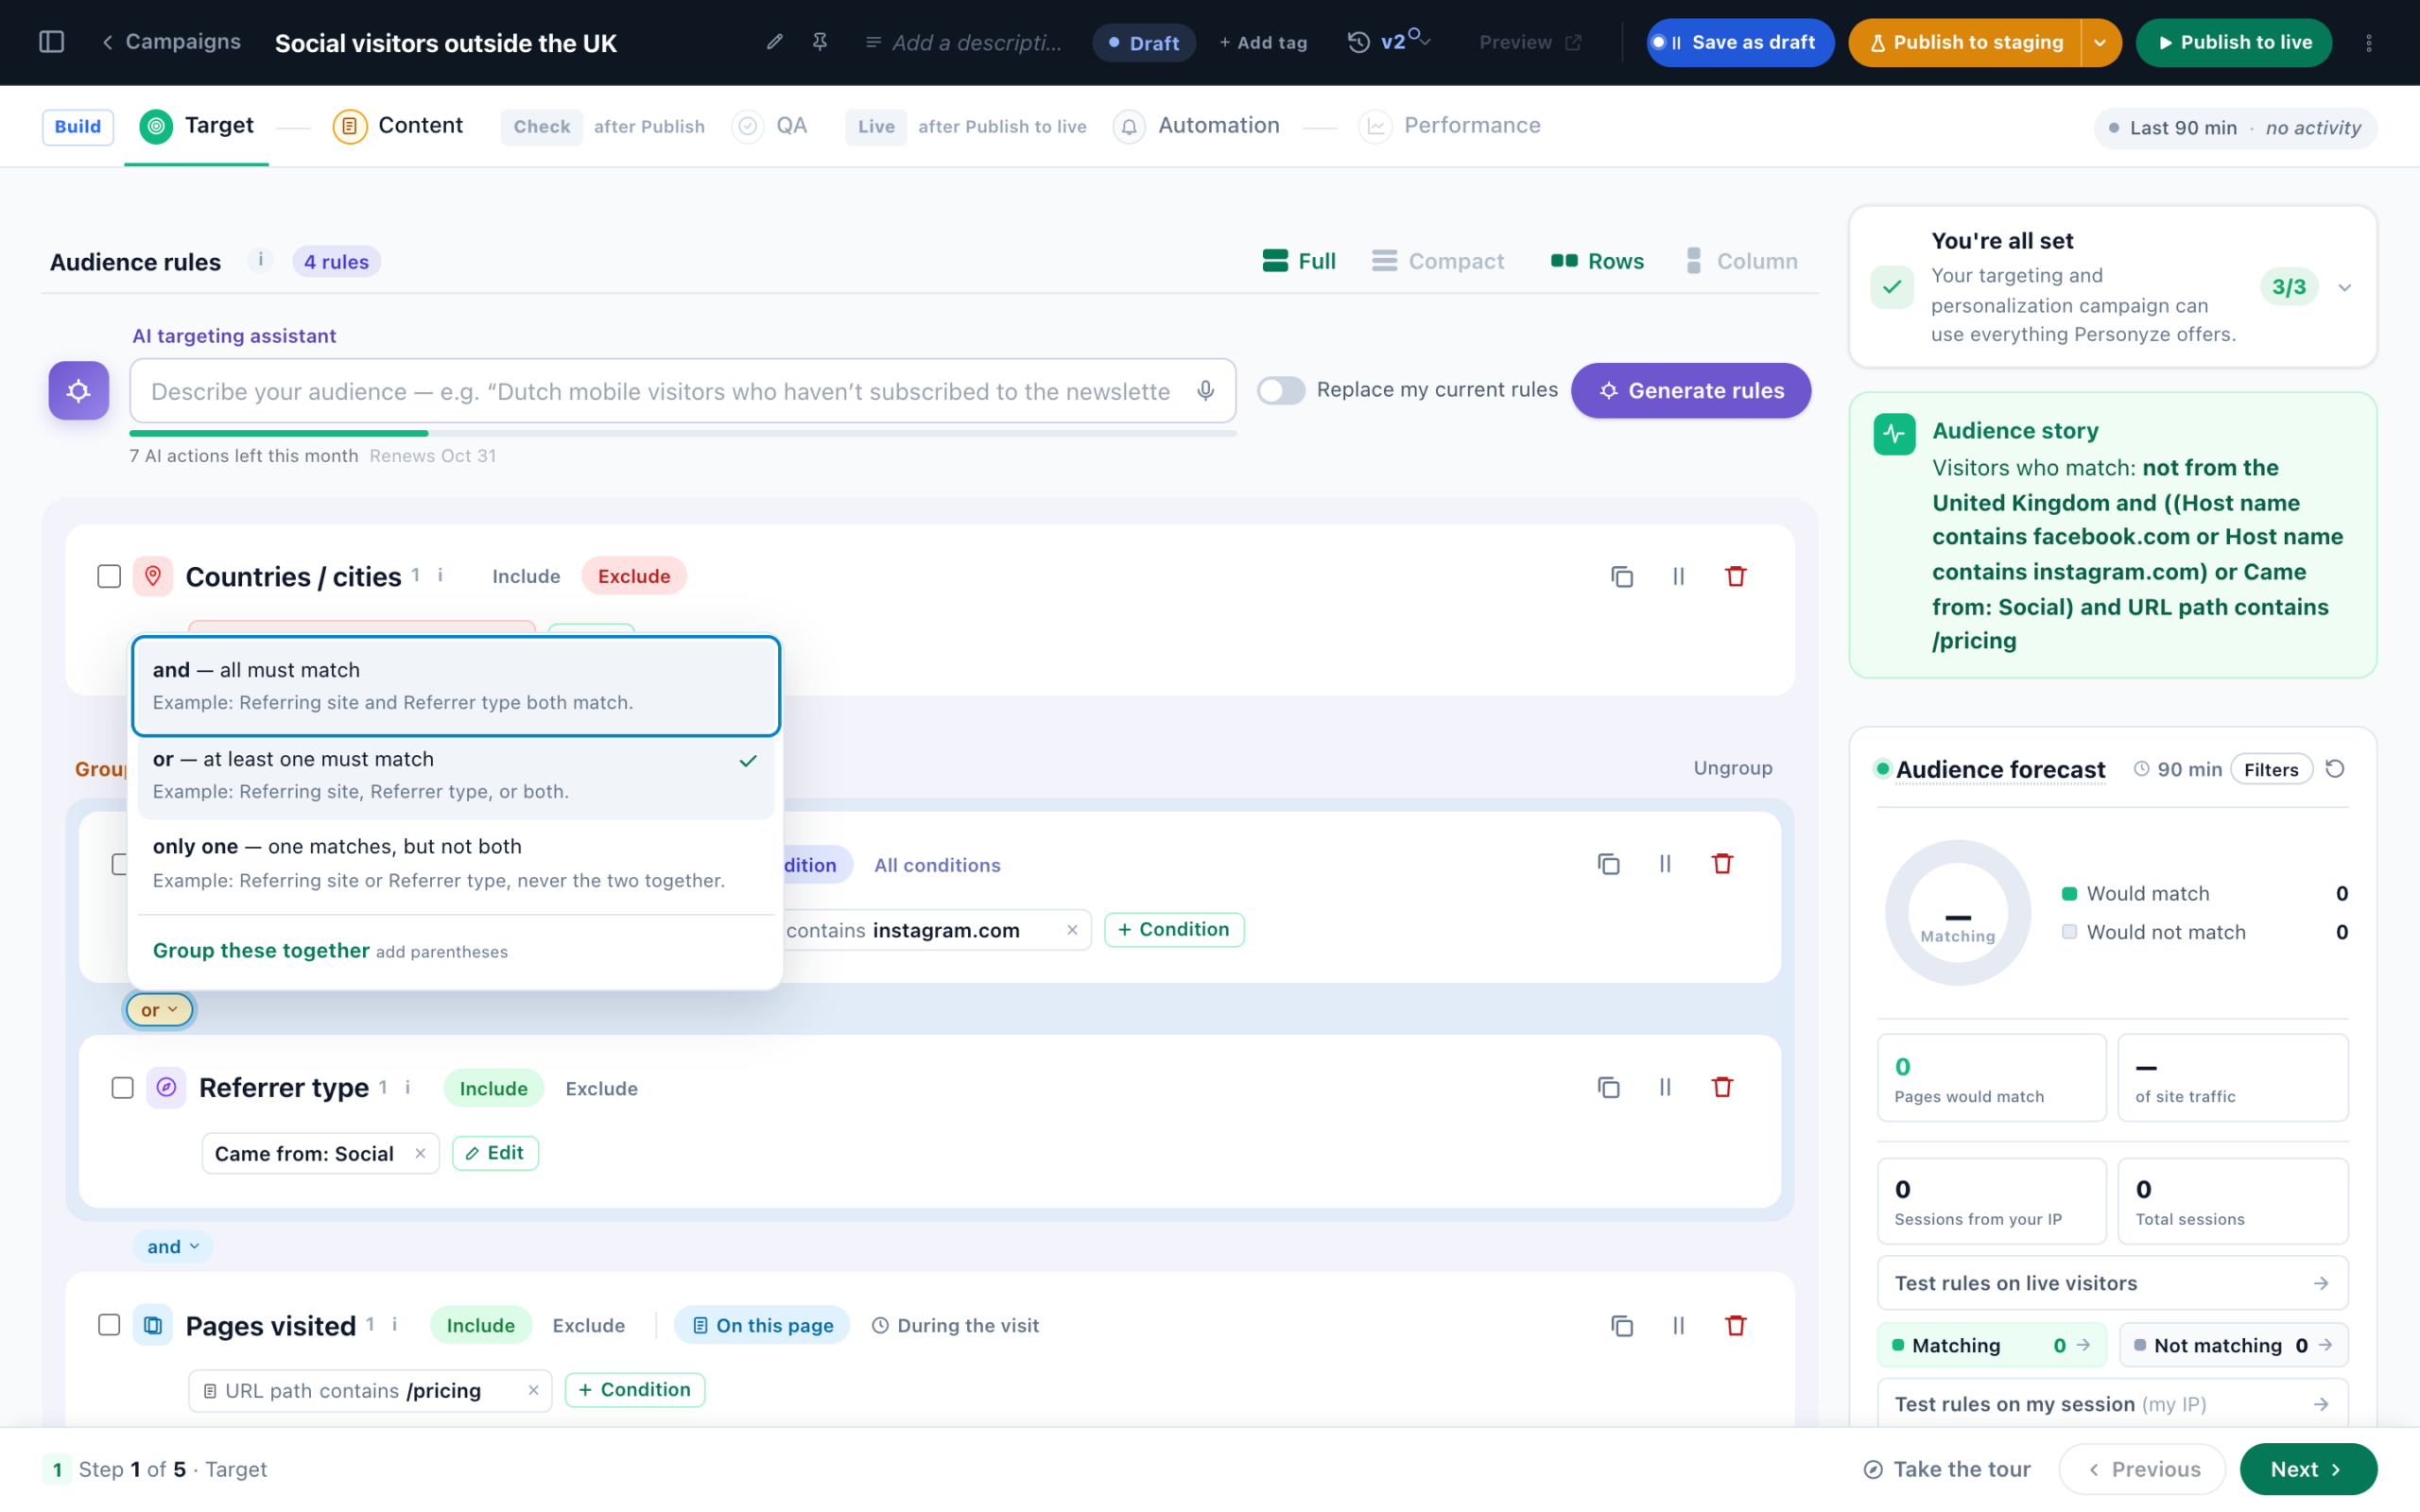
Configure the rule
Pick a rule type and fill in its condition — for example, match a page category, a visited URL, a behavior threshold, or a CRM field value. Add more conditions to the same rule with + Condition, or add another rule and choose how they join. Each rule instantly updates the forecast.
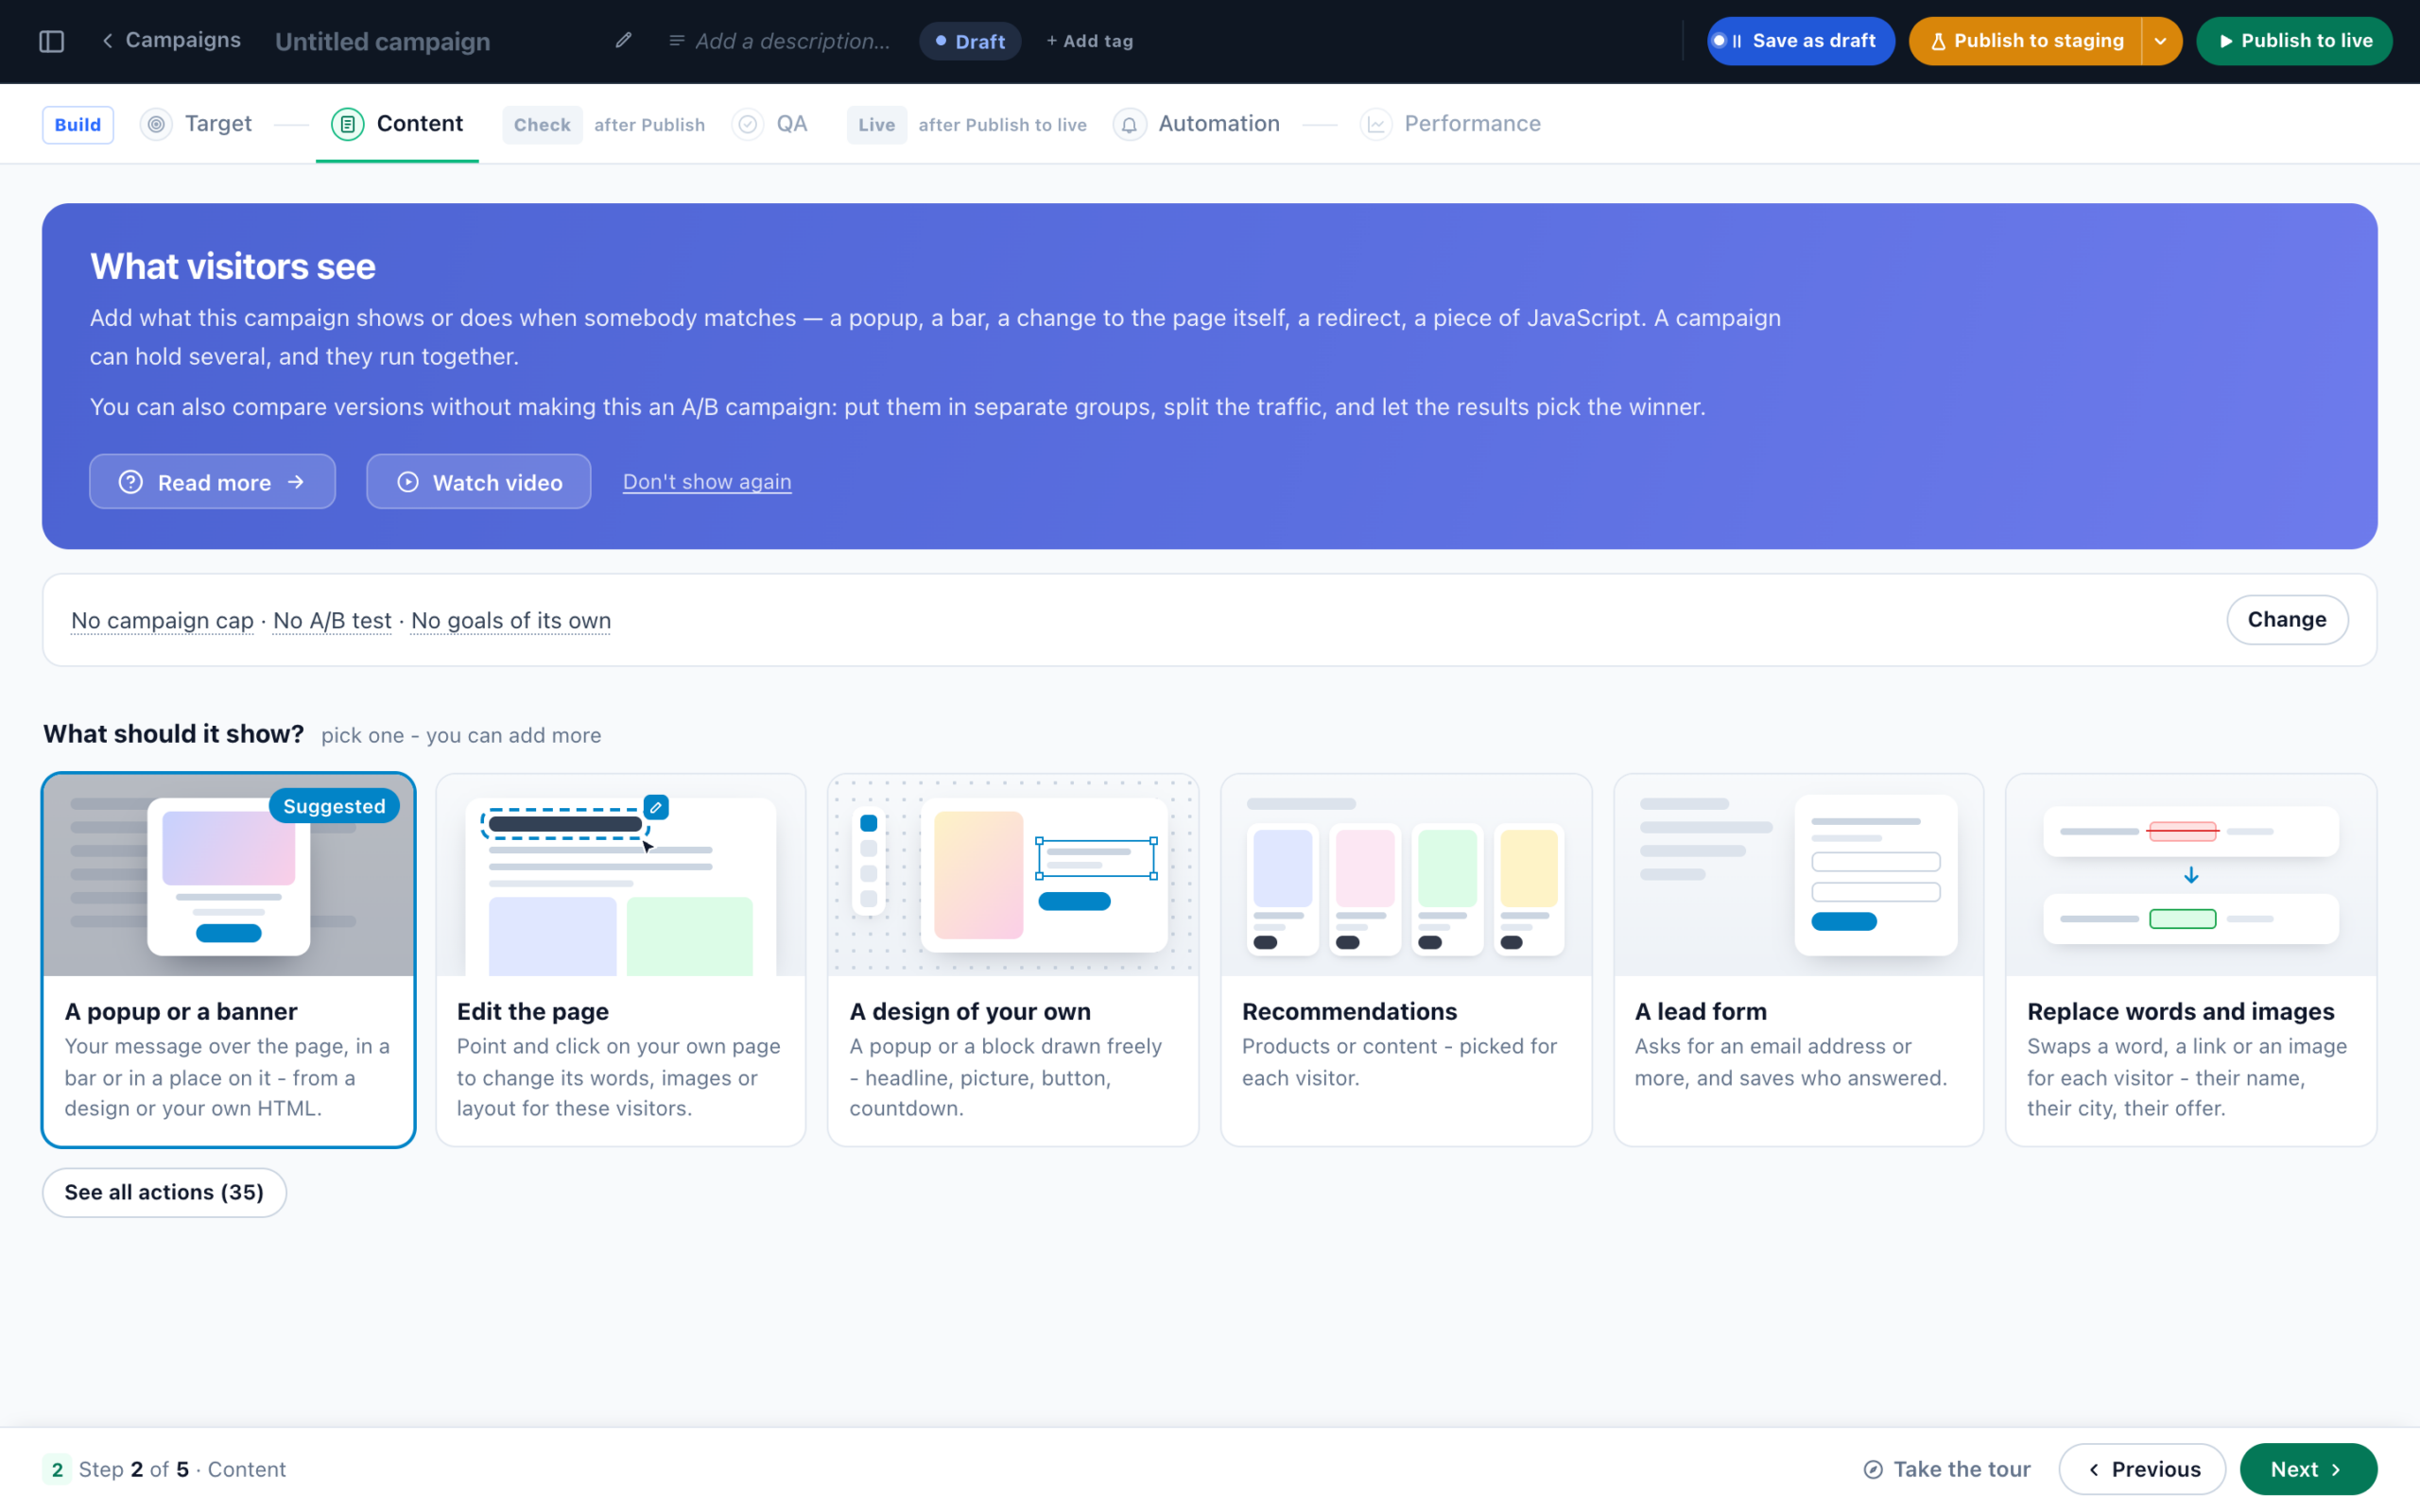
Content — start adding actions
Move to the Content step. This is where you define what matching visitors actually see. On a new campaign it shows pictures of what you can add, under What should it show? — pick one to open its designs, or See all actions for the whole list. Everything you add here is shown to every visitor that matches your targeting.
Pick an action
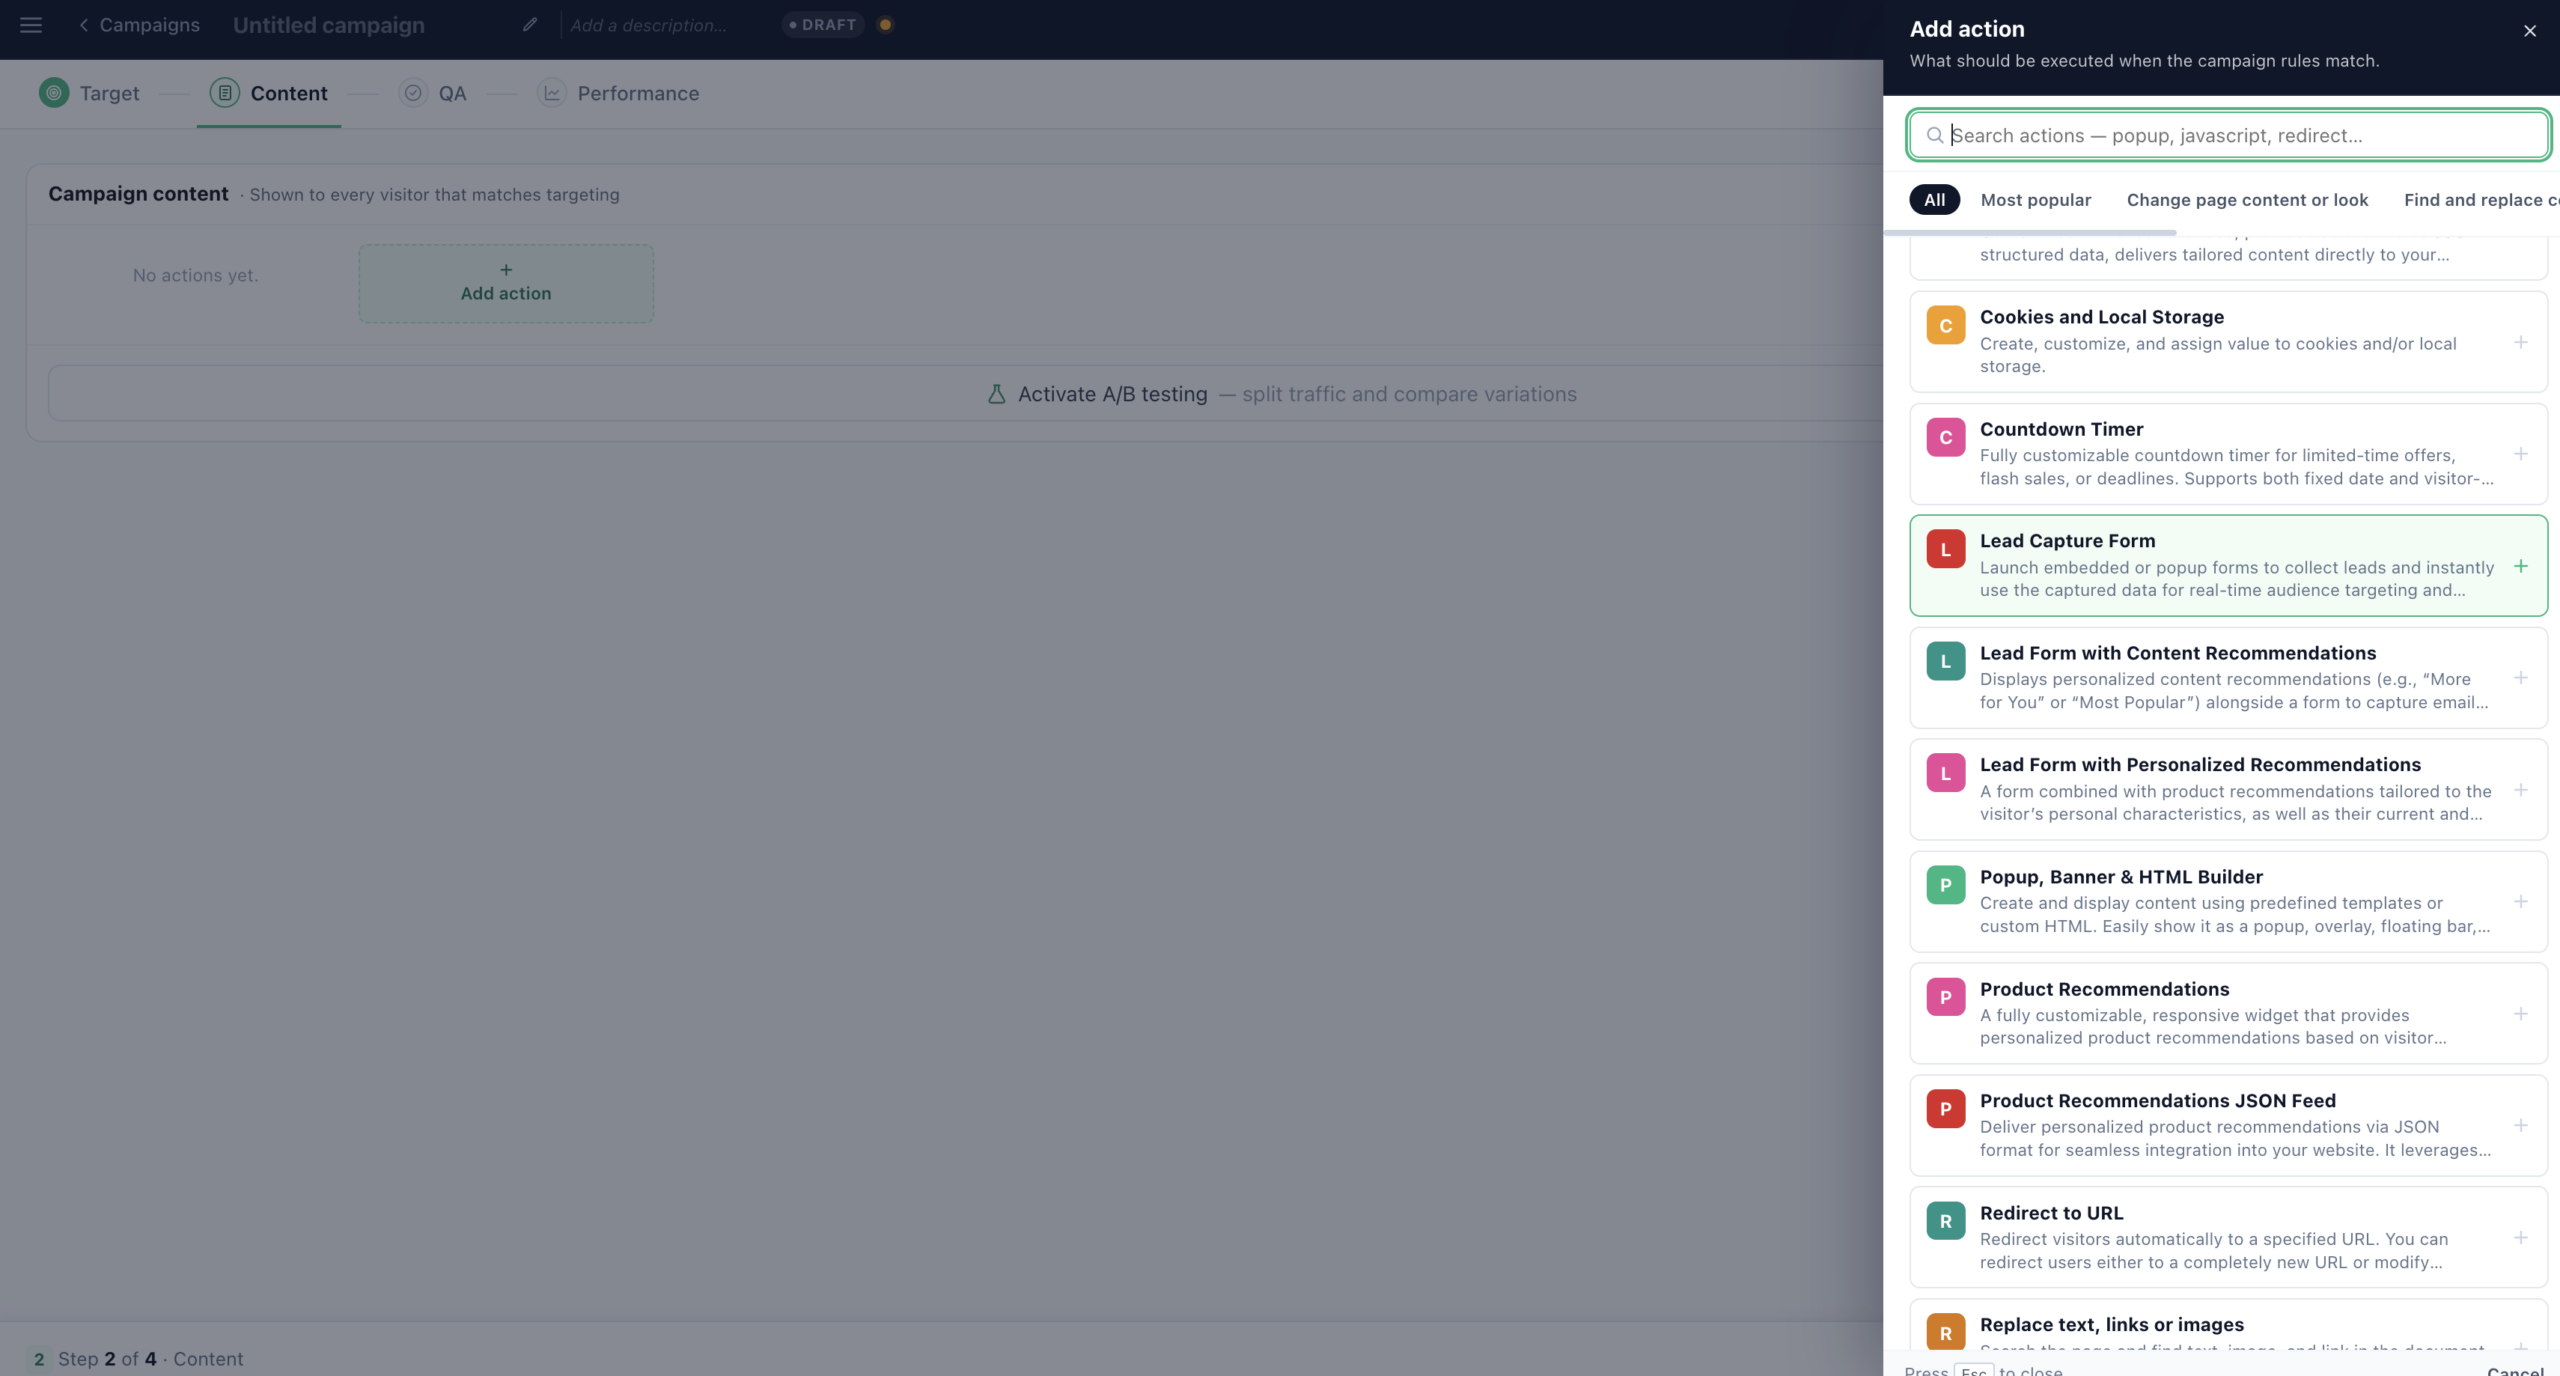
The Add action panel lists everything Personyze can do when the campaign matches: popups and banners, lead-capture forms, product and content recommendations, countdown timers, redirects, cookies and local storage, custom JavaScript, and more. Search or browse by category. On a campaign’s first visit to Content, See all actions (N) opens the whole gallery in place — a picture and a plain name for each type, with search and chips. Recommendations is one card that asks Products or Content.
Customize the look & feel
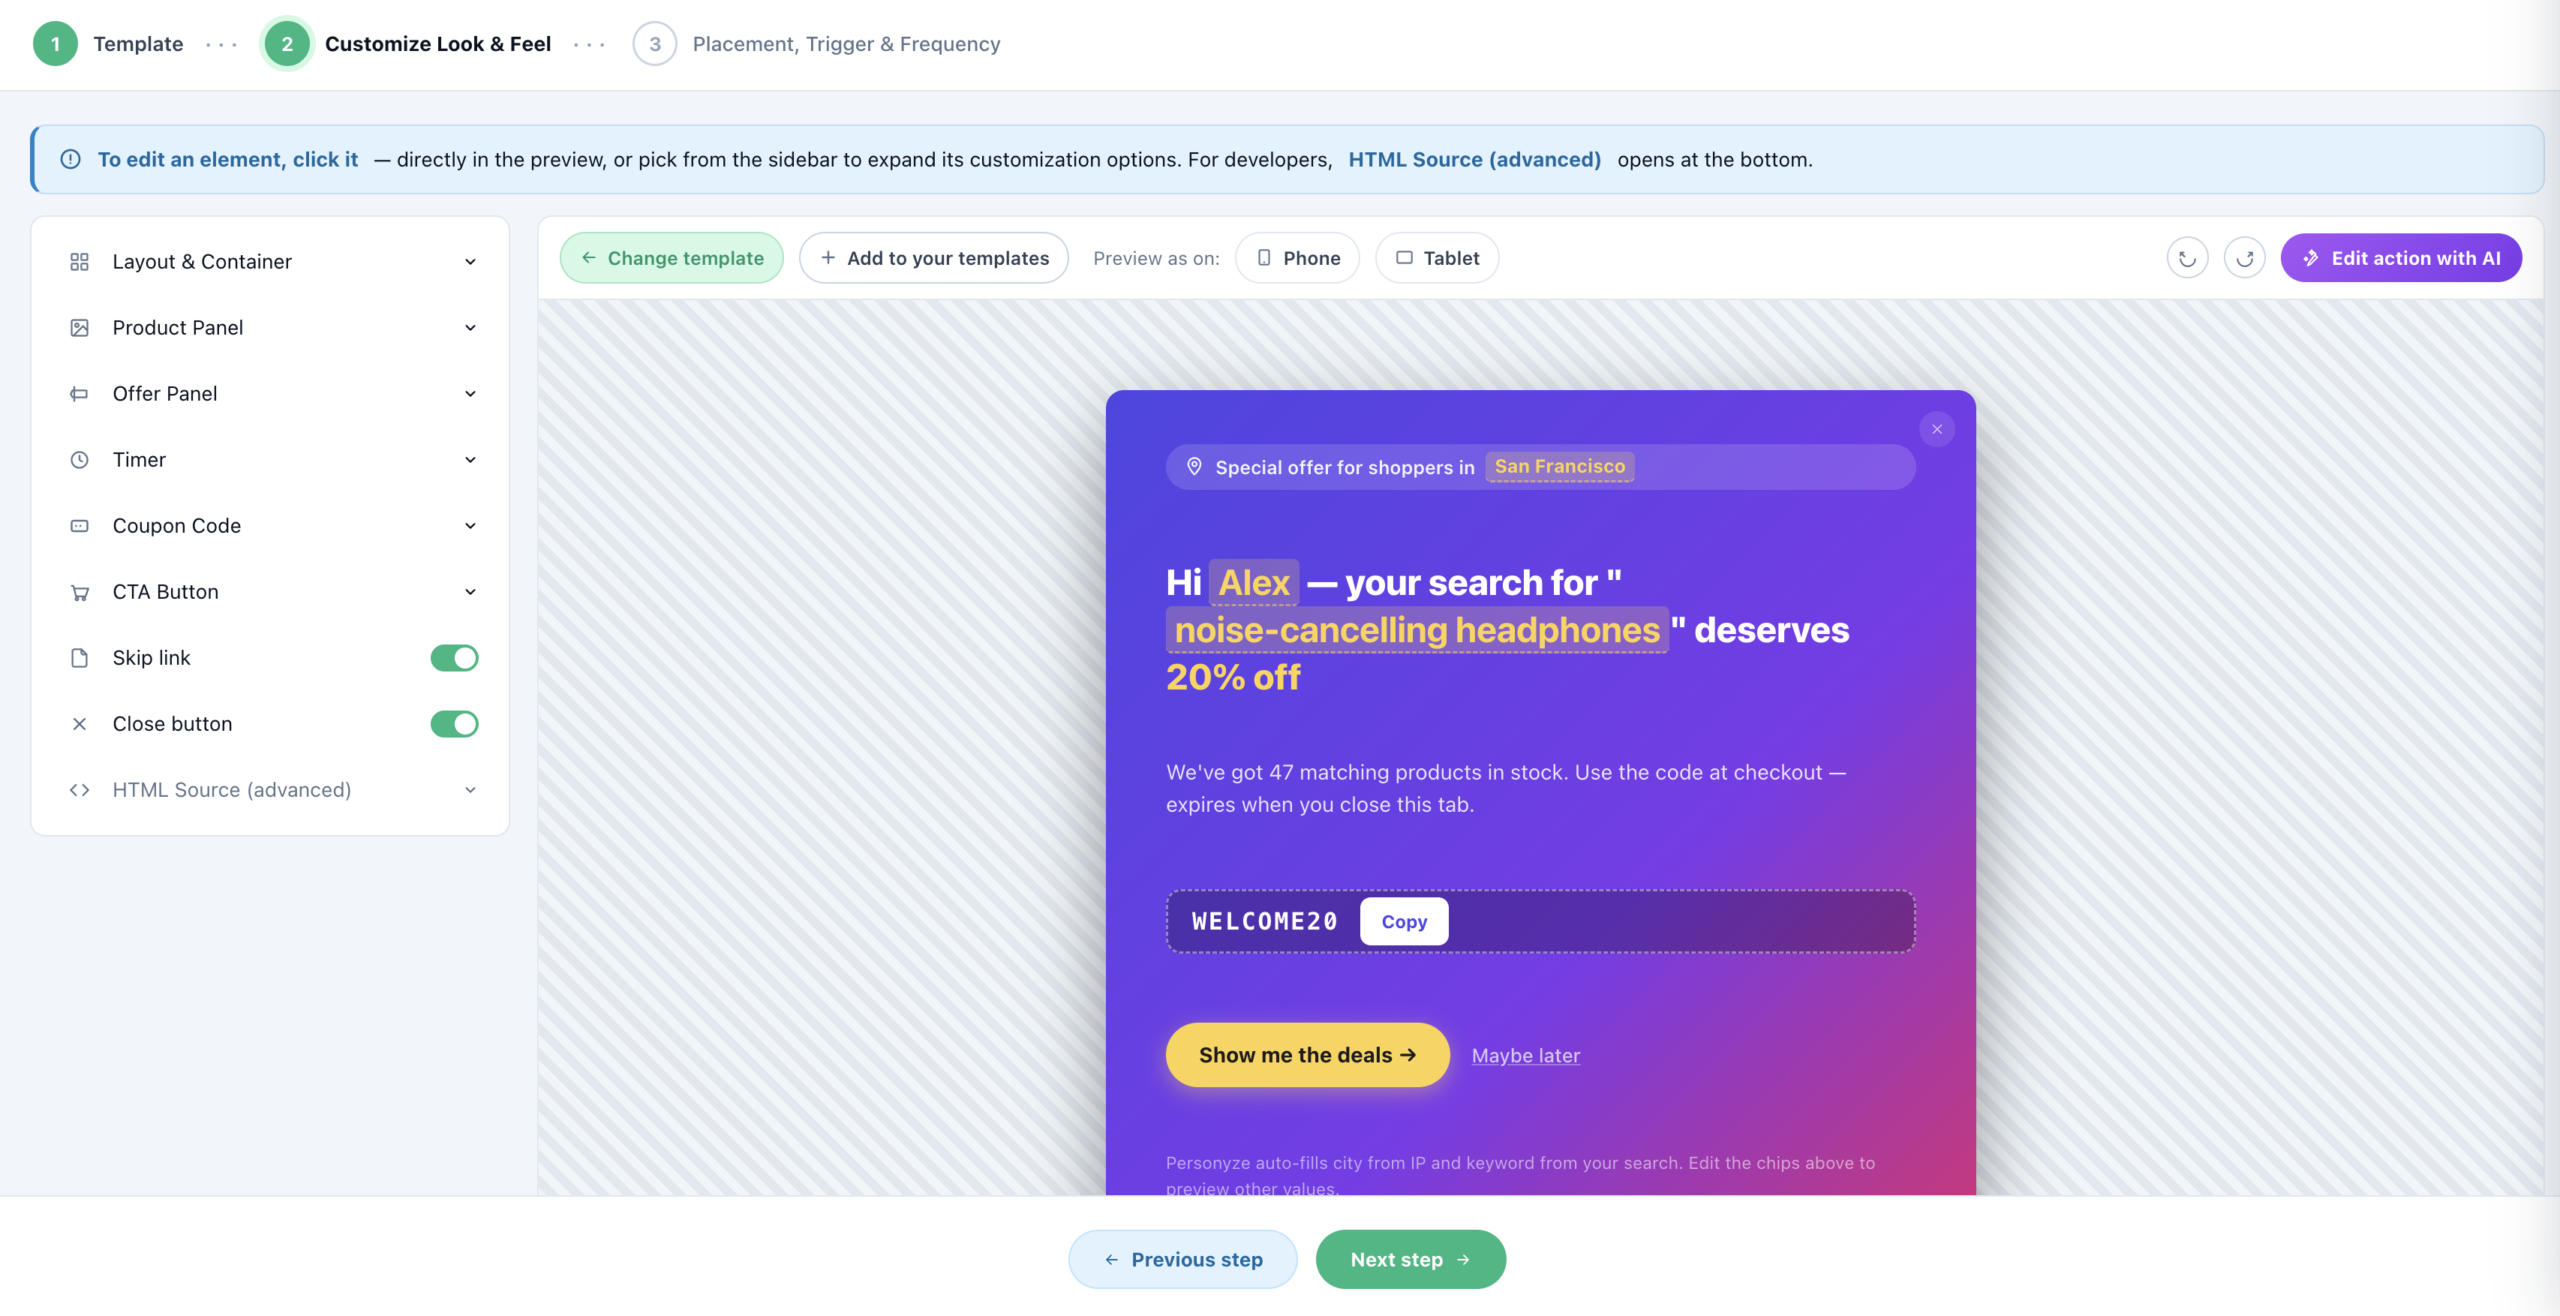
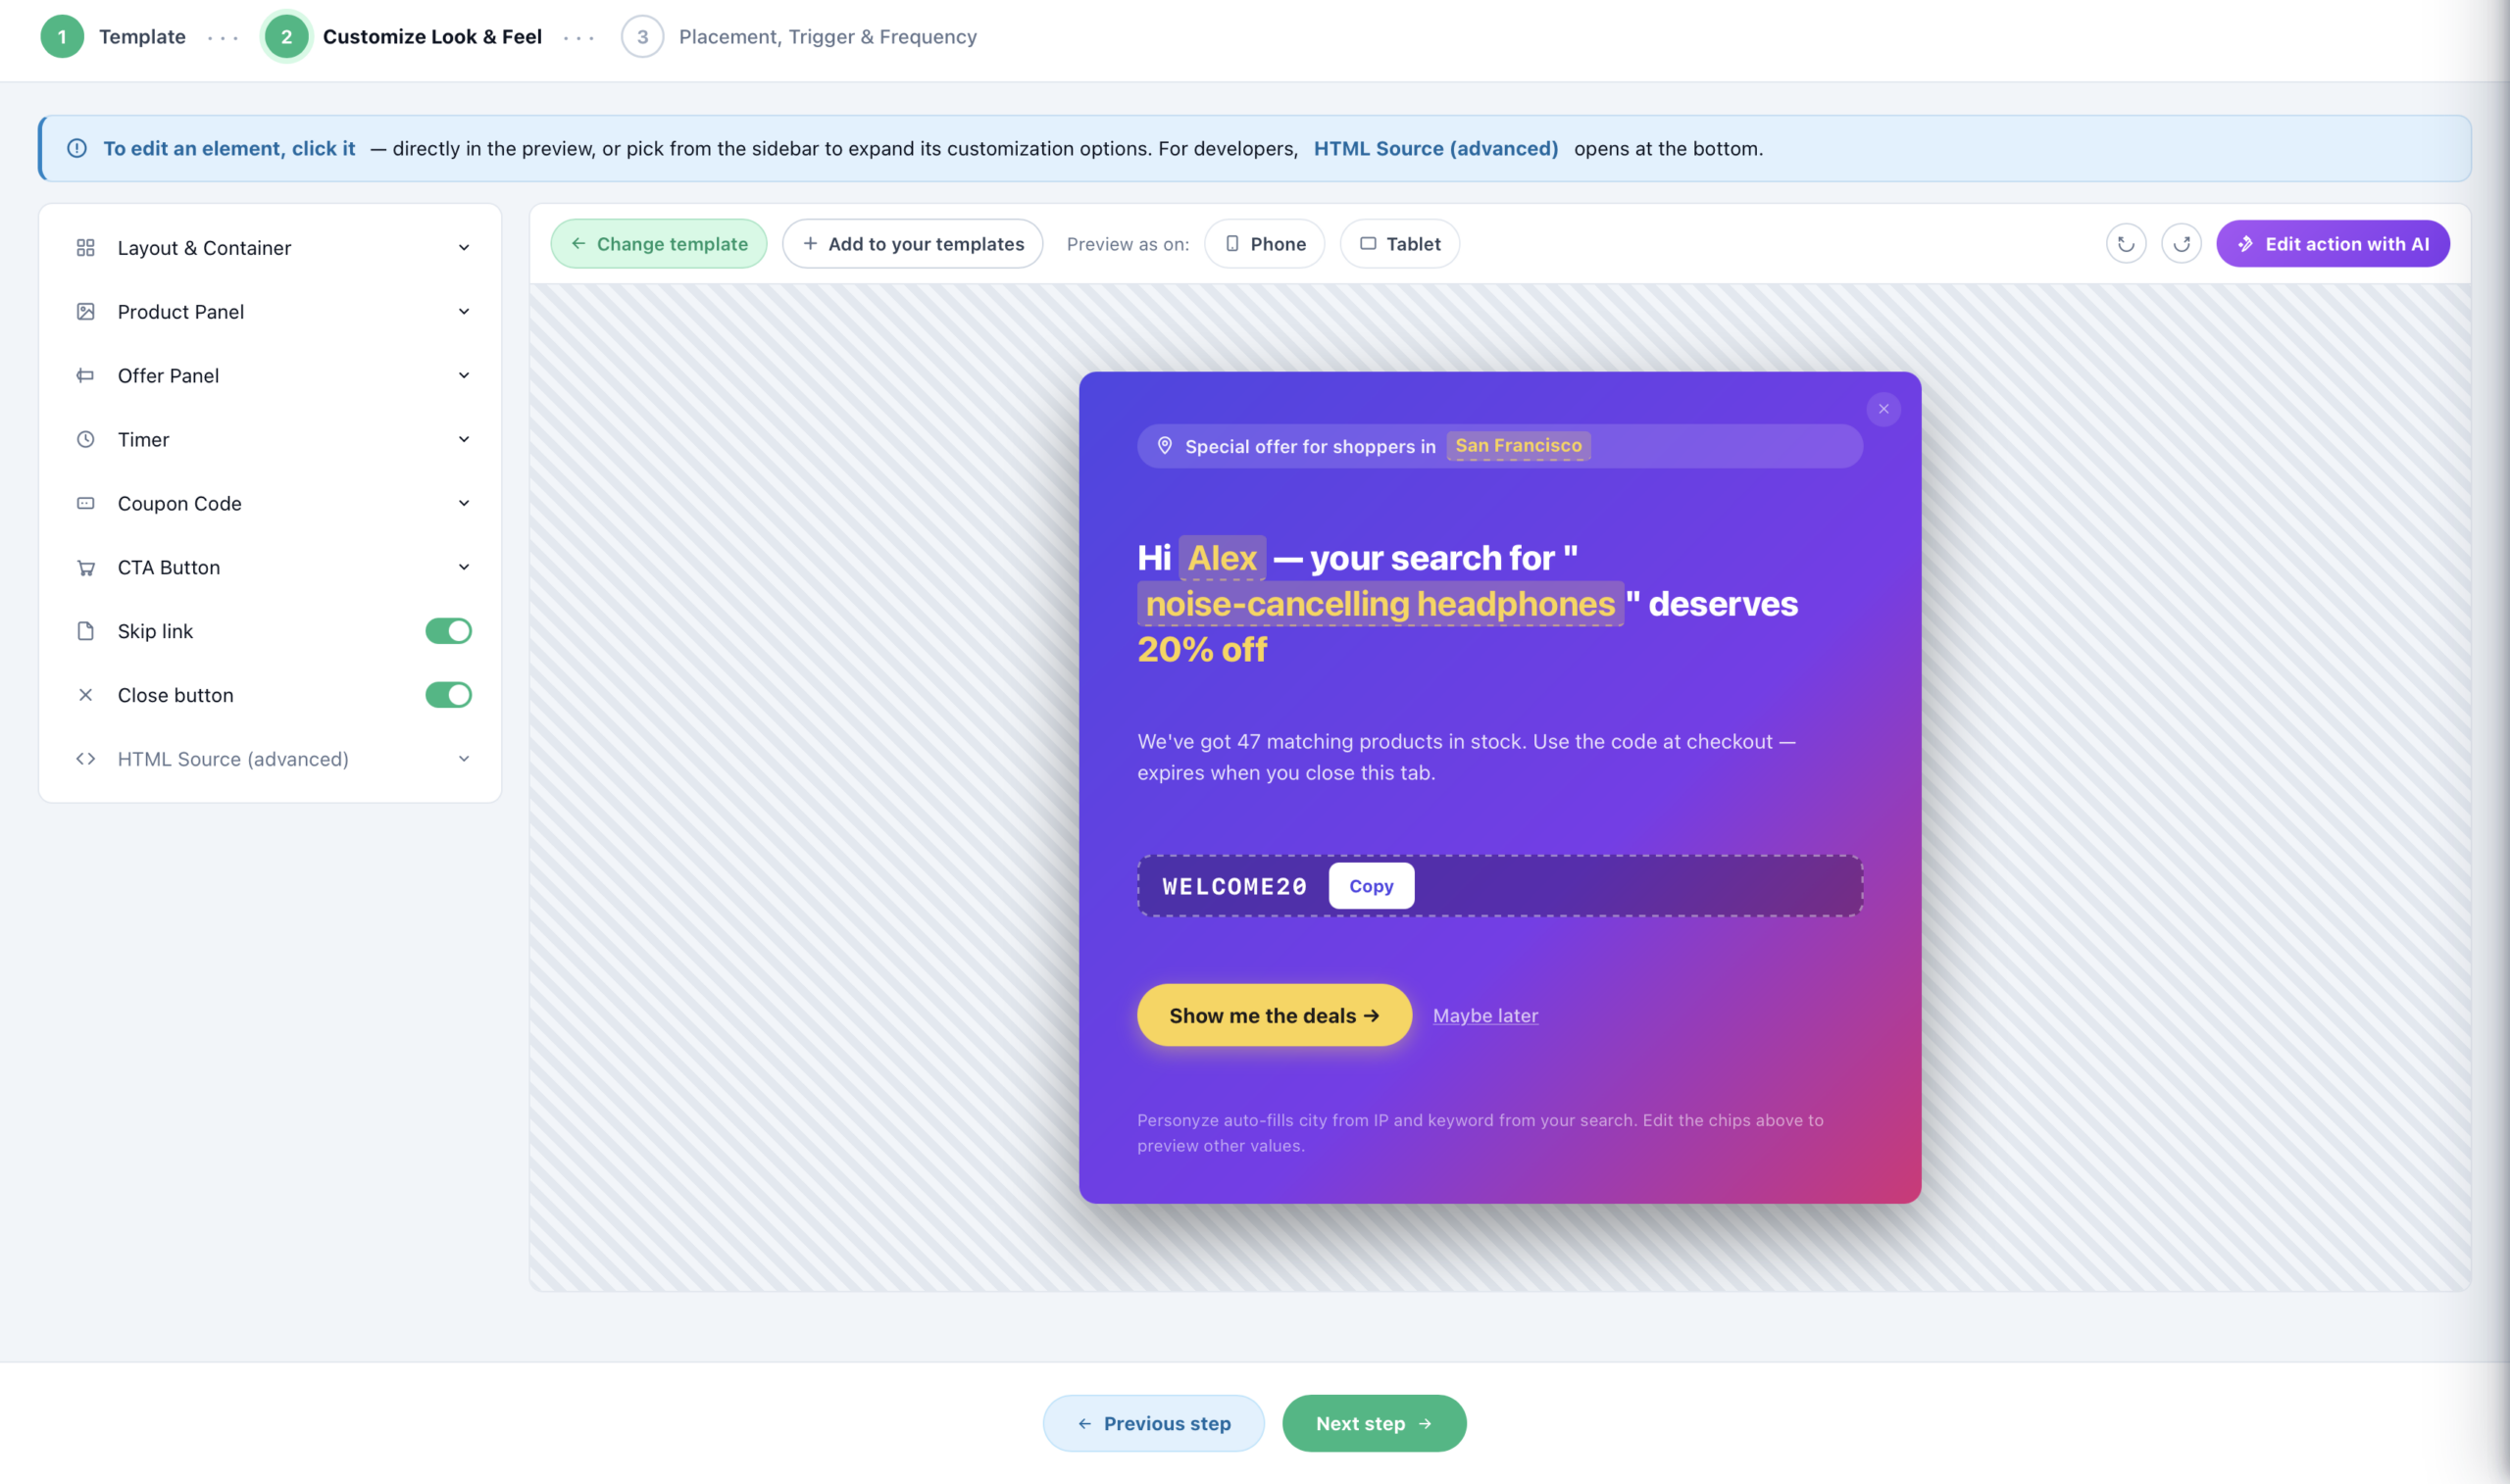
After picking a template, customize it in the visual editor — layout and container, product panel, offer, timer, coupon code, CTA button, and more. Click any element directly in the preview to edit it. Personyze auto-fills dynamic values (like city from IP or a search keyword) so you can preview real personalization.
Set placement & trigger
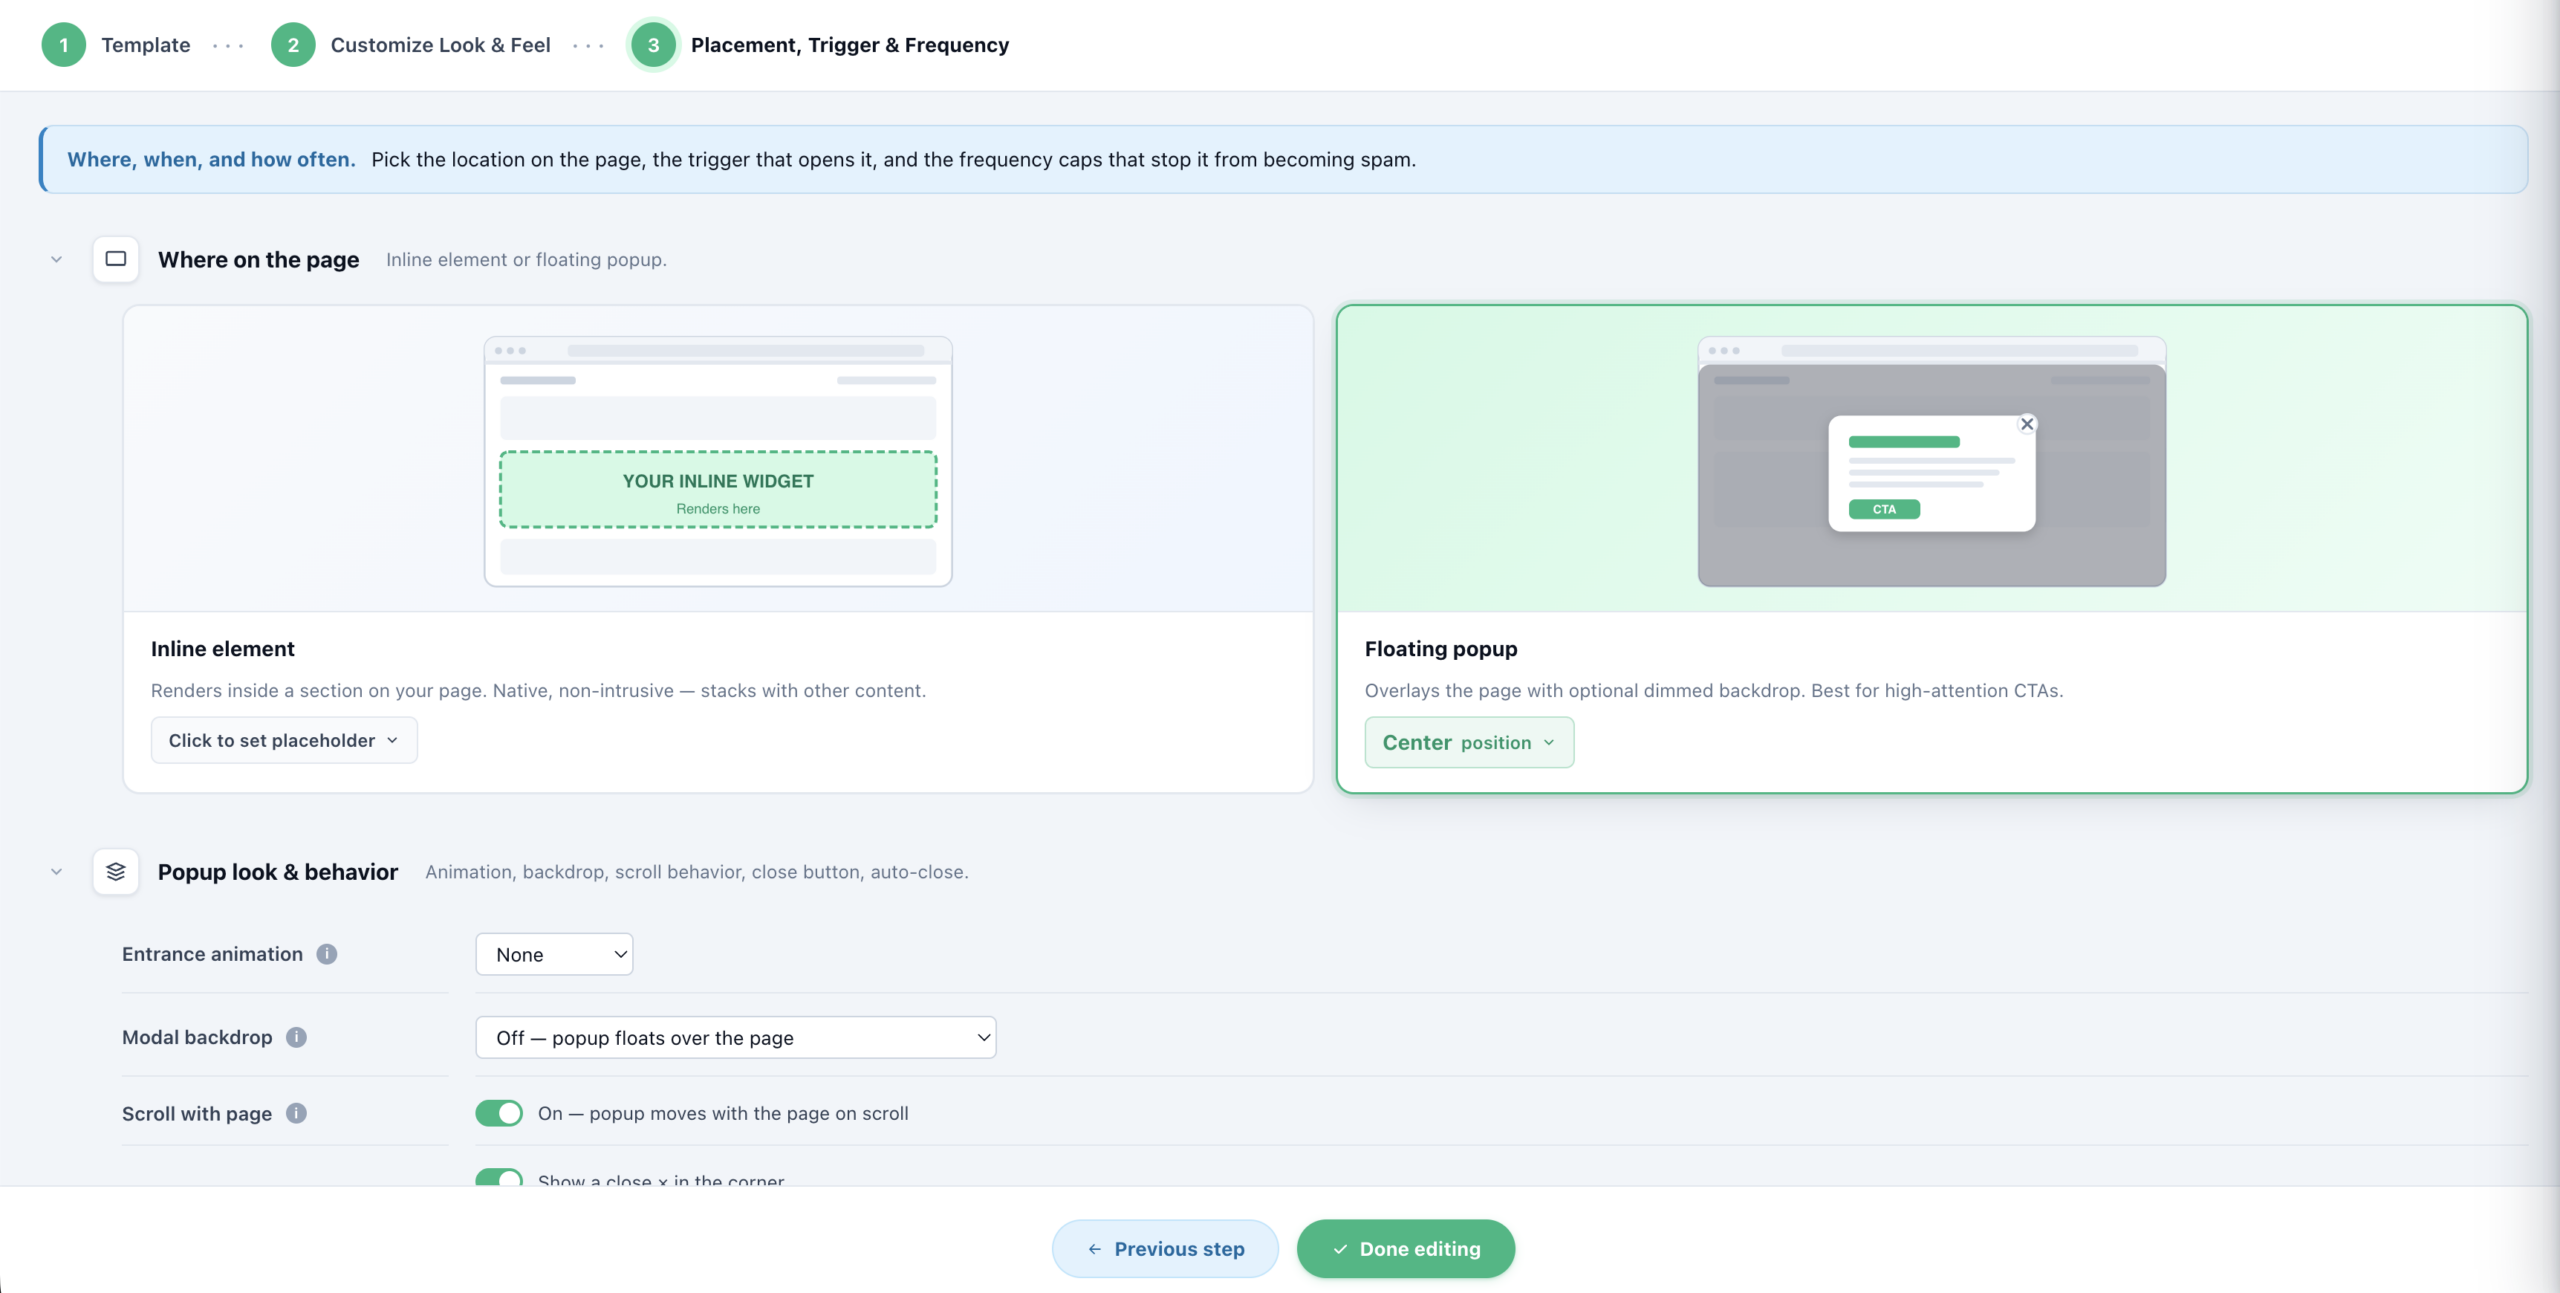
Choose where it appears — an inline element that renders inside a section of your page, or a floating popup that overlays it (with optional dimmed backdrop). Then set the entrance animation, scroll behavior, close button, trigger, and the frequency caps that stop it from becoming spam.
Save & publish the campaign
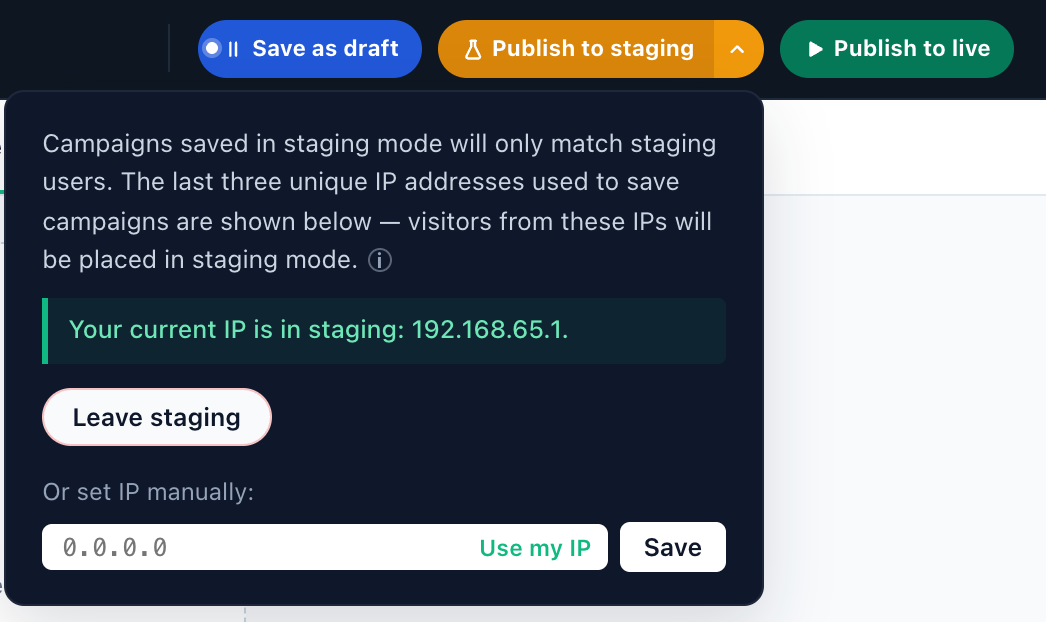
When you’re ready, save the campaign. Save as draft keeps it private while you work. Publish to staging shows it only to visitors in staging mode, so you can QA it safely. Publish to live turns it on for real visitors that match your audience.
Measure performance
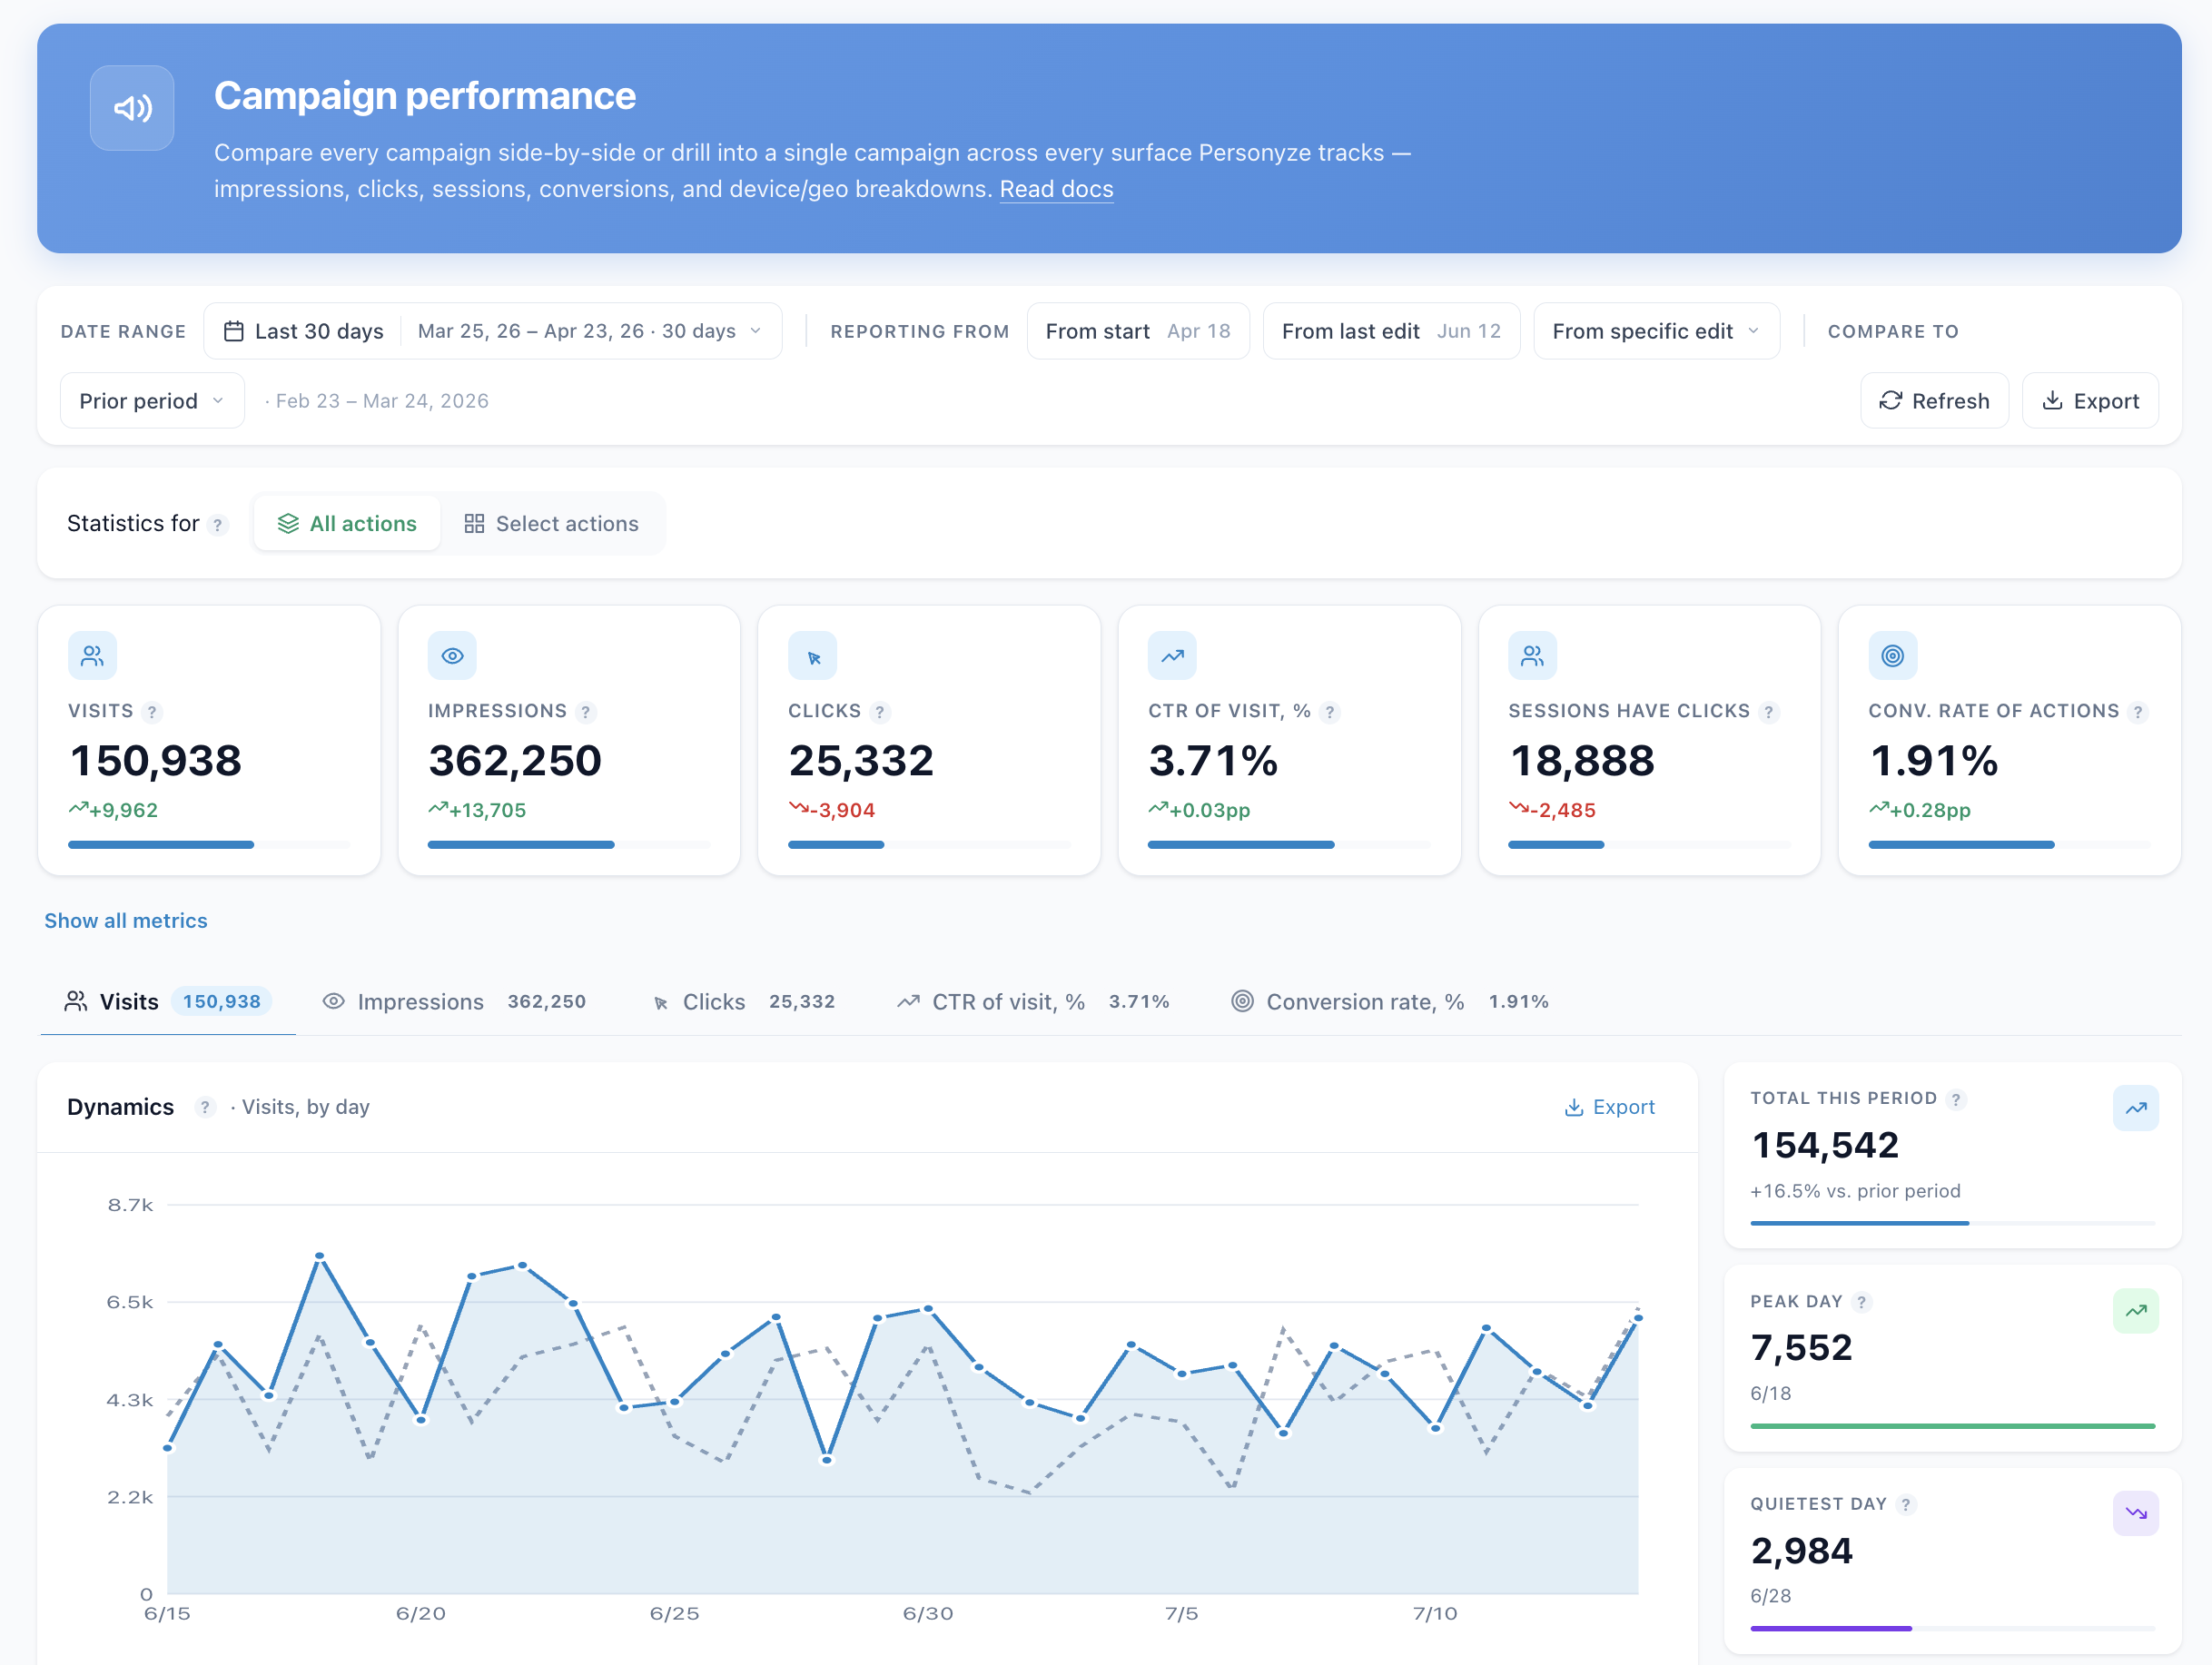
Once live, the Performance dashboard reports visits, impressions, clicks, CTR, sessions with clicks, and conversion rate — with day-by-day dynamics, period comparisons, and per-action breakdowns. Export anytime, or drill into individual visitor sessions.
Target — build the audience
On the Target step, you define who sees this campaign. Each rule narrows the audience; join rules with and / or / only one, group them, and set each rule to Include or Exclude. The live Audience Forecast on the right updates as you build, showing how many visitors would match and what share of traffic that is.
Add an audience rule
Click Add audience rule to open the rule picker. Personyze offers dozens of rule types across categories: visitor context (location, device, language, weather), behavior (pages viewed, clicks, time on site, cart contents), traffic source (referrer, UTM, campaign), and integrations (HubSpot, 6sense, Clearbit, and more).
Configure the rule
Pick a rule type and fill in its condition — for example, match a page category, a visited URL, a behavior threshold, or a CRM field value. Add more conditions to the same rule with + Condition, or add another rule and choose how they join. Each rule instantly updates the forecast.
Content — start adding actions
Move to the Content step. This is where you define what matching visitors actually see. On a new campaign it shows pictures of what you can add, under What should it show? — pick one to open its designs, or See all actions for the whole list. Everything you add here is shown to every visitor that matches your targeting.
Pick an action
The Add action panel lists everything Personyze can do when the campaign matches: popups and banners, lead-capture forms, product and content recommendations, countdown timers, redirects, cookies and local storage, custom JavaScript, and more. Search or browse by category. On a campaign’s first visit to Content, See all actions (N) opens the whole gallery in place — a picture and a plain name for each type, with search and chips. Recommendations is one card that asks Products or Content.
Customize the look & feel
After picking a template, customize it in the visual editor — layout and container, product panel, offer, timer, coupon code, CTA button, and more. Click any element directly in the preview to edit it. Personyze auto-fills dynamic values (like city from IP or a search keyword) so you can preview real personalization.
Set placement & trigger
Choose where it appears — an inline element that renders inside a section of your page, or a floating popup that overlays it (with optional dimmed backdrop). Then set the entrance animation, scroll behavior, close button, trigger, and the frequency caps that stop it from becoming spam.
Save & publish the campaign
When you’re ready, save the campaign. Save as draft keeps it private while you work. Publish to staging shows it only to visitors in staging mode, so you can QA it safely. Publish to live turns it on for real visitors that match your audience.
Measure performance
Once live, the Performance dashboard reports visits, impressions, clicks, CTR, sessions with clicks, and conversion rate — with day-by-day dynamics, period comparisons, and per-action breakdowns. Export anytime, or drill into individual visitor sessions.
Step 1 — Target: build the audience
The Visitor Targeting screen is where you define who the campaign applies to. Rules combine 70+ real-time visitor attributes into an expression that Personyze evaluates on every page view.
Adding rules: start empty, then pick the signals you need
A new campaign’s audience starts empty — it would match every visitor until you narrow it. Click + Add audience rule and pick a rule type: each pick becomes a new rule, joined to the others with “and”. To add a condition to a rule you already have, use its own + Condition.
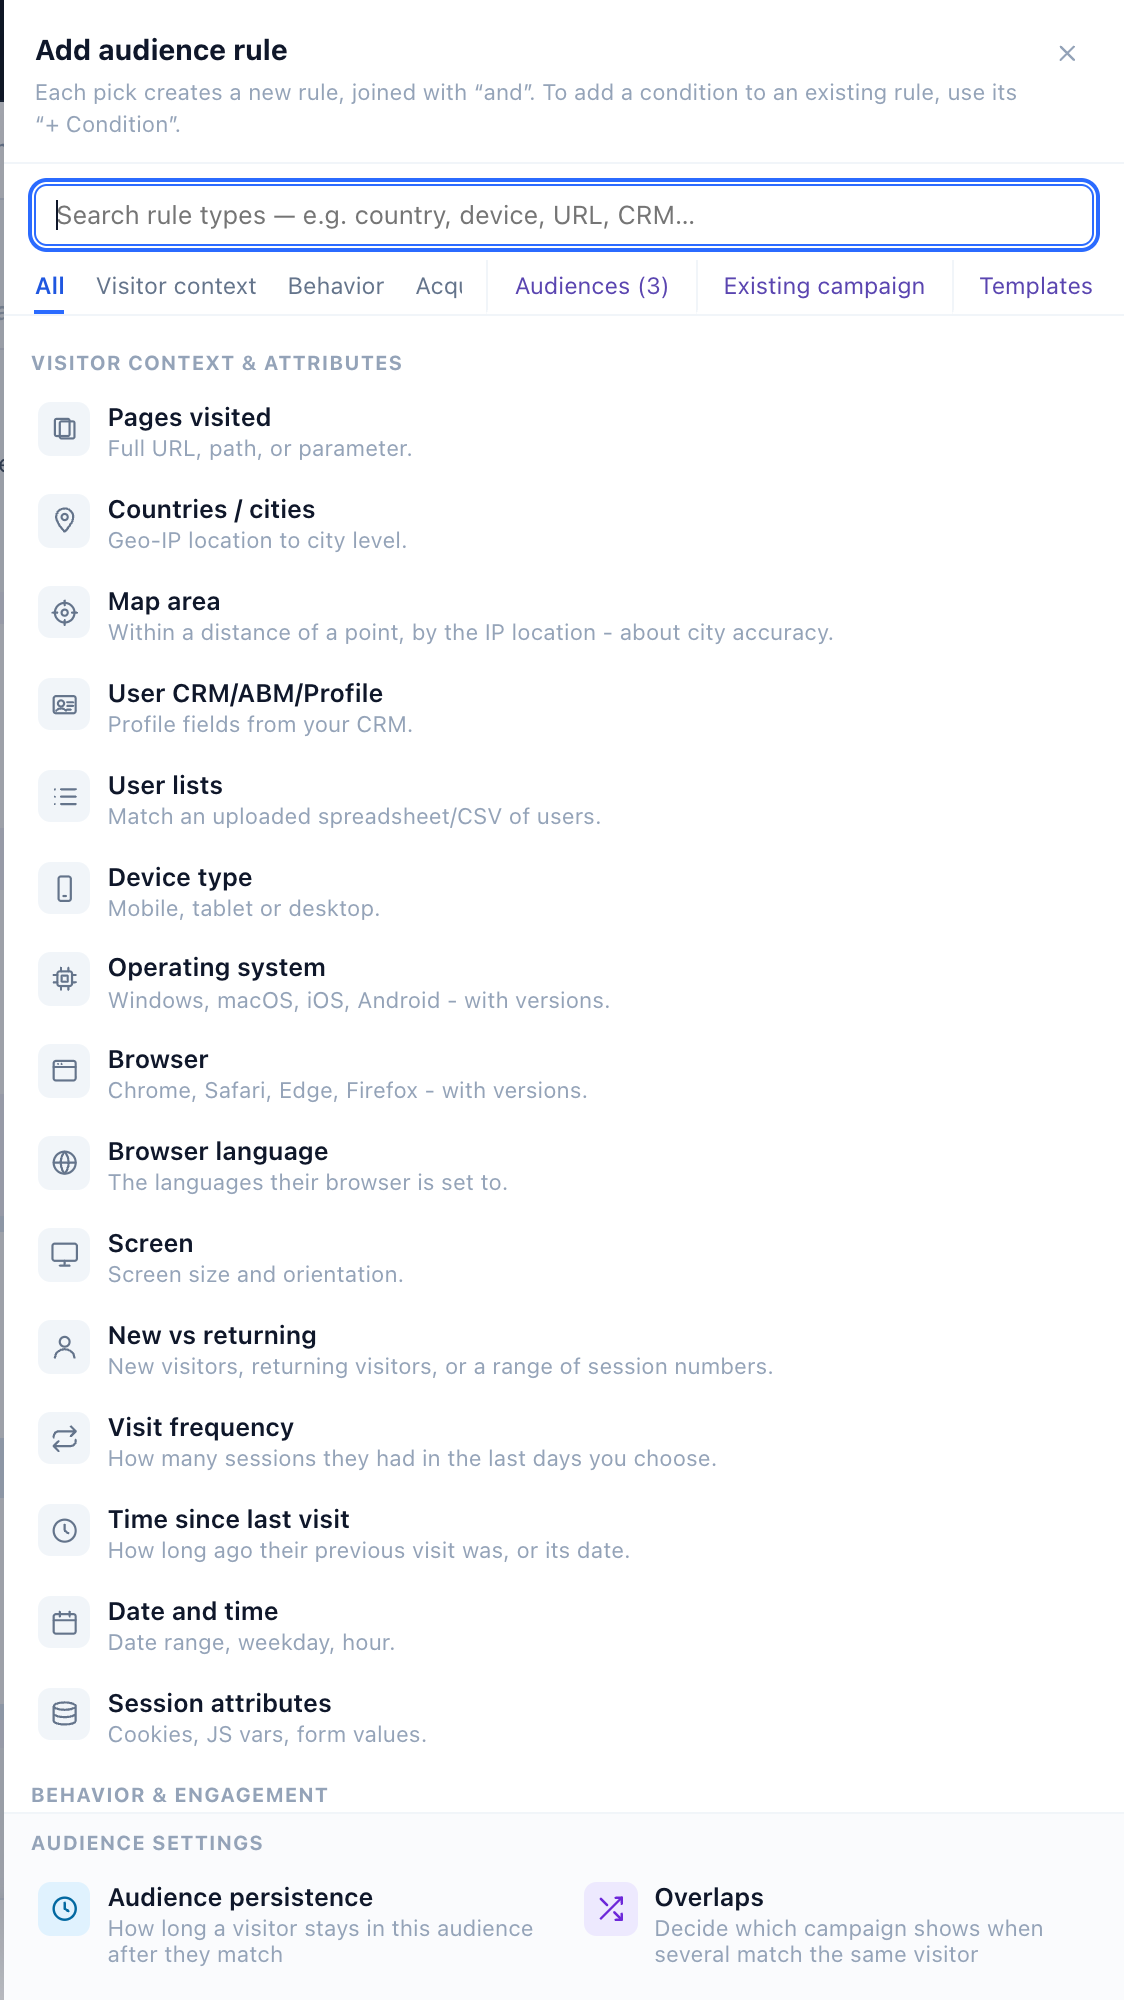
The menu has a search box that looks through every rule, and tabs for the rule families — Visitor context, Behavior, Acquisition, Conversions, E-commerce, Content and Integrations — plus Audiences, Existing campaign and Templates for rules that already exist (see the Add audience rule menu). The main families:
Visitor context & attributes — who and where the visitor is, right now:
- Pages Visited — match on the full URL, a path, or a query parameter; check it on this page or during the visit.
- Countries / Cities — geo-location down to city level from the visitor’s IP.
- User / CRM / ABM data — known-visitor profile fields synced from your CRM or CDP (lifecycle stage, plan tier, lifetime value, industry, and custom fields).
- Device & System — device type (mobile, tablet, desktop), operating system, and browser.
- Visitor Type — new vs. returning, plus session count.
- User Lists — match against a spreadsheet/CSV of users you upload.
- Date & Time — a date range, day of week, or hour of day (useful for launches, sales windows, and business hours).
- IP Addresses — specific IPs or CIDR ranges (handy for internal QA or named accounts).
- Weather — the visitor’s local conditions by IP or GPS.
Behavior & engagement — what the visitor has actually done, this session or over time:
- E-commerce — products they’ve viewed, added to cart, or purchased.
- Product Interactions — counts across products (distinct, same, or total).
- Last Product Interaction — their most recent shown / cart / purchase event, for “pick up where you left off” targeting.
- Content Interaction — article views, favorites, and subscriptions.
- Session Attributes — cookies, JavaScript variables, and form values captured on the page — your own client-side data.
- Time on Site — total time in the current session.
- Landing Page — the first page of the session.
- Traffic Source — referrer, search engine, or campaign the visit came from.
Integrations — signals pulled live from connected tools. Known-visitor data flows in through our integrations with HubSpot, Salesforce, Pardot, Zoho, Tealium, Segment, and Zeotap; for anonymous B2B visitors, ABM providers can infer company name and firmographics so you can target by account before anyone fills out a form.
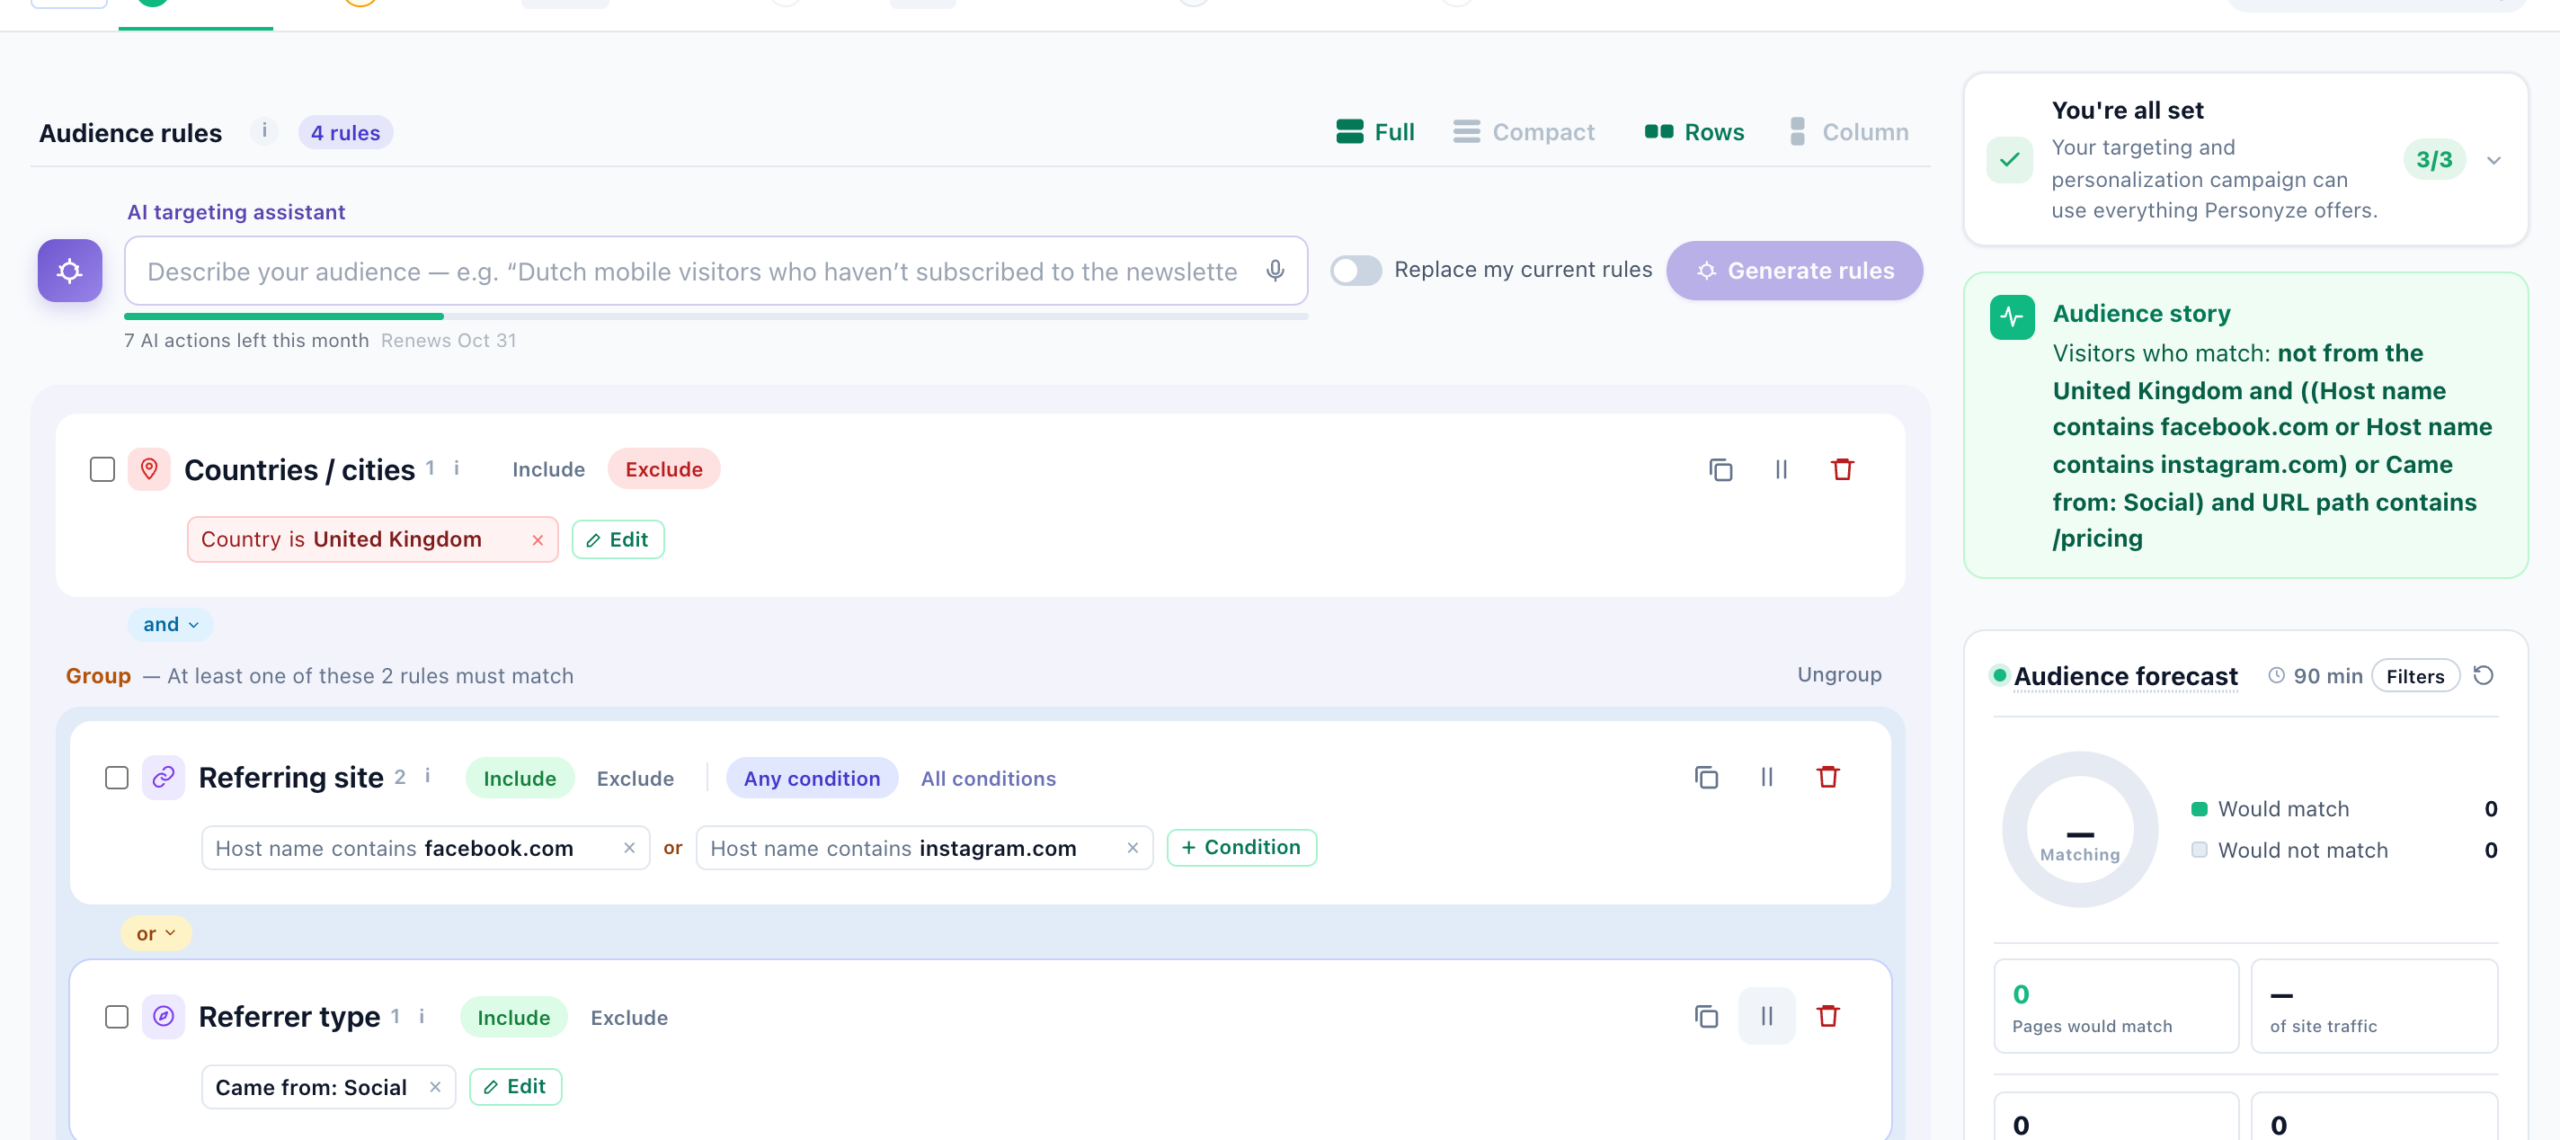
Each rule is a card under Audience rules, with its own Include / Exclude, Any condition / All conditions and, where the rule offers it, On this page / During the visit. Rules join with a connector pill — and, or or only one — and can be grouped like brackets in math. A rule can be as simple as “is on the pricing page” or as layered as “viewed the pricing page in the last 14 days and is on a paid plan, excluding anyone who opened a support ticket in the last 7 days.” How each part works: how a rule is built, and how rules combine.
An example audience
Here’s what the step looks like once several rules have been added. This is one example — not a default or a required set. On the right, the Audience story reads the rules back as one sentence, above the live forecast:
AI Targeting Assistant

If you already know the audience you want in plain English, describe it to the AI assistant and it generates a matching rule set. You review, edit, and refine before saving — it’s a starting point, not a black box.
For example, typing “returning US visitors who viewed the pricing page but didn’t sign up in the last 30 days” produces a rule set like: Visitor Type is returning AND Countries is United States AND Pages Visited contains /pricing (in this session) AND NOT a sign-up event in the last 30 days — each as an editable rule you can adjust.
The assistant is a row at the top of Audience rules. Type or dictate the audience and press Generate rules: the new rules are added to yours. Turn on Replace my current rules to start fresh instead — the button then reads Generate and replace. When the description is unclear, the assistant asks a question first; Refine carries on the conversation, Start over forgets it, and Undo puts the rules back as they were.
The live audience forecast
As you edit rules, the Audience forecast in the right-hand column updates continuously, showing how much of your site’s last 90 minutes of traffic would match versus would not match. But the counters are only the summary — the real value is opening the forecast to see the actual visitors behind the numbers.
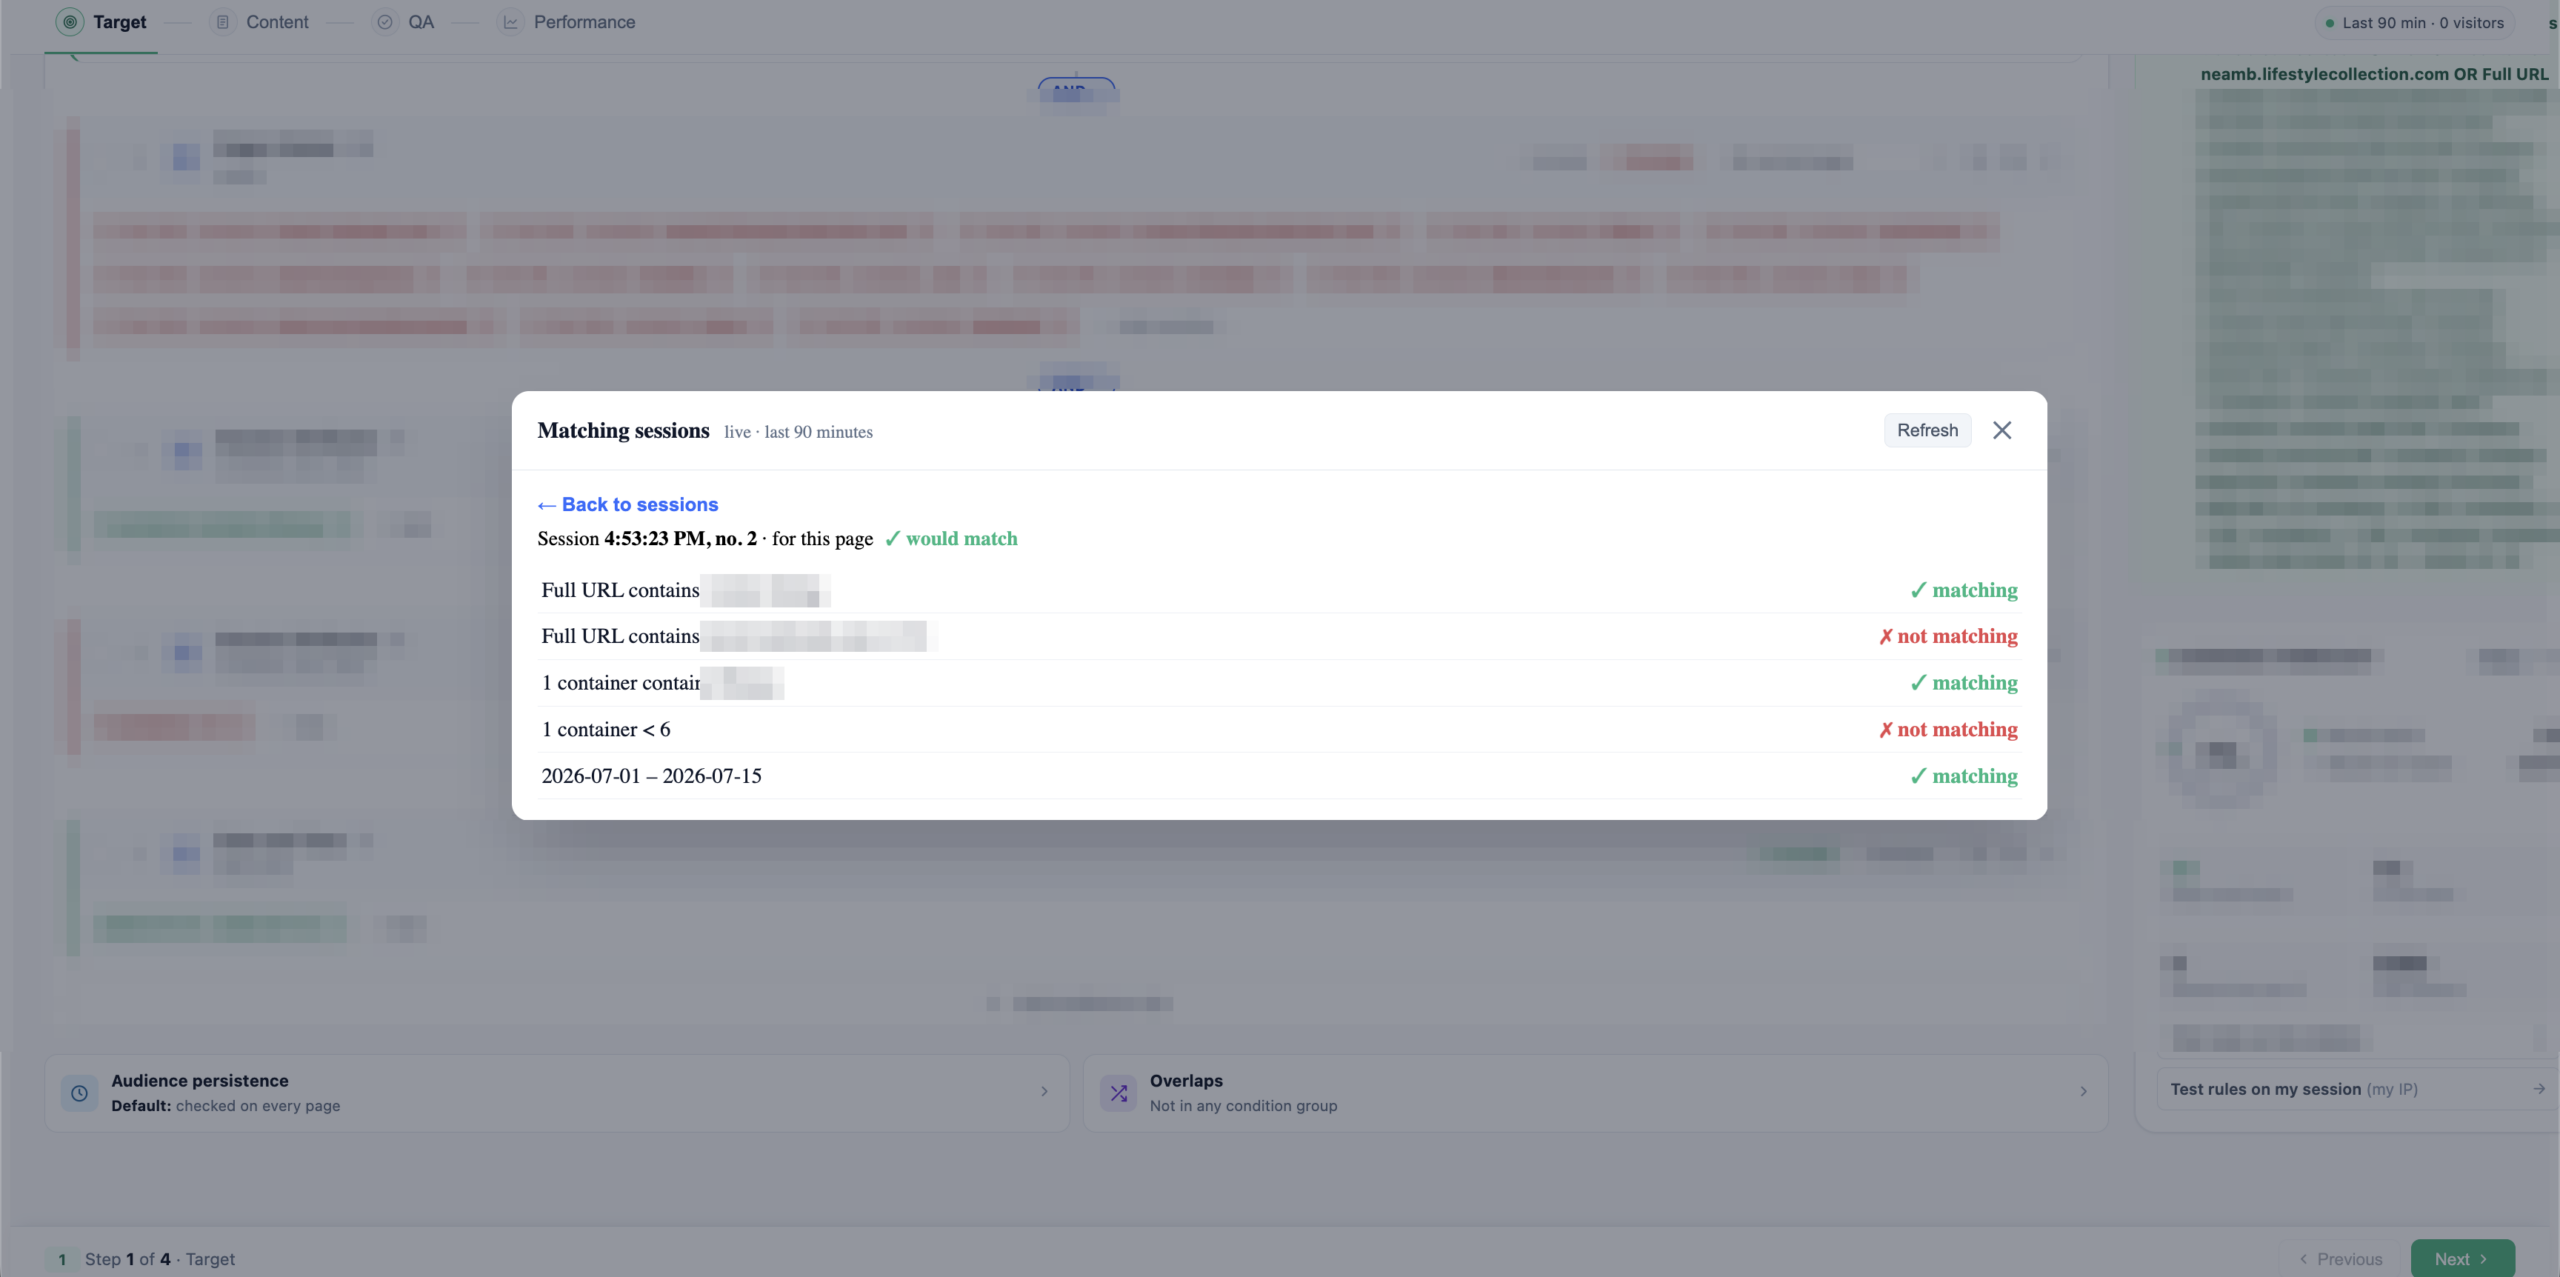
Expand it and you get two lists: the visitors who would match your current rules and the ones who would not. Click into any visitor to see their full detail — the pages they viewed, their session and device, their CRM/profile attributes, and exactly which of your rules they passed or failed. That’s how you confirm you’re targeting the right people, not just the right number of them: you can spot a visitor who slipped into the audience by accident, or a visitor you expected to match who didn’t, and trace it straight to the rule responsible.
Used this way, the forecast prevents the two most common audience mistakes before the campaign ever goes live:
- Too narrow — a compound rule set that matches only a handful of visitors. The campaign runs but nobody sees it. An empty would-match list makes this obvious immediately, instead of weeks later.
- Too broad — a rule you thought was specific that actually matches half your traffic. Reading the would-match list surfaces visitors who clearly don’t belong, so you can tighten the rules before launch.
- Right count, wrong people — the number looks healthy but the audience is the wrong crowd. Only inspecting individual visitors catches this, and it’s the mistake the counters alone can never reveal.
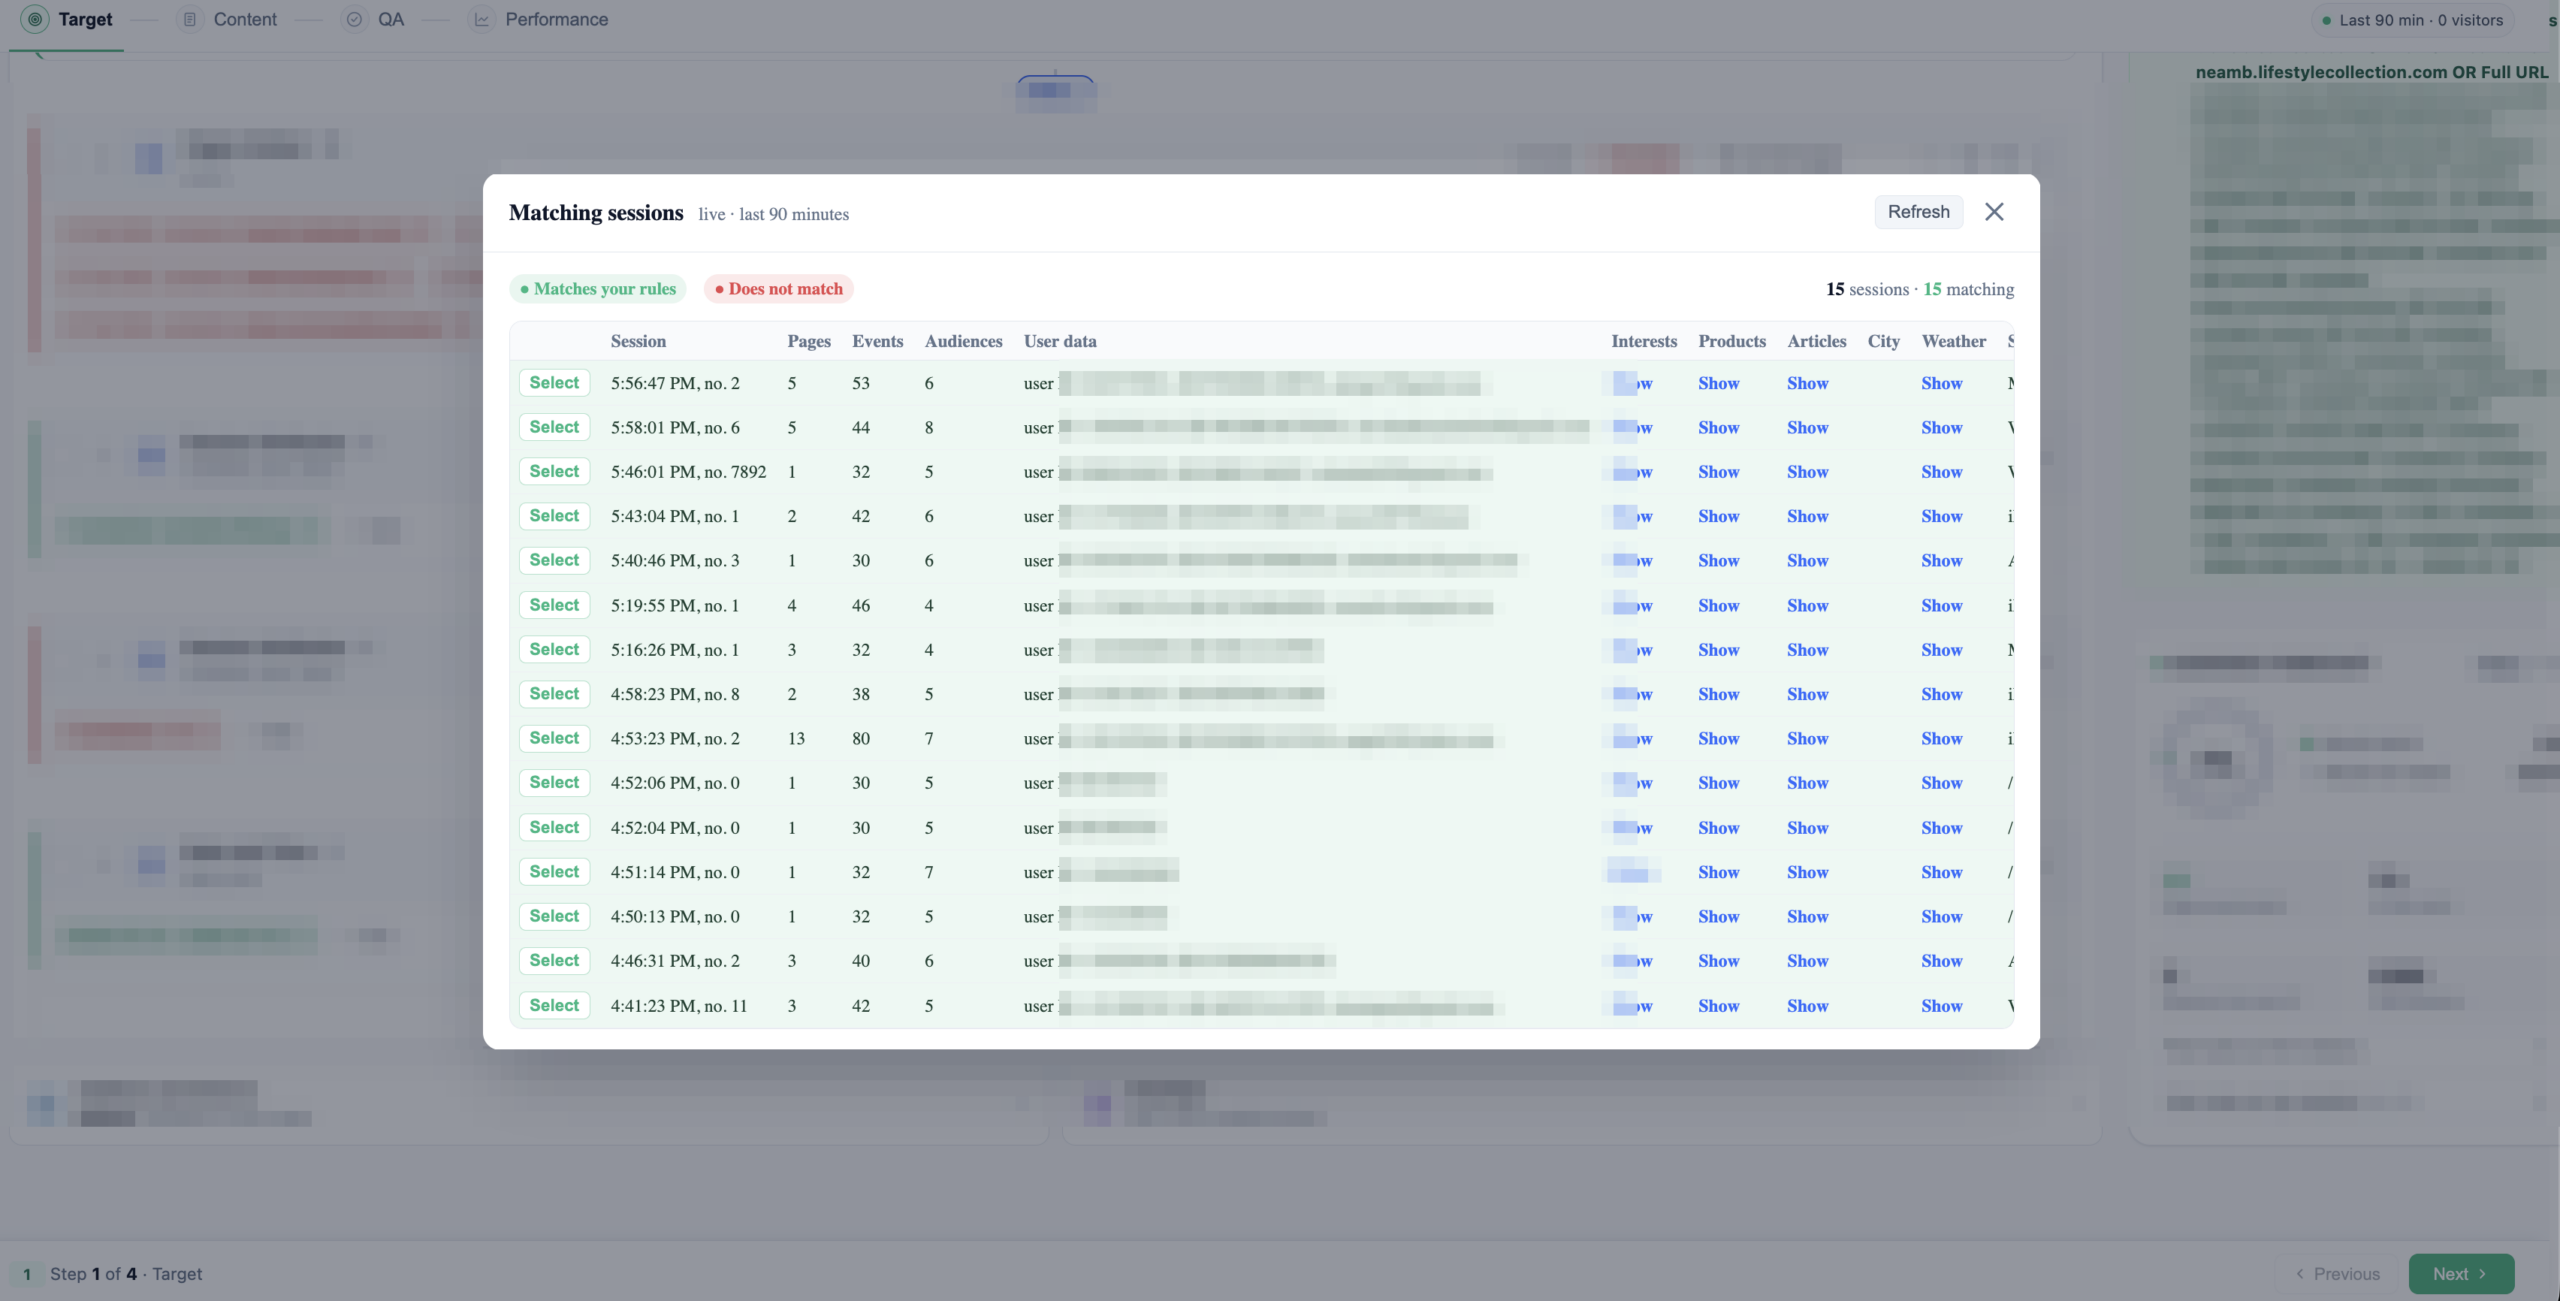
The forecast also has a live-traffic mode — “Test rules on live visitors.” Instead of a rolling sample, Personyze evaluates your rule set against visitors arriving in real time and shows which ones would qualify, without saving anything. You can open a single live session and see it checked rule-by-rule, or scan the whole list of recent sessions flagged as matching or not — a final sanity check before you publish.
Group priority for overlapping audiences
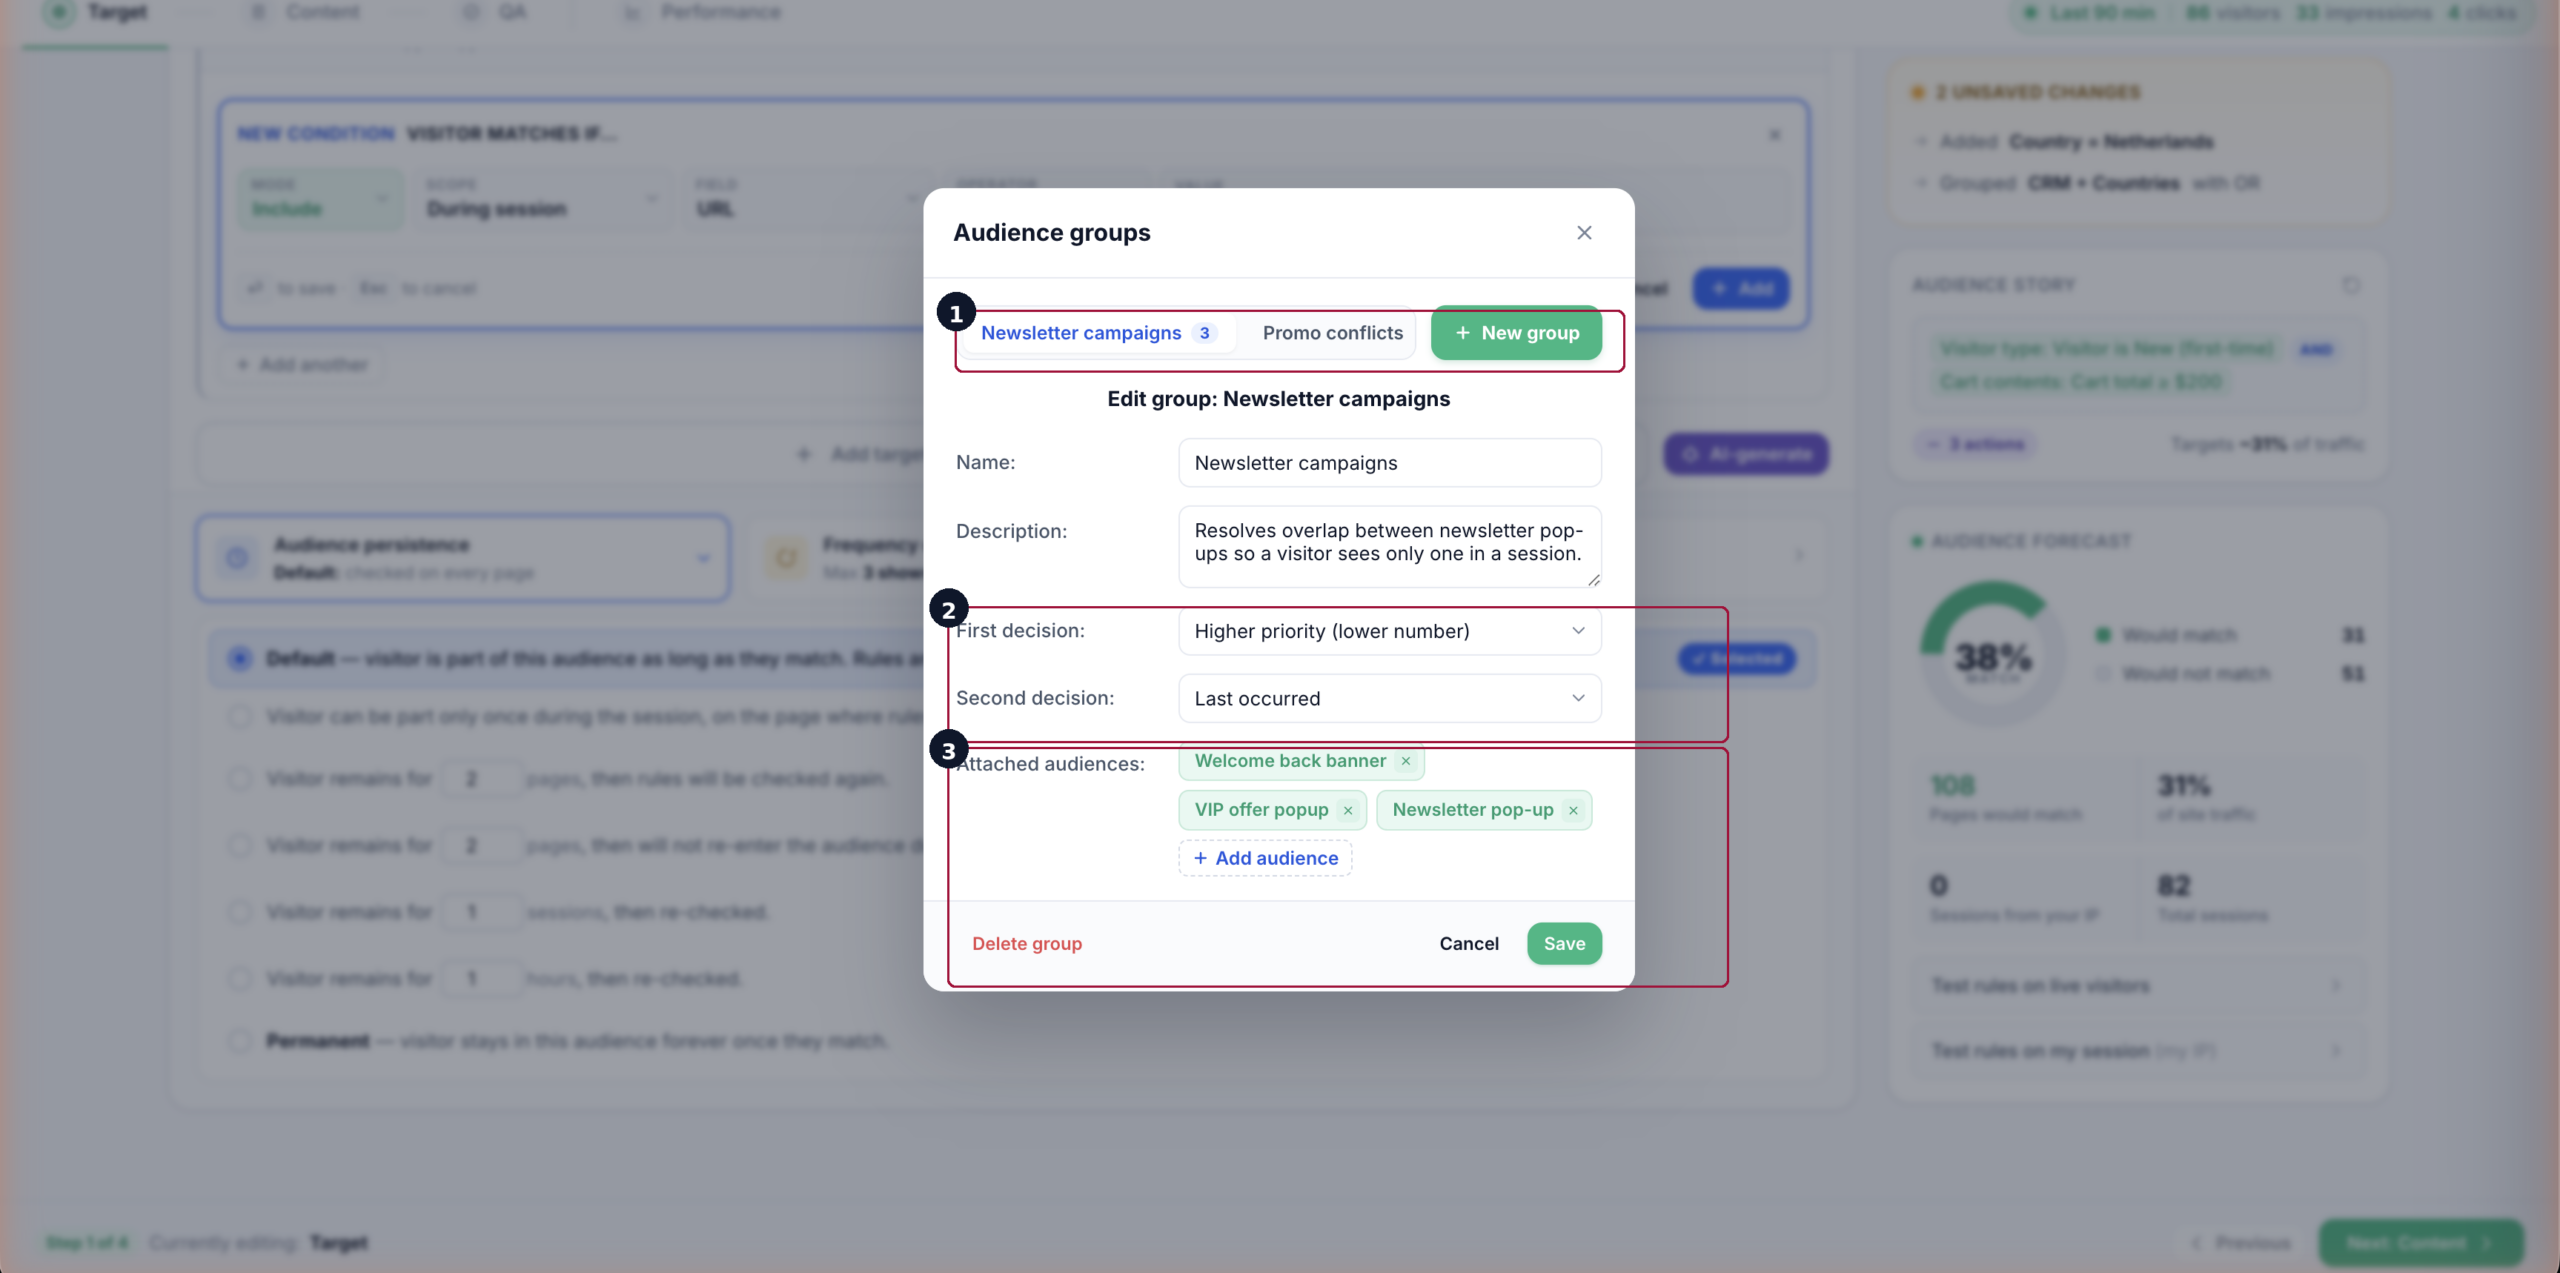
When two campaigns can match the same visitor, an audience group decides which one wins. The Overlaps pill under the rules ticks the groups this campaign is in; Manage audience groups opens the groups themselves. Add the overlapping audiences to a shared group and give each a priority (lower number = higher precedence). The group’s conflict-resolution rule then picks the winner for a shared visitor — higher priority first, with ties broken by “first occurred” or “last occurred” — so a visitor who qualifies for both sees only the intended content.
Audience settings: persistence and overlaps
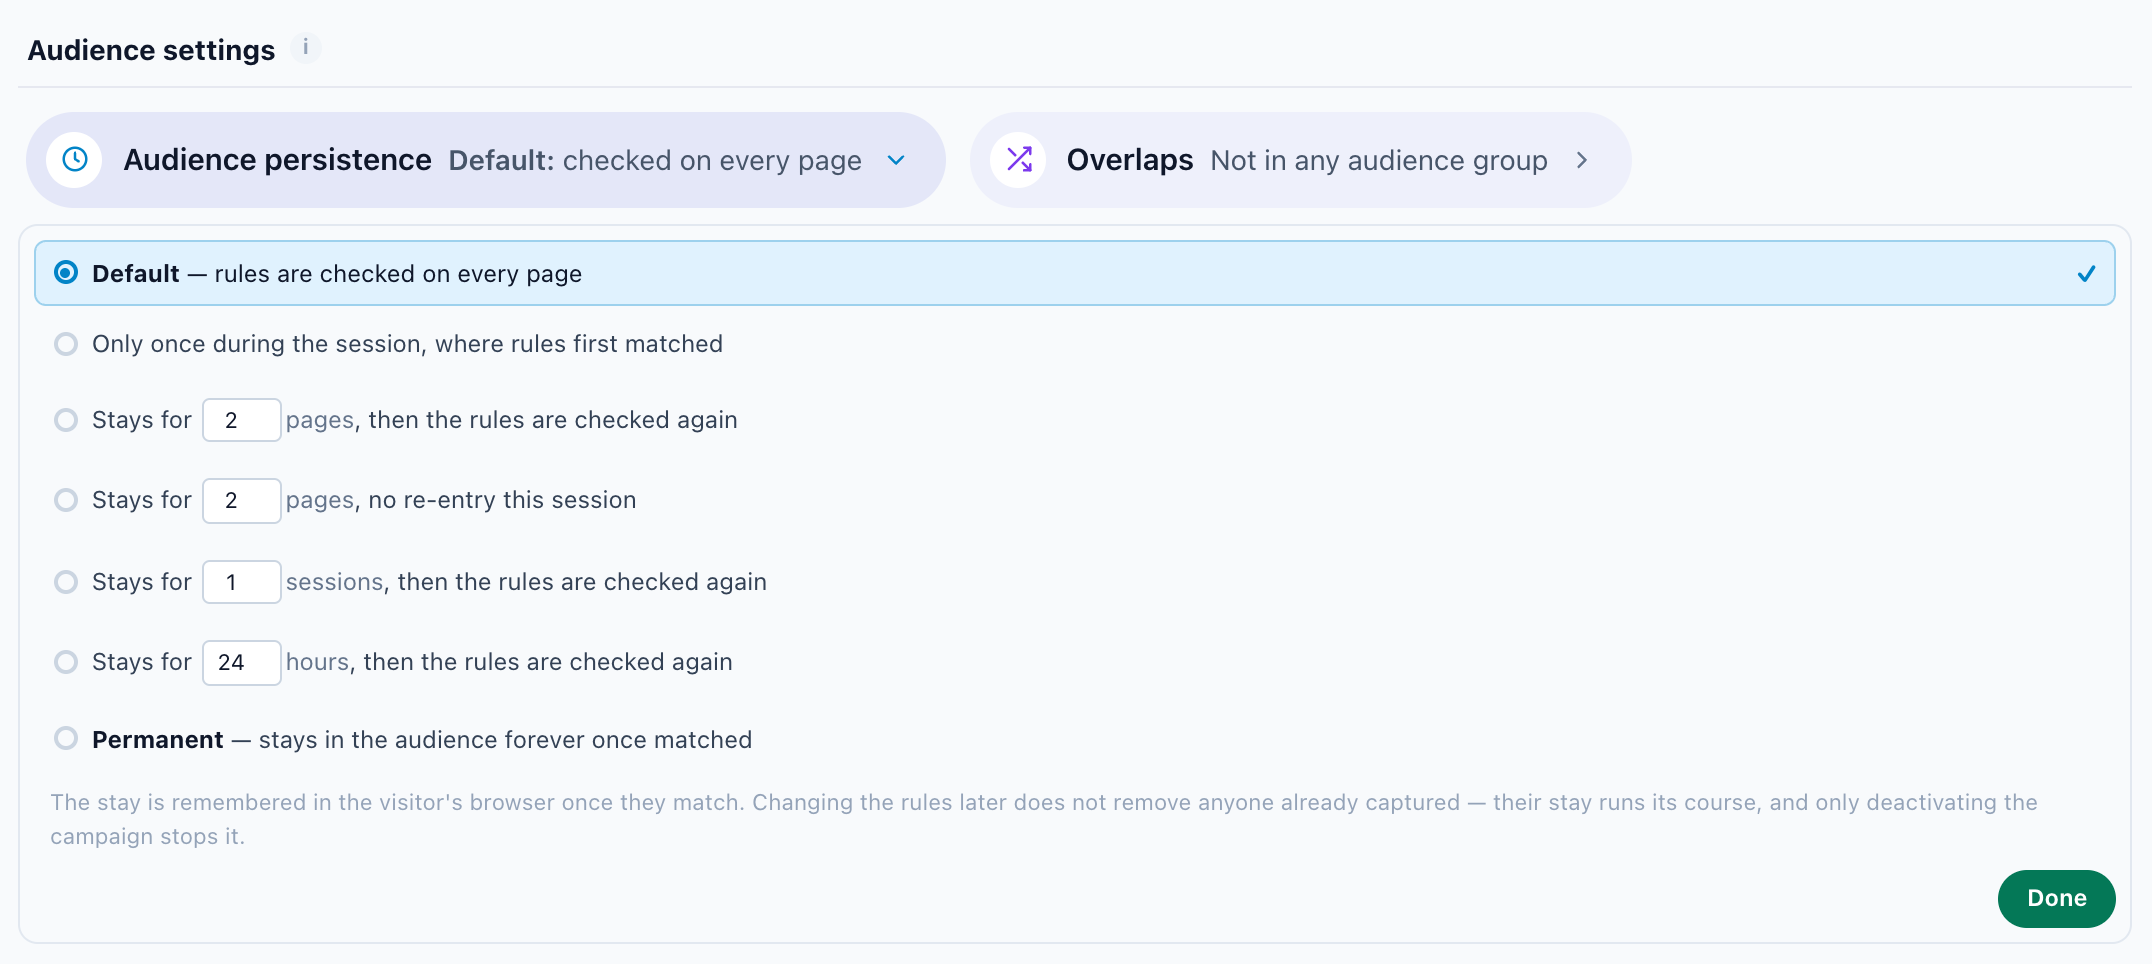
Under the rules, Audience settings holds two pills, also listed at the foot of the Add audience rule menu. Audience persistence controls how long a visitor stays in the audience after they match:
- Default — the rules are checked on every page.
- Only once during the session, where rules first matched.
- Stays for a number of pages, then the rules are checked again — or with no re-entry this session.
- Stays for a number of sessions or hours, then the rules are checked again.
- Permanent — stays in the audience forever once matched.
For most acquisition campaigns, per-session persistence is right; for retention or loyalty campaigns, a permanent stay makes the experience follow the visitor across future sessions. The stay is remembered in the visitor’s browser, so changing the rules later does not remove anyone already captured. Overlaps puts the campaign in an audience group (above). An email campaign has neither: it matches its recipients when it sends.
How often a matched visitor sees the campaign is the Campaign cap, on the Content step’s Campaign settings card. Per-session caps keep the same popup from firing twice in one visit; per-visitor caps keep a returning visitor from seeing the same message every time; no cap suits content that should run every time, like a header banner. See Frequency caps.
Full rule-by-rule reference: Targeting Rules in Personyze.
Step 2 — Content: design what your audience sees
Once the audience is defined, the Content step is where you decide what those visitors actually see. Content in Personyze is built from actions — and a single campaign can hold as many as you need. A header bar, a personalized recommendation widget, a countdown timer, and an exit-intent popup can all live in the same campaign, each firing for the same audience. Every action carries its own configuration, delivery health, and click-through tracking.
Adding an action is a two-part choice: what type of action it is (which decides the editor you work in), and how it behaves (placement, trigger, timing). The rest of this step walks through the action types, starting with the two you’ll reach for most.
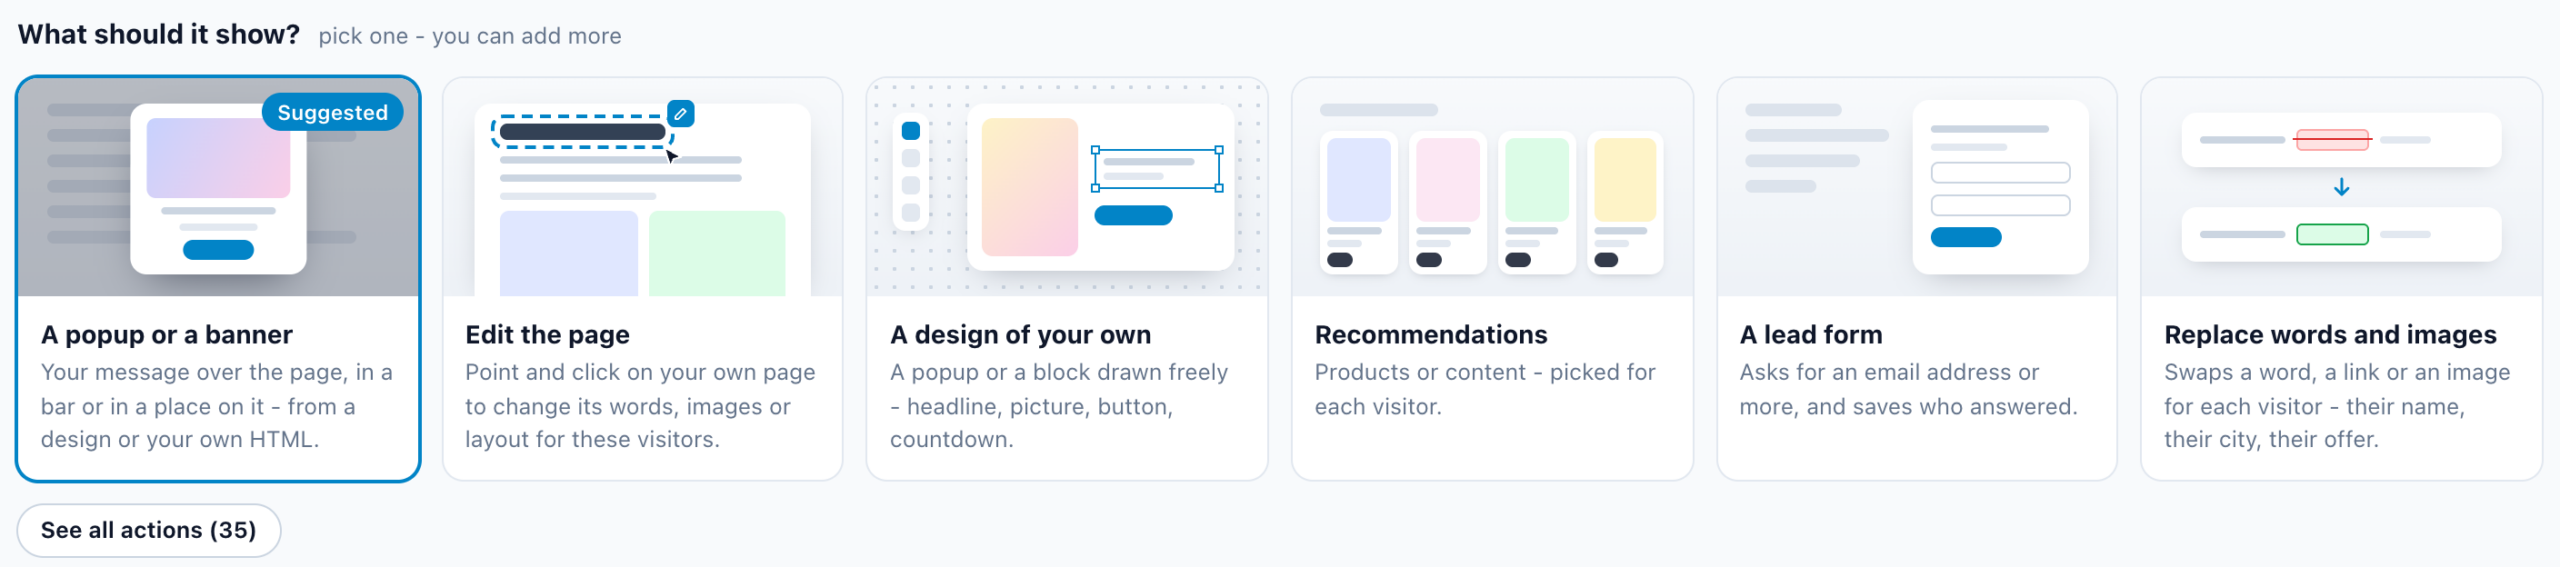
An empty campaign: pictures of what to add
A new campaign’s Content step is not a blank box. Under What should it show? it draws pictures of what this kind of campaign can add — for a Targeting and Personalization campaign: A popup or a banner (marked Suggested), Edit the page, A design of your own, Product recommendations, A lead form and Replace words and images. A picture opens the action picker at that type’s designs; See all actions opens the whole list.
Most campaign types have a set of their own: recommendation and promotion campaigns show their widgets, Reviews, Feedback & NPS and Surveys their forms, an email campaign asks What should it send?, and a web push subscription asks How should it ask?. Other designs… or See all actions closes the row wherever the list holds more. A picture of an add-on’s type shows only on accounts that have the add-on. An A/B Testing campaign starts with its test’s groups instead.
The Campaign settings card: cap, goals and A/B test
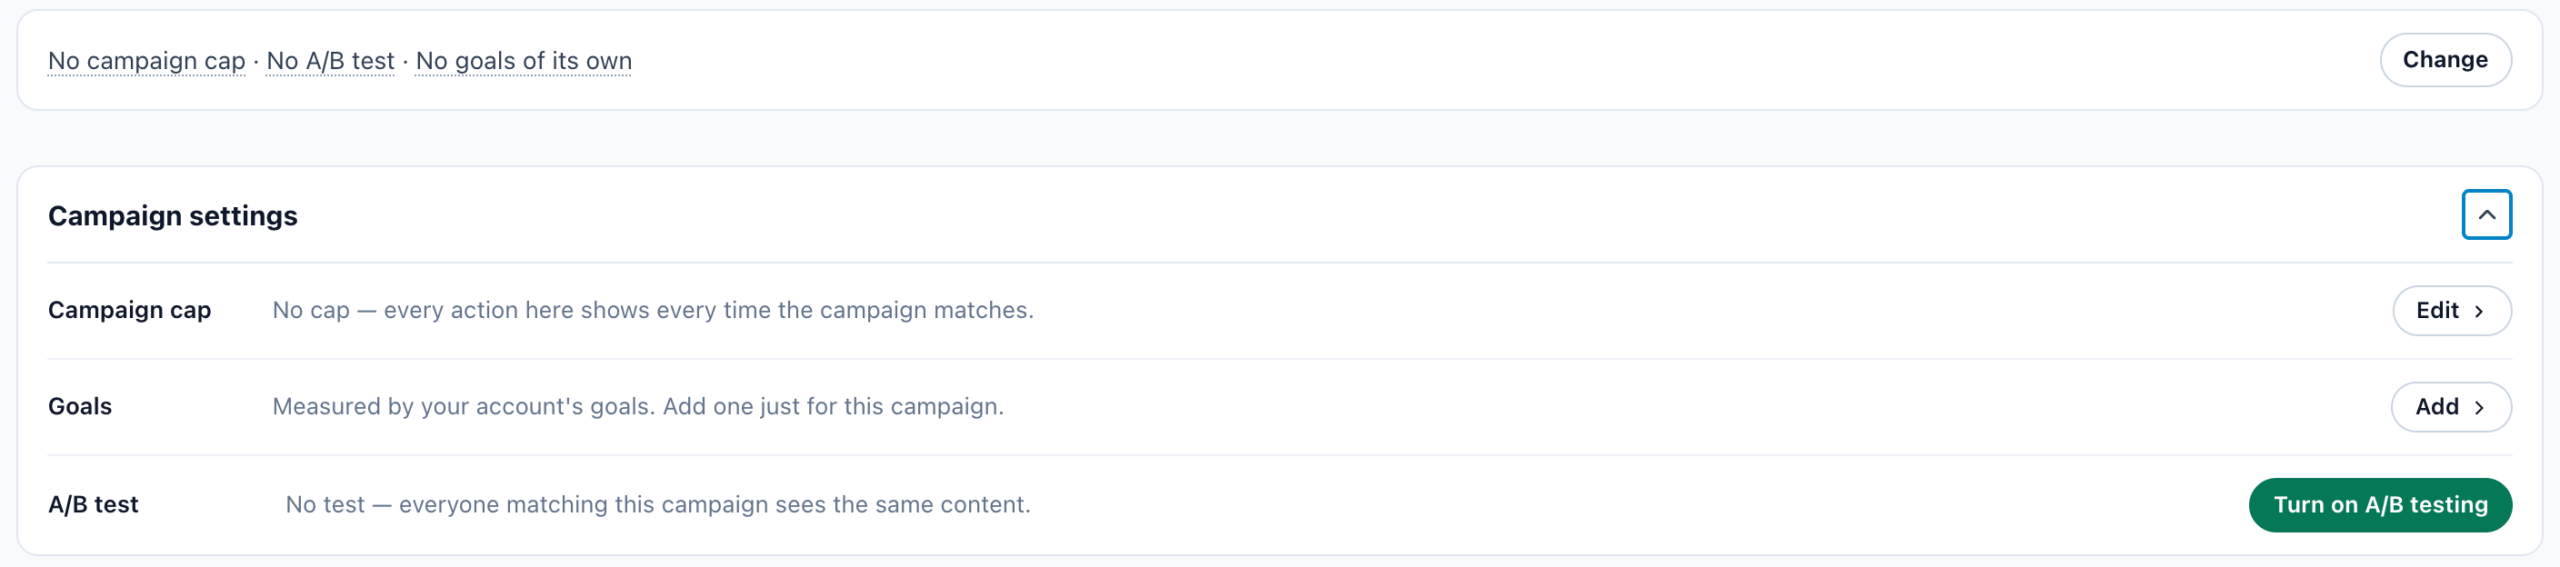
The campaign’s own settings are three rows of one Campaign settings card at the top of the Content step: Campaign cap (how often one visitor may see the campaign — see Frequency caps), Goals (below) and A/B test (Step 3). On most campaign types the card is folded to one line that names each part — for example No campaign cap · No A/B test · No goals of its own — with its detail on hover. Change opens the card; the arrow at its top folds it again. An email or push campaign has no campaign cap, so its line leaves the cap out.
Adding actions
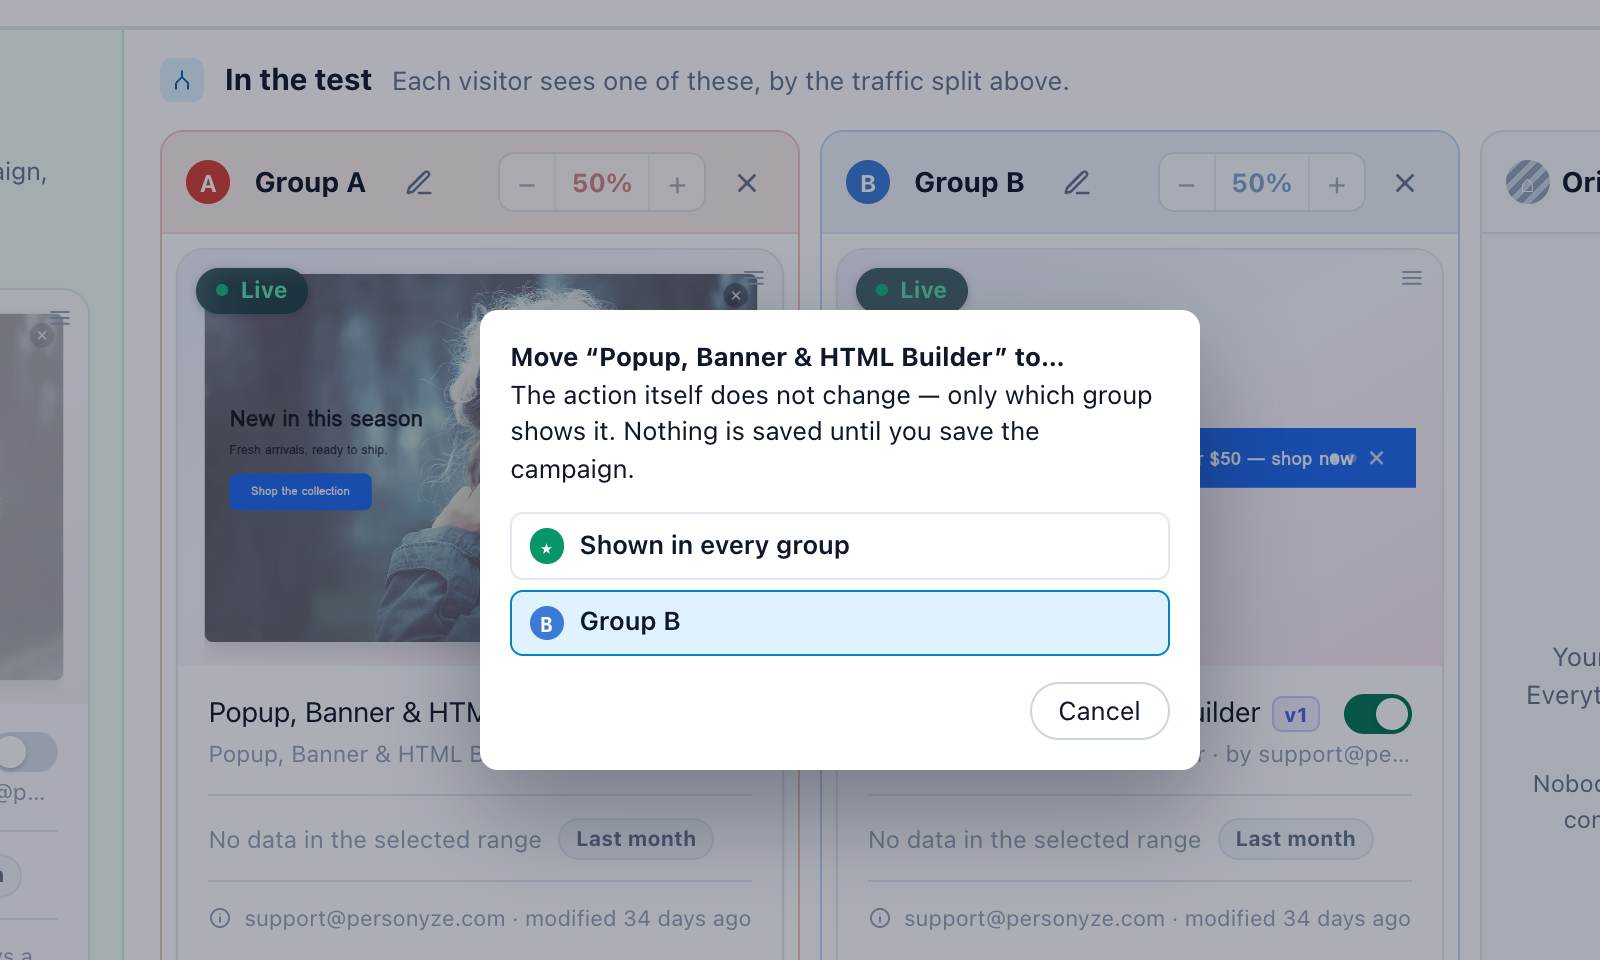
Move actions between groups. You don’t have to rebuild a variation from scratch — grab an action by its drag handle (the “≡” at the top-right of the card) and drop it into another group’s Add action zone. Hovering a card also shows quick controls to Edit, Detach, or Preview it. This makes it easy to start from the campaign’s base content and tweak just one element per variation.
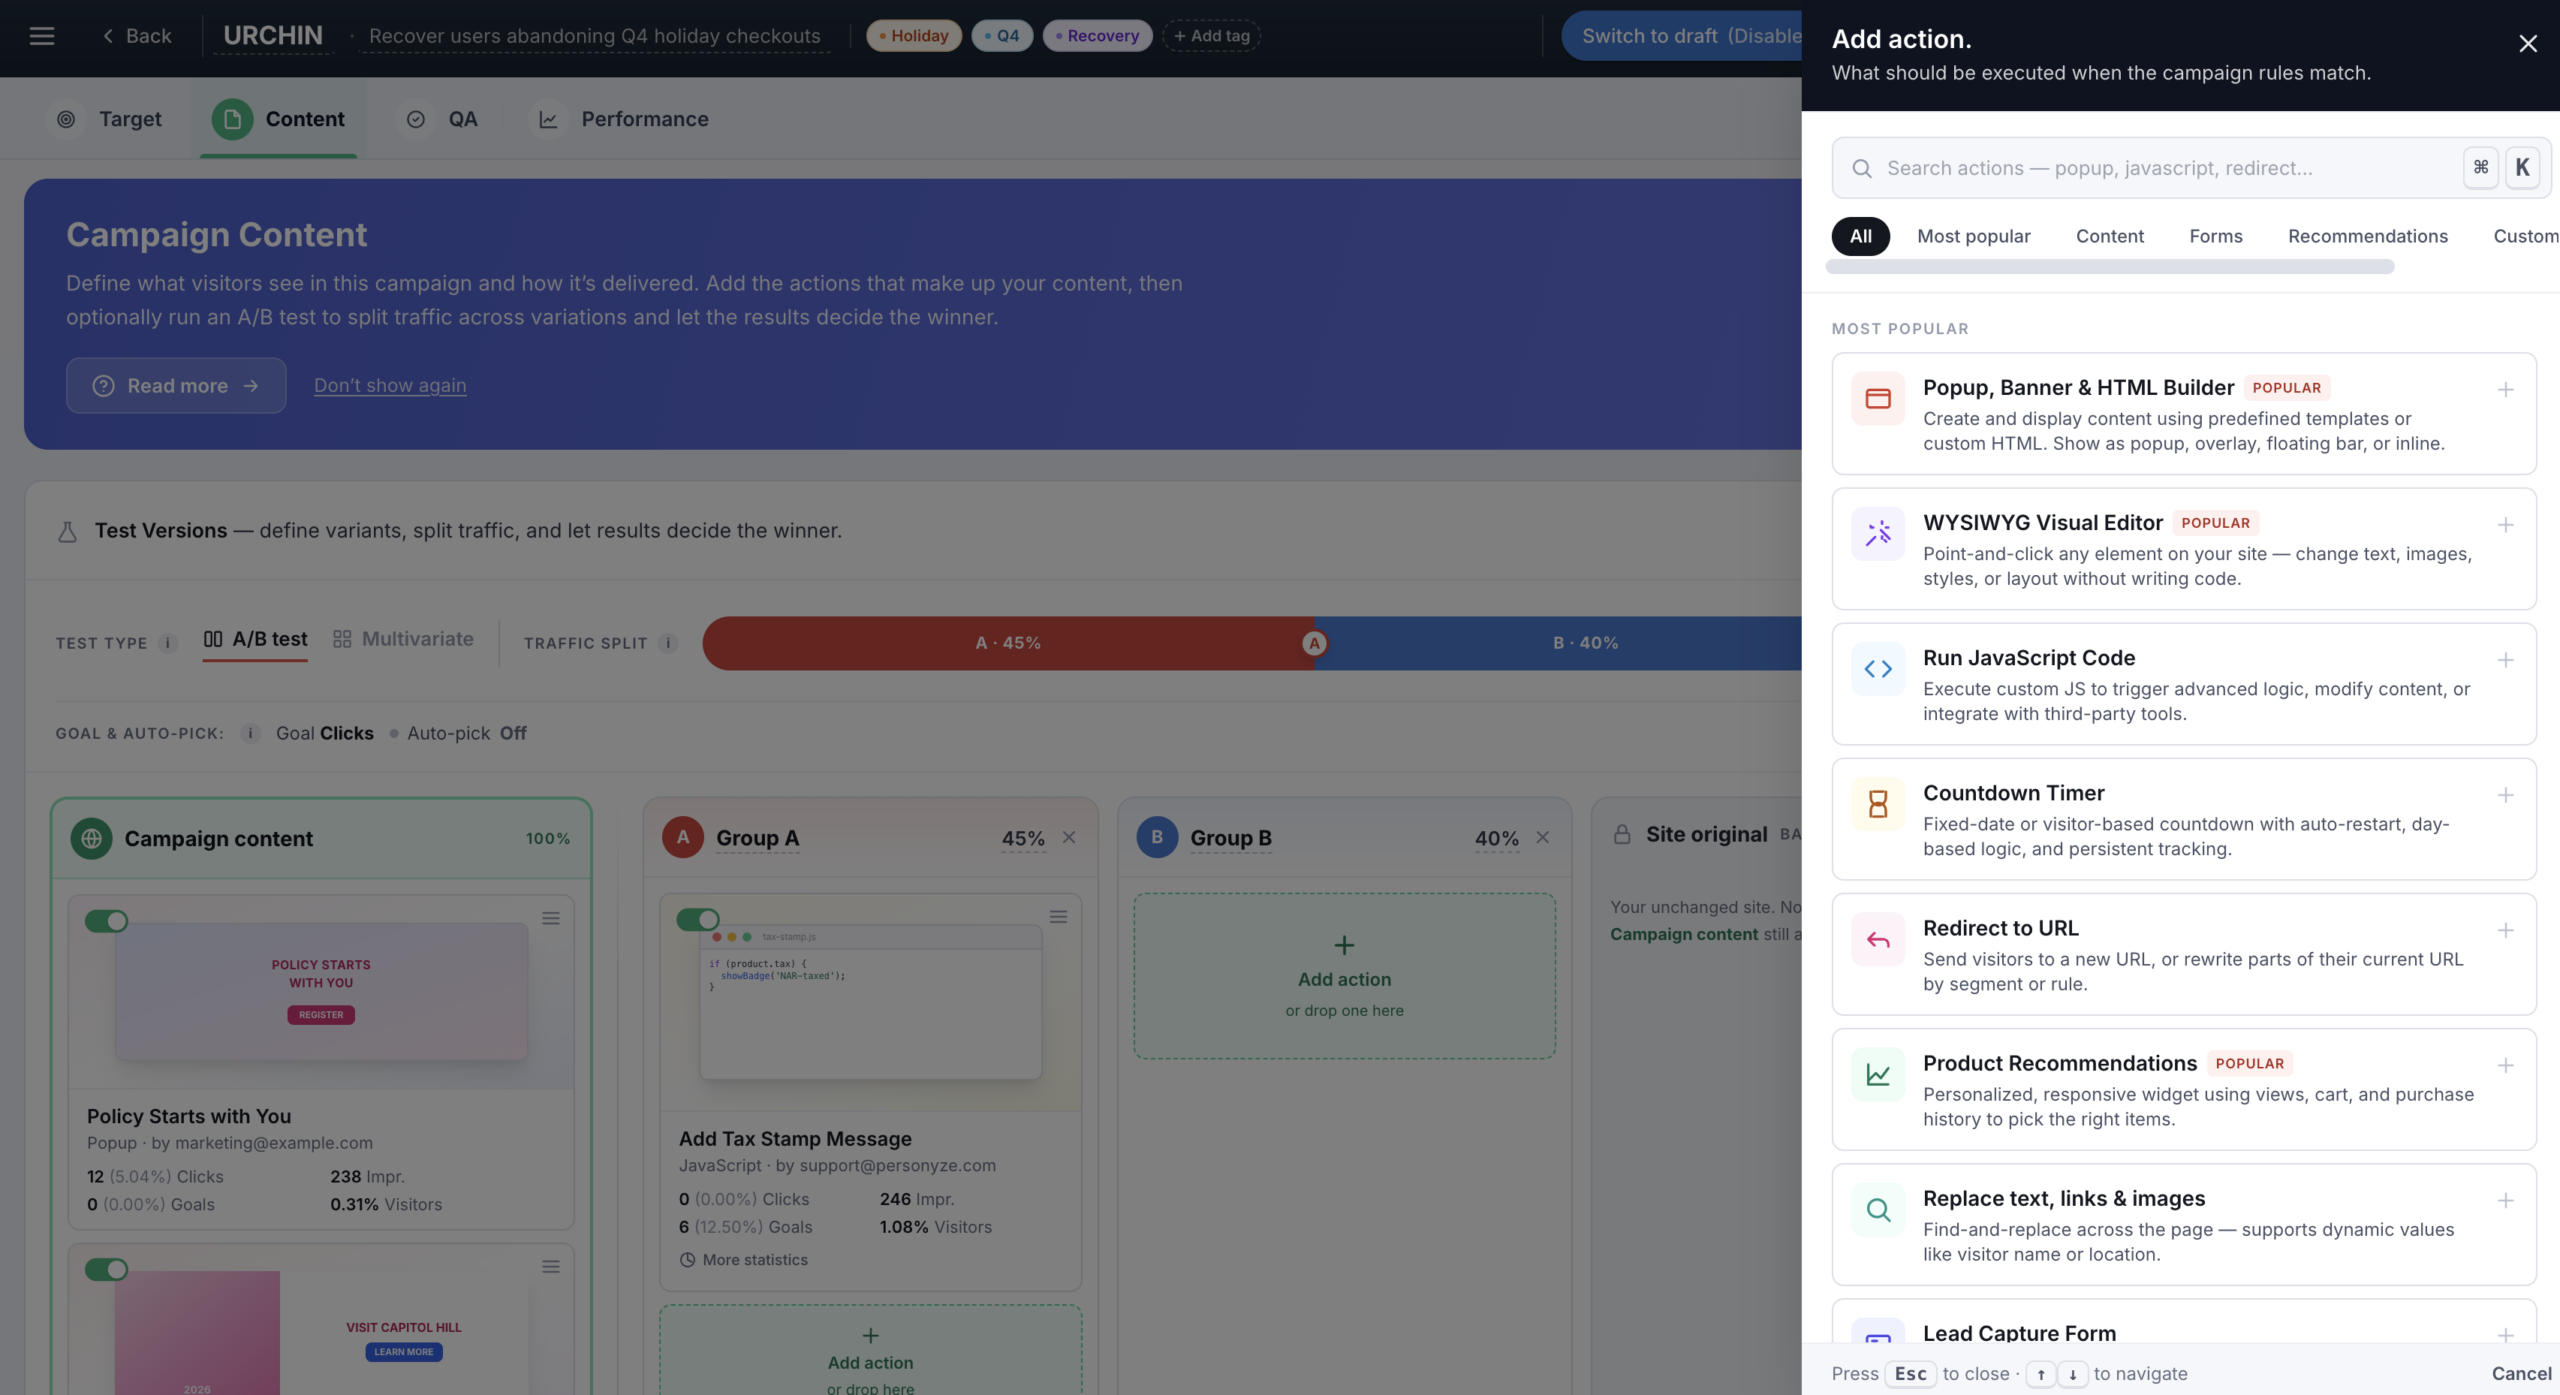
The Content screen (above) is the campaign’s control room. The main list holds every action, each with a status pill (Live, Staging, Draft or Off), its delivery health, and the last time it fired, plus quick controls to edit, duplicate, or remove it. The right-hand rail keeps the last 90 minutes of activity, the campaign’s primary conversion goal, and shortcuts to version history and the full performance report always in view. To add an action, you pick its type — which is where the two main editors come in.
The action type you pick determines the editor you work in. Two cover most campaigns — the Live Editor and the Popup, Banner & HTML Builder — with a set of specialized action types for everything else.
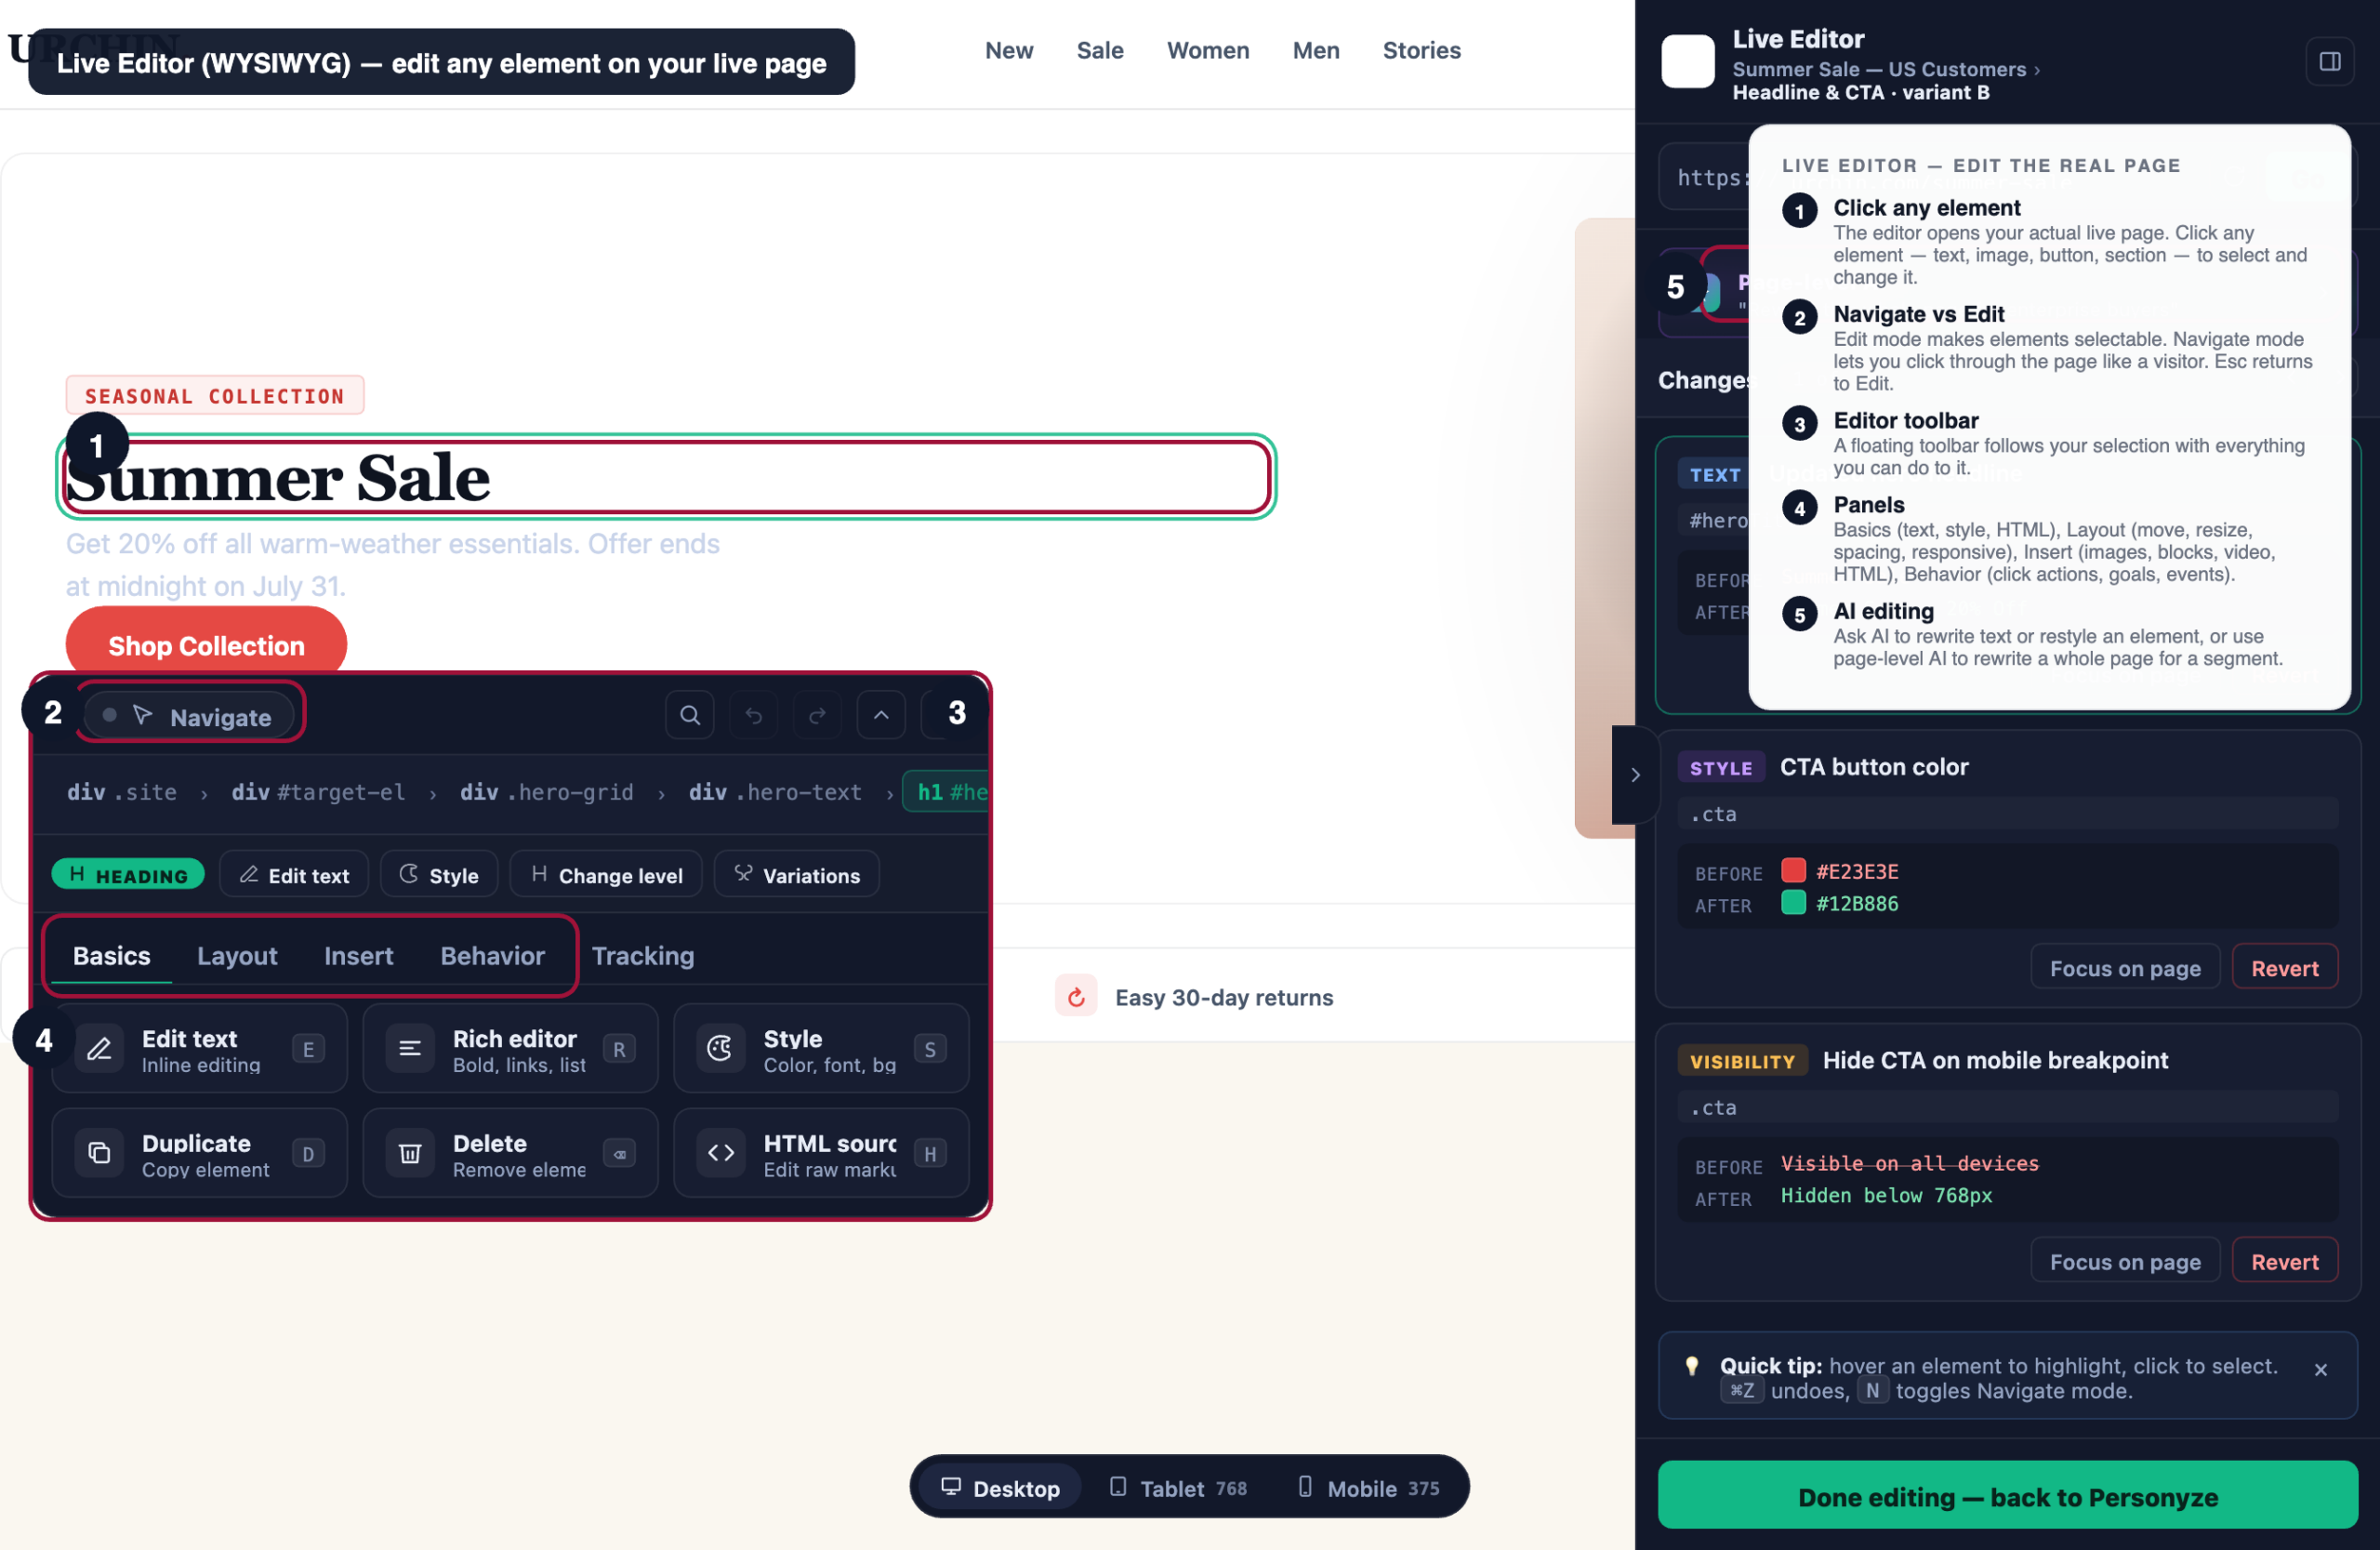
Live Editor (WYSIWYG)
The Live Editor is Personyze’s most-used content tool: it opens your actual live site inside the editor and lets you edit any element on the page — text, style, layout, images, links, buttons — with click-to-edit precision. Changes are captured as a variation that Personyze injects for your audience only; the underlying site code isn’t touched.
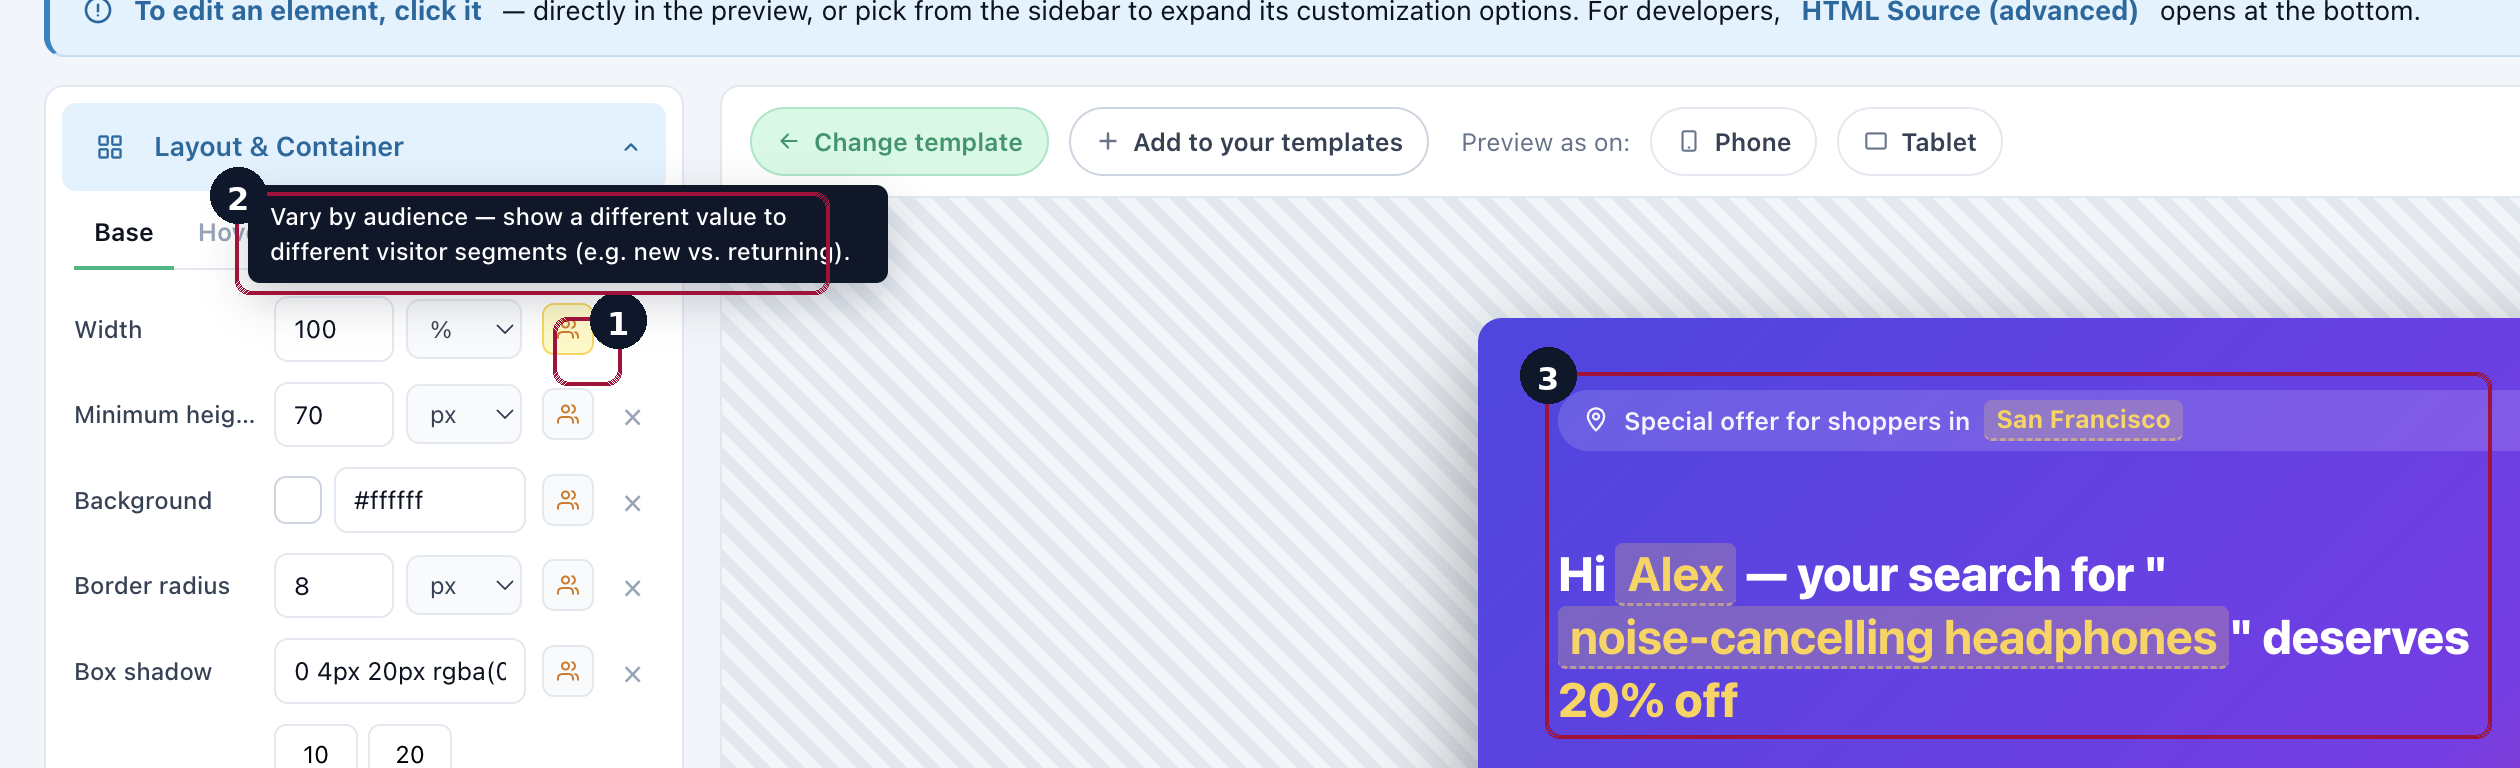
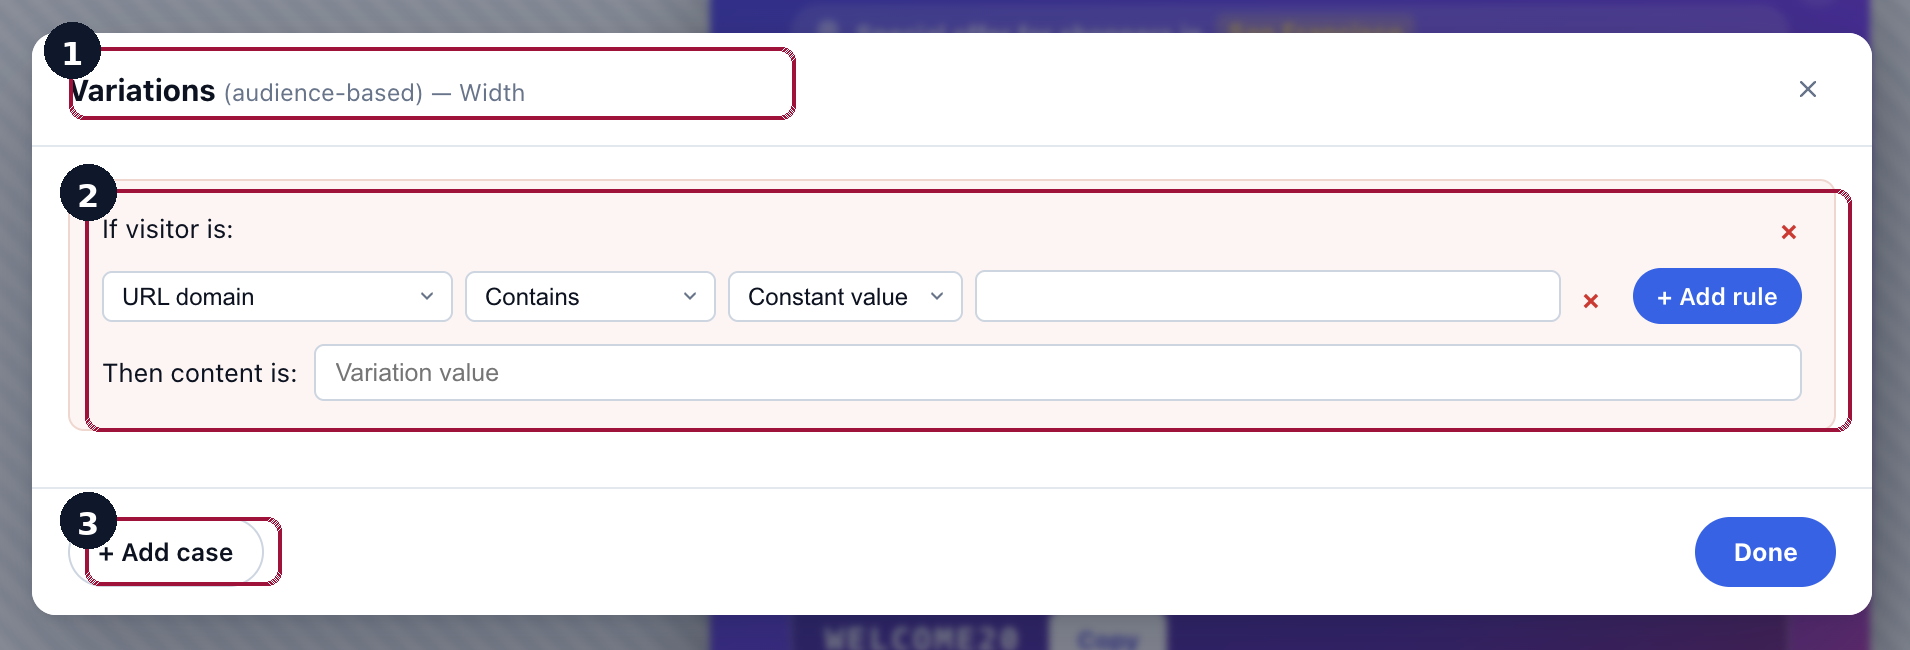
The same content can carry different versions by case. With Split Cases, a single action holds a Default version plus extra cases — each shown only when its condition is met (most often the visitor’s location, but also device, audience, language, or a CRM / feed value). You switch between cases and edit each one right in the WYSIWYG editor (the Popup & Banner editor works the same way).
What the Live Editor covers:
- Navigate vs. Edit modes — Edit mode makes every element clickable so you can pick something to change; Navigate mode disables editing so you can click links and interact with the page as a real visitor. Press Esc to return to Edit.
- Basics panel — edit text (with a rich-text editor for bold/italic/lists/links), change styling (color, font, size, background), duplicate or delete an element, or drop into raw HTML source when needed.
- Layout panel — move & resize by dragging corners, adjust spacing (margin/padding), change alignment for flex & grid layouts, hide/show per device breakpoint, preview responsive breakpoints, or reposition with z-index and pinning.
- Insert panel — drop in new elements: images (upload or URL), links, buttons, reusable blocks, videos (YouTube / Vimeo / MP4), or raw custom HTML snippets.
- Behavior panel — attach behavior to any element: run custom JavaScript on click, scroll to an anchor, delay or hover-triggered actions, count clicks toward the action’s stats, register the element as a conversion goal, or fire a custom event with a name and payload.
- AI-assisted editing — for any selected element, ask the AI for style suggestions (“Match brand accent,” “Modern sans look,” “More contrast,” “Softer, rounded”) or text rewrites (“Make it punchier,” “Shorter,” “Benefit-focused,” “More urgent,” “Match brand voice”). The AI proposes changes you review, apply, or discard.
- Page-level AI — for wholesale rewrites, describe the goal (“Rewrite this whole page for enterprise buyers”) and the AI proposes an integrated set of changes across the page.
- Variation history — every element tracks how many variations have been created and lets you switch between them for comparison.
Popup, Banner & HTML Builder
When you want to put a new element on the page — a popup, a sticky header/footer bar, a floating bubble, a slide-in notification, a message box, an embedded in-page banner, or a fully custom HTML block — use the Popup, Banner & HTML Builder. It ships with production-ready templates for each format and supports live personalization tokens (e.g., “Hi Alex — your search for ‘noise-cancelling headphones’ deserves 20% off”) that resolve at render time from the visitor’s profile, session, or CRM data.
Despite the name, this builder isn’t limited to overlays that float on top of the page. Every content item can be pinned to a placeholder — a CSS selector you point at any element on your site. Set a placeholder and the content is injected at that spot, and it can replace the existing content there rather than only adding alongside it. That makes the same builder useful both for classic overlays (a popup, a corner toast) and for swapping in-page content (a hero banner, a promo strip, a block inside a product page) without touching your site’s code.
Edit any action with AI
Any action — a popup, banner, WYSIWYG edit, or block of HTML — can be edited with AI instead of by hand. Click Edit action with AI, describe the change in plain English, and Personyze rewrites the action’s HTML for you to review and apply.
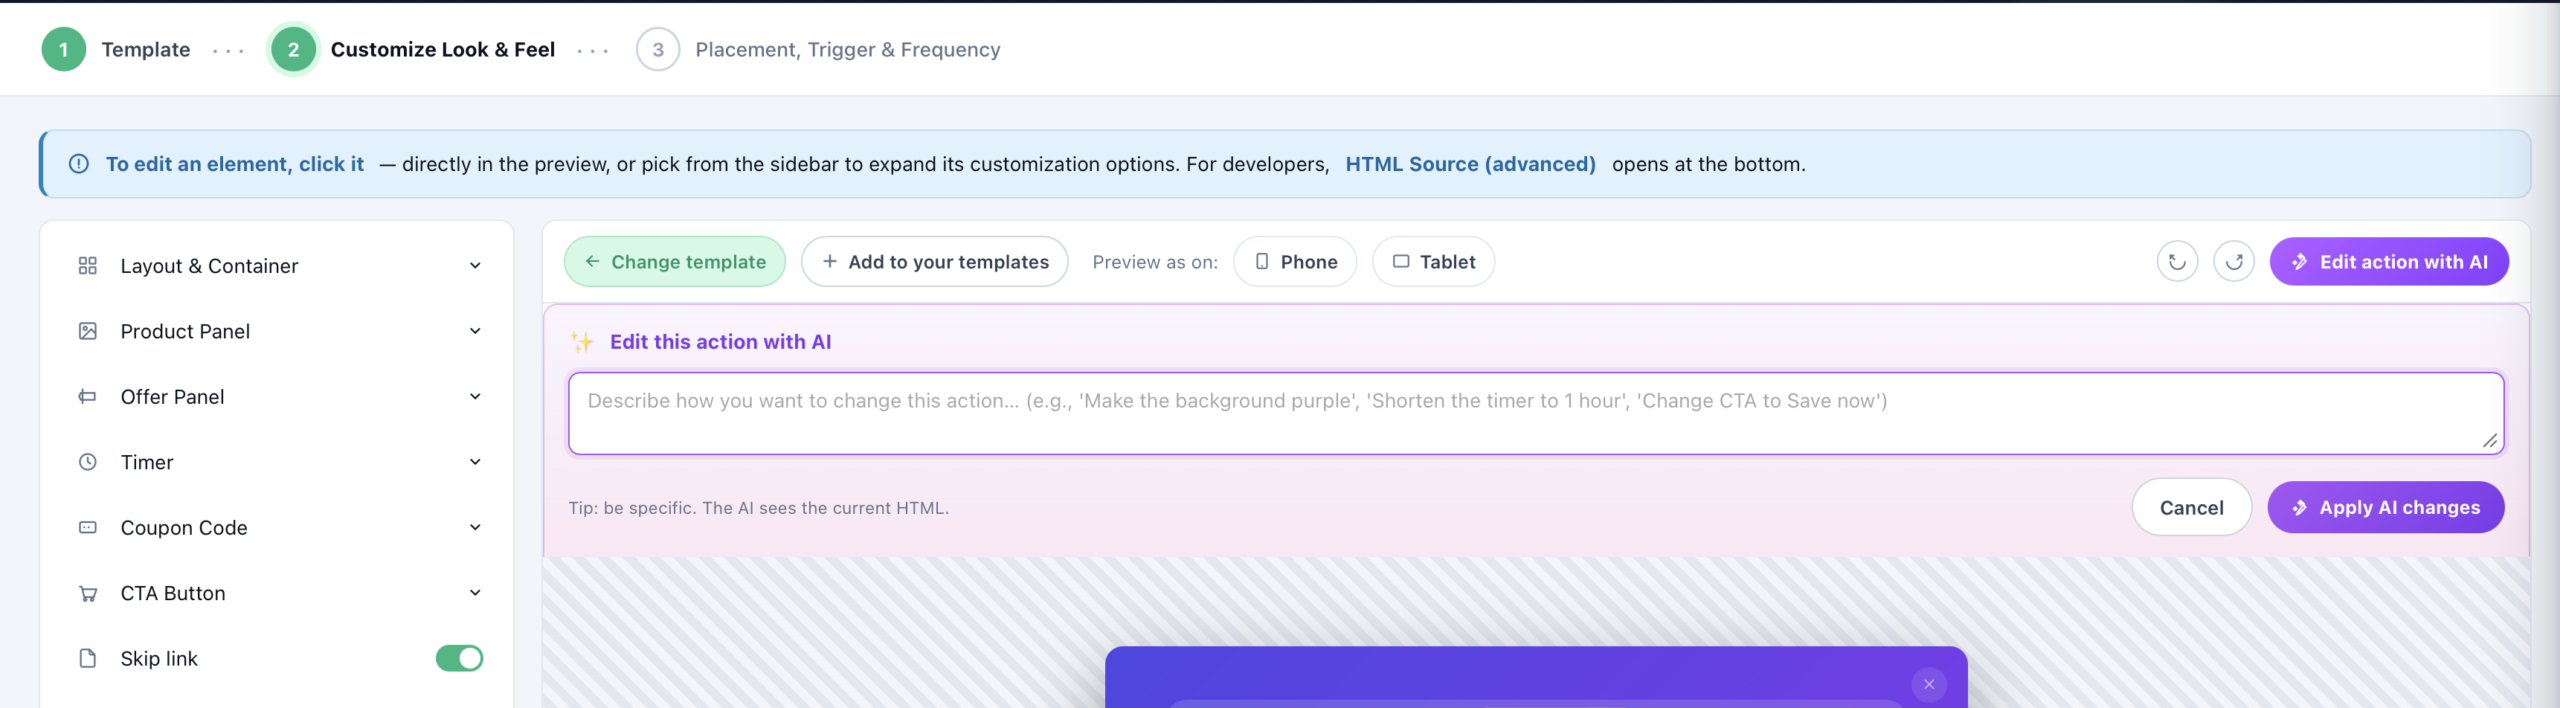
The AI can:
- Restyle — colors, fonts, spacing, layout, button styles (“match our brand accent,” “more contrast,” “modern sans look”).
- Rewrite copy — headlines, body, CTAs (“make it punchier,” “benefit-focused,” “more urgent,” “match brand voice”).
- Change the creative — swap or adjust images, timers, coupon codes, and other template elements.
- Insert personalization — add Personyze variables like the visitor’s first name, city, or a searched keyword so the action fills in per visitor.
The AI proposes the change; you review, apply, or discard — nothing goes live until you accept it.
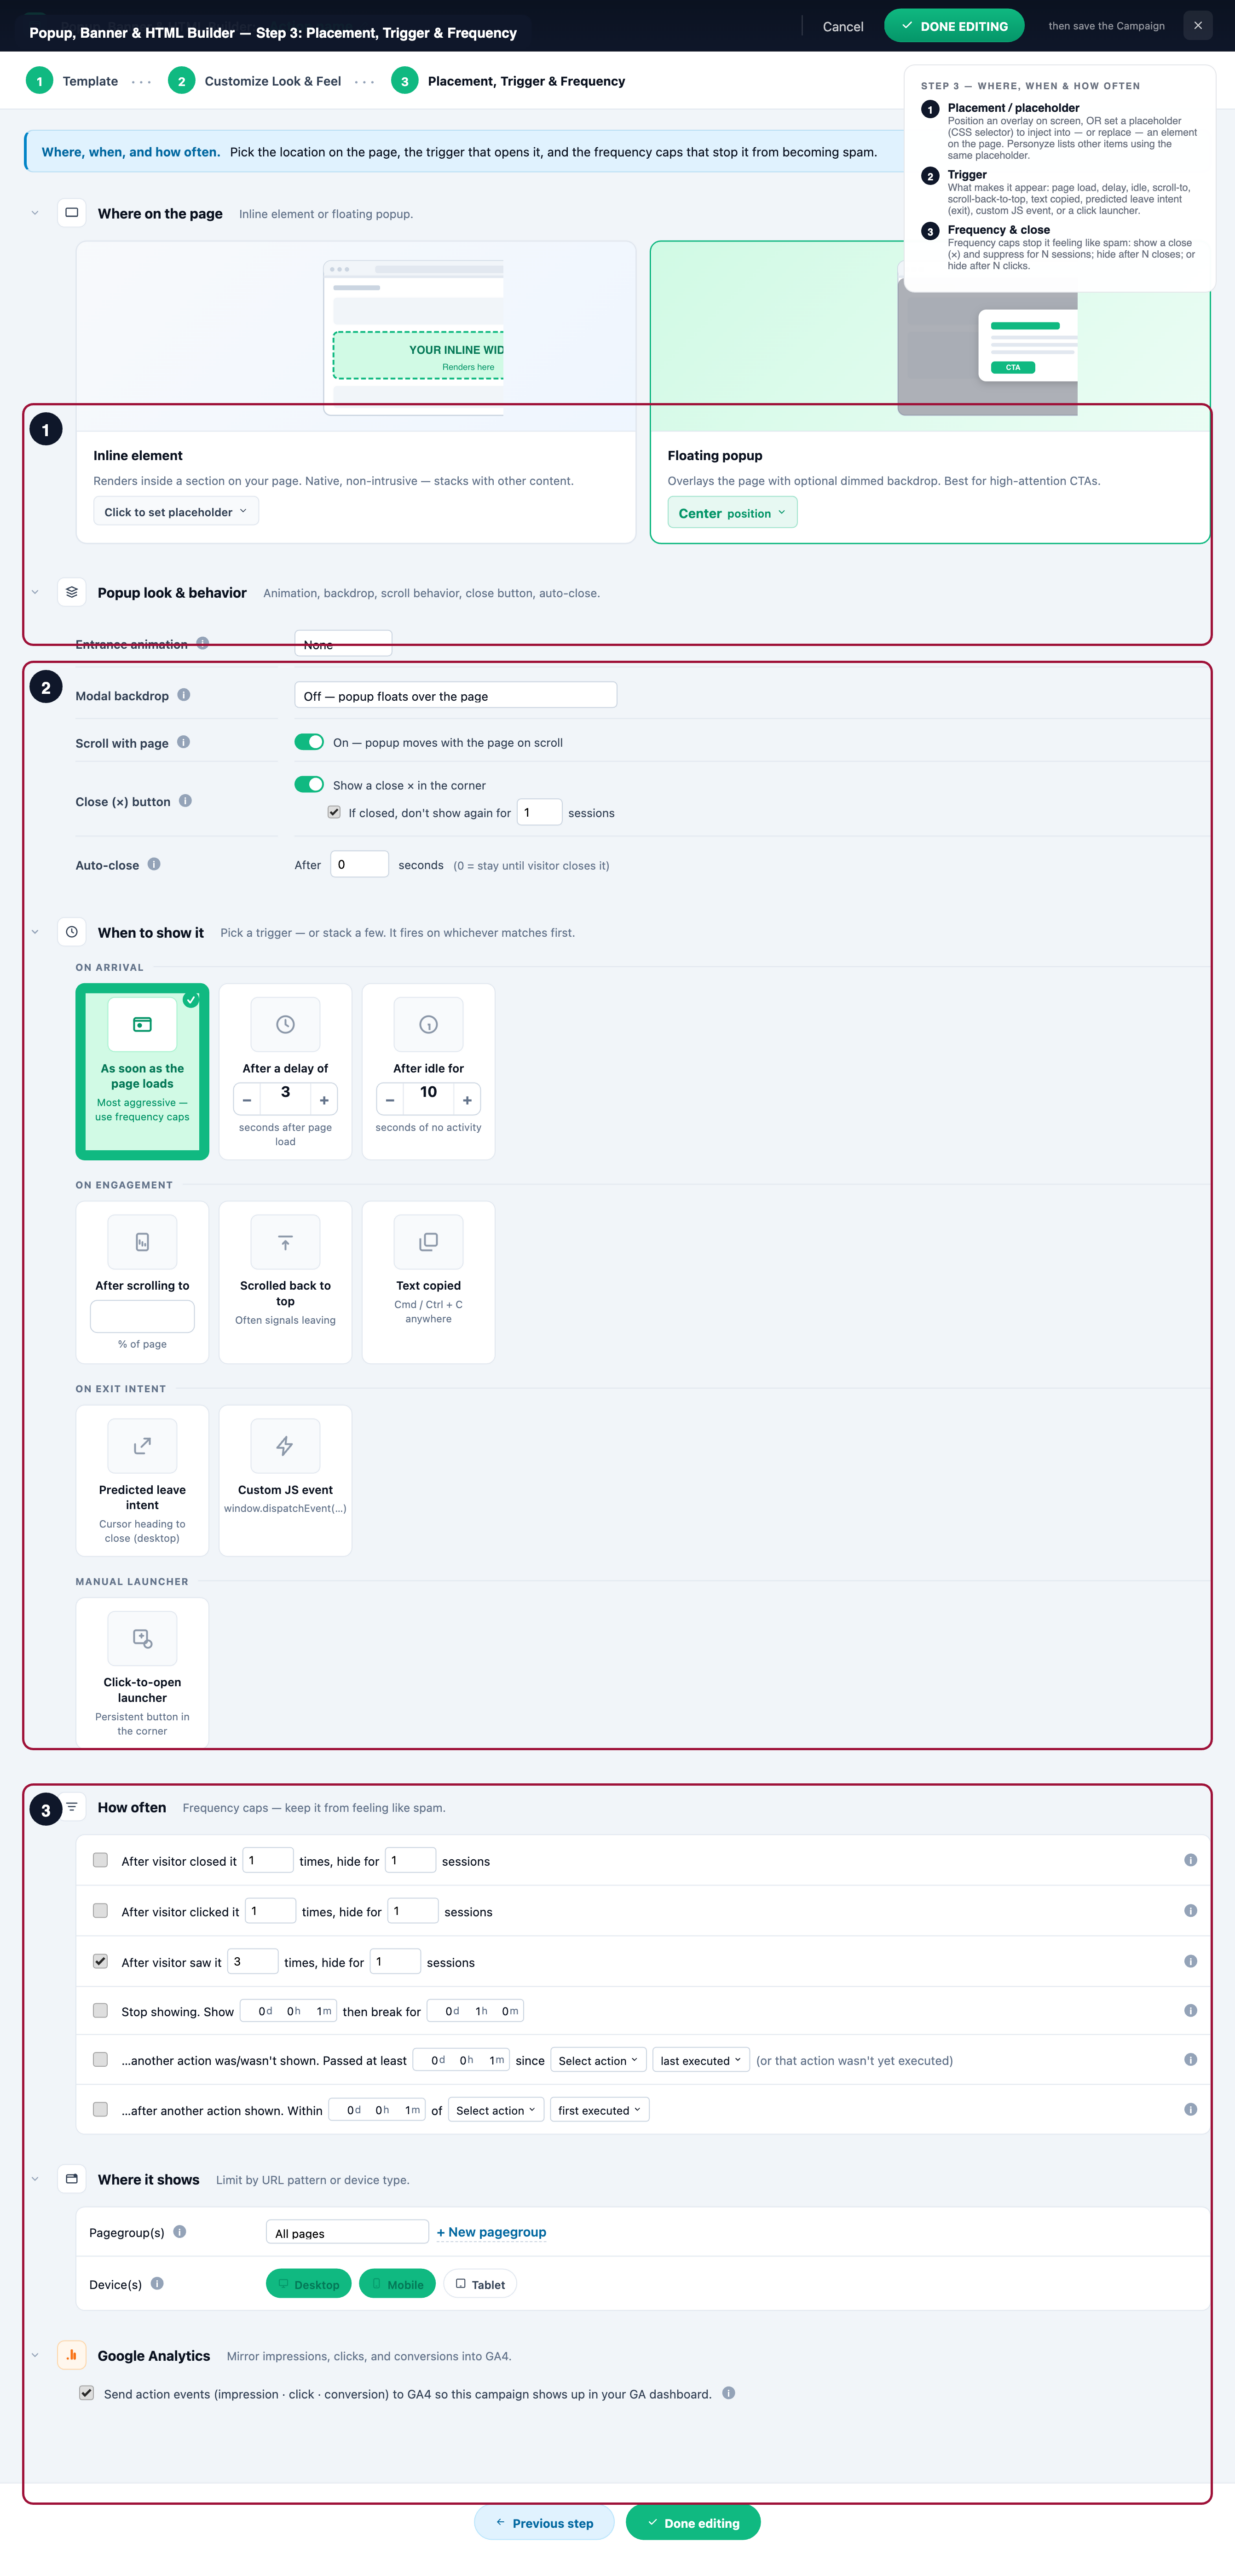
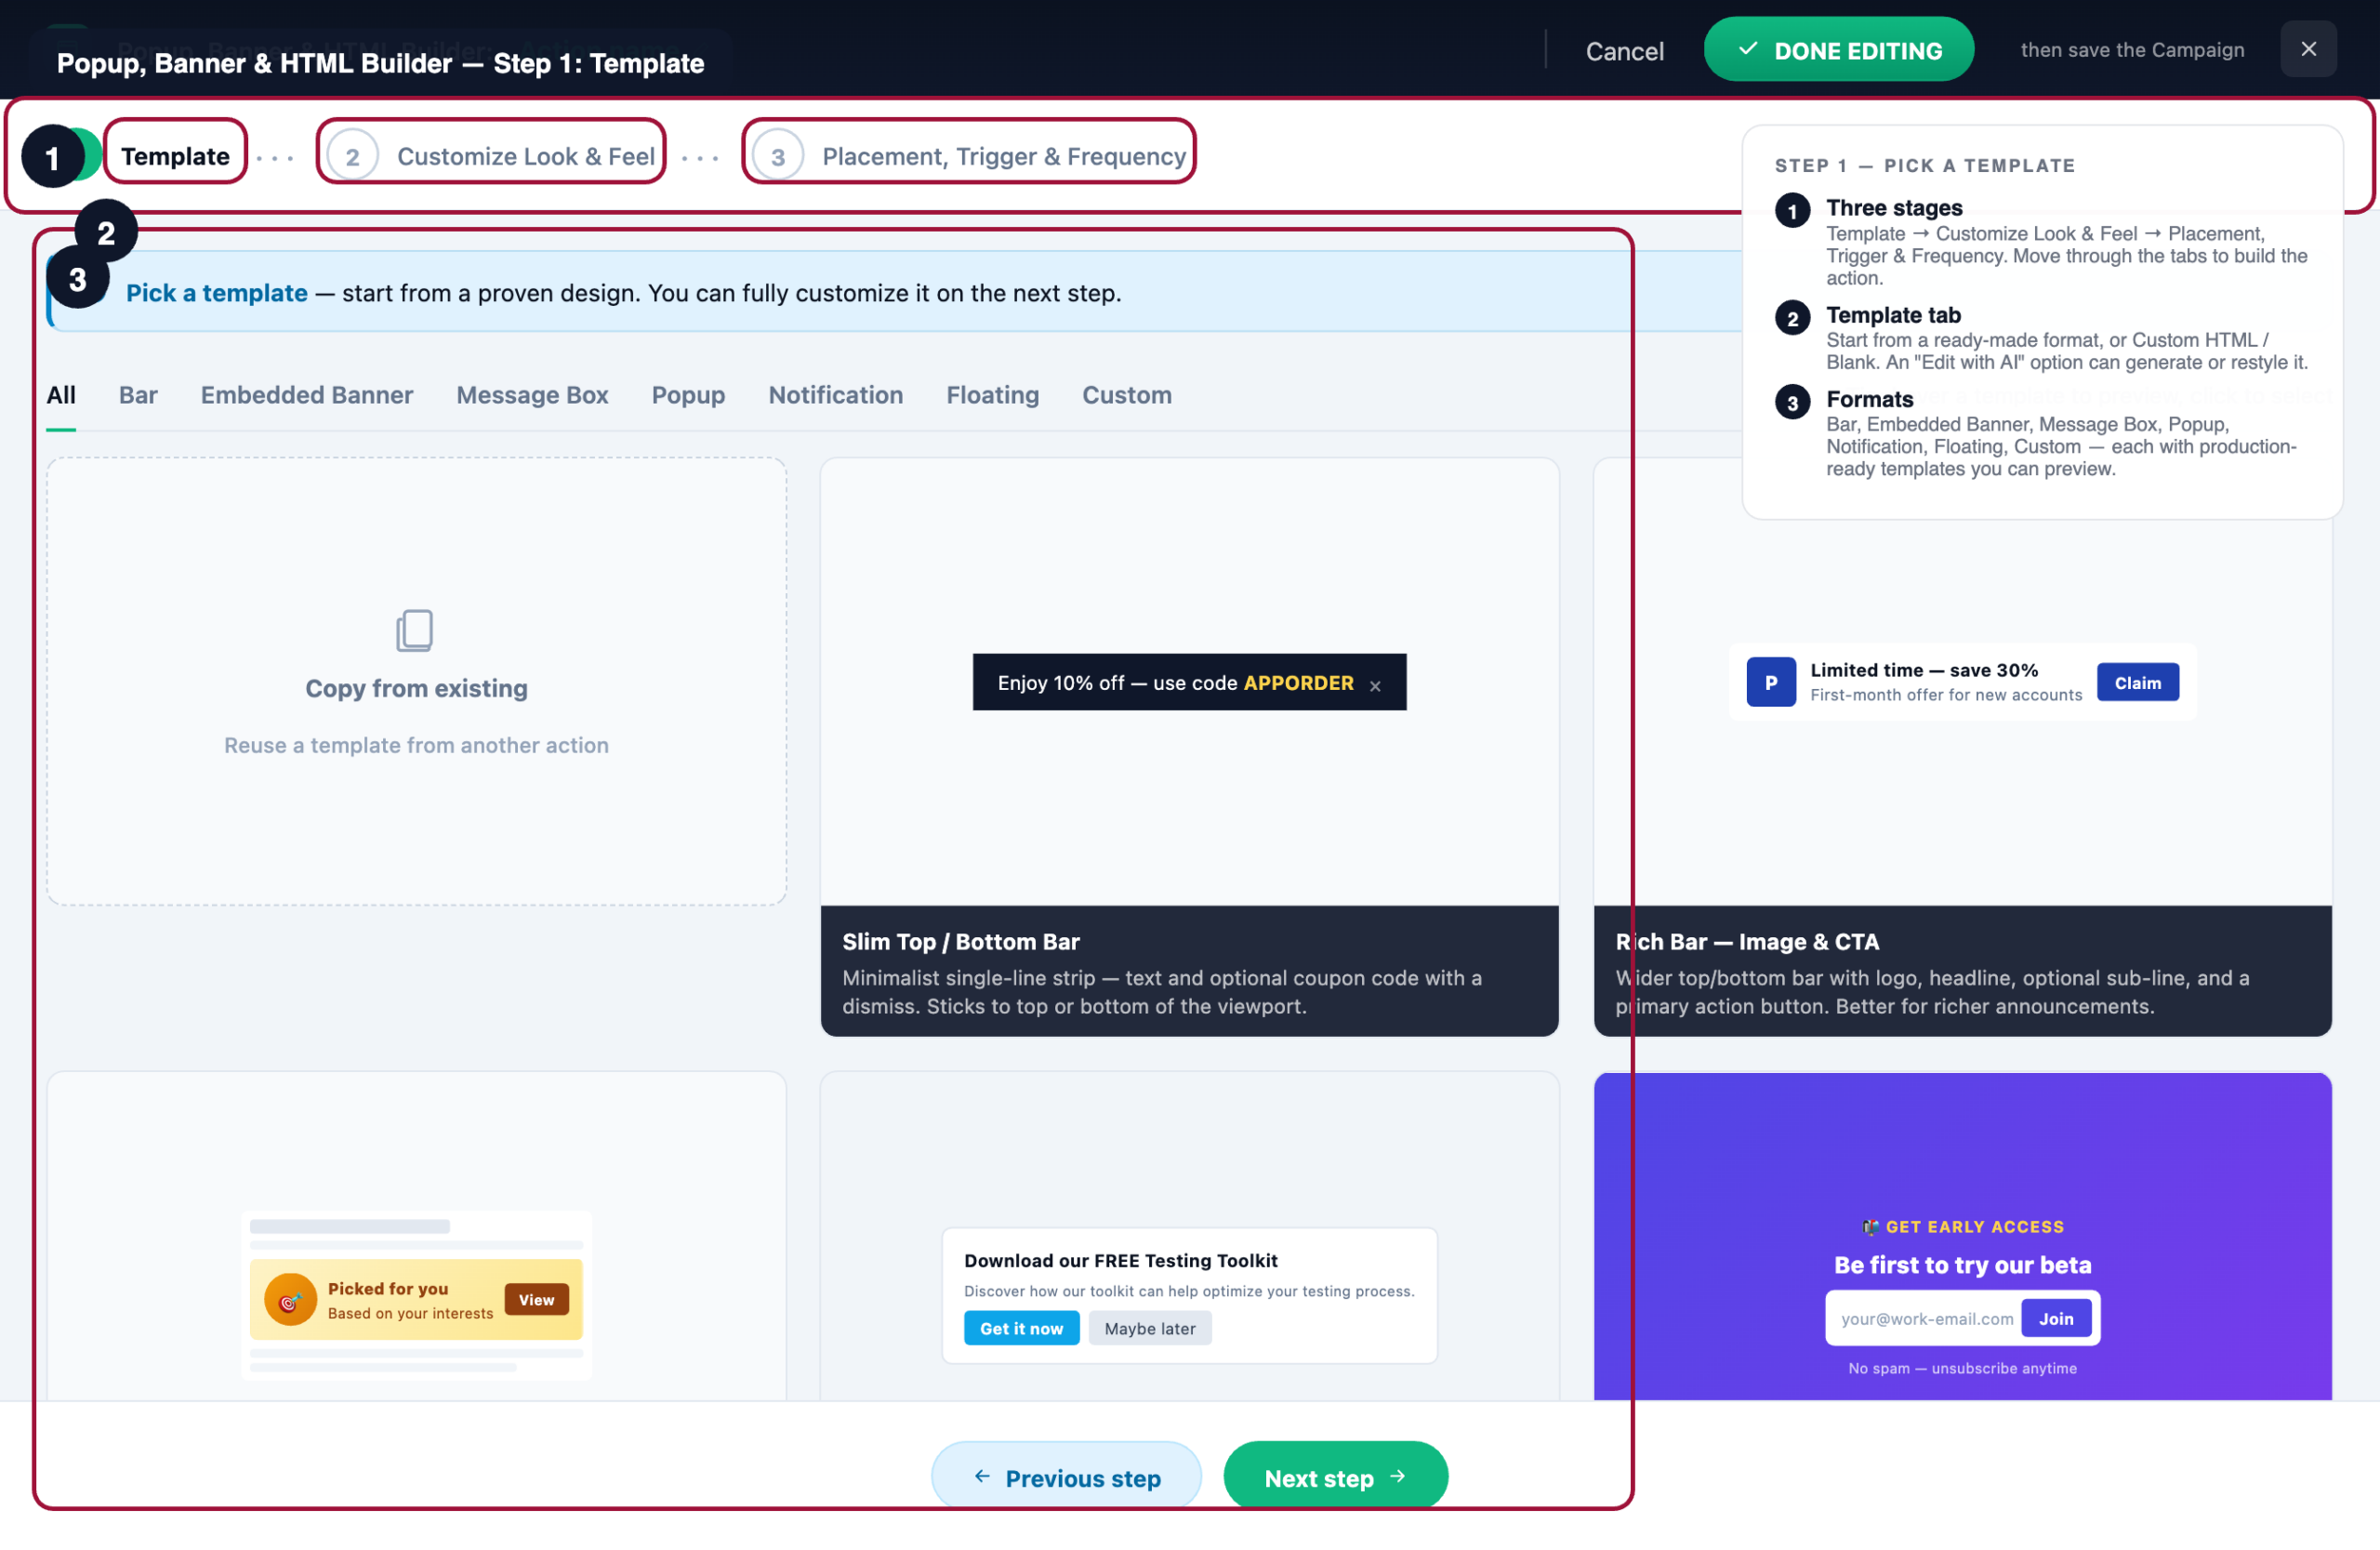
The builder walks through three stages:
1 · Template. Start from a format-specific template, filterable by type: Bar (slim sticky top/bottom bar, or a rich bar with image & CTA), Embedded Banner (inline in a specific page slot), Message Box (inline messaging with CTAs), Popup (modal overlay — signup / lead form, or countdown promo), Notification (slide-in corner toast), Floating (floating bubble / launcher), and Custom HTML / Blank (raw markup). Any template can embed a product-recommendation widget powered by your catalog (Bought Together, Countdown, Grid, Slider, and more), and there’s an “Edit this action with AI” option to generate or restyle it from a prompt.
2 · Customize look & feel. Adjust the design — layout, colors, fonts, imagery, buttons, and responsive behavior across base / hover states and phone / tablet / desktop breakpoints — and drop in personalization tokens that resolve per visitor.
3 · Placement, trigger & frequency. This stage decides where, when, and how often the content shows:
- Placement — for overlays, choose a screen position (top/bottom, left/center/right, or centered). For in-page content, set a placeholder selector to inject into — or replace — an element on the page. Personyze also lists every other content item already using that same placeholder, so you can see what competes for the slot.
- Trigger — what makes it appear: as soon as the page loads, after a delay, after the visitor is idle for a while, after scrolling to a point, when they scroll back to the top, when text is copied, on predicted leave intent (exit intent), on a custom JS event, or from a click-to-open launcher.
- Frequency & close behavior — frequency caps keep it from feeling like spam: show a close (×) button and, if closed, suppress it for N sessions; hide it after the visitor has closed it a set number of times; or hide it after they’ve clicked it a set number of times.
Full guide: Popup & Banner Action Guide.
Other action types
Personyze also supports these action types, each with its own dedicated guide:
- Product Recommendations — dedicated recommendation widgets (Bought Together, Also Viewed, Trending, Personalized by browsing history, Category-based, and more) powered by your product catalog feed.
- Countdown Timer — add urgency with a live countdown to a specific date/time, a per-visitor session countdown, or a rolling window.
- Redirect to URL — send matching visitors to a different URL entirely. Useful for A/B testing landing pages or routing paid traffic to a segment-specific page.
- JavaScript Action — run arbitrary JavaScript when the audience matches. Used for anything the built-in action types don’t cover — talking to a third-party API, mutating page state, firing tracking events, or wiring up something custom.
- Email actions — personalized email sends including cart abandonment, re-targeting, and campaign-driven sends, with recommendations embedded at open-time.
- Web Push Notifications — reach visitors who’ve granted push permissions with time-of-day or event-triggered notifications.
Give the campaign its own goal
The Goals row of the Campaign settings card lists the goals this campaign is measured by, and Add goal either creates a new one already scoped to this campaign or attaches an existing one.
A goal made this way is campaign-dedicated: it does not spend one of the twelve account-wide slots, there is no limit on how many you make, and it stays off the dashboard and out of every other campaign’s reports. Use it for the outcome that only means something here — a click on this promotion’s CTA, a form only this campaign drives. Scopes, and how to make one.
Step 3 — A/B testing (optional)
A campaign with a single variation just serves that content to the whole audience. But any campaign can be turned into an A/B test by adding two or more variations, splitting traffic across them, and letting the results decide the winner. It’s the fastest way to prove whether a change actually moves your goal instead of guessing.
Setting up the test
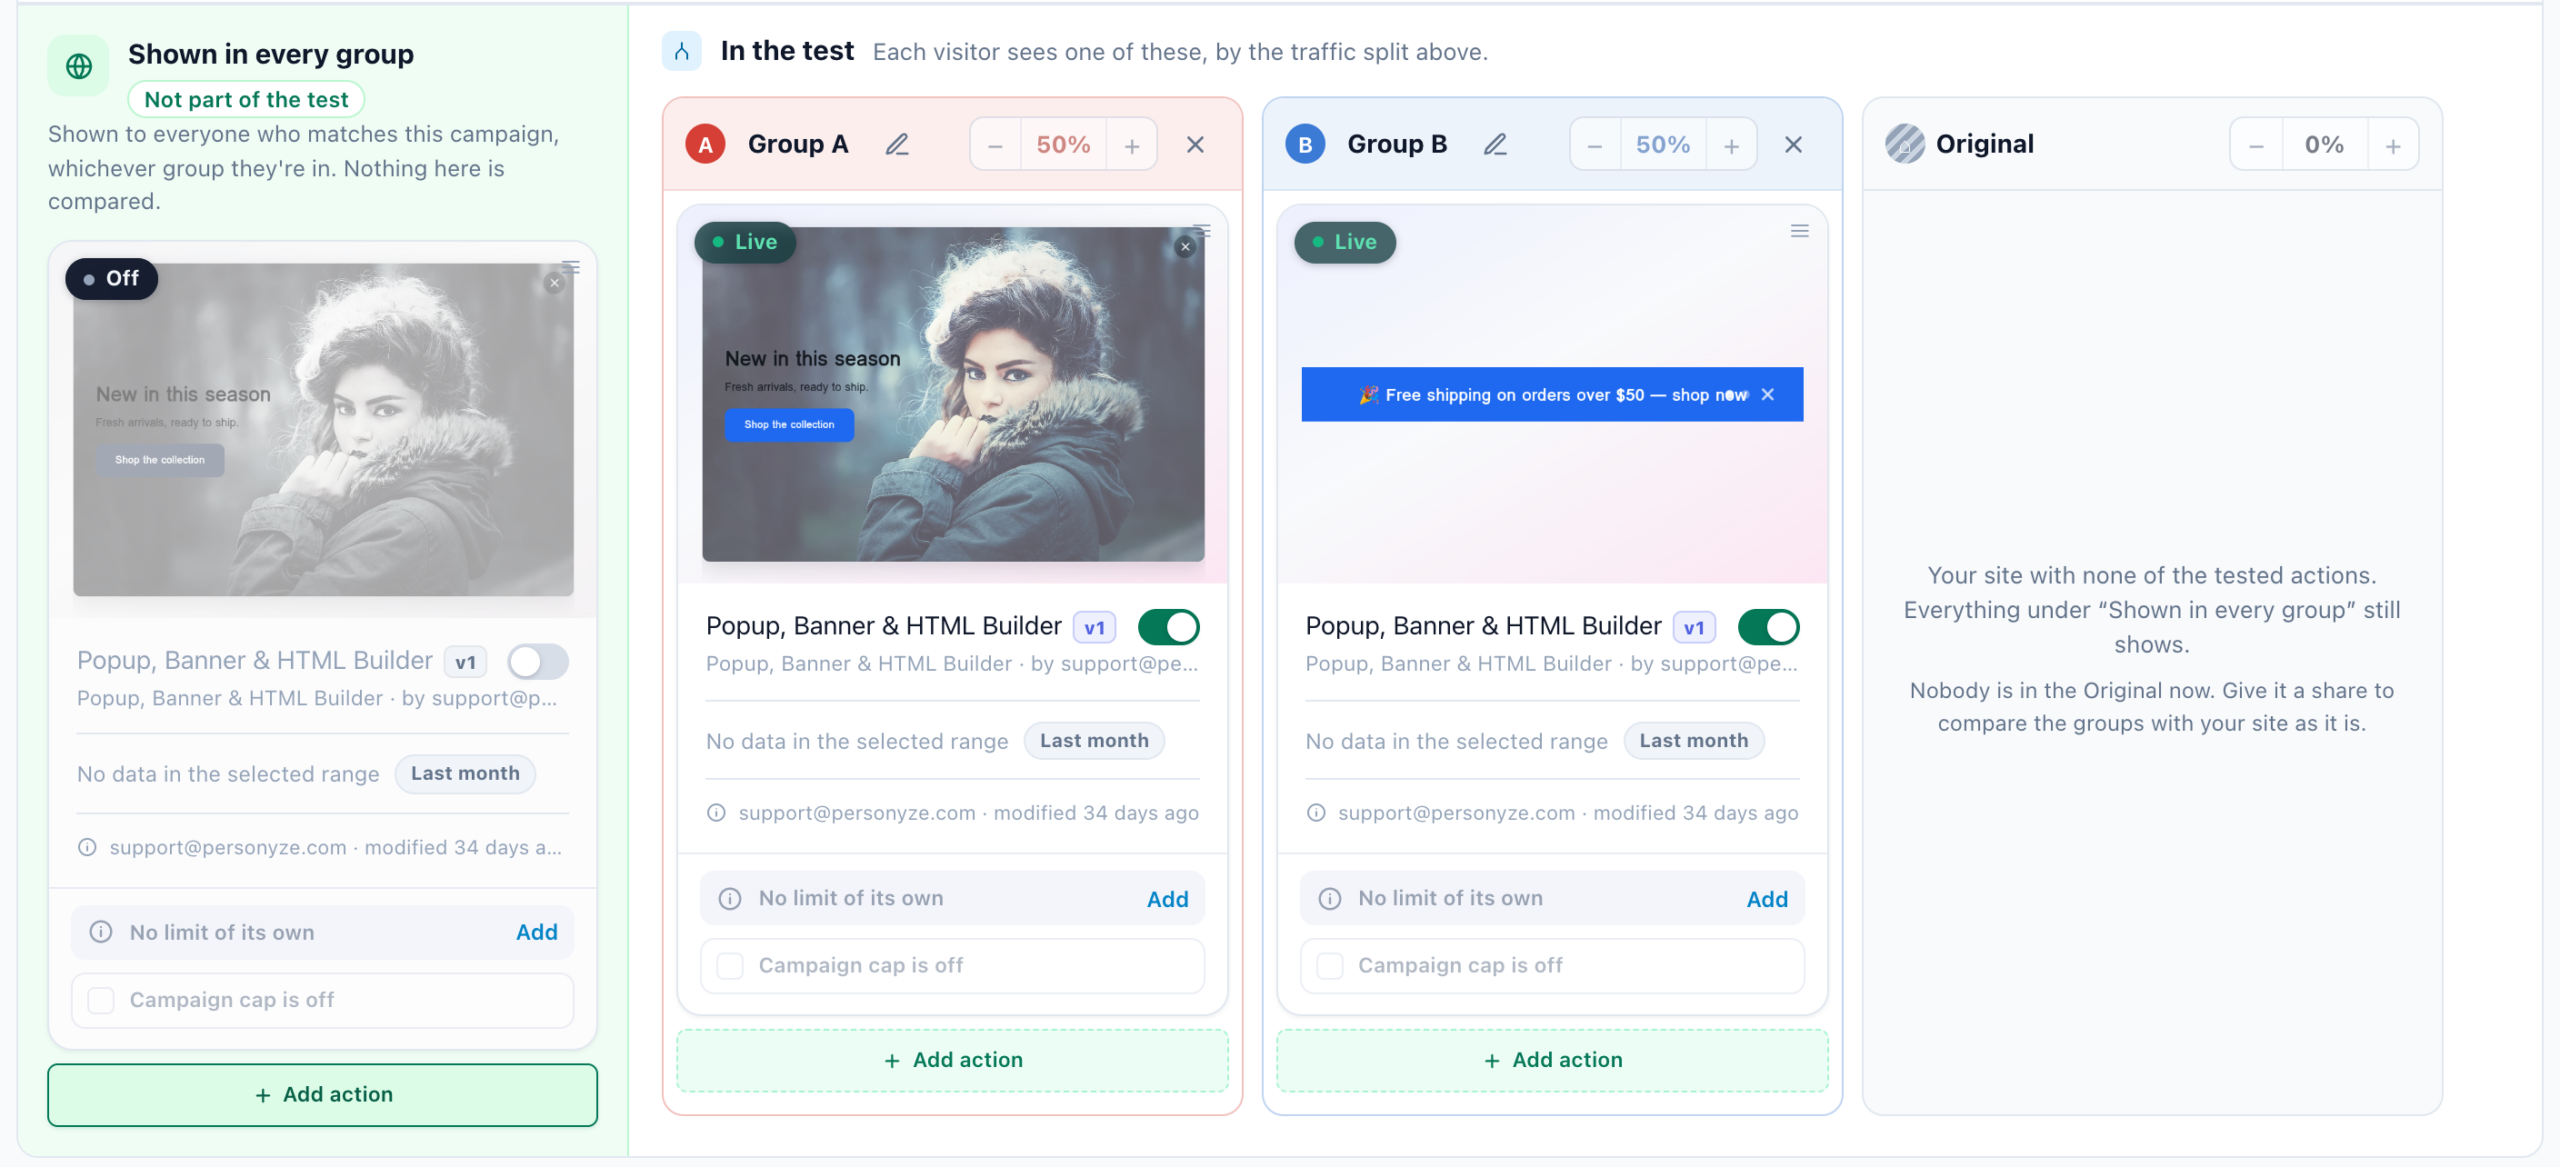
An A/B Testing campaign starts with its test on, two groups at 50% each. Any other campaign becomes a test from the A/B test row of its Campaign settings card: Turn on A/B testing. The content then becomes the A/B test card: Group A, Group B and so on, each a version of the content, beside the Original — your site with none of the tested actions, kept as the baseline. Turn off on the row ends the test and moves the groups’ actions into the content everyone sees.
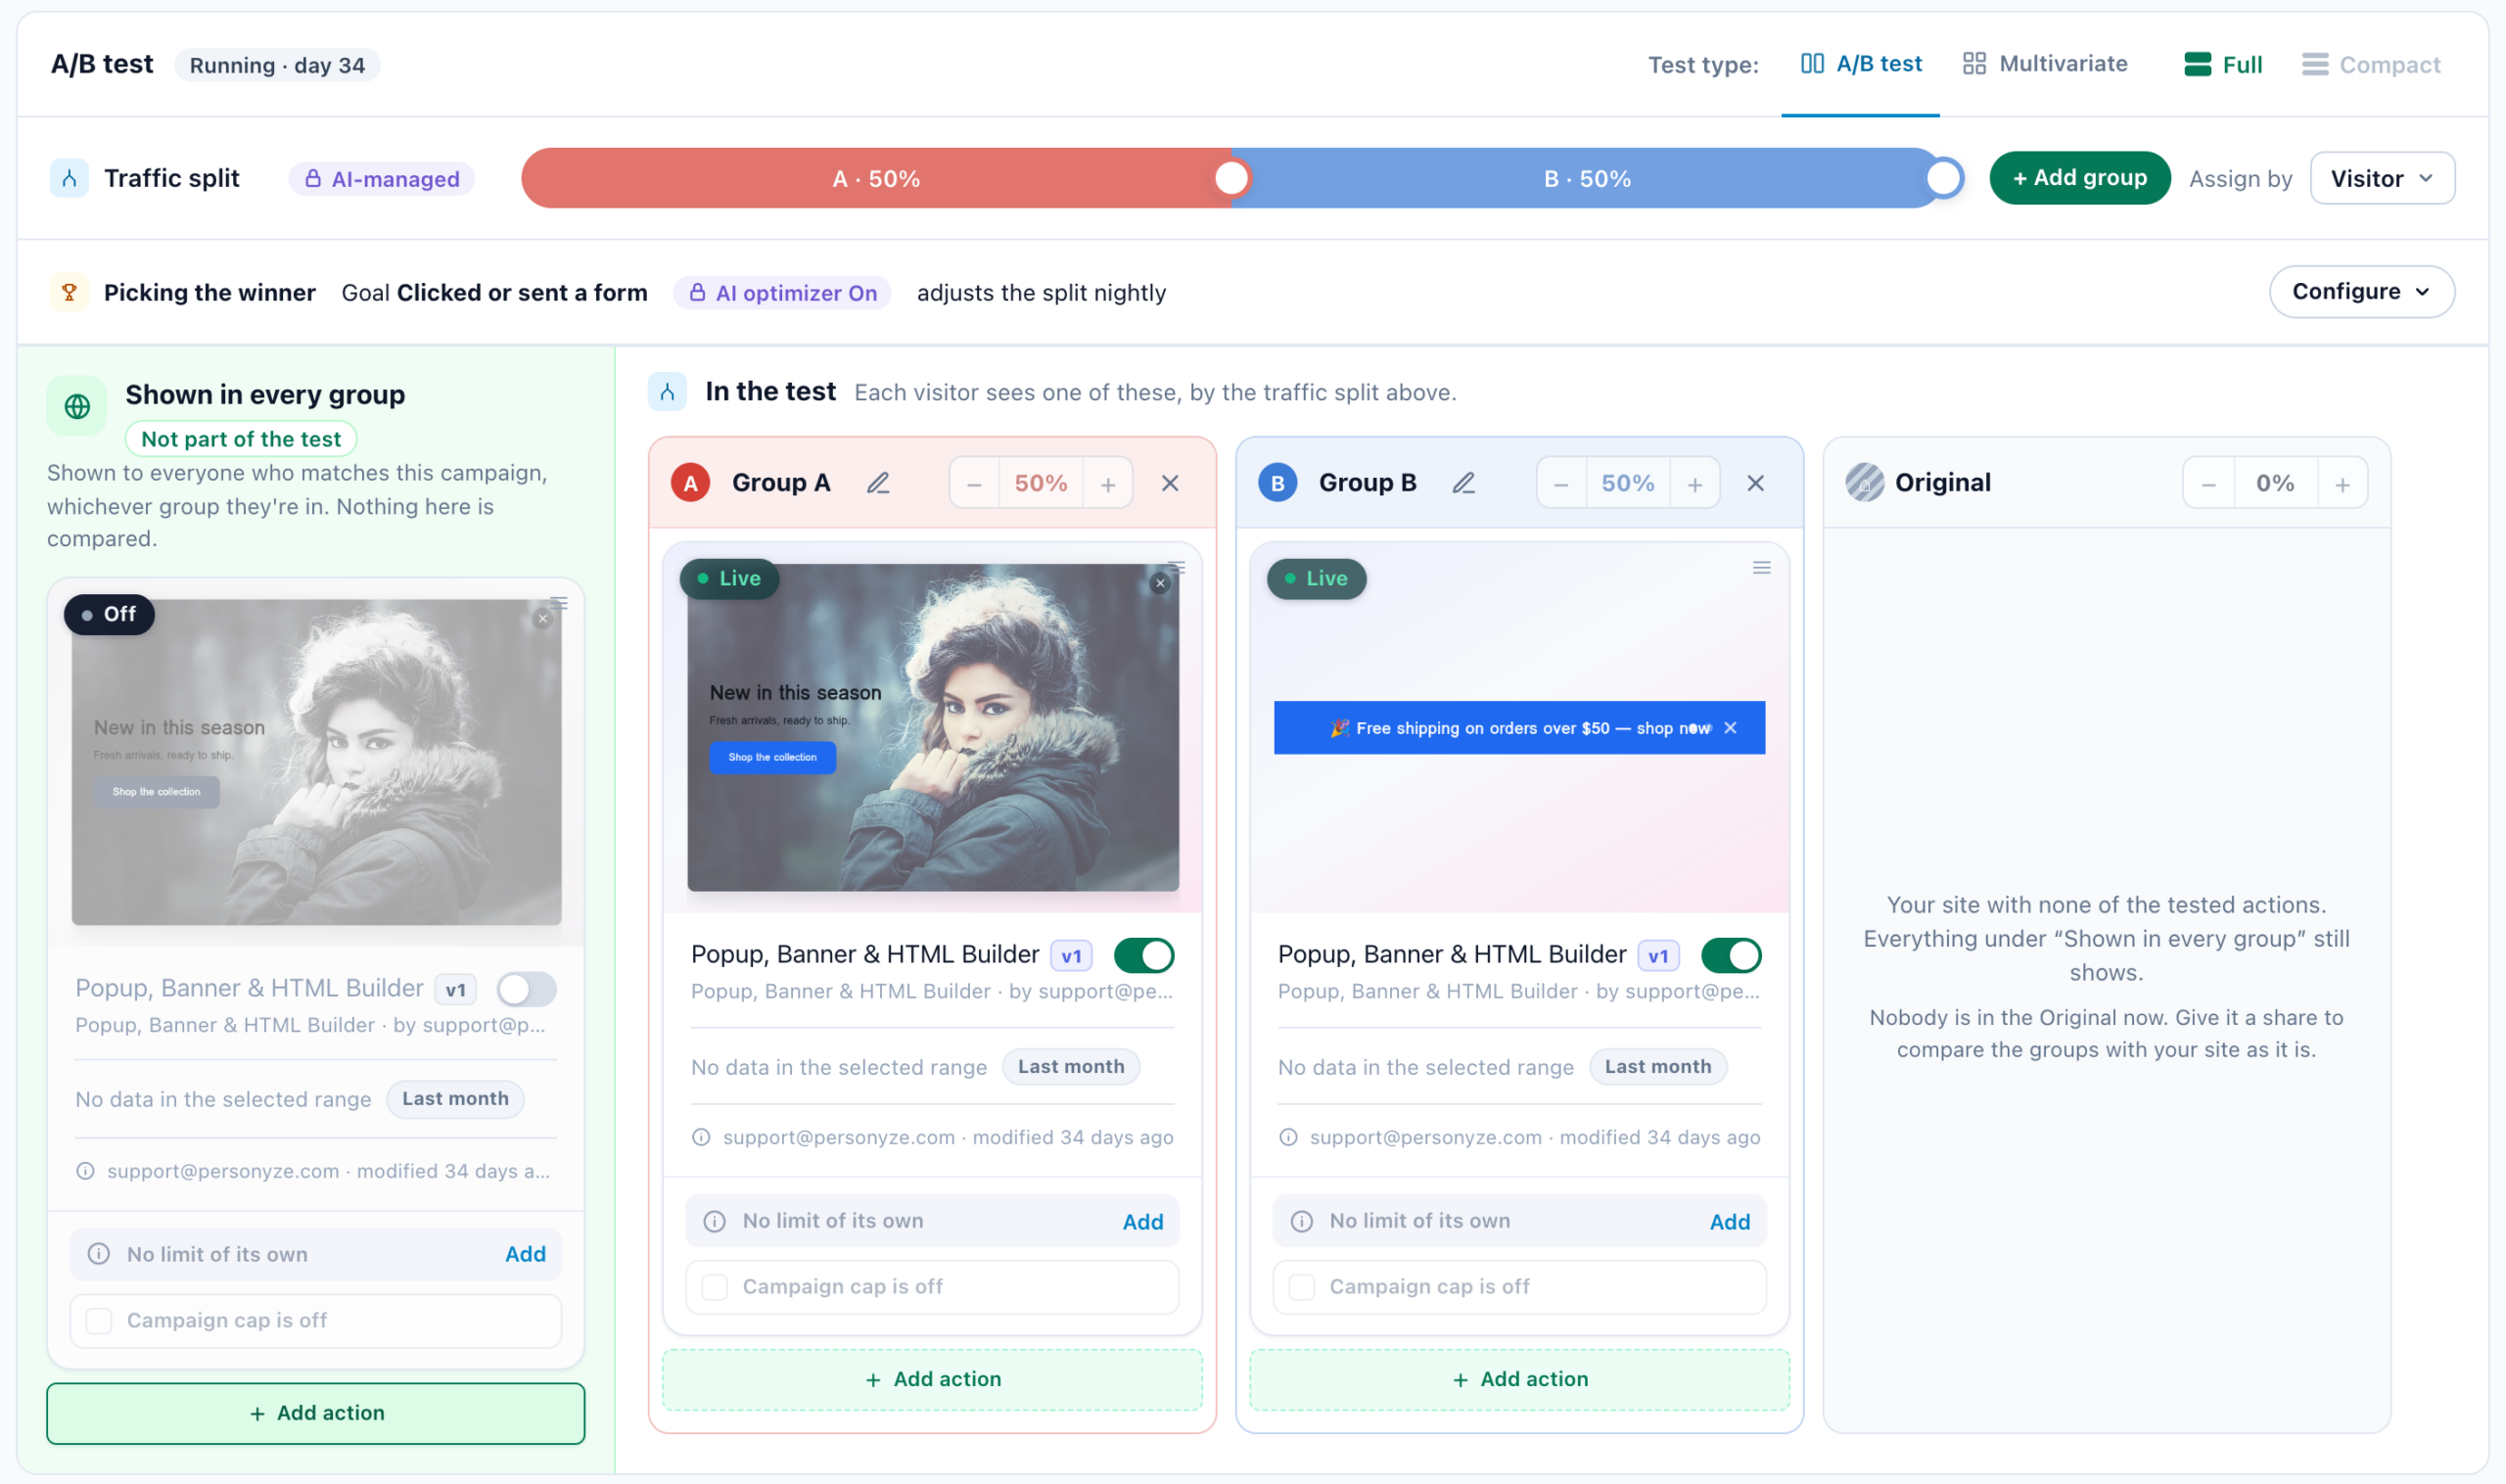
Allocate traffic with the split bar. Drag the handles between the coloured segments, or use − / + on a group, to set each group’s share (for example A 45% / B 40%, leaving the Original 15%). The shares add up to at most 100%, and what they leave goes to the Original: holding some traffic there is what lets you measure lift against doing nothing. + Add group adds a version; Remove group on a group’s header removes it.
Shown in every group. The green column on the left holds content outside the test, shown to everyone the campaign matches, whichever group they are in. Nothing in it is compared.
Choose how visitors are assigned. Assign by decides how a person is put in a group: Visitor (each visitor stays in one group — the classic A/B test), Visit (a different group each visit — good for banners) or Page view (every page view picks at random). Under Same group across campaigns, Visitor (fixed id) and Visit (fixed id) keep a person in the same group in every campaign with that mode and the same split — a control group across your whole program. More on Assign by.
Set the goal and how the winner is picked. Picking the winner is one line under the split; Configure opens it: the goals the test is judged on, Pick a winner or Optimize continuously (AI optimizer), Auto-pick winner and the decision strategy (Cautious, Balanced, Fast or Custom). Every setting explained.
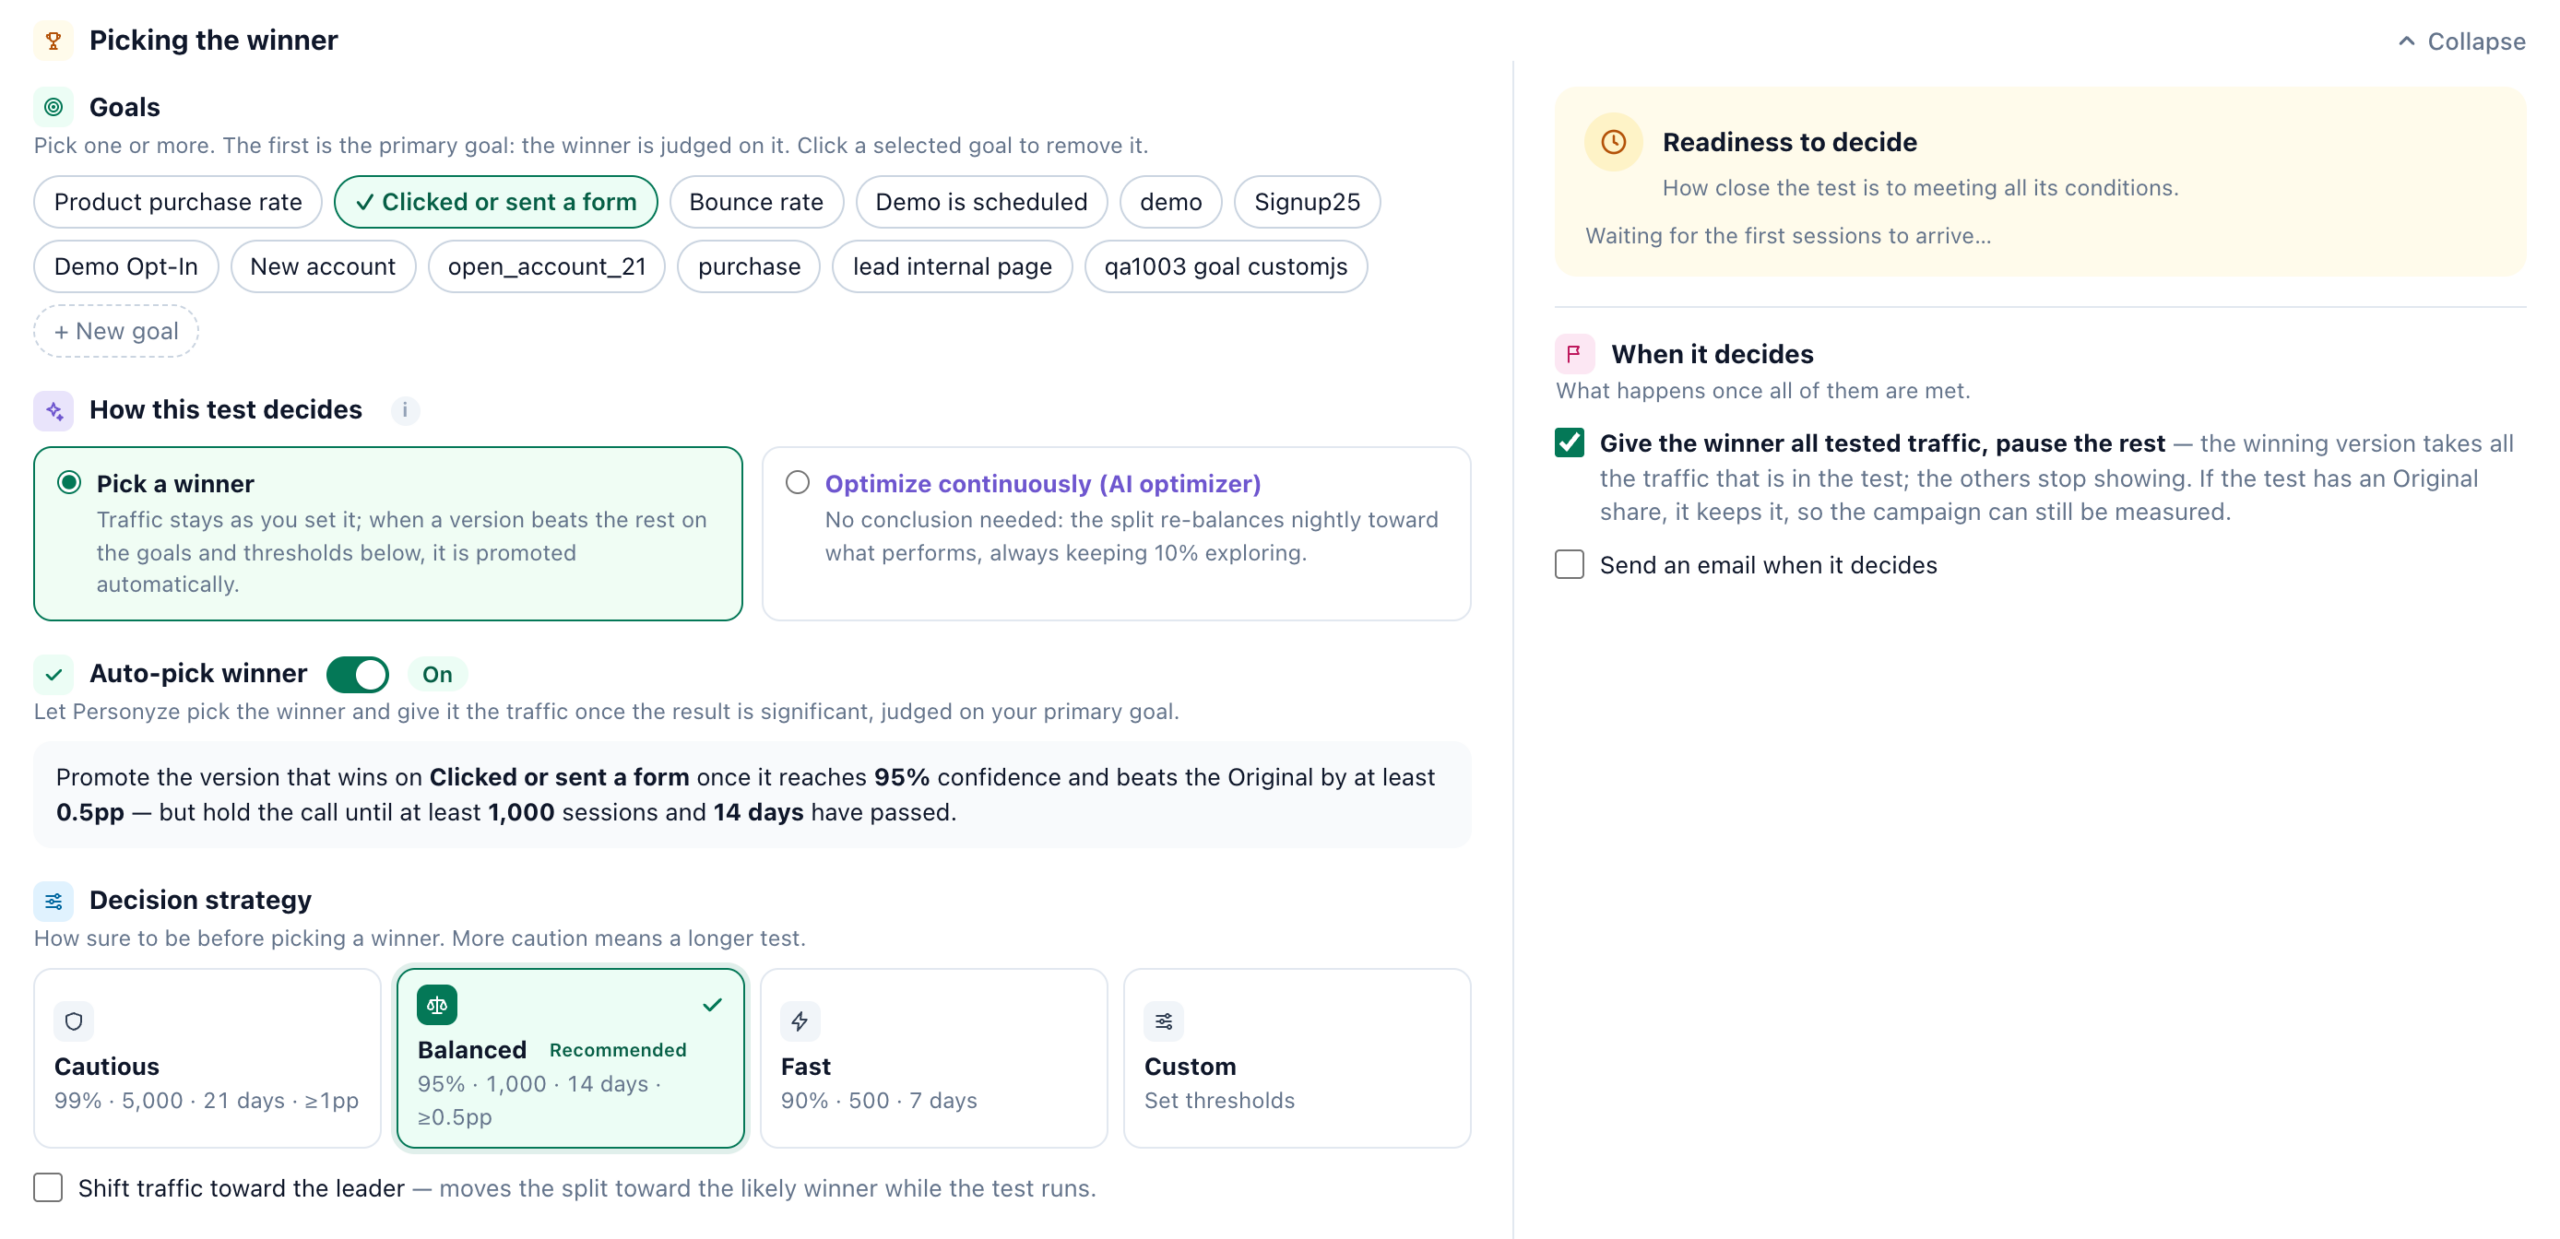
Changed something mid-test? New groups, a different split or an edited action change what is being measured. Read the results from the change with the Performance step’s From last edit range.
Multivariate: test several elements at once
An A/B test compares whole versions against each other. Multivariate tests individual elements in combination. Pick Multivariate as the A/B test card’s Test type and, instead of one list of groups, you create variables — each variable is one thing you’re varying (say, card order, or the annual-plan copy) — and add each way it could look as an option inside it. A visitor sees one option from each variable, and Personyze builds every combination of them.
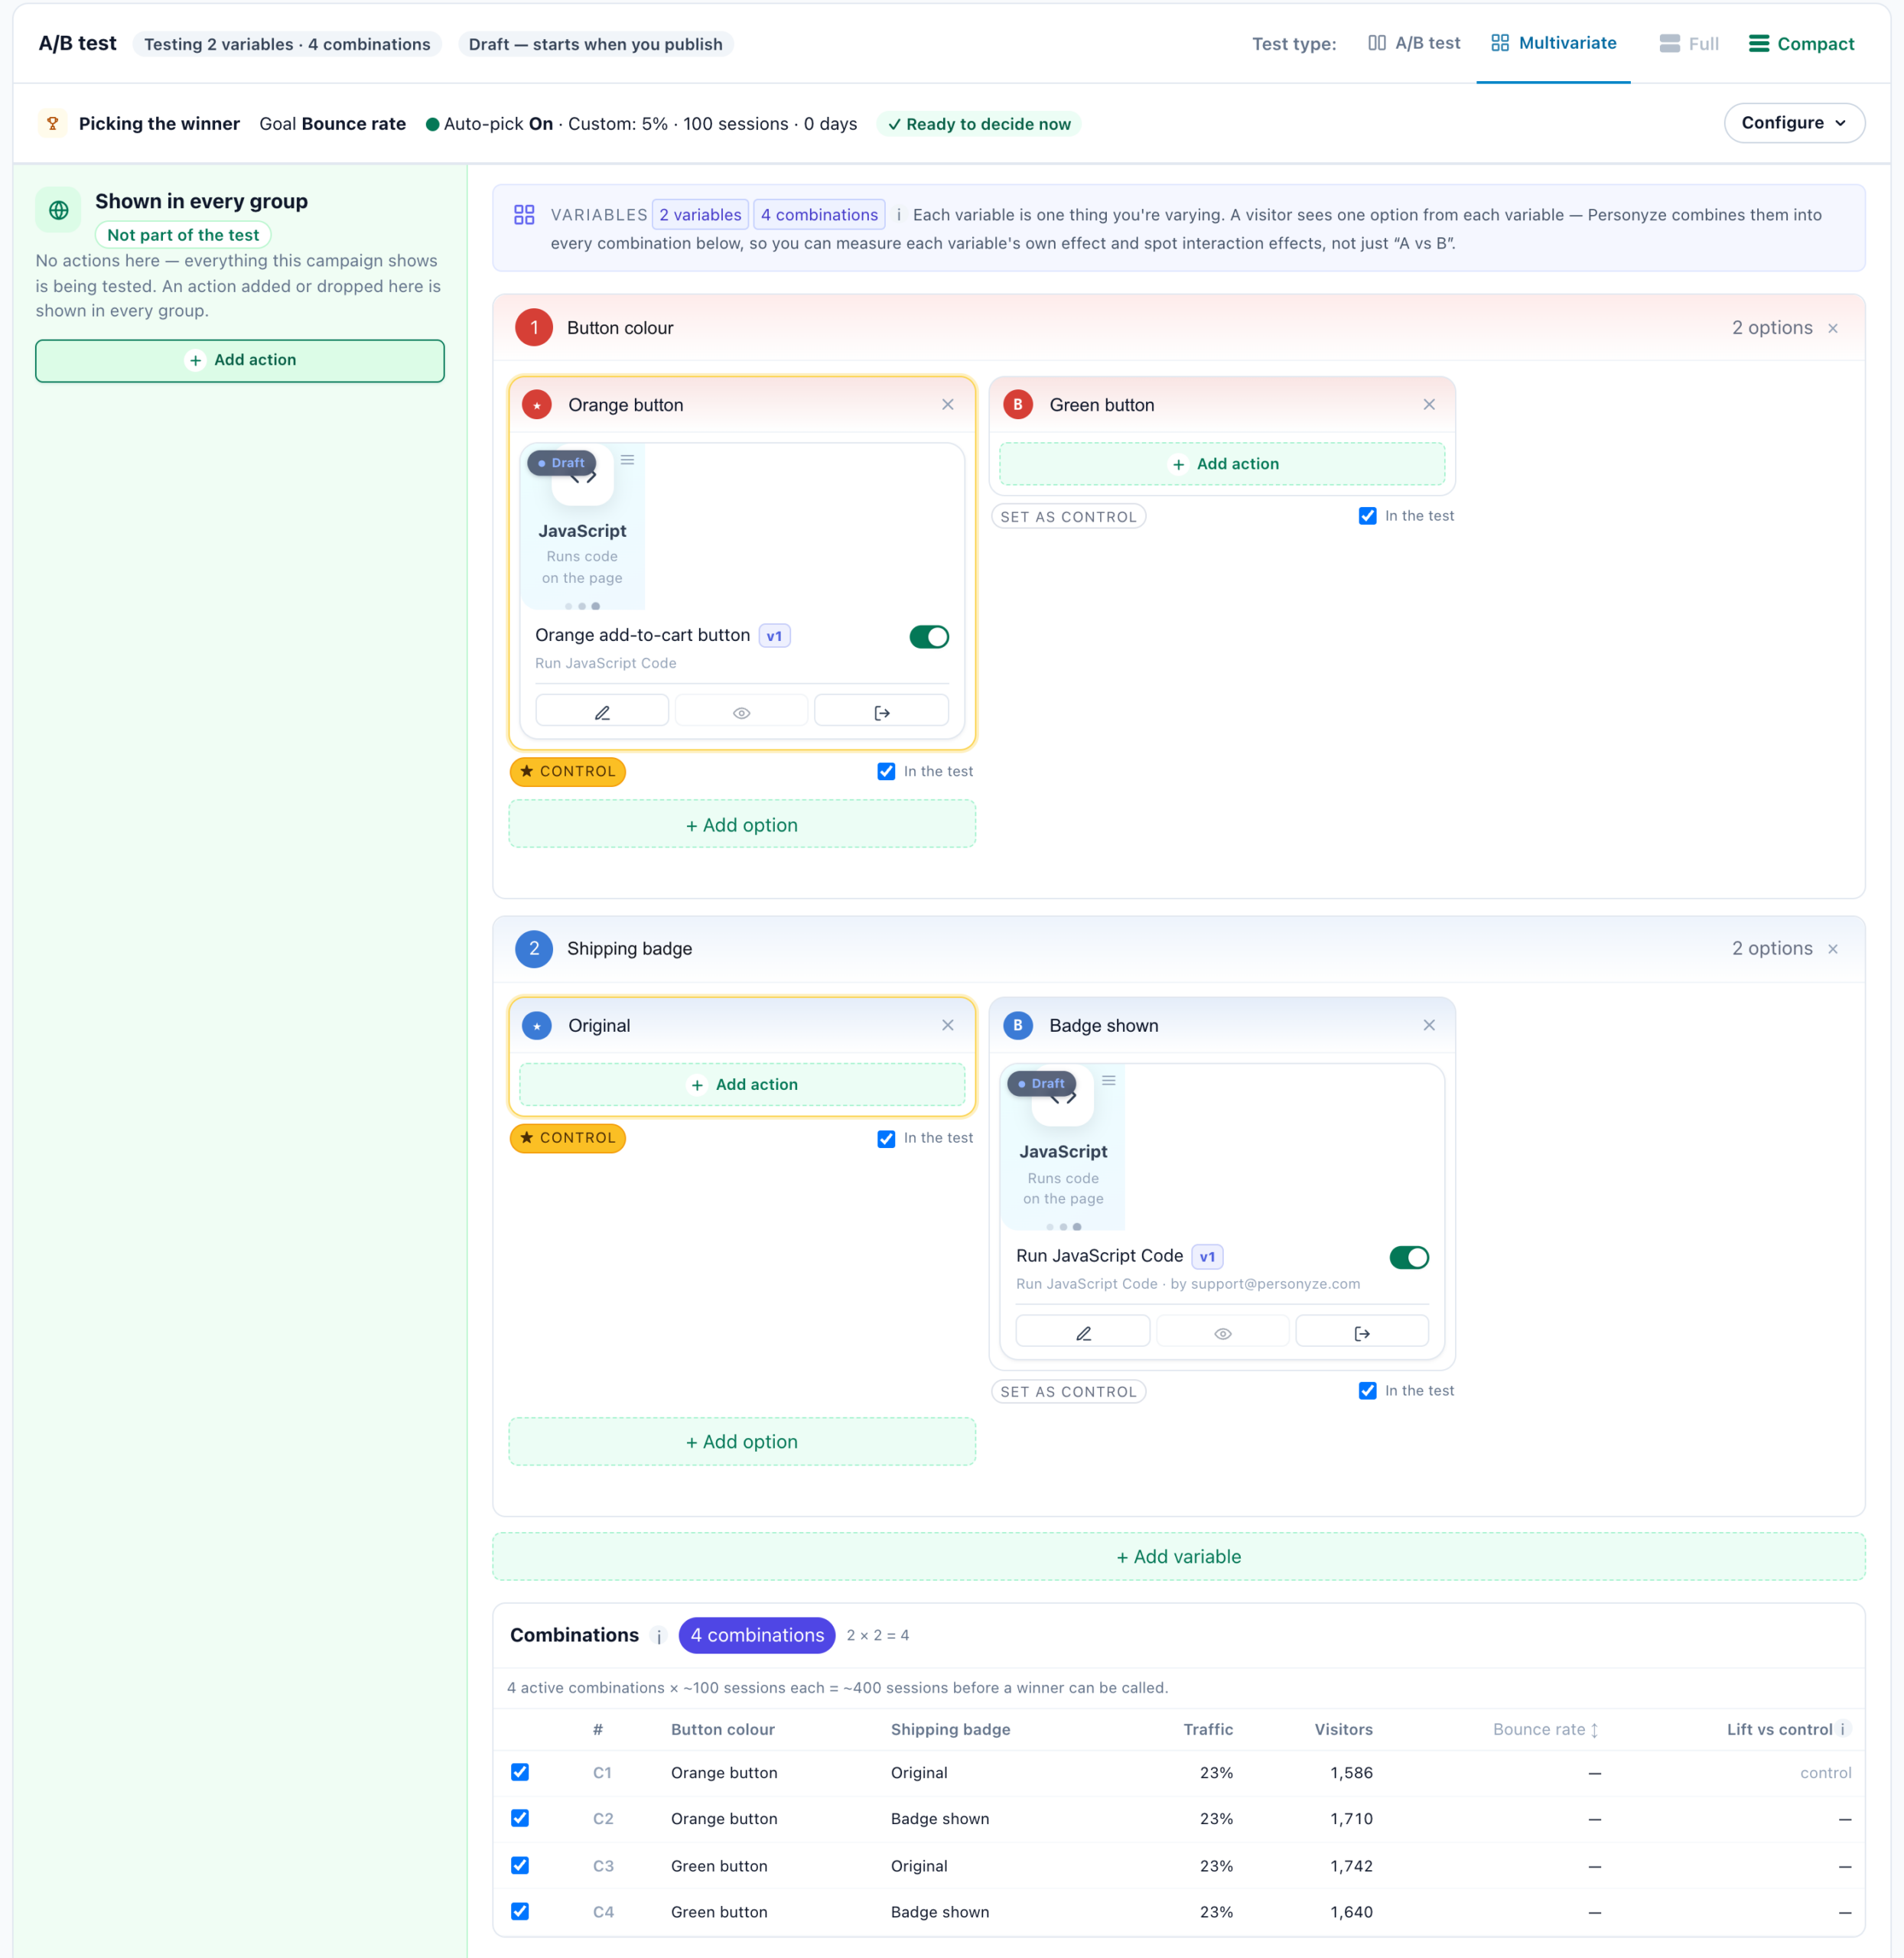
Because it measures each element’s individual impact and how elements interact, multivariate is the right choice when you want to know which specific change drove the result — at the cost of needing more traffic, since every combination has to accumulate enough data.
Reading the results
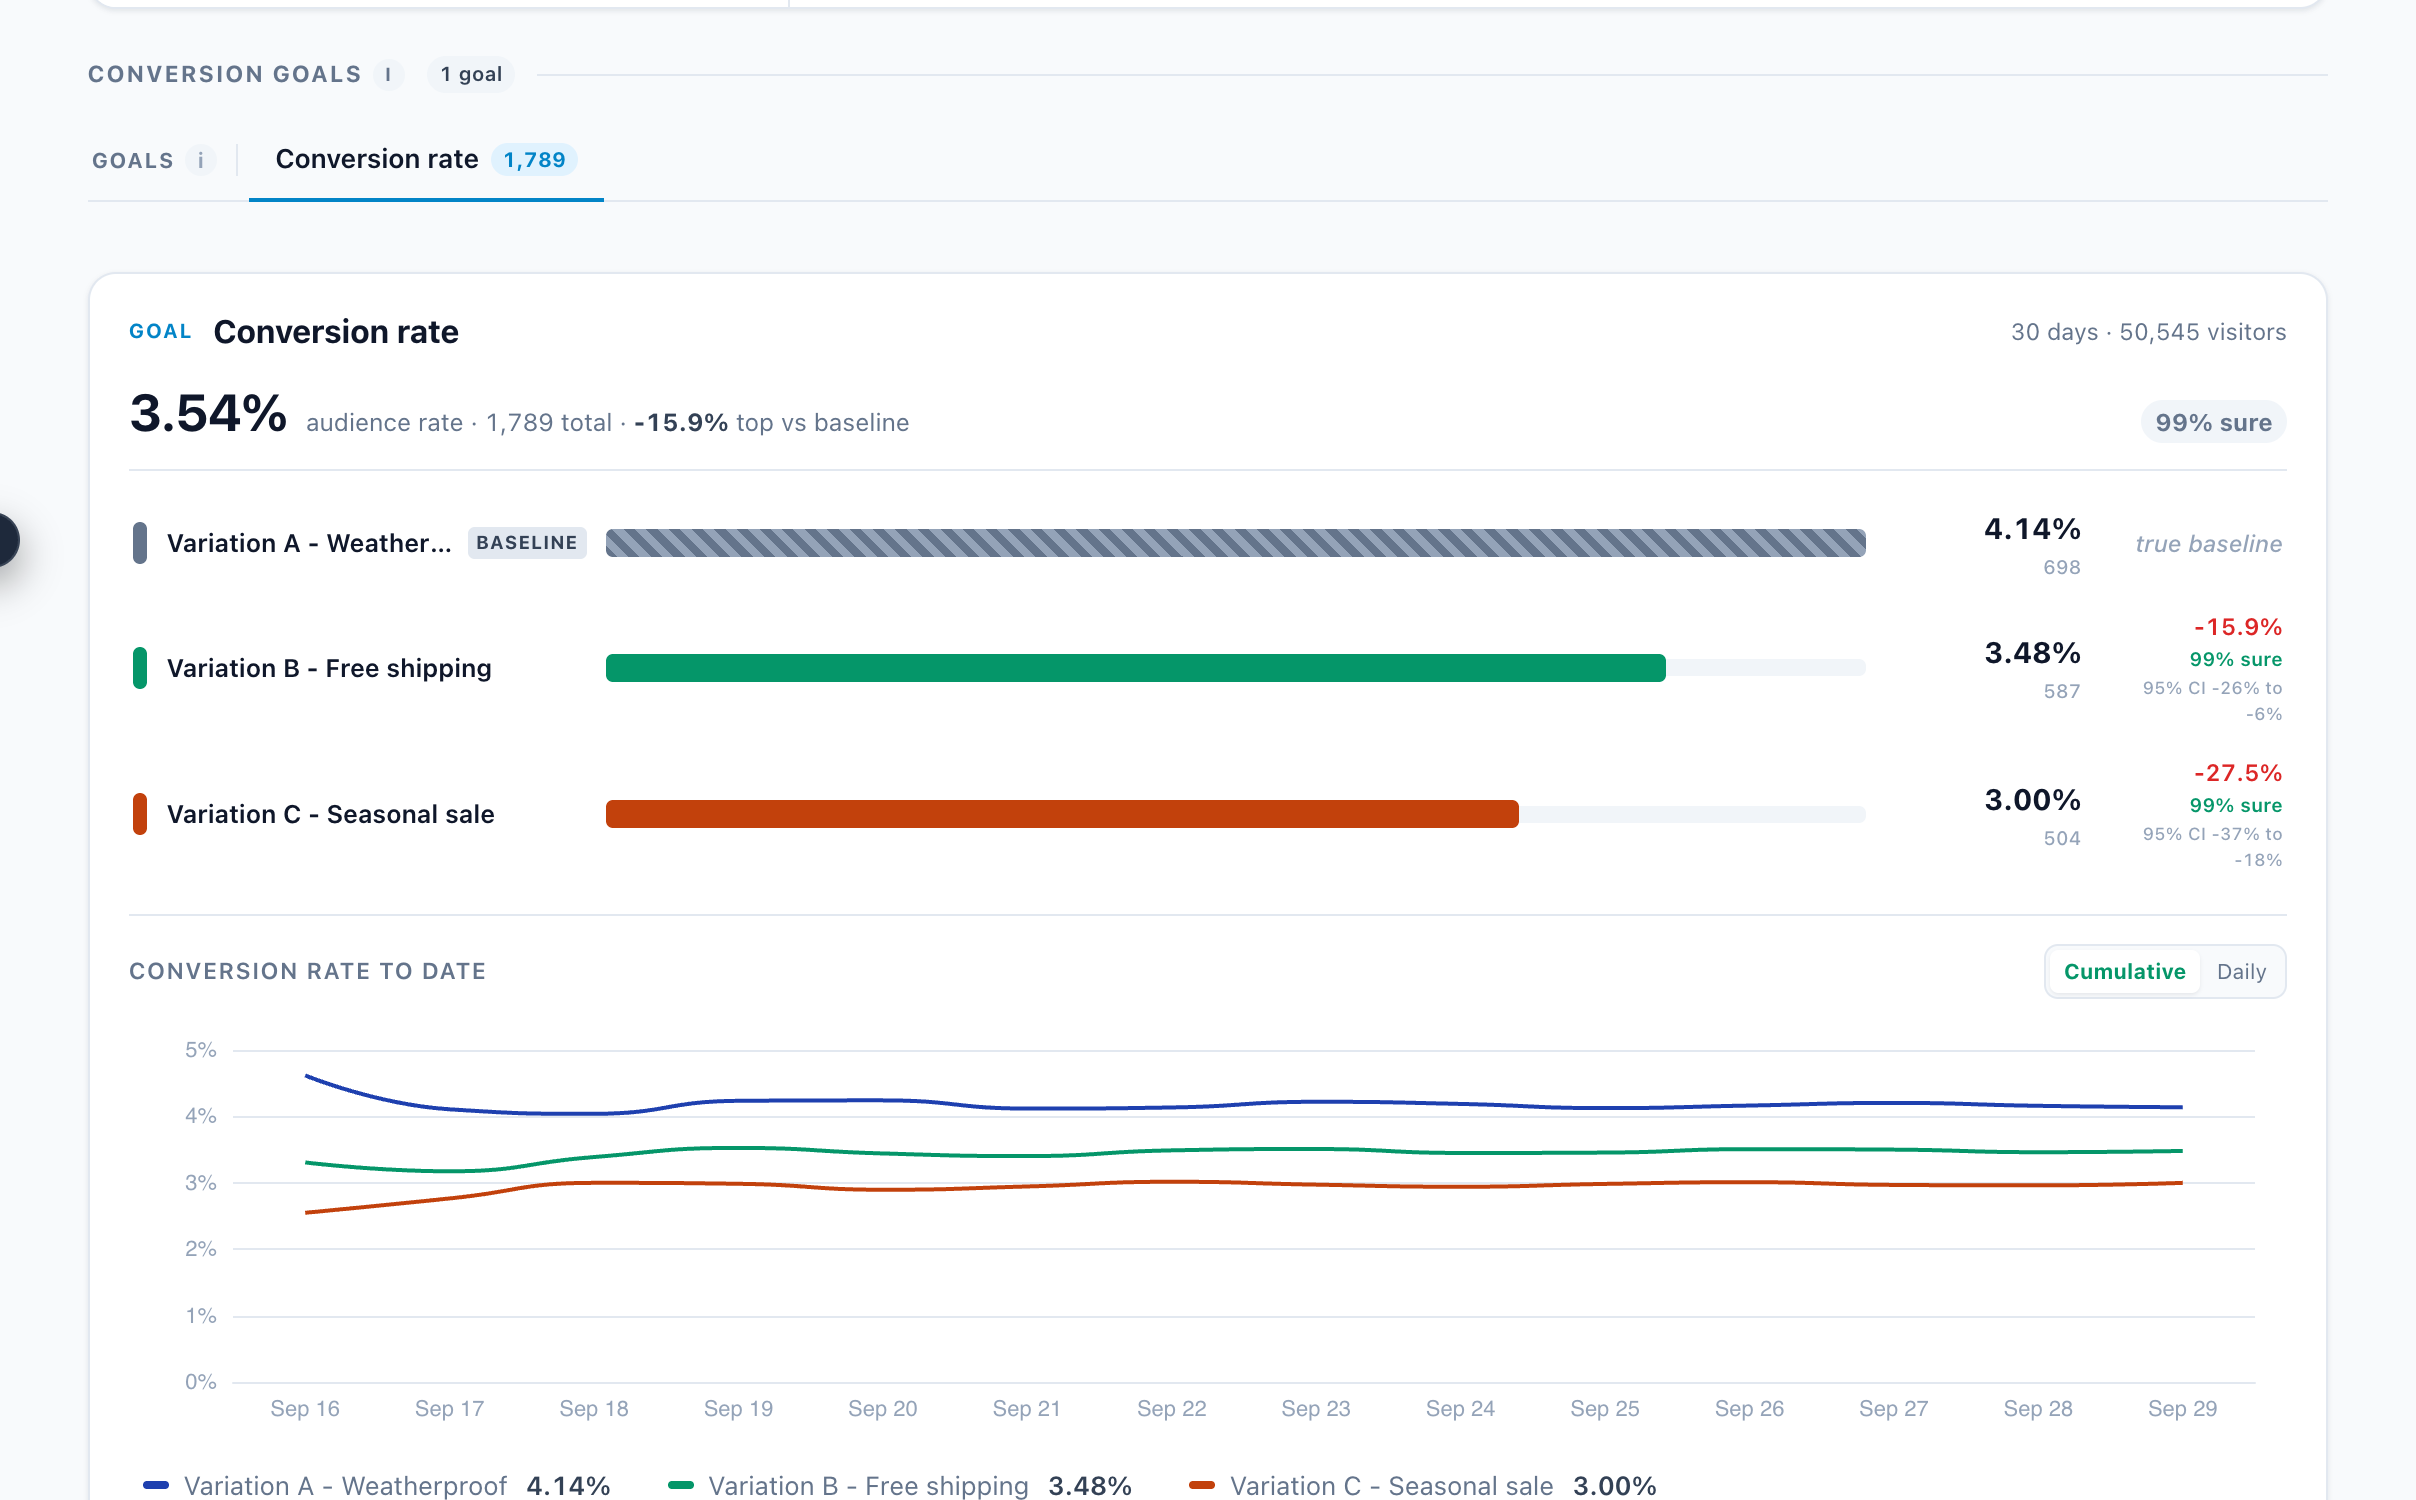
The results dashboard is built to answer one question first — which variation won, and can I trust it?
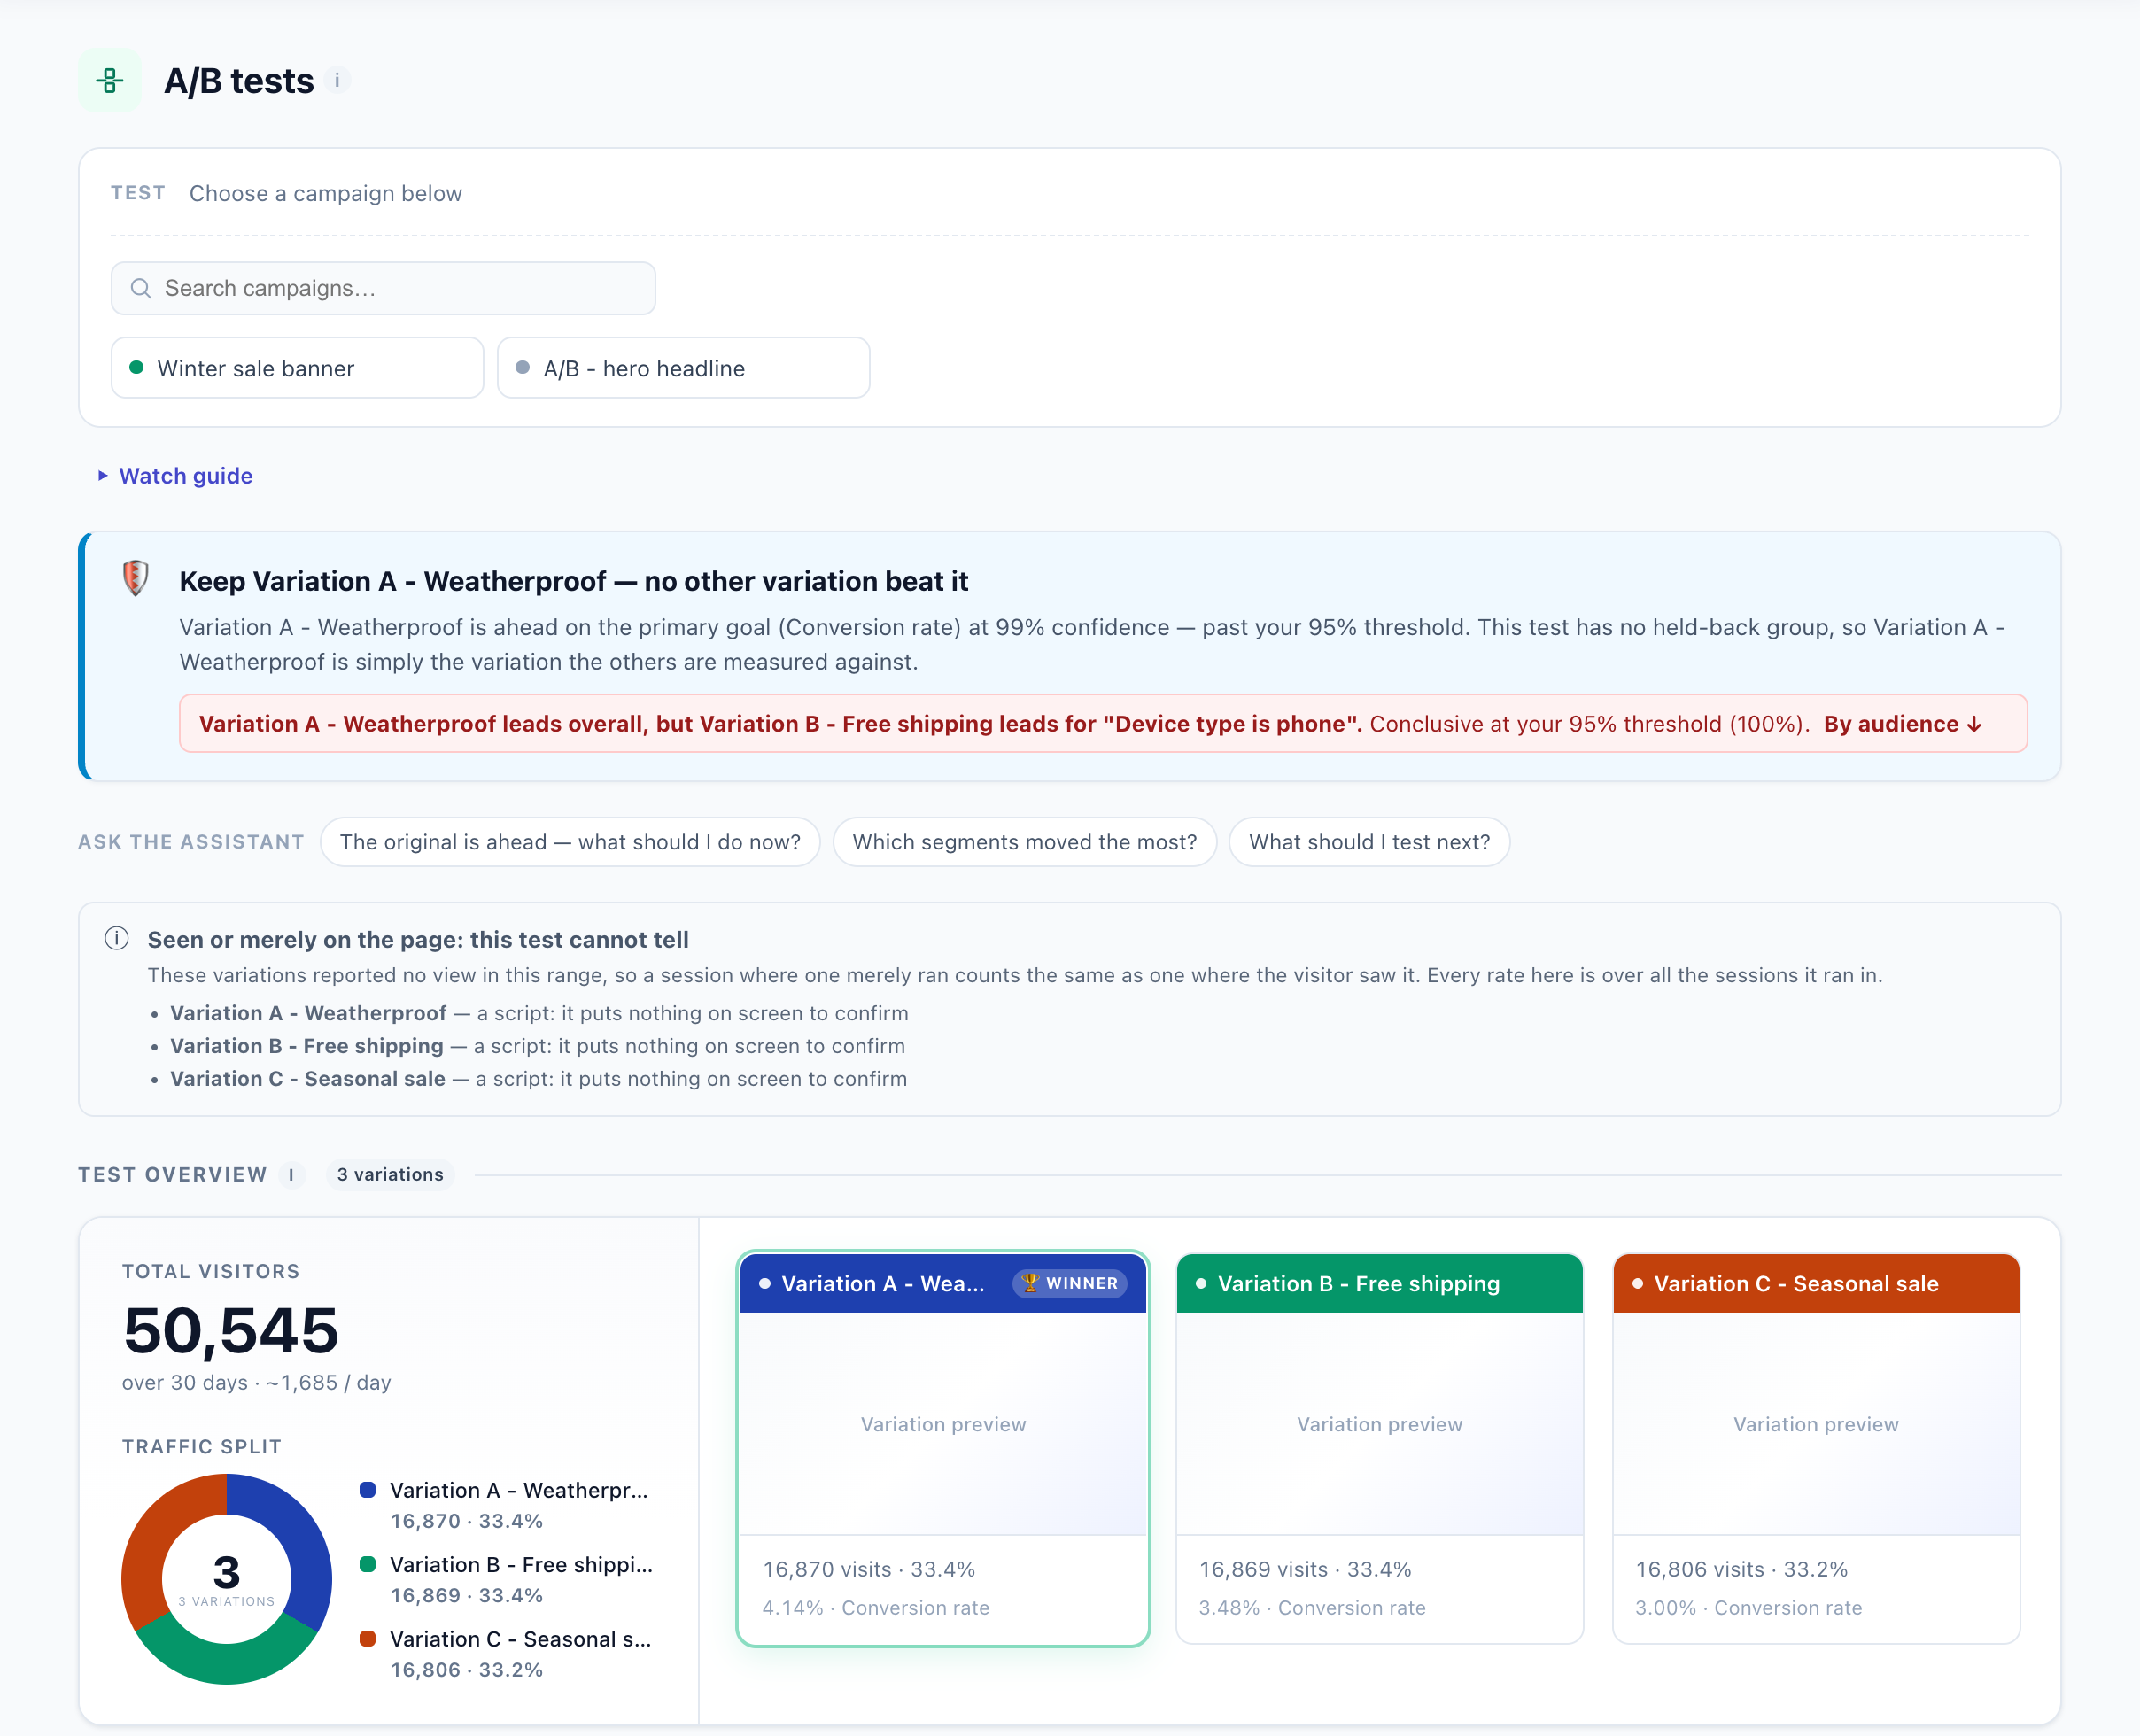
- Winner recommendation — when a variation reaches statistical significance on the goal, Personyze surfaces it at the top and offers to promote it in one click (in the example above, promoting Variation B on the strength of its social-proof treatment).
- Delivery-health alerts — the dashboard flags problems that would invalidate a result, such as a variation that under-delivered because a selector was missing on some pages. A “winner” built on broken delivery isn’t a real winner, and this stops you from acting on one.
- Summary KPIs — Visitors, Impressions, Delivered, Clicks, and Conversion rate for the whole test, with each variation compared side by side.
- Per-goal breakdown — if the campaign tracks several goals (say Trial signups, CTA clicks, and Demo requests), each is reported per variation, because a variation can win on one goal while losing on another.
- Daily performance & trend — how each variation performs day by day and how the conversion-rate gap is trending, so you can tell a stable lead from one that’s still swinging and avoid calling the test too early.
- Engagement detail — deeper interaction metrics beyond the headline conversion, for understanding why a variation is winning.
Full guide: A/B Testing.
Save as draft, Publish to staging, Publish to live
How you save a campaign decides who can see it. The campaign’s top bar has three buttons:
- Save as draft — keeps your work without showing it to anyone. Saving a draft of a campaign that is on staging or live takes it off: it is how you pause a campaign without deleting it.
- Publish to staging — the campaign serves only the staging audience: visitors in staging mode, never your real visitors. You are usually one already — Personyze puts visitors from the last three IP addresses used to save campaigns in staging mode. The arrow joined to the button opens the Staging mode panel: whether your IP is in staging, and a way to enter or leave it. Campaign statistics are not counted for staging visitors. This is where a campaign should be while you check it.
- Publish to live — the campaign serves every visitor who matches the audience.
The normal flow is: build → Publish to staging → QA it → Publish to live when it’s right. Staging mode is explained in Testing & QA.
QA before launch
The QA step opens on one card with the answer: Ready, or Almost ready with how many things to look at. Under it are four lines — Who it reaches, Tried it, It runs and Nothing in its way — each with Details behind it: the audience forecast, action delivery and overlaps. Be one of them opens your site as a visitor the rules match, and Does it look right? offers the other ways to see it. See The QA step for each line.
Before a campaign reaches real visitors, QA it with the QA Simulator. When you start QA, Personyze opens a small dialog asking for the page URL you want to preview on — you paste in the address of the page where the campaign should appear (your pricing page, a product page, the homepage), and Personyze opens that real page with the campaign injected, exactly as a matching visitor would see it.
Video: The QA simulator: test a campaign as any visitor, and ask the AI why (2:06) — it plays at the top of Testing & QA.
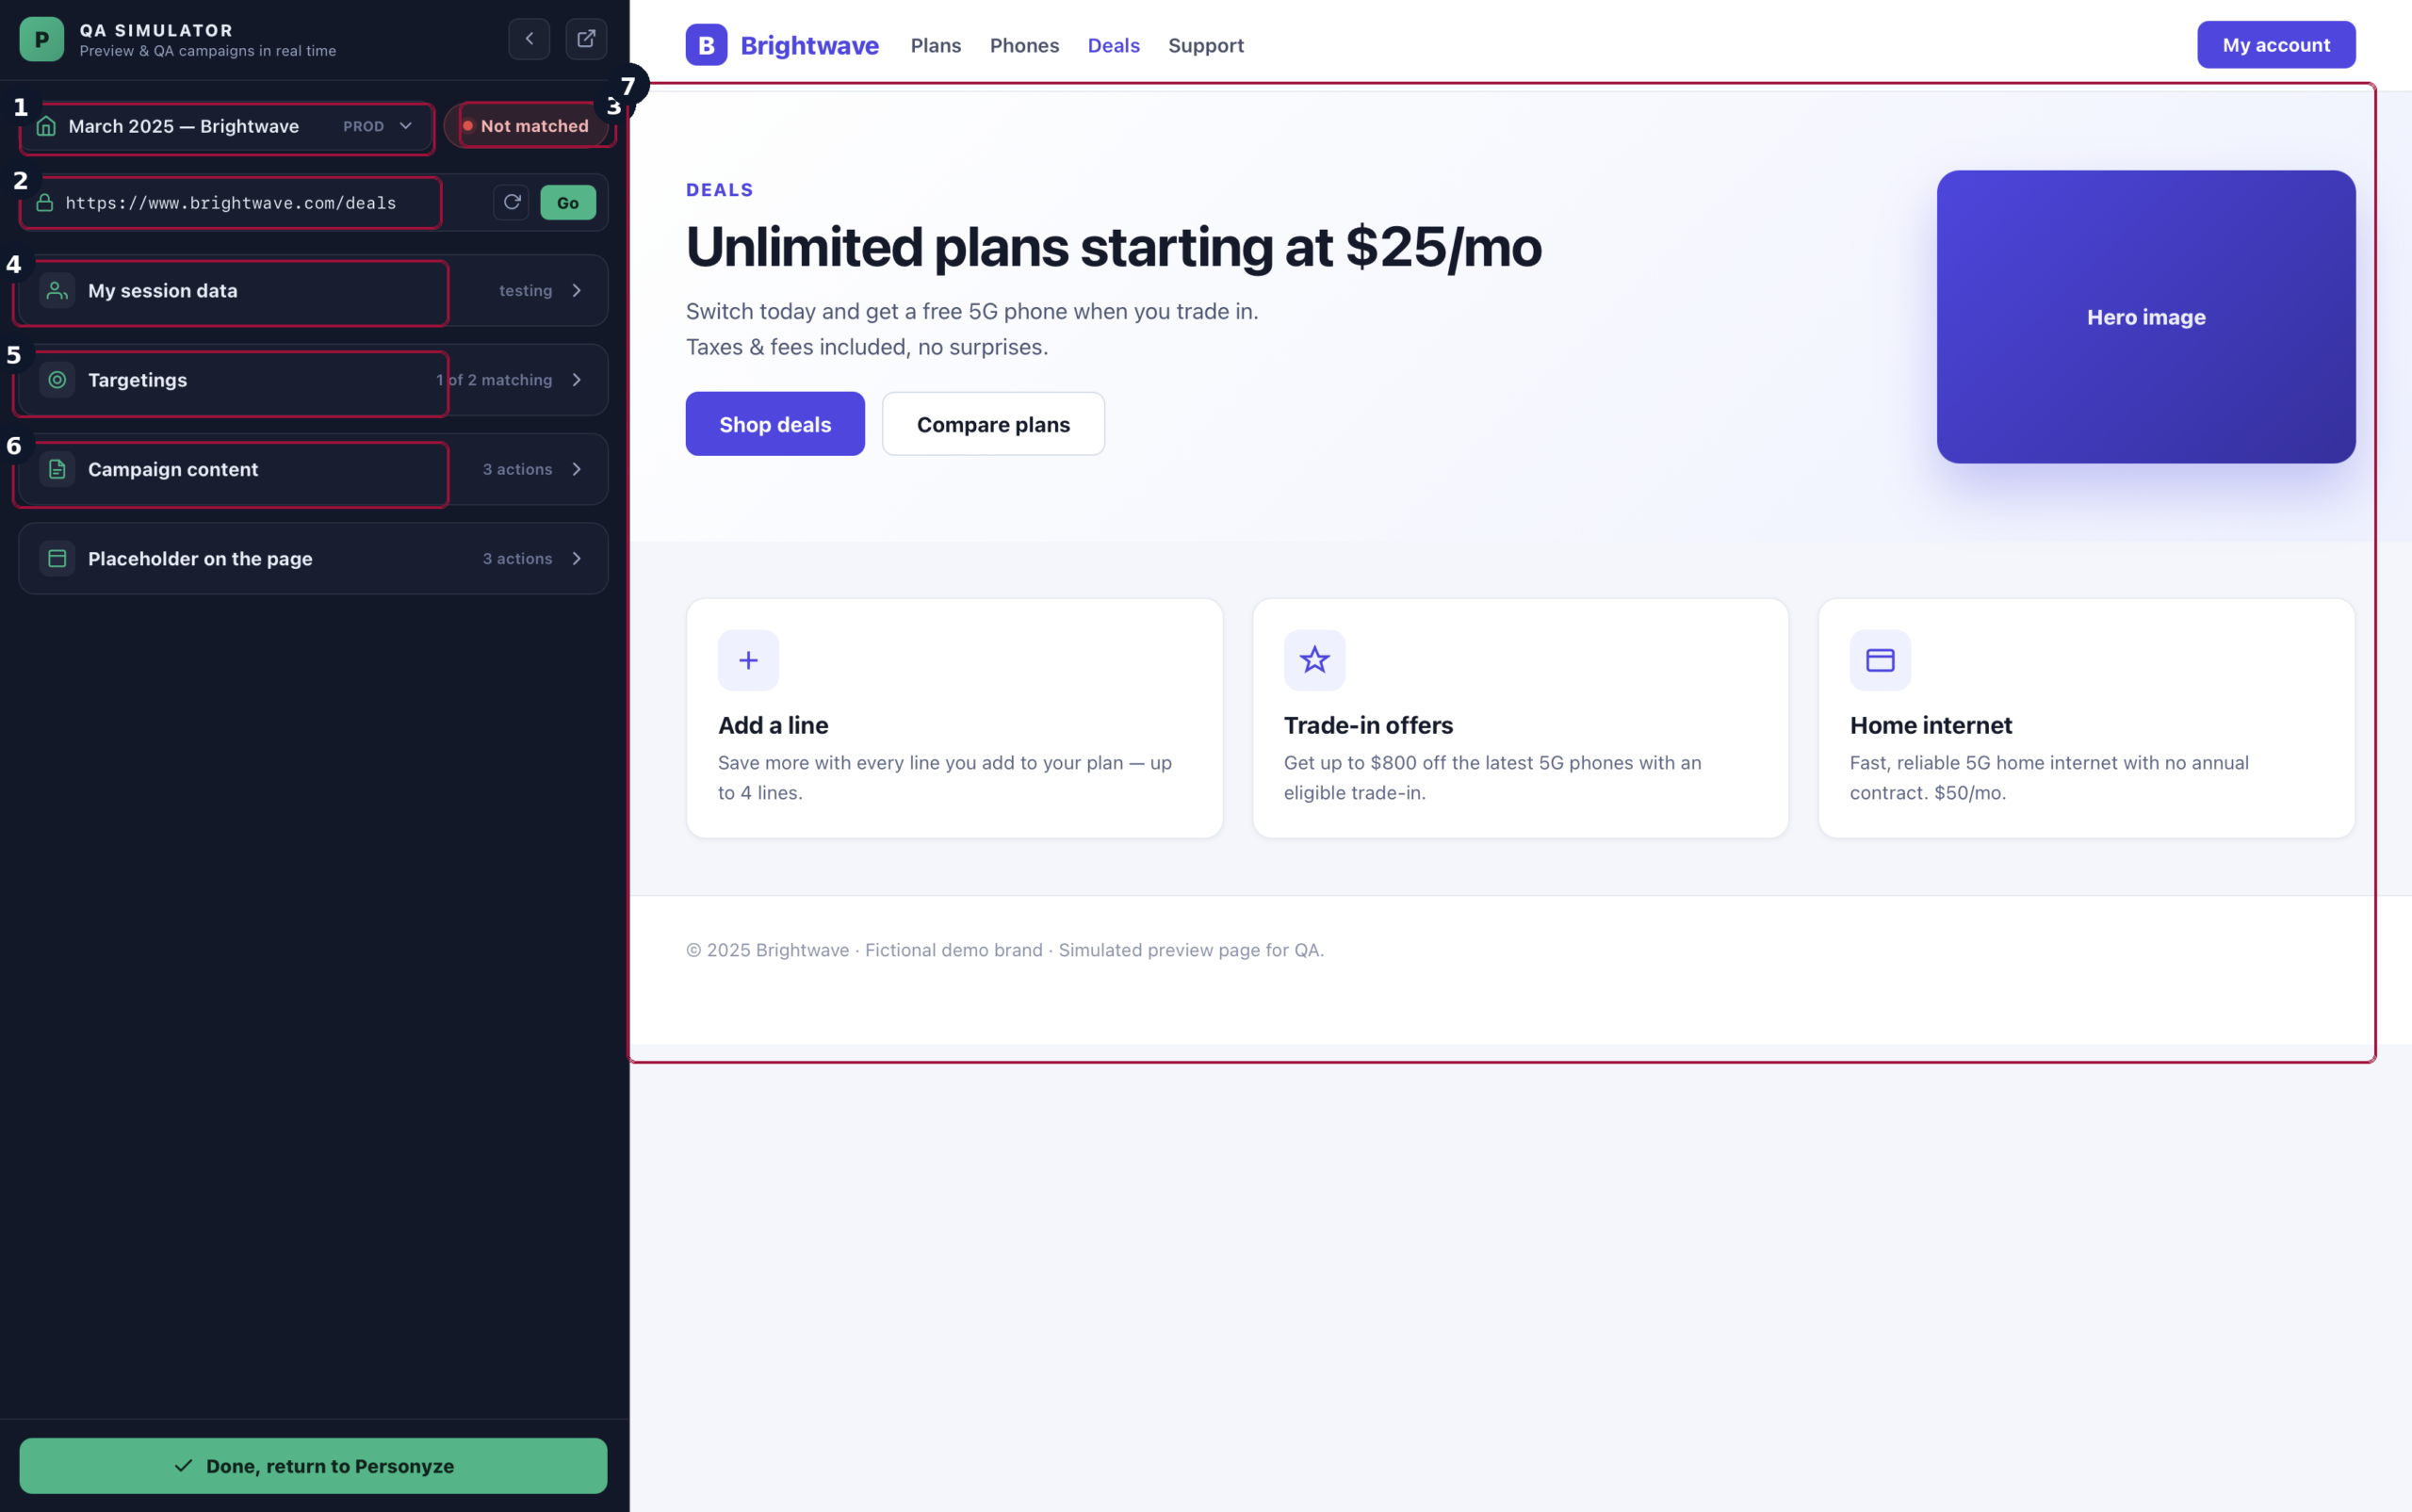
From there you can:
- Preview on any page — test the campaign on the specific URLs it targets, not just an abstract preview, so you catch selector and placement issues on the actual page structure.
- Impersonate a visitor profile — simulate any combination of audience attributes (returning vs. new, a CRM segment, a geo, a device) and confirm the campaign shows — or correctly stays hidden — for each one.
- Check the rendered result — placement, timing/trigger, personalization tokens resolving from the profile, and how it interacts with any other campaign competing for the same visitor — all without affecting live traffic.
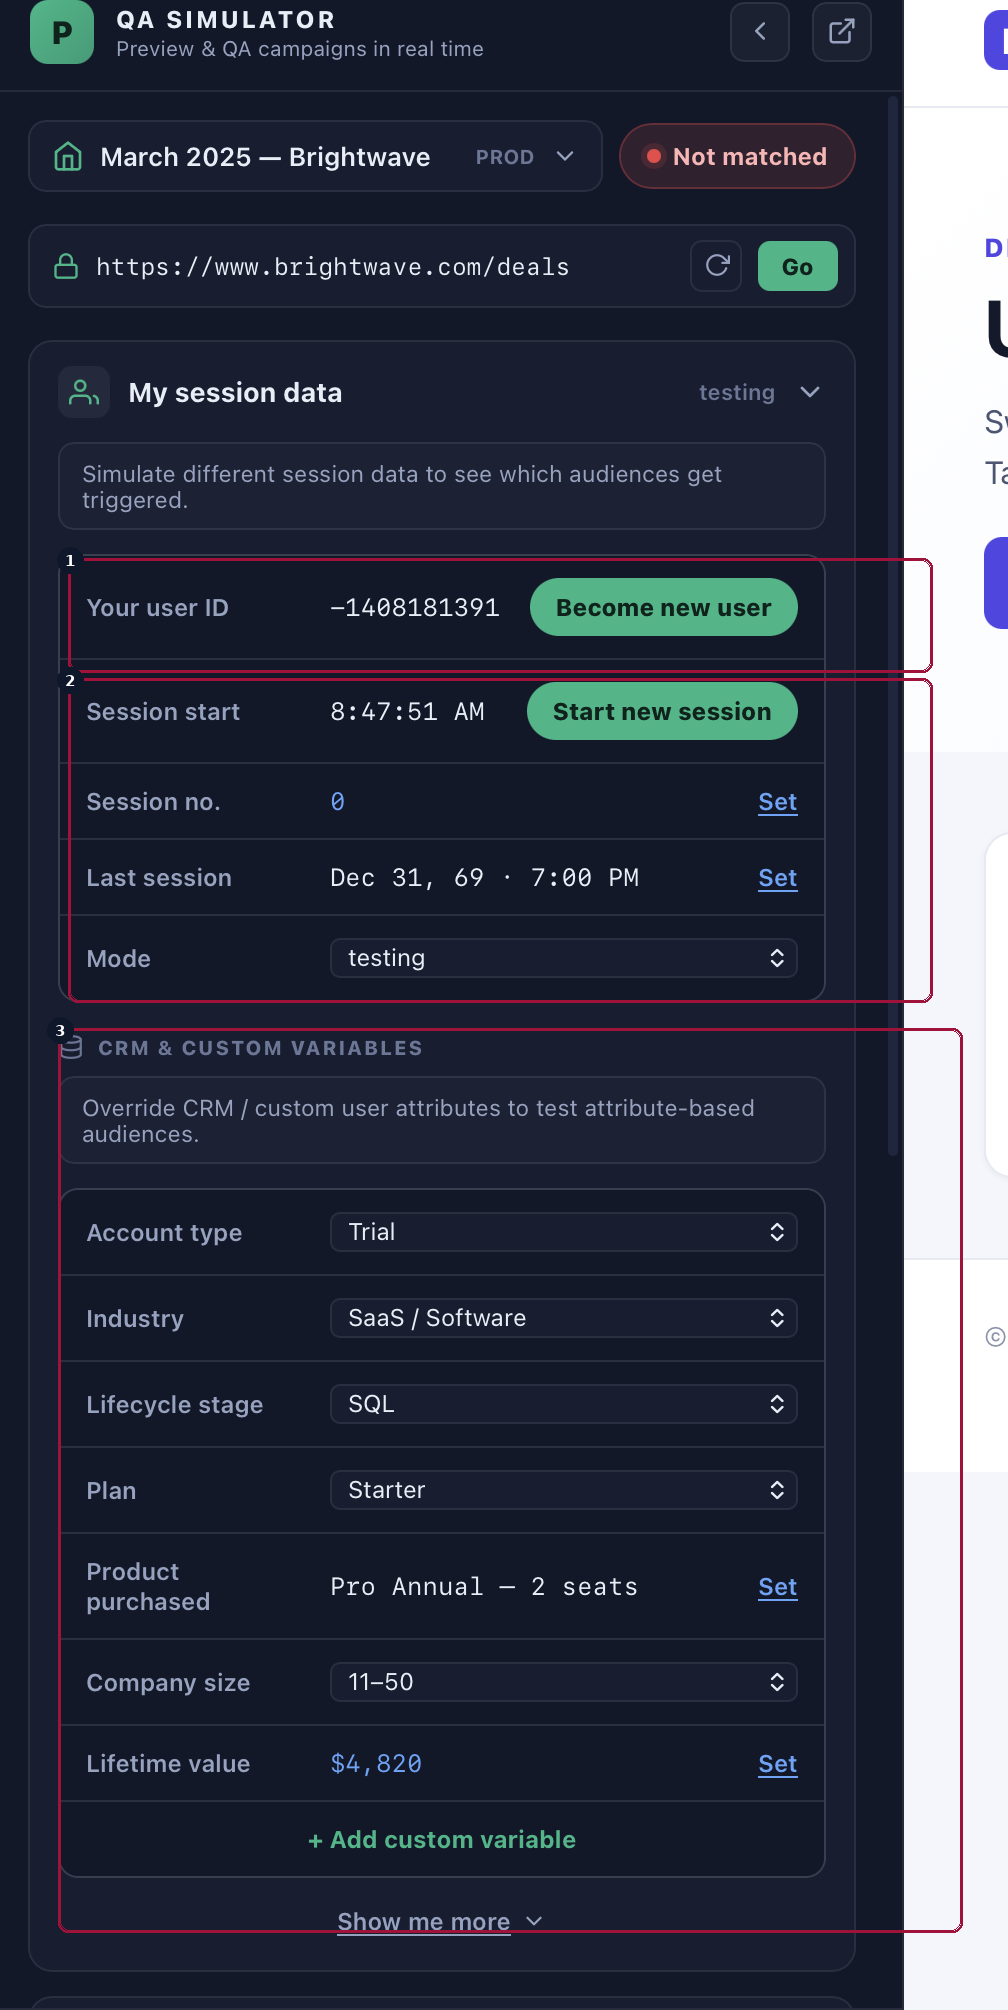
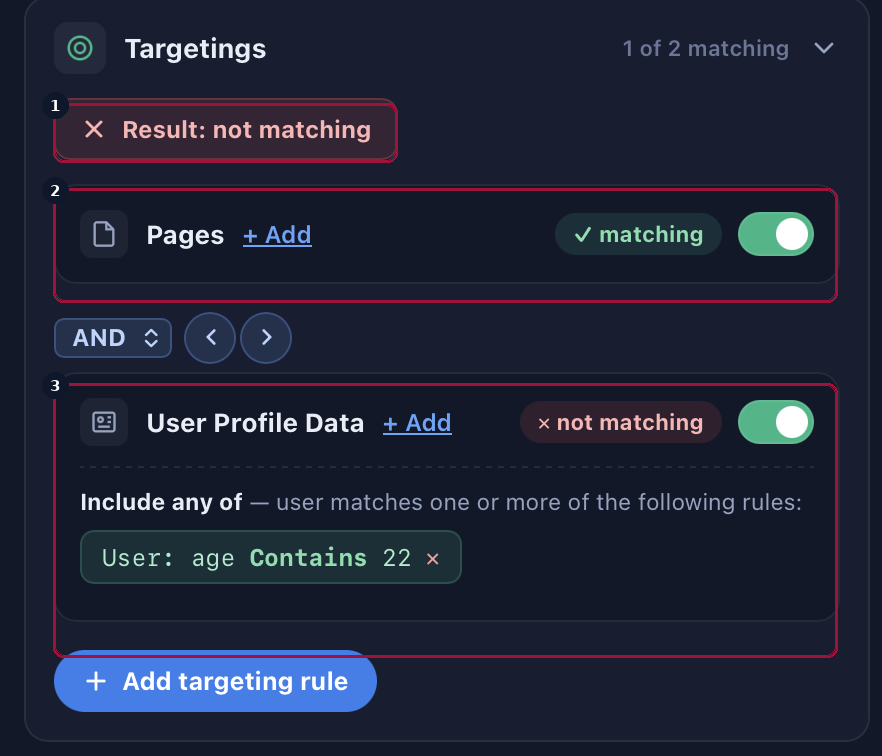
Publish to staging and QA it there first, fix anything the simulator surfaces, then publish the campaign to live.
Manage a campaign: duplicate, versions & delete
Once saved, a campaign lives in your campaign list, where every campaign shows its status and live metrics (impressions, CTR, conversion rate, revenue). Expand any row for a quick overview, or use the row’s actions to edit, pause, duplicate, or open its performance report. How to find a campaign in a long list, what the status pills and the next step on a row with no numbers mean, and Quick views and filters: see The campaign list.
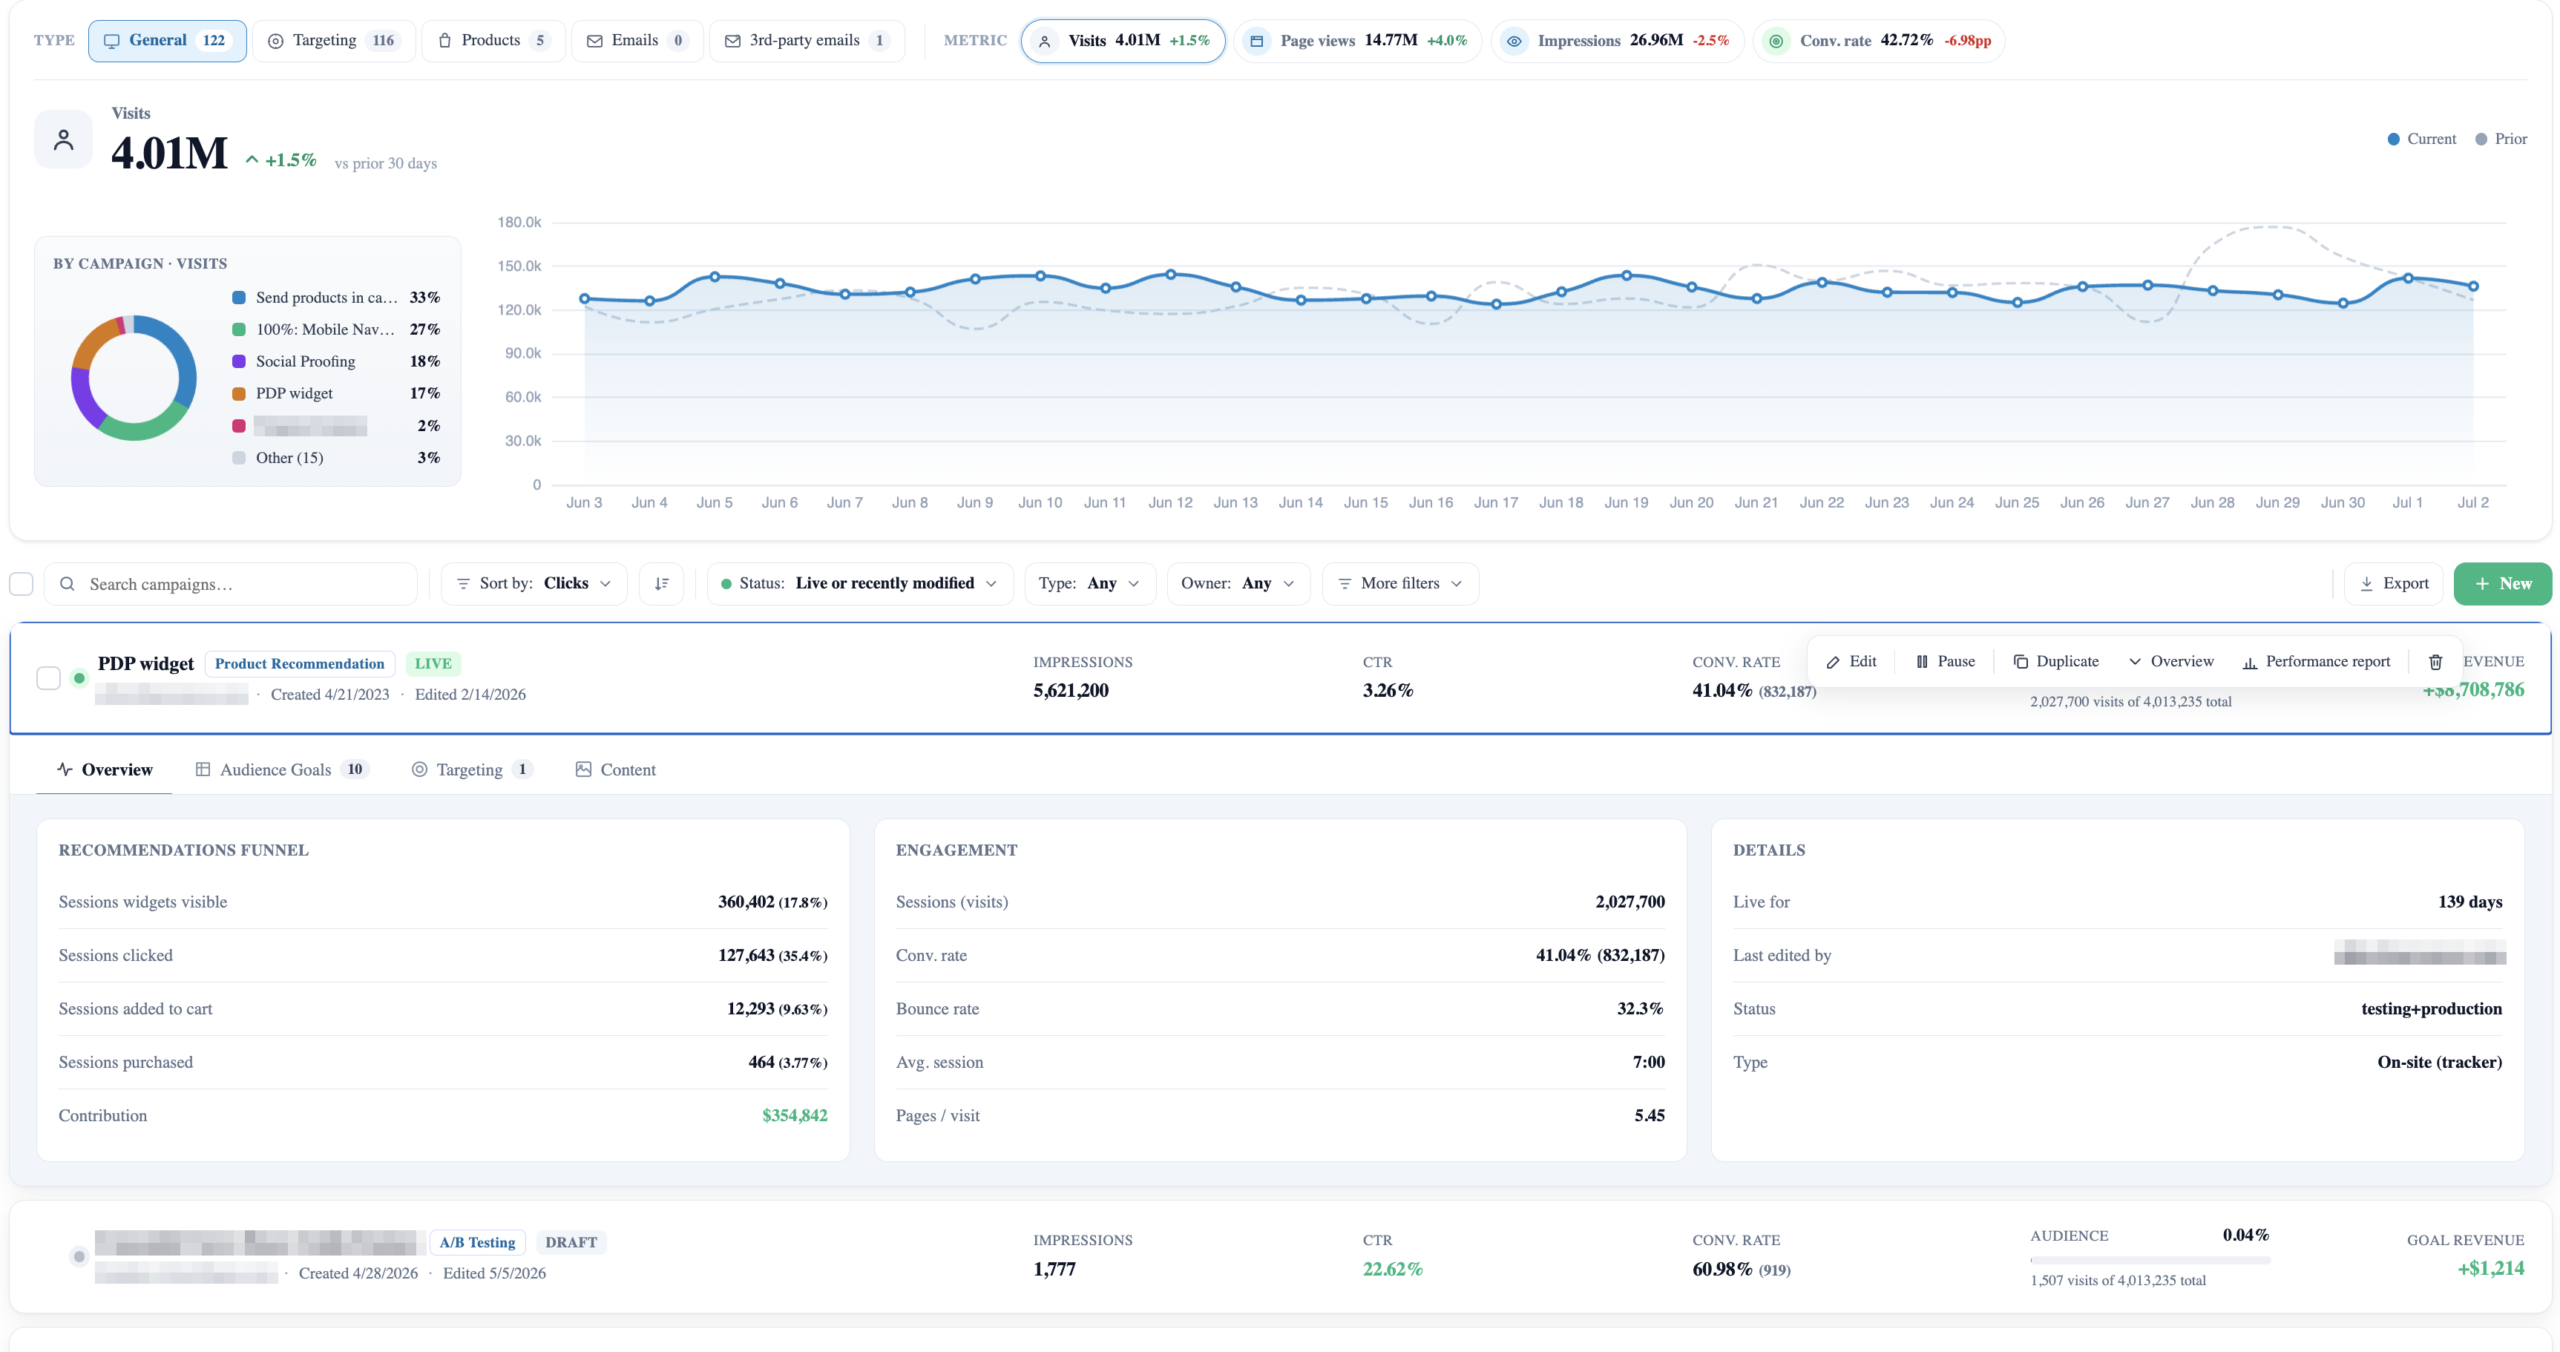
Every campaign has a “⋮” menu in the top bar with four housekeeping actions: Preview (open the live experience exactly as a visitor would see it), Version history (browse previous saved versions and restore one), Duplicate campaign (make an editable copy), and Delete campaign (permanently remove it).
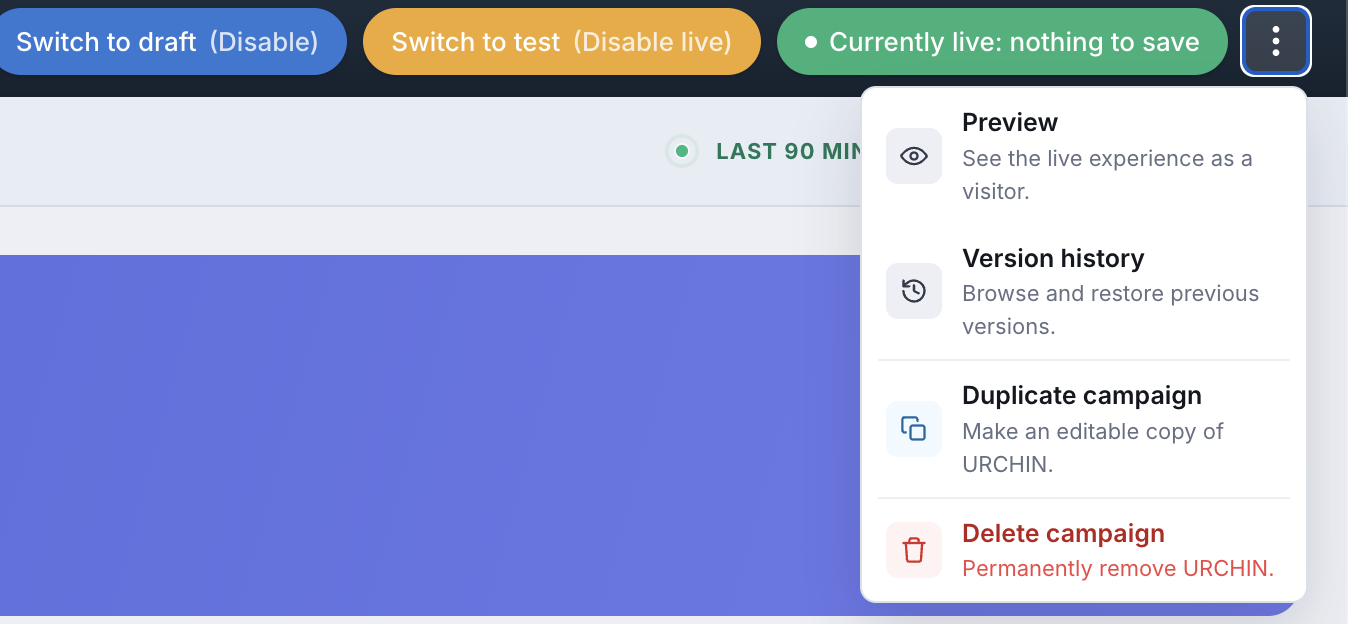
When a campaign works, you rarely build the next one from scratch. Duplicate the campaign to get a copy as a new draft, with its audience rules and settings. Choose With actions to copy its actions too, as new independent ones that edits to the copy don’t touch in the original, or Without actions for the campaign shell alone. It’s the fastest way to:
- Reuse a proven setup — clone a winning campaign and change just the audience (e.g. run the same offer for a different country or segment).
- Try a bigger change safely — duplicate, experiment on the copy, and leave the original running untouched.
- Template your work — keep a well-built campaign as a starting point you duplicate whenever you need the same structure.
The duplicate always starts as a draft, so cloning never accidentally pushes a second campaign live.
Measure performance
Once the campaign is live, the campaign performance dashboard shows aggregate performance against the primary goal and every action: how many visitors saw the campaign, which actions they clicked, how each action performed vs. the prior period, and where traffic is coming from.
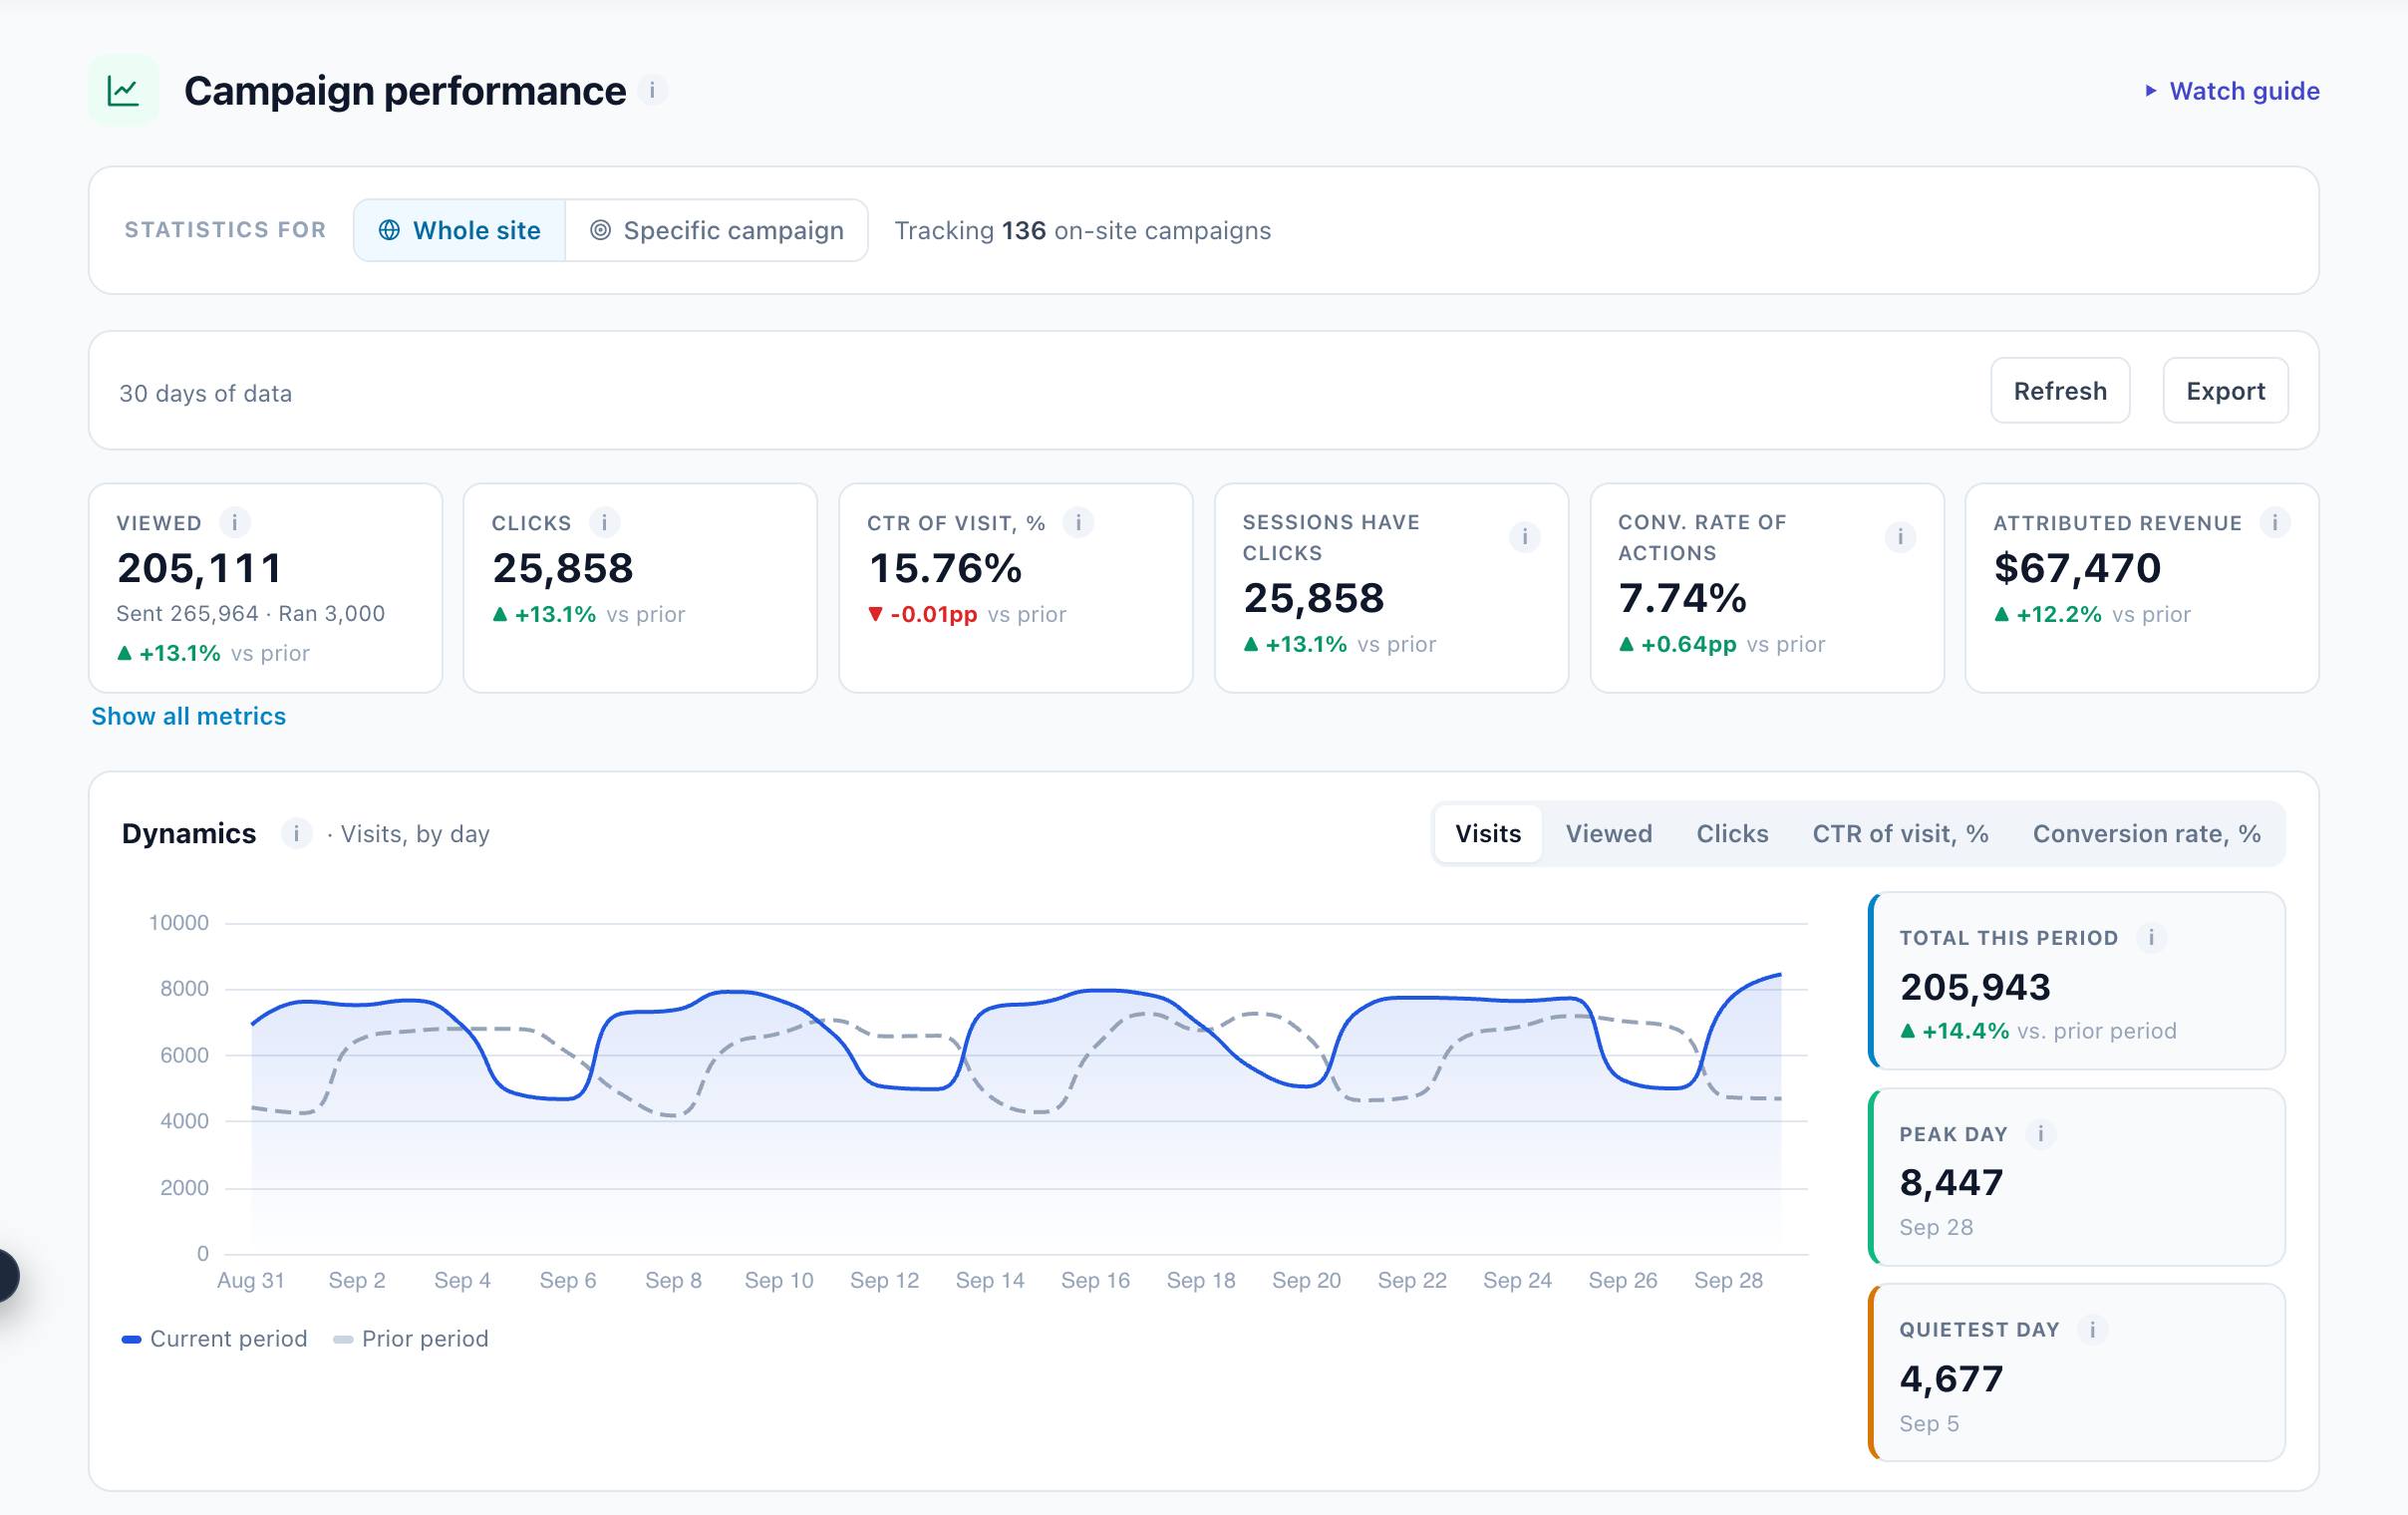
What the performance view shows:
- Visits over time — daily volume of visitors in the audience, so you can spot delivery gaps, traffic-source shifts, or day-of-week patterns.
- Actions clicked — click-through per action inside the campaign, ranked from best- to worst-performing. Actions with low CTR are called out as candidates to redesign or remove.
- Action performance & conversions — conversion attribution per action against the campaign’s primary goal, compared to the prior reporting period.
- Comparison to prior period — every KPI is shown vs. the same length of time immediately before, so you can see whether performance is trending up, flat, or declining.
Reading the numbers: One campaign’s Performance step on the Performance Metrics page explains every figure on this screen and how to read it.
Drill into individual visitors
Aggregate numbers show what’s happening; the user report shows who it’s happening to. Every visitor who interacted with the campaign is listed with their full session context — the pages they visited, actions they saw, what they clicked, and what they bought (or didn’t).
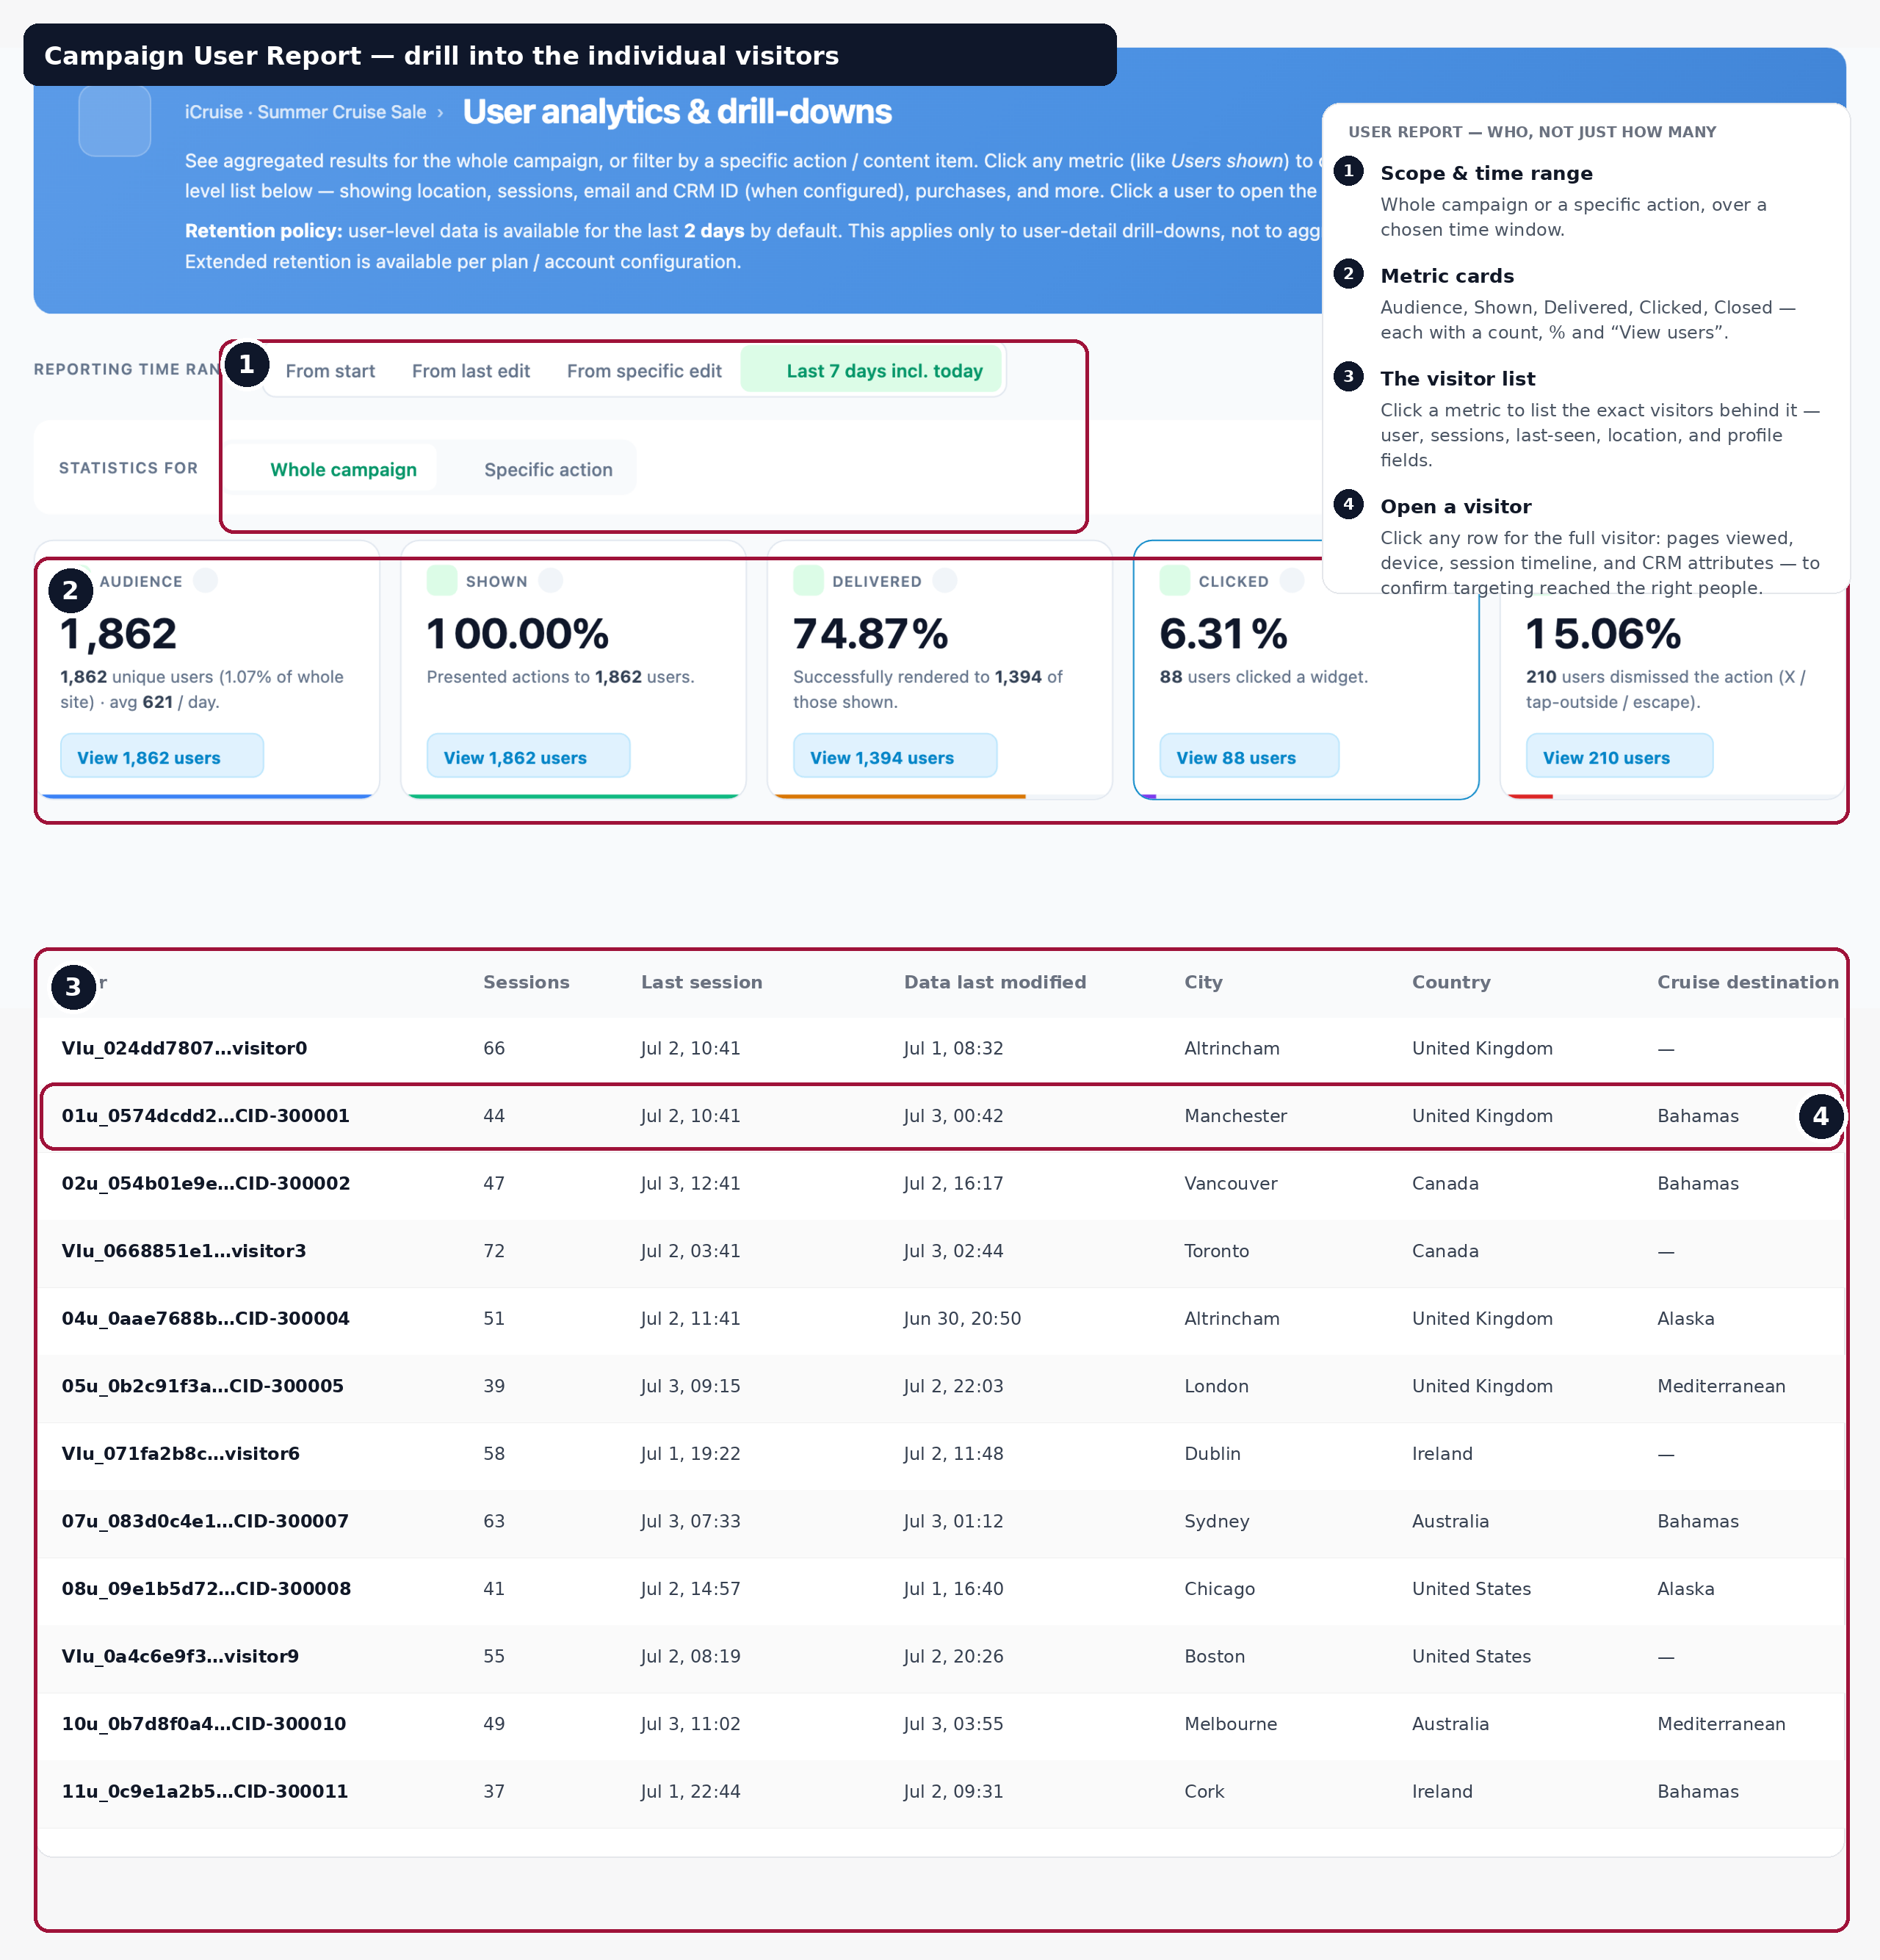
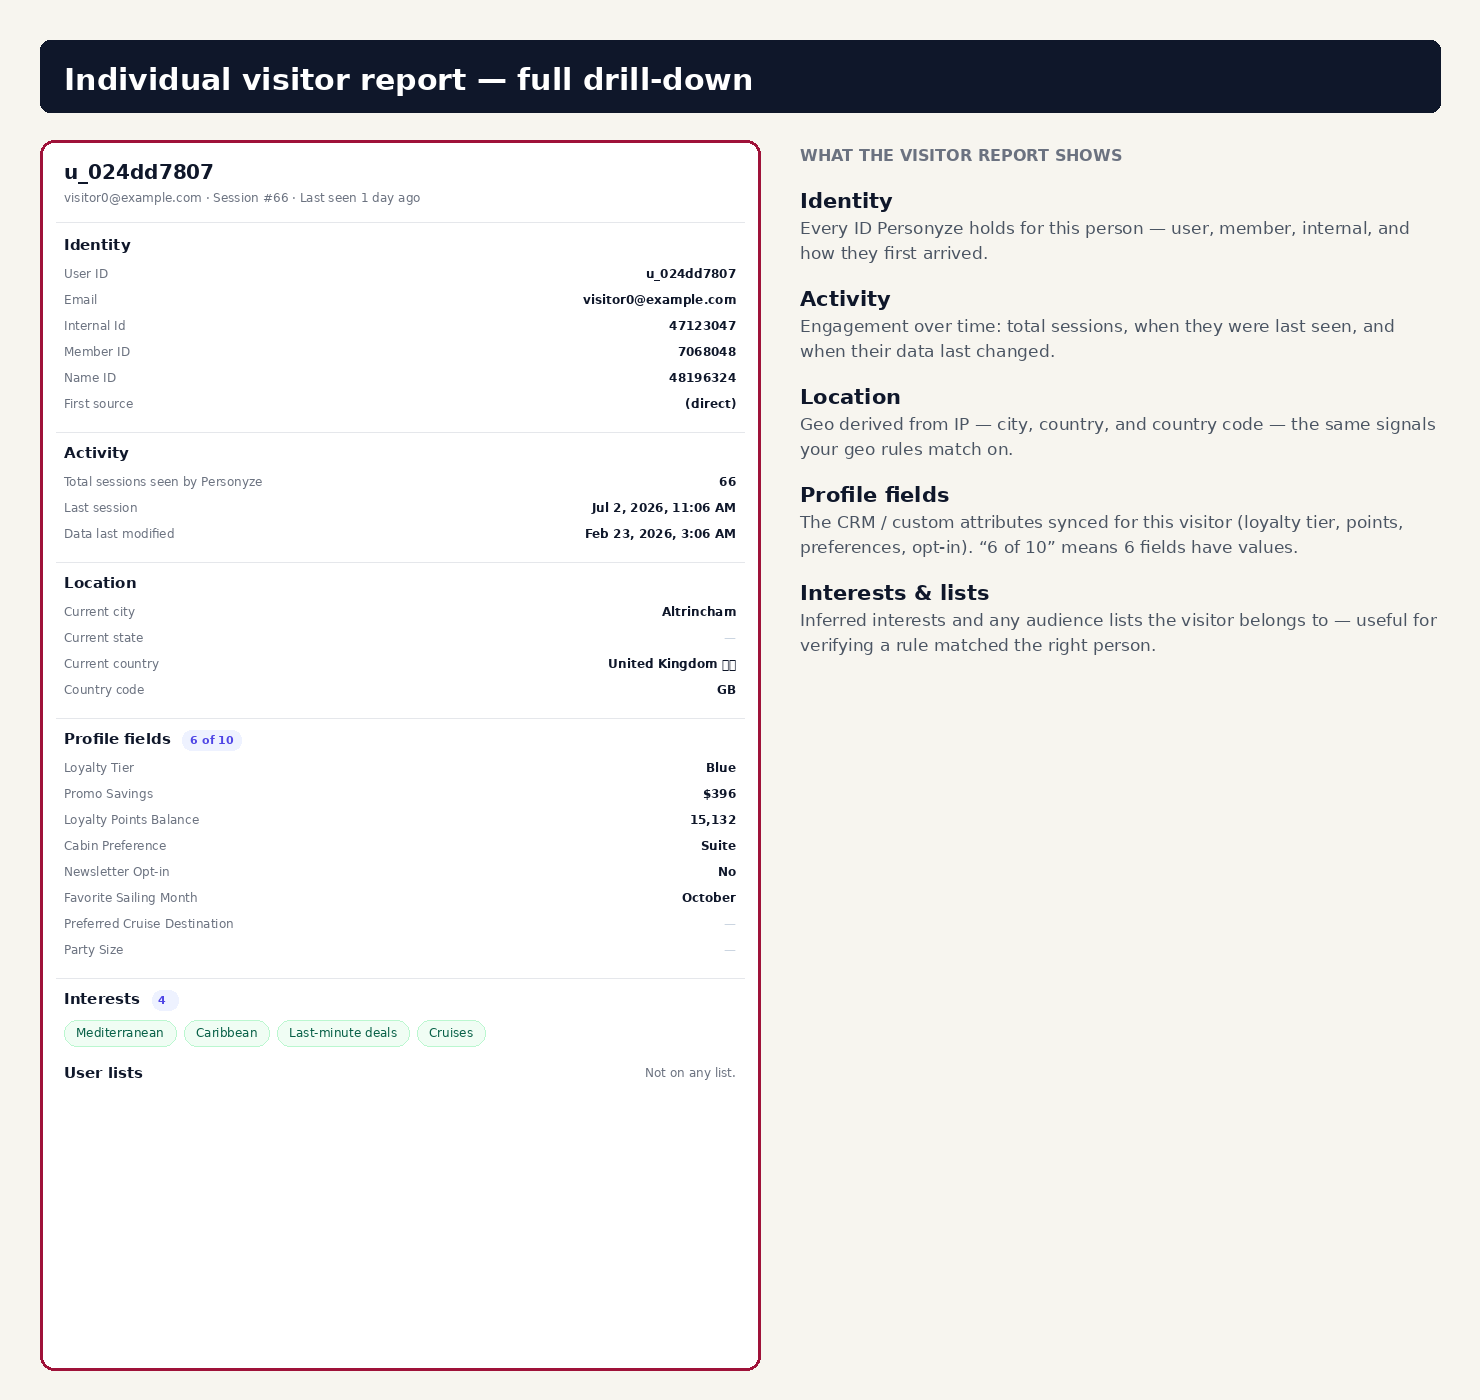
What the user report is useful for:
- Qualitative patterns — read individual visitor sessions to see what real users experienced. Aggregate numbers hide the story; individual sessions reveal it.
- Diagnosing under-delivery — when a campaign should be reaching more visitors than it is, drilling into specific sessions often reveals the cause (an audience rule too strict, an action selector missing on some pages, a trigger not firing on mobile).
- Sales / CS follow-up — for B2B use cases, filter the report to a specific known account or CRM contact to see exactly what marketing content that person has been exposed to.
- Internal IDs — if you’re passing a CRM ID or user ID as a Personyze internal identifier, the report links visitor sessions across devices and stitches them into a single user timeline.
Before you launch: a quick checklist
Run through this before you publish a campaign to live:
- Audience defined? The forecast shows a sensible would-match count — not zero, not half your traffic — and spot-checking individual visitors confirms they’re the right people.
- Content correct? Every action previews the way you expect, and any Split Cases resolve to the right variation per audience.
- Overlaps handled? If this campaign can collide with another, the audiences share a group with priorities set.
- QA passed? You published to staging, ran the QA Simulator and fixed anything it surfaced.
- Published the right way? Staging while you’re still verifying; publish to live only when it’s ready for real visitors.
Once live, watch the performance dashboard and drill into individual visitors to confirm the campaign is doing what you intended.
Frequently asked questions
How does targeting work in Personyze?
You build an audience from rules — location, device, pages viewed, behavior, referrer, UTM, weather, CRM data, and more. Rules join with and / or / only one, can be grouped, and each rule is set to Include or Exclude. Visitors who match see the campaign’s content.
Can I create an audience without building rules manually?
Yes. The AI Targeting Assistant lets you describe your audience in plain English (e.g. ‘mobile visitors from Germany who haven’t subscribed’) and generates the rule set for you, which you can then edit.
What happens when a visitor matches more than one campaign?
Group priority decides. Personyze evaluates audiences in priority order, so you control which campaign wins when audiences overlap.
Can I A/B test a personalization campaign?
Yes. Split your audience across variations; Personyze tracks impressions, clicks, and conversion rate per variation and can automatically reallocate traffic to the winning variation.
How do I preview a campaign before it goes live?
Use the QA Simulator to view the site as a specific visitor, confirm which audiences match, and check that each action renders correctly — all before publishing.
What metrics does Personyze report for a campaign?
Impressions, click-through rate, conversion rate, audience reach, and goal revenue per campaign — with the ability to drill into individual visitor sessions.
Related
- Targeting Rules in Personyze — every audience rule type with examples
- Resolve Audience Overlaps and Conflicts
- Page Groups — reusable groupings of URLs for audience & content rules
- Personyze QA Simulator
- A/B Testing
- Setting Custom Goals Tracking