
Your email platform is great at sending. But what if the product recommendations inside each email updated themselves in real time — showing each recipient exactly what they’re most likely to buy, based on their most recent behavior, at the moment they open the email?
Watch the 1:27 walkthrough: picking an email template, how each product is rendered as an image, the fallback when there is nothing to show, and copying the code.
That’s what Personyze’s open-time email recommendations do. You drop one HTML snippet into your email template once, whichever email platform (ESP) you use. This guide walks through the campaign and then the embed for Mailchimp, Klaviyo, HubSpot, ActiveCampaign, Brevo and Constant Contact.
How open-time personalization works
A normal product block is baked in when the email is sent, so everyone gets the same thing. Here the snippet is only image tags. Every time someone opens the email, their email client asks Personyze for those images, and Personyze picks the products for that person at that moment.
- Personyze learns from your site. Product views, add-to-carts and purchases, tied to a person once Personyze knows their email or your own ID for them.
- Your ESP sends the email with the snippet in it. Your platform’s merge tag puts each recipient’s email (or ID) into the image addresses.
- The recipient opens the email. Their email client requests the images from Personyze.
- Personyze renders the images on the spot, from that person’s history and your catalog as it is now.
<img> tags wrapped in links. Any email platform that lets you add custom HTML can carry it, including Mailchimp, Klaviyo, HubSpot, ActiveCampaign, Brevo, Constant Contact, Campaign Monitor and Salesforce Marketing Cloud.Create the campaign
New campaign → Email & SMS → Product Recs in 3rd-Party Emails. The wizard has eight steps:
| Step | What you do there |
|---|---|
| Catalog | Check the product catalog the picks come from. |
| Interactions | Check that views, add-to-carts and purchases are arriving from your site. |
| Look | Pick an email template and style it. |
| Recommendation | Choose the algorithm, how many items, and what fills in when it comes back short. |
| Code | Get the snippet, with your email platform’s merge tag already in it. |
| QA | See the exact images any recipient would get. |
| Automation | Optional rules that alert you, or act, when this campaign’s numbers cross a line. See Automation. |
| Performance | What the widget earned, from Viewed to Purchased. |
There is no Target step: everyone the email goes to gets the widget, and the snippet decides per person what it shows.
Before you start
- A product catalog in Personyze. The New campaign card warns you when there is none.
- The Personyze tracking code on your site, so there is behaviour to personalize from. See Installing Personyze.
- Recipients Personyze can recognise. Their email, or your own user ID, has to be on their Personyze profile: captured on your site (a form, a login, or the JavaScript API) or sent through the server API. Anyone else gets the non-personal picks.
- An email template you can add HTML to, such as a Code, HTML or Custom Code block.
Step 1 — Catalog
Personyze keeps one product catalog per site, and email, on-site and JSON recommendations all read it. If it is not set up yet, do it in Settings → Recommendation setup → Product Catalog. There are five ways in:
| Way in | What it is |
|---|---|
| Upload a file | CSV, TSV or XLSX, uploaded once or on a recurring basis. |
| URL feed | Personyze polls a public URL on a schedule. Google Merchant feeds work out of the box. |
| SFTP push | You push files to an SFTP account Personyze sets up for you. |
| JSON API | Push or pull individual records. |
| Site crawl | Personyze reads your product pages and builds the catalog from the product data they publish for search engines. |
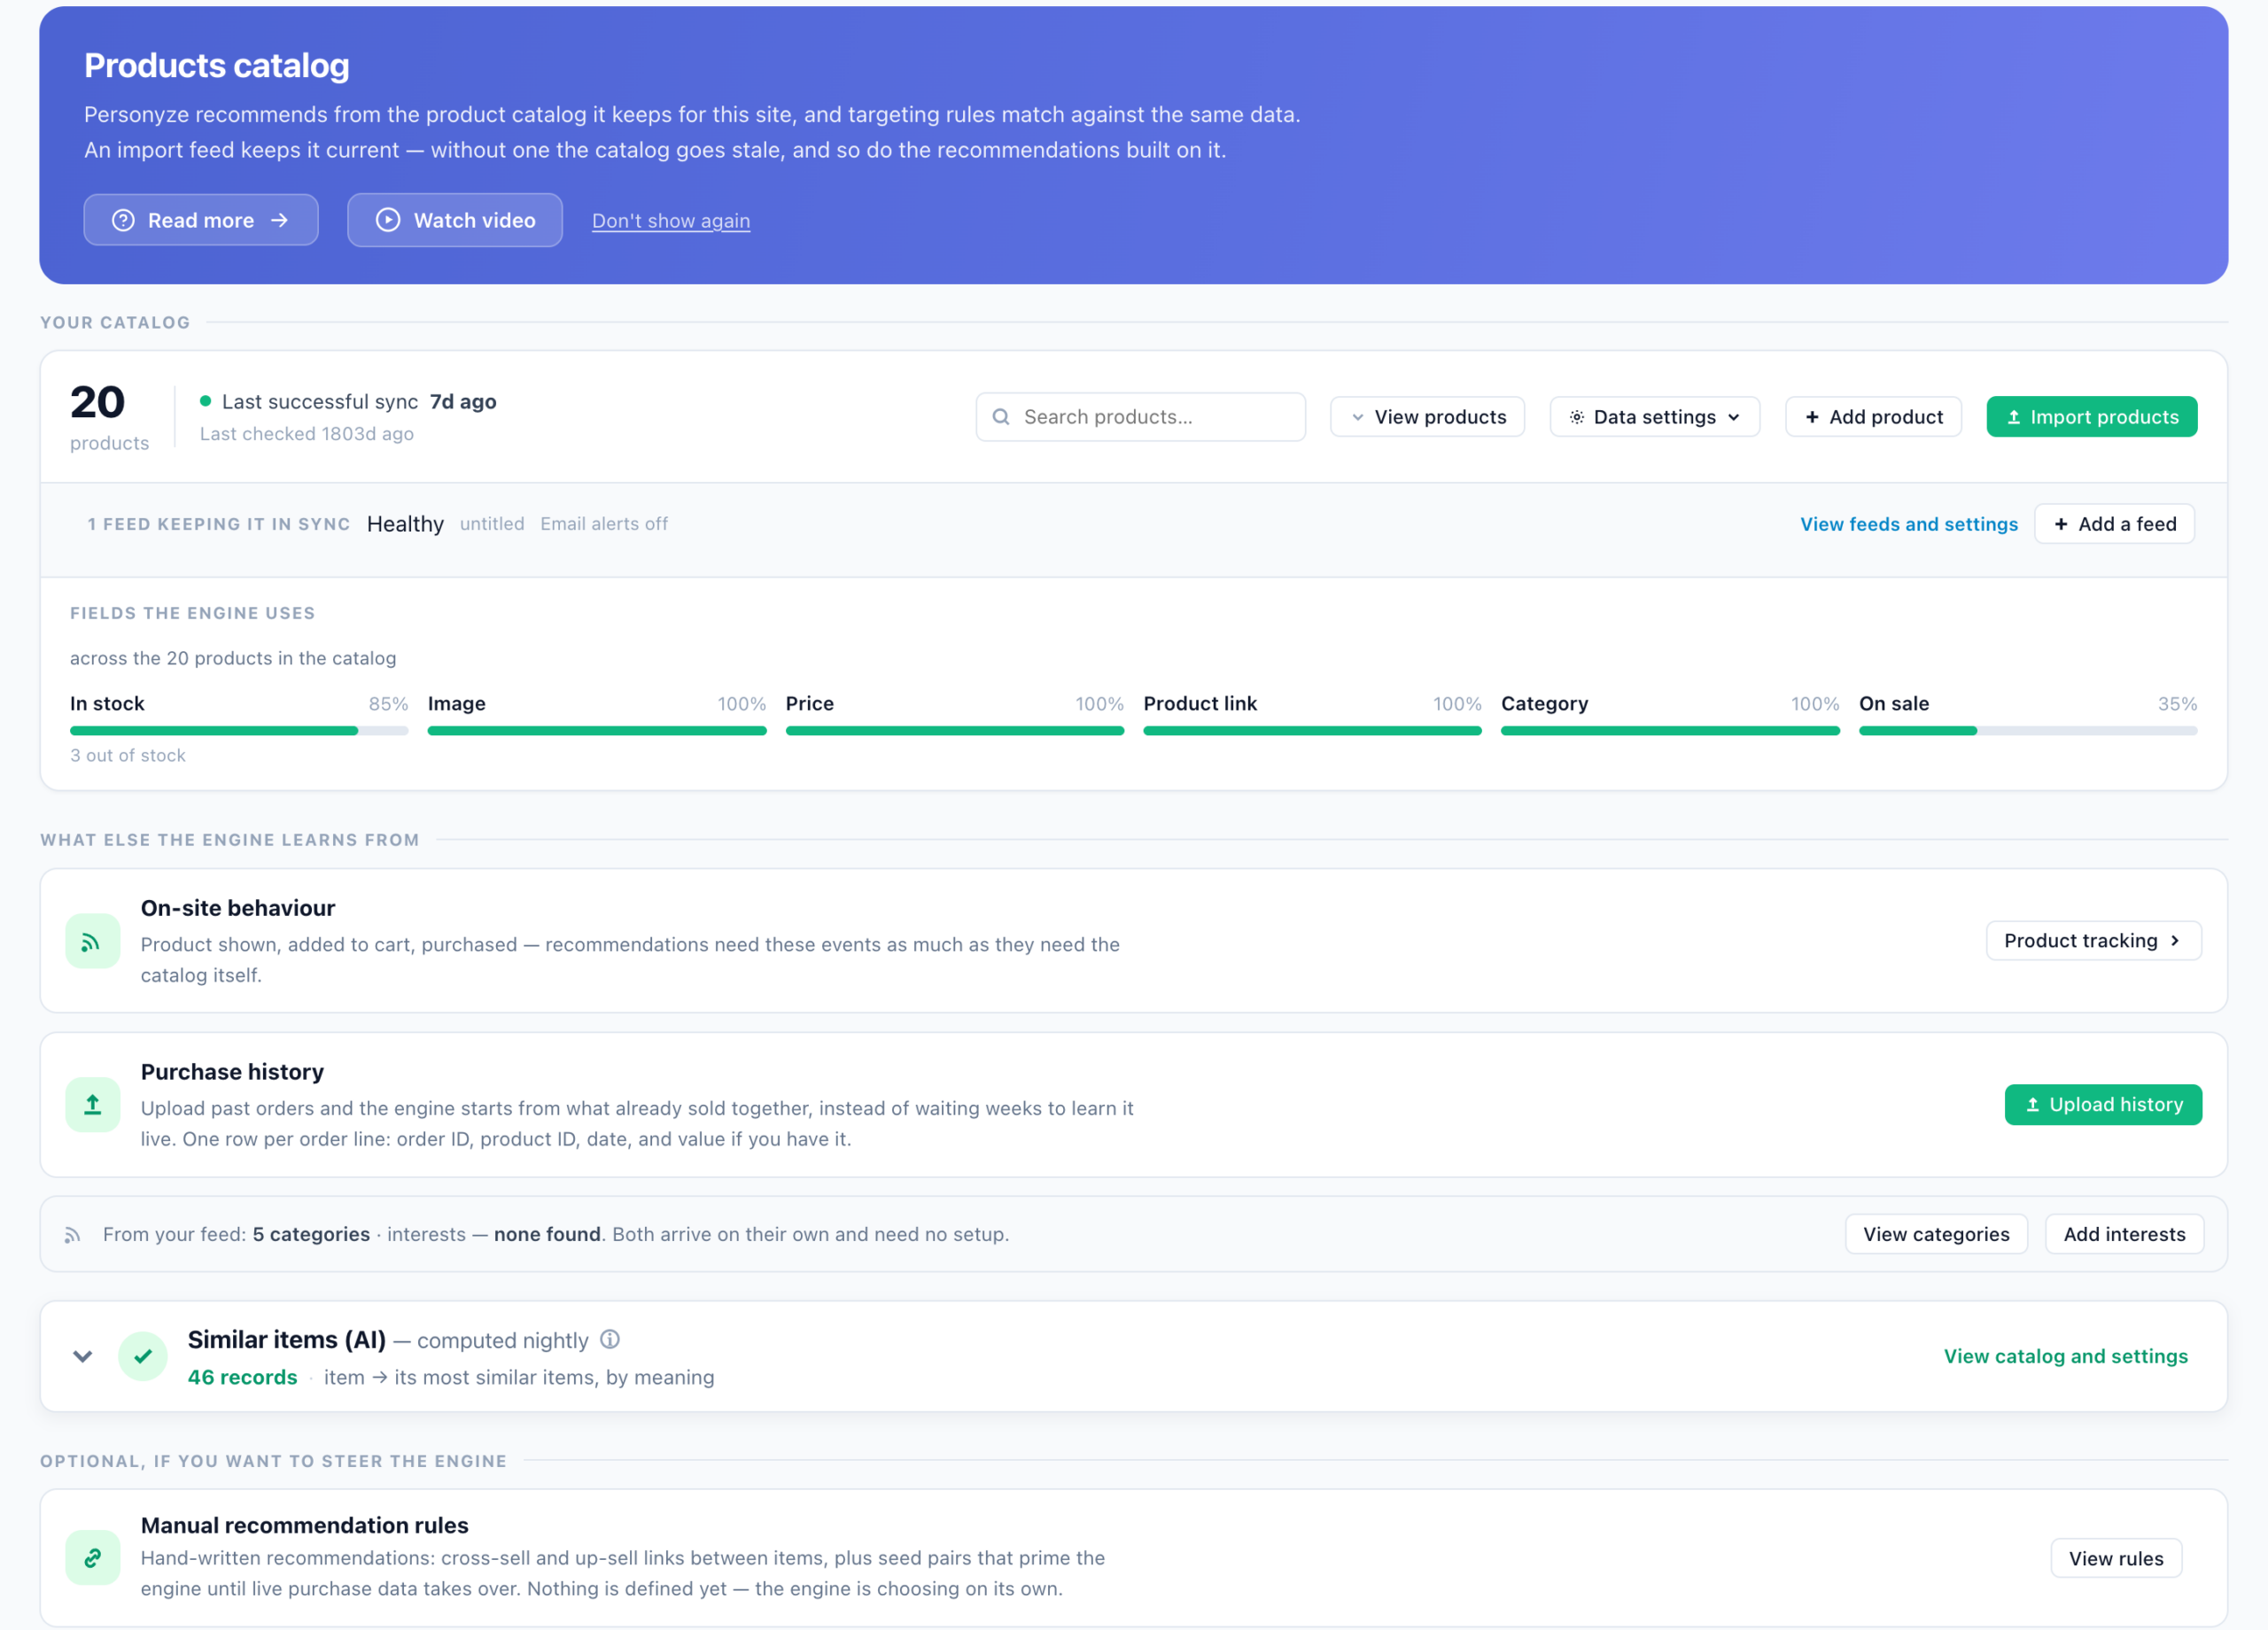
Step 2 — Interactions
The personalized algorithms learn from what each person did on your site: products viewed, added to cart and purchased. The Interactions step shows whether each event is arriving, and the setup lives in Settings → Recommendation setup → Product Tracking. Most sites need no code there: store integrations, Google Tag Manager and on-page detection all work. Every route is on Product Interaction Tracking.
If you would rather send the events from your own code, these are the tracker commands:
window.personyze = window.personyze || [];
// on a product page
personyze.push(["Product Viewed", "12345"]);
// when that product is added to the cart
personyze.push(["Product Added to cart", "12345"]);
// on the order confirmation: everything in the cart was bought
personyze.push(["Products Purchased"]);
The ID is the product’s Internal ID in your catalog. An event whose ID is not in the catalog cannot be matched to a product. For a single item bought outside the cart, send ["Product Purchased", "12345"].
Step 3 — Look
Choose Browse template gallery and pick a design. You can then change colours, text and layout in the editor beside the preview. Each product is rendered as one image, so the design looks the same in every email client. The product layouts:


The gallery also has single-image formats for ads and social: Leaderboard Banner — 728×90, Square Social Tile — 320×320, Story Tile — 360×640 and a Price Drop Retargeting Card.
The first card in the editor, Image & link, has three settings:
- Generate image type: PNG (transparent) keeps rounded corners and sits cleanly on any email background, while JPEG makes smaller files.
- Link brings to: the item’s URL by default, or any other field in your catalog.
- If a link is broken, send them to: where a click lands when the item’s link cannot be reached.
Step 4 — Recommendation
This is where you choose the algorithm. The picker is the same one on-site widgets use, with one difference. An email is not opened on a page of your site, so the Page row offers what the recipient did instead:
| Page choice | The picks are anchored to | Typical email |
|---|---|---|
| General | No particular item | Newsletters, win-back emails, announcements |
| Items they viewed | Items the recipient viewed | Browse abandonment |
| Items in their cart | Items in the recipient’s cart now | Cart abandonment |
| Items they purchased | Items the recipient bought | Order confirmation, shipping and receipt emails |
The Type row groups the algorithms as it does for the web: Personalized & Behavioral; Cross-Sells, Co-Views & Upsells; Visitor History; Catalog Events; and Custom. What each one picks is on Recommendation Algorithms. Good starting points for email:
- Personalized Recommendations: picks from the recipient’s own browsing and purchases. Best for people who have visited your site.
- Recently Viewed, or Others Who Viewed Also Viewed on Items they viewed: browse-abandonment emails.
- Items in Cart, and Cross-Sells on Items in their cart: cart abandonment.
- Cross-Sells or Up-Sells on Items they purchased: post-purchase follow-ups. Use Buy it Again for products people reorder.
- Most Popular, Trending Now or Best Sellers: new subscribers, and anyone Personyze does not know yet.
When it comes back short
The Output card beside the algorithm decides how many items there are, and what happens when there are too few:
- Recommendations to show: how many items to ask for, up to 12. The Code step gives you one image slot per item.
- Fallback algorithms → Add fallback: more algorithms that run in order when the main one, and each fallback before them, returns too few items. Each fallback has its own filters. A common setup is Personalized Recommendations with Best Sellers as the fallback.
- Fill empty cells: when this is on, a short or empty result is topped up with your most popular items, then the rest of the catalog. When it is off, only what the recommendation actually returned is shown.
Below the Output card are the same filters and tuning as on-site widgets: Skip items the visitor already…, Restrict the catalog, Fine-tune the algorithm and Custom filter rules. See Filters and Fallbacks.
Non-personal recommendations
You can use this with no individual history at all:
- Anchor to a product. In the Code step, choose the Product internal ID tab and put a product ID in the snippet. Personyze then recommends as it would for someone who viewed that product, for example related items in an order confirmation.
- Site-wide picks. Most Popular, Trending Now or Best Sellers on General need no history for the person at all.
Step 5 — Code
The Code step builds the snippet in three choices:
- The identifier. Email; Internal User ID, which is your own ID for the person and only works if you also send it to Personyze from your site or the server API; or Product internal ID, for non-personal picks.
- Your email platform. Its merge tag is written into the snippet for you. Custom takes any tag you type.
- Copy. Paste the snippet into your template once, where you want the products to appear.
What the snippet does
Each <img> address carries the recipient’s email (or ID). When the email is opened, Personyze:
- looks up that person’s profile: what they viewed, added to cart and bought;
- runs the algorithm you chose in Step 4;
- checks your catalog as it is now, for price and stock;
- renders each product as an image and returns it.
Each slot has its own key in its address (k=…v, k=…w and so on), so every slot shows a different item. If the template has a heading, a heading image goes above the row, and it disappears when there is nothing to show. A two-slot snippet with Mailchimp chosen looks like this:
<table border="0" cellpadding="0" cellspacing="0" role="presentation">
	<tr>
		<td align="center" valign="top">
			<a href="https://pic.personyze.com/href/k=8qy0zs2vbzcv/email=*|EMAIL|*">
				<img src="https://pic.personyze.com/png/k=8qy0zs2vbzcv/email=*|EMAIL|*" alt="Recommended" border="0" style="display:block; max-width:100%; height:auto;">
			</a>
		</td>
		<td align="center" valign="top">
			<a href="https://pic.personyze.com/href/k=8qy0zs2vbzcw/email=*|EMAIL|*">
				<img src="https://pic.personyze.com/png/k=8qy0zs2vbzcw/email=*|EMAIL|*" alt="Recommended" border="0" style="display:block; max-width:100%; height:auto;">
			</a>
		</td>
	</tr>
</table>
With Internal User ID the addresses end in internal_id= followed by your platform’s ID tag. With Product internal ID they end in item_internal_id={INSERT PRODUCT ID HERE}, and you put the product ID there yourself.
href, for the click) and once in the image (src). Change both.Insert it into your email platform
It is the same on every platform: add an HTML block to your template, paste the snippet, and make sure the recipient’s email is filled in by that platform’s merge tag. If you chose your platform in the Code step, the tag is already there.
🐒 Mailchimp
- Open your campaign template. Go to Campaigns → Email Templates (or open a draft and click Edit Design) to launch the drag-and-drop editor.
- Add a Code content block. Drag a Code block from the sidebar into your template, typically below the main hero and above the footer.
- Paste the snippet. The tag for the recipient’s email is
*|EMAIL|*. - Send a test email to verify. Use Preview & Test → Send a Test Email, because the visual preview does not fill in merge tags. Open the test in your inbox to confirm the images load with real recommendations.
*|EMAIL|* in the address. Always send a real test email to verify.🎯 Klaviyo
- Open the email template editor. Go to Content → Templates, or open your flow or campaign email and click Edit.
- Add a Text or HTML block. Drag in a Text block and switch it to HTML mode, or use an HTML block if your template has one. Paste the snippet.
- Check the tag. The Code step inserts
{{ person.email }}. - Preview with a real profile. Use Klaviyo’s Preview as Person, select a real subscriber, and check the images load with personalized recommendations.
🟠 HubSpot
- Open the email editor. Go to Marketing → Email and open or create a campaign. Click Edit to launch the drag-and-drop editor.
- Add a Rich Text or Custom HTML module. Drag a Rich Text module into your template, click the
</> Source Codeicon to switch to HTML, and paste the snippet. - Check the tag. HubSpot uses HubL:
{{ contact.email }}. - Send a test. Use HubSpot’s Send Test Email with a real contact record to confirm the tag resolves and recommendations load.
⚡ ActiveCampaign
- Open the email designer. Go to Campaigns → Create a Campaign, or open an automation email, in the email designer.
- Add an HTML block. Drag an HTML content block into your template and paste the snippet.
- Check the tag. ActiveCampaign uses percent-wrapped tags:
%EMAIL%. - Test. Add a test contact to the automation, or use Send Preview Email with a real contact, to confirm the tag resolves and recommendations appear.
💙 Brevo (formerly Sendinblue)
- Open the template editor. Go to Email → Templates and open or create a template.
- Switch to the HTML editor. Click the
</> HTMLbutton to reach the raw HTML, and paste the snippet where the recommendations should appear. - Check the tag. Brevo uses
{{ contact.EMAIL }}, with the field name in capitals. - Send a test. Use Preview & Test → Send Test Email with a real contact.
📮 Constant Contact
- Open the email. Go to Campaigns → Create an Email, choose your template and open the editor.
- Add a Custom Code block. Click Insert → More → Custom Code to add a raw HTML block, and paste the snippet.
- Check the tag. Constant Contact documents
[[EmailAddress]]as the email-address tag for custom code. Choosing Constant Contact in the Code step writes it into the snippet for you. - Preview and test. Use Preview → Preview As Subscriber with a real subscriber, and send a test to confirm the images load before you send to the list.
Quick reference — email merge tags
The tags each platform documents for the recipient’s email address and for a recipient ID (used by the Internal User ID tab). For the ones marked “Code step”, choosing the platform there writes the tag into the snippet for you.
| Email platform | Email tag | User ID tag | How it gets there |
|---|---|---|---|
| Mailchimp | *|EMAIL|* |
*|UNIQID|* |
Code step |
| Klaviyo | {{ person.email }} |
{{ person.id }} |
Code step |
| HubSpot | {{ contact.email }} |
{{ contact.hs_object_id }} |
Code step |
| ActiveCampaign | %EMAIL% |
%SUBSCRIBERID% |
Code step |
| Brevo | {{ contact.EMAIL }} |
{{ contact.EXT_ID }} |
Code step |
| Salesforce Marketing Cloud | %%emailaddr%% |
%%_subscriberkey%% |
Code step |
| Braze | {{${email_address}}} |
{{${user_id}}} |
Code step |
| SendGrid | {{email}} |
none documented | Code step |
| Iterable | {{email}} |
{{userId}} |
Code step |
| Customer.io | {{customer.email}} |
{{customer.id}} |
Code step |
| Marketo | {{lead.Email Address}} |
{{lead.Id}} |
Code step |
| Omnisend | [[contact.email]] |
none documented | Code step |
| Constant Contact | [[EmailAddress]] |
none documented | Code step |
| Campaign Monitor | [email] |
— | Custom, entered by you |
| Any other platform | Your platform’s tag for the email address | Your platform’s tag for the ID | Custom, entered by you |
internal_id= in the address), and no email address travels in the image URLs. It only matches if you send that same ID to Personyze, from your site or the server API, so it sits on the person’s profile as their Internal ID. SendGrid, Omnisend and Constant Contact document no ID tag, so for them the snippet keeps an {INSERT INTERNAL ID HERE} placeholder: replace it with the tag of a custom field that holds your ID.Step 6 — QA
Before sending to your list, the QA step shows the actual images a recipient would get. These are live renders, and they are not counted as views. Save the campaign first: the images come from the saved version, so unsaved edits do not show.
| Who to preview | What you see |
|---|---|
| Recipient | Search by email or ID, or filter your user base. You get the images that person would receive, marked Personalized or Fallback, with their profile and their recent product interactions (product, price, status, when). Use it to check that tracking reaches the right person. |
| Product | Pick a product and see the non-personal version anchored to it, the same for every recipient. |
| New recipient | Preview the fallback shows what someone Personyze cannot identify gets. This is the worst case for the campaign. |
What to check before sending
- The picks look personal. For a known recipient they should relate to what that person viewed or bought. If they look generic, check that events are arriving (Step 2) and that the person’s email is on their profile.
- The fallback is acceptable. Preview a New recipient. An empty slot there is a result, not a broken image: the campaign had nothing to show. Add a fallback algorithm or turn on Fill empty cells (Step 4) if it should always fill.
- Send a real test from your ESP. Visual previews do not fill in merge tags. Open the test in a real inbox.
- Clicks land in the right place. Click each product in the test email and check it opens the right product page.
Step 7 — Automation
This step is optional. Add rules that email you, post to Slack, call a webhook or pause the campaign when its numbers cross a line you set. See Automation.
Step 8 — Performance
The Performance step shows Email Get Code statistics. Personyze does not send the email, so there is no Sent, bounce or unsubscribe figure. Counting starts when a recipient’s email client shows the widget.
Reading the numbers: Email, SMS, web push and 3rd-party emails on the Performance Metrics page explains every figure on this screen and how to read it.
| Figure | What it counts |
|---|---|
| Viewed | Emails confirmed viewed by recipients. It comes from the widget’s view pixel, which filters out the image prefetches and proxy loads that would inflate a raw render count. |
| Clicked | Recipients who clicked at least one recommended item and reached your site, as a % of Viewed. The total number of item clicks is shown beside it. |
| Added to cart | Recipients who added a recommended product to the cart in the same session as their click, as a % of Clicked. |
| Purchased | Recipients who bought an item this campaign recommended, as a % of Added to cart. |
| Transactions · Totaling · Share of site revenue | Orders that included a recommended item, their value, and that value as a share of the whole site’s revenue for the period. |
Every metric card has a Users … link (Users viewed, Users clicked and so on). It opens the exact people behind the number, one row per person with their profile attributes. You can pick columns, filter the list or export it to CSV. Use it to check that the people who click are the ones you meant to reach.
Below the cards, Funnel timeline shows the stages by day or week, and Revenue attribution shows the campaign’s revenue or transactions against the site’s. The reporting time range can be From start, From last edit (or a specific edit) or a date range you pick. Figures can take 1–3 hours to appear after a session ends. For all your email widgets together, open Analytics → Off-site campaigns → 3rd-party emails.
Tips for best results
- Keep your catalog fresh. Keep a feed in sync, because stale prices and sold-out products lose trust instantly.
- Place the block mid-email. Below the hero banner and above the footer usually gets more clicks than the very top or bottom.
- 3–4 products for transactional emails, 4–6 for dedicated recommendation sends. More products means more scrolling, so test to find your number.
- Set a fallback that makes sense. For subscribers with no history, fall back to Best Sellers or Most Popular rather than random products.
- Match the subject line to the picks. If the subject says “Picked just for you”, make sure behavioural data is arriving before you send at scale.
- Mind the alt text. The snippet’s images carry
alt="Recommended". Readers whose email client blocks images, as corporate Outlook often does, see only that, so a clearer call to action there can help.
Related
- Recommendations Outside Your Site — Where to Start: every off-site surface, side by side.
- Content Recommendations in 3rd-Party Emails: the same mechanism for articles.
- Personalized Banners in 3rd-Party Emails: one banner per recipient instead of products.
- Recommendation Algorithms
- Product Interaction Tracking