
Leadfeeder identifies the companies behind anonymous traffic using IP-to-company resolution. Now part of Dealfront, it’s a popular European choice for GDPR-conscious B2B teams that want to know which companies visit before they fill out a form.
The Personyze integration pulls Leadfeeder attributes onto each visitor’s profile automatically — so the moment Leadfeeder identifies a visitor’s company, that data is available across every Personyze targeting rule, campaign, content variable, and report.
What data Leadfeeder brings into Personyze
Common attributes available through the integration include:
- Company identification — company name, domain, industry, sub-industry
- Size signals — employee count, annual revenue, funding stage
- Geography — HQ country, state, city
- Role/department (when available) — visitor’s job function or seniority
- Leadfeeder-specific signals — see the Leadfeeder property catalog for the full list
You map each Leadfeeder attribute to a Personyze visitor variable during setup. Personyze then keeps those variables fresh on every visit.
Why pair Leadfeeder with Personyze
Leadfeeder on its own tells you who is visiting. Personyze tells you what to do about it. Together they unlock four high-leverage motions:
Setting up the Leadfeeder integration
- Get your Leadfeeder API key. In Leadfeeder go to Personal settings → API token to find the token.
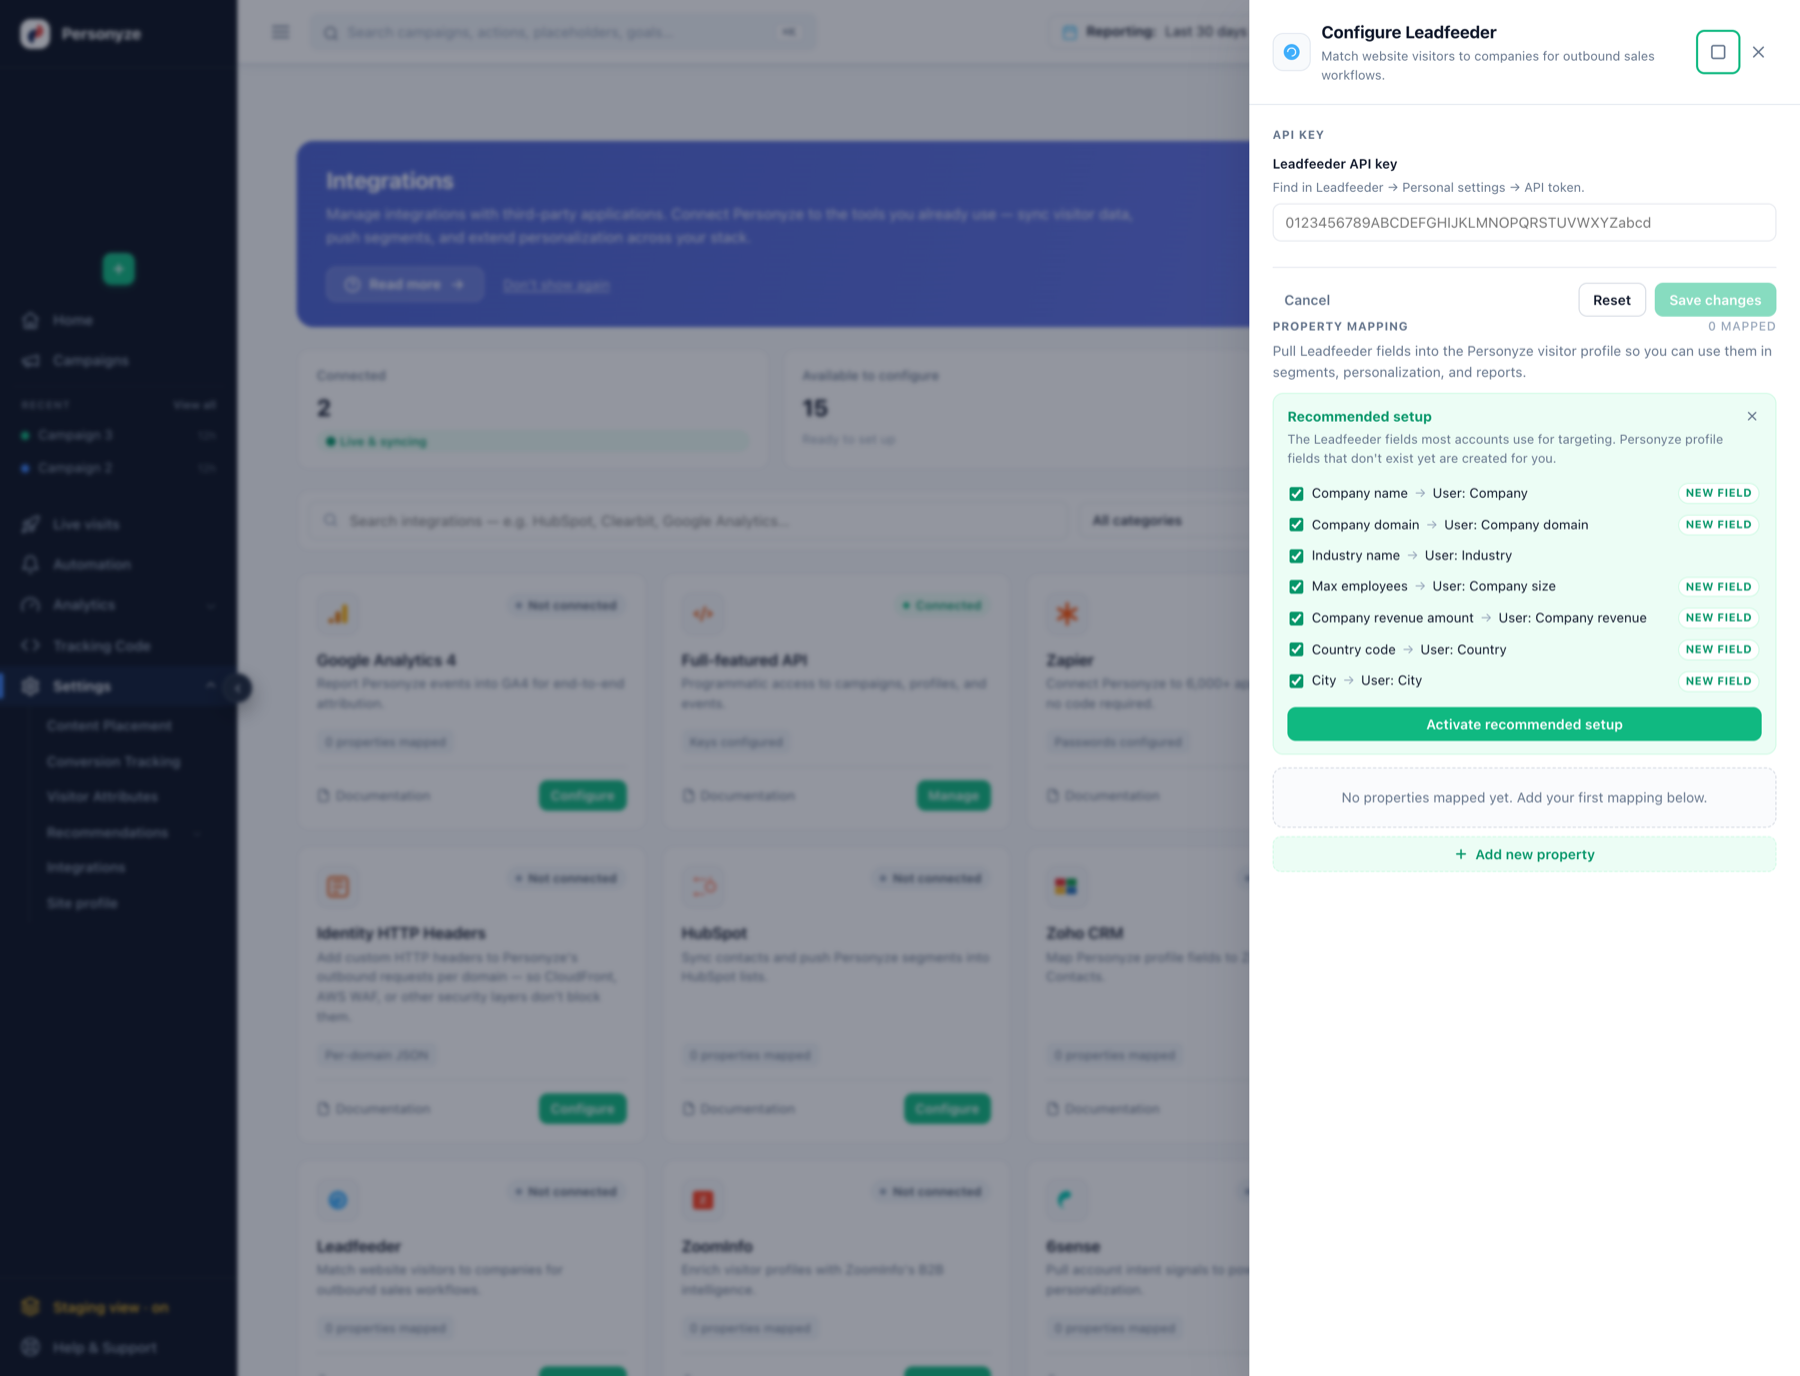
- Open the Personyze drawer. In the panel go to Settings → Integrations, find the Leadfeeder tile and click Configure. A drawer opens on the right.
- Save the key. Enter it in the Leadfeeder API key field and click Save changes. Personyze validates the key and the tile switches to Connected.
- Map data fields — one click. The drawer opens with a Recommended setup panel pre-selecting the Leadfeeder fields most accounts use for targeting. Click Activate recommended setup and Personyze creates any visitor-profile fields that don’t exist yet (marked New field) and wires the mappings:
- Company name → User: Company
- Company domain → User: Company domain
- Industry name → User: Industry
- Max employees → User: Company size
- Company revenue amount → User: Company revenue
- Country code → User: Country
- City → User: City
- Add anything else. Need a field that isn’t in the recommended list? Click + Add new property, pick the Leadfeeder attribute on the left and either an existing Personyze visitor variable or a new one on the right.
- Verify. Mappings activate immediately — open Live visits and new sessions from identified companies will show the Leadfeeder attributes on their profile.
Using Leadfeeder data across Personyze
Targeting rules
The mapped Leadfeeder variables appear under the User Profile Data rule in any wizard. Build audiences like:
- Industry equals “Software” — show a tech-specific landing variant
- Employee count > 1,000 — surface enterprise-tier pricing and case studies
- Annual revenue between $10M–$100M — middle-market specific messaging
- Country in [Germany, France, Netherlands] — region-tailored language and currency
Dynamic content variables
Insert Leadfeeder variables directly into headlines, paragraphs, and CTAs using the Personyze WYSIWYG editor‘s Insert Personyze Variables menu. Examples:
- “Welcome,
{Company Name}” in the hero of your homepage - “Trusted by leading
{Industry}teams” in social proof sections - “See how companies like
{Company Name}reduce churn by 30%” in case-study CTAs
If Leadfeeder doesn’t have data for a particular visitor, the variable defaults to blank — always test with both an identified visitor and an anonymous one to make sure your fallback copy reads naturally.
Reports and Live Visits
Leadfeeder attributes also appear as filter dimensions in your Personyze analytics reports — segment campaign performance by industry, employee size, region, or any mapped attribute. They also surface in Live Visits, where you can watch in real-time which companies are on your site right now and which campaigns are firing for them.
Named-account targeting
For account-based campaigns, you can target specific named companies. Either type them into the targeting rule one at a time, or upload a spreadsheet of company names (lead-scoring tier lists, target account lists, etc.) — Personyze matches against the Leadfeeder-resolved company name on each visit.
Best practices
- Map only the attributes you’ll use. Each mapped property adds a small bit of overhead. Start with the 4–6 attributes most relevant to your campaigns and add more as needed.
- Always set fallback content. Not every visitor will be identified by Leadfeeder. Make sure your default content (when Leadfeeder variables are blank) still reads naturally and converts.
- Test both identified and anonymous flows. Use the QA step to preview as a known-company visitor and as an unknown one. Both should look polished.
- Combine with on-site behavior. Leadfeeder tells you about the company; Personyze’s behavioral tracking tells you about the individual. The strongest campaigns combine both — e.g., “enterprise-revenue visitor who’s viewed pricing 3+ times this week.”
- Monitor match rate. Leadfeeder’s identification rate isn’t 100% — typical resolution rates are 30-60% of B2B traffic depending on your industry and geography. Check your reports periodically to confirm the match rate matches your expectations.
On the Personyze site
- Leadfeeder personalization with Personyze — turning visitor identification into on-site personalization.
- B2B website personalization — personalizing before the form fill.