
CRM Integration with Personyze
Informing Personyze with your CRM data allows our system to know your site’s visitors better, which always means better segmentation and personalization. The process in Personyze is relatively simple and has multiple options to suit different clients’ needs.
Integration Methods
Here are the primary methods for integrating CRM data into Personyze, depending on specific needs:
-
Sharing Data Locally – Pull data from your CRM or other databases during the visitor’s session, by “grabbing” cookies or custom javascript variables, and store it locally in that user’s profile in Personyze. You can view here a full guide with screenshots
-
API call – using the appropriate Personyze API method, you can integrate your database so that updates to your database are automatically uploaded to Personyze. You can also send information back from Personyze to your database, to update it with new information derived from behavioral tracking. This means that API integration can be a two-way data exchange, where both services inform each other, to create more accurate knowledge of your customers, across the board.
-
Upload your user list with CRM information – If you have a list of users that doesn’t exist in a DB, Personyze can still upload it in the form of a spreadsheet. When uploading a user list to Personyze, it should contain an identifier key such as email or CRM ID. That key should also be present on the site, as a site cookie or URL parameter, Javascript variable or page element, so Personyze can grab it. You can view here a full guide with screenshots
How to Integrate
How to specifically execute each of these CRM integration methods, in Personyze.
-
Sharing Data Locally:
Set Personyze to grab the CRM data that is already locally available on your site by selecting the containers which the data is already being poured into (such as a login email form), then set Personyze to monitor those containers, and grab whatever data is pulled in real-time, when the user is on the site.
To do this, follow the path:
Account Settings > Grab Site Dynamic Data > User Profile > Add New Profile Field
Here, you will be presented with a choice, whether to insert a known selector (page element that receives data), or Find on Pages. In many cases, the intuitive way is easiest, and selecting Find on Pages will take you to the simulator.
Within the simulator, you can select many options for what data you wish to grab:
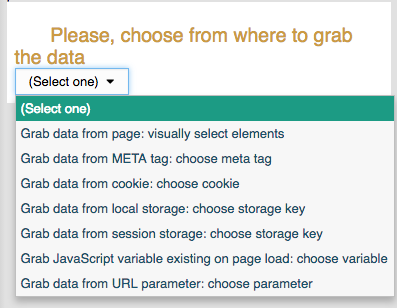
If you simply wish to select a page element to monitor for data by hand, such as a search bar or login form, you select “Visually Select On Pages,” and then use your cursor to select the element you wish to monitor.
Once the selection is made, you return to Personyze and choose your final settings, click save, and you should see a new container listed in your CRM tracking integration page.
2. API Call
Integrating your CRM with Personyze via API has the advantage that once the connection is set up, there is very little you need to do to keep the system updated. When you update your CRM, it will also update Personyze, and you can even set it up so that Personyze will continuously be in communication with your CRM, and will update automatically. You also have the ability to have Personyze send information to your CRM, making the integration a two-way exchange.
To integrate using API calls, use the path:
Account Settings > Grab Site Dynamic Data > Manage Users: view, edit, import
Here you will see a list of user profiles which you can manage, and in this case, you’ll be clicking on the option near the top of the page, which says “Use API.” The complete explanation of the API setup process can be found here.
3. Upload User List
Sometimes, the data you want to upload doesn’t exist in the form of a standard CRM or other databases. In such cases, this data can be integrated into Personyze using a spreadsheet.
To do this, follow this path:
Account Settings > Grab Site Dynamic Data > Manage Users: view, edit, import > Import
Click “Choose File” to select the spreadsheet to upload. Make sure that the data fields in the spreadsheet you import match what you want them to be in Personyze, and also that each user has a unique ID.
Once uploaded, your Manage Users page should be populated with all the user IDs and data from the spreadsheet, which is now available for segmentation and personalization.
To be implemented successfully, the unique User ID from the datasheet must be matched to the user as they navigate your site. If the user arrives at your site but hasn’t been matched to the profile ID that was uploaded in the spreadsheet, Personyze won’t know who they are, and won’t be able to use the data you uploaded.
This can be accomplished by sending the user a custom URL when you direct them to your site, which contains their ID as a unique data variable. Alternatively, if their user ID is also their site login, they can be matched when they log in to your site, by setting Personyze to grab the ID from the login container, using the local data sharing method.
Automatic Integrations
Personyze also offers more automated integrations with both Segment and Hubspot via API Key. This type of integration will allow you to simply and quickly set up data integration between Personyze and external data sources, without having to manually upload or synchronize.
Click Here for instructions on how to integrate with Segment
Click Here for instructions on how to integrate with Hubspot