Personyze A/B testing splits your audience across multiple variations of a campaign, measures each against your primary goal and supporting KPIs, and lets you promote the winner — manually after reviewing results, or automatically once a variation is conclusive.
There’s no separate “activate testing” step. The moment you add a second variation to a campaign, it starts in Test mode and begins splitting traffic. But a good test doesn’t begin with the variations — it begins with targeting, because who you test on determines whether the results mean anything.
New here? This quick walkthrough shows the whole flow. The full detail — with every screen — is below.
Start with targeting
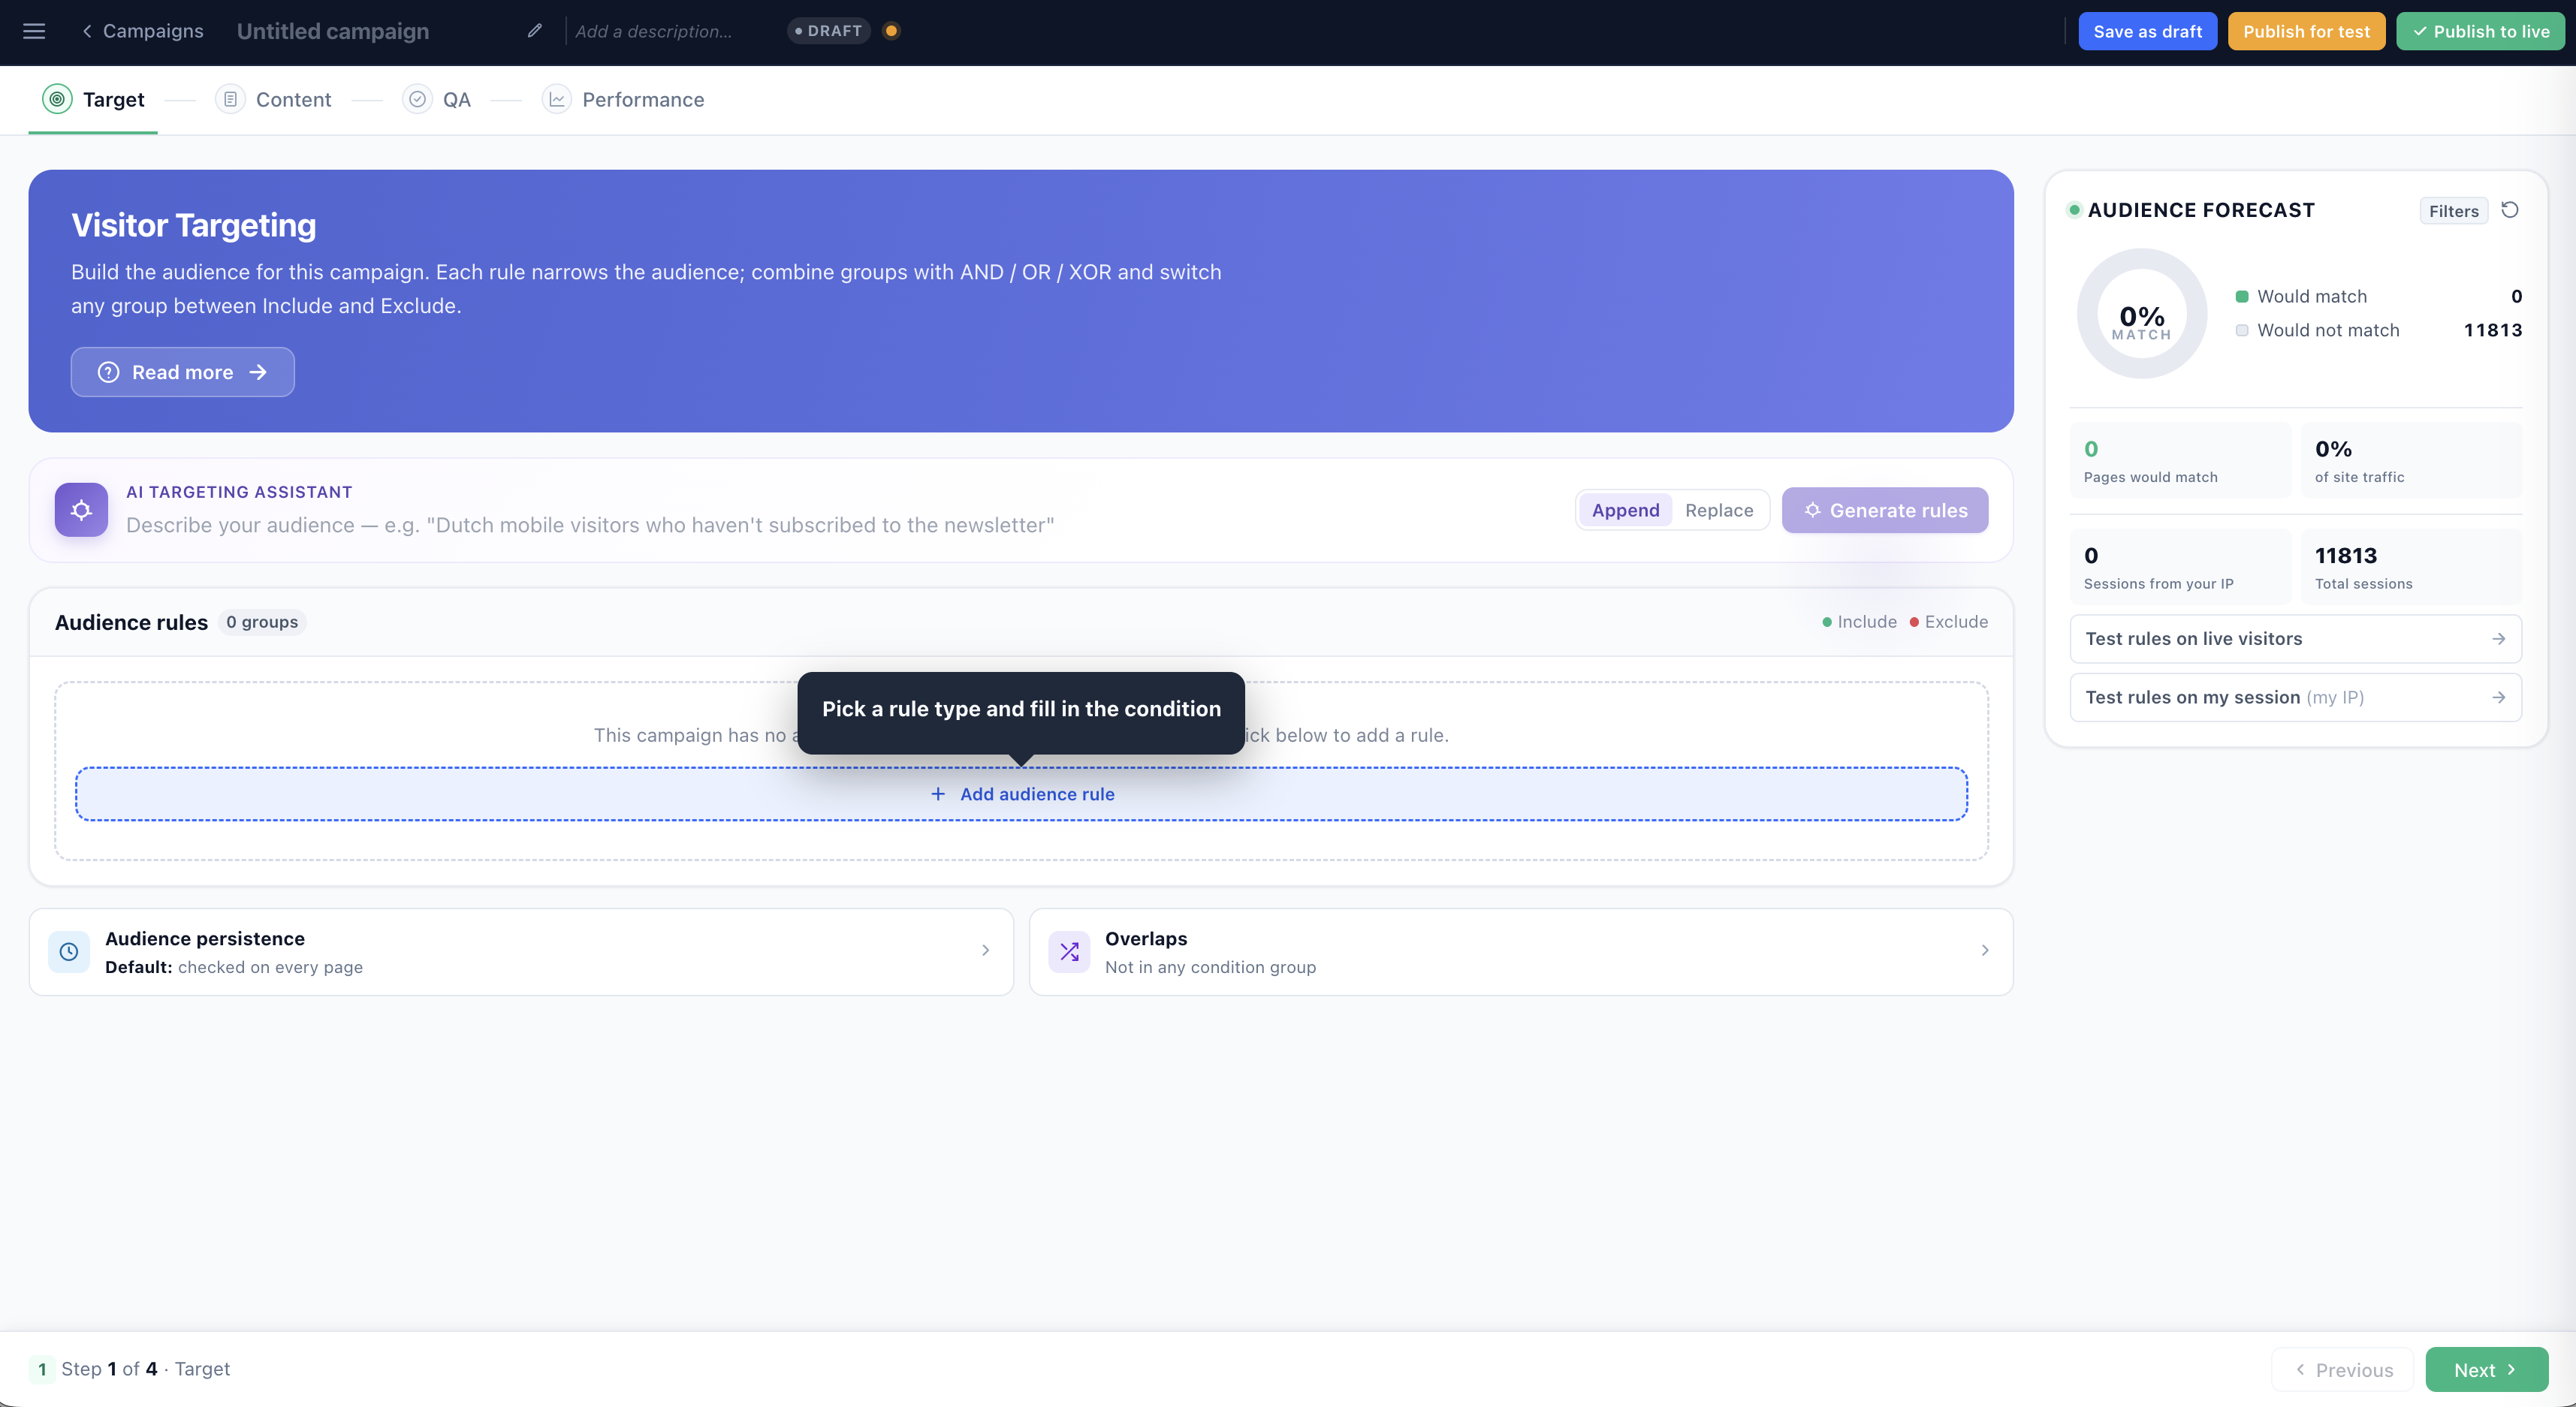
Every A/B test begins on the Target step. Here you define who enters the test — each rule narrows the audience, and the live Audience Forecast on the right shows how many visitors qualify as you build. Testing a focused audience produces cleaner results that reach significance faster.
Add & configure your rules
Click Add audience rule and pick from dozens of rule types — location, device, pages viewed, behavior, referrer, UTM, and CRM data. Combine conditions and groups with AND / OR / XOR, and set any group to Include or Exclude.
Build your variations
Move to the Content step. This is where you create the versions you want to compare. It starts empty — you add actions here, then create variations of them. Each variation is what one slice of your audience will see.
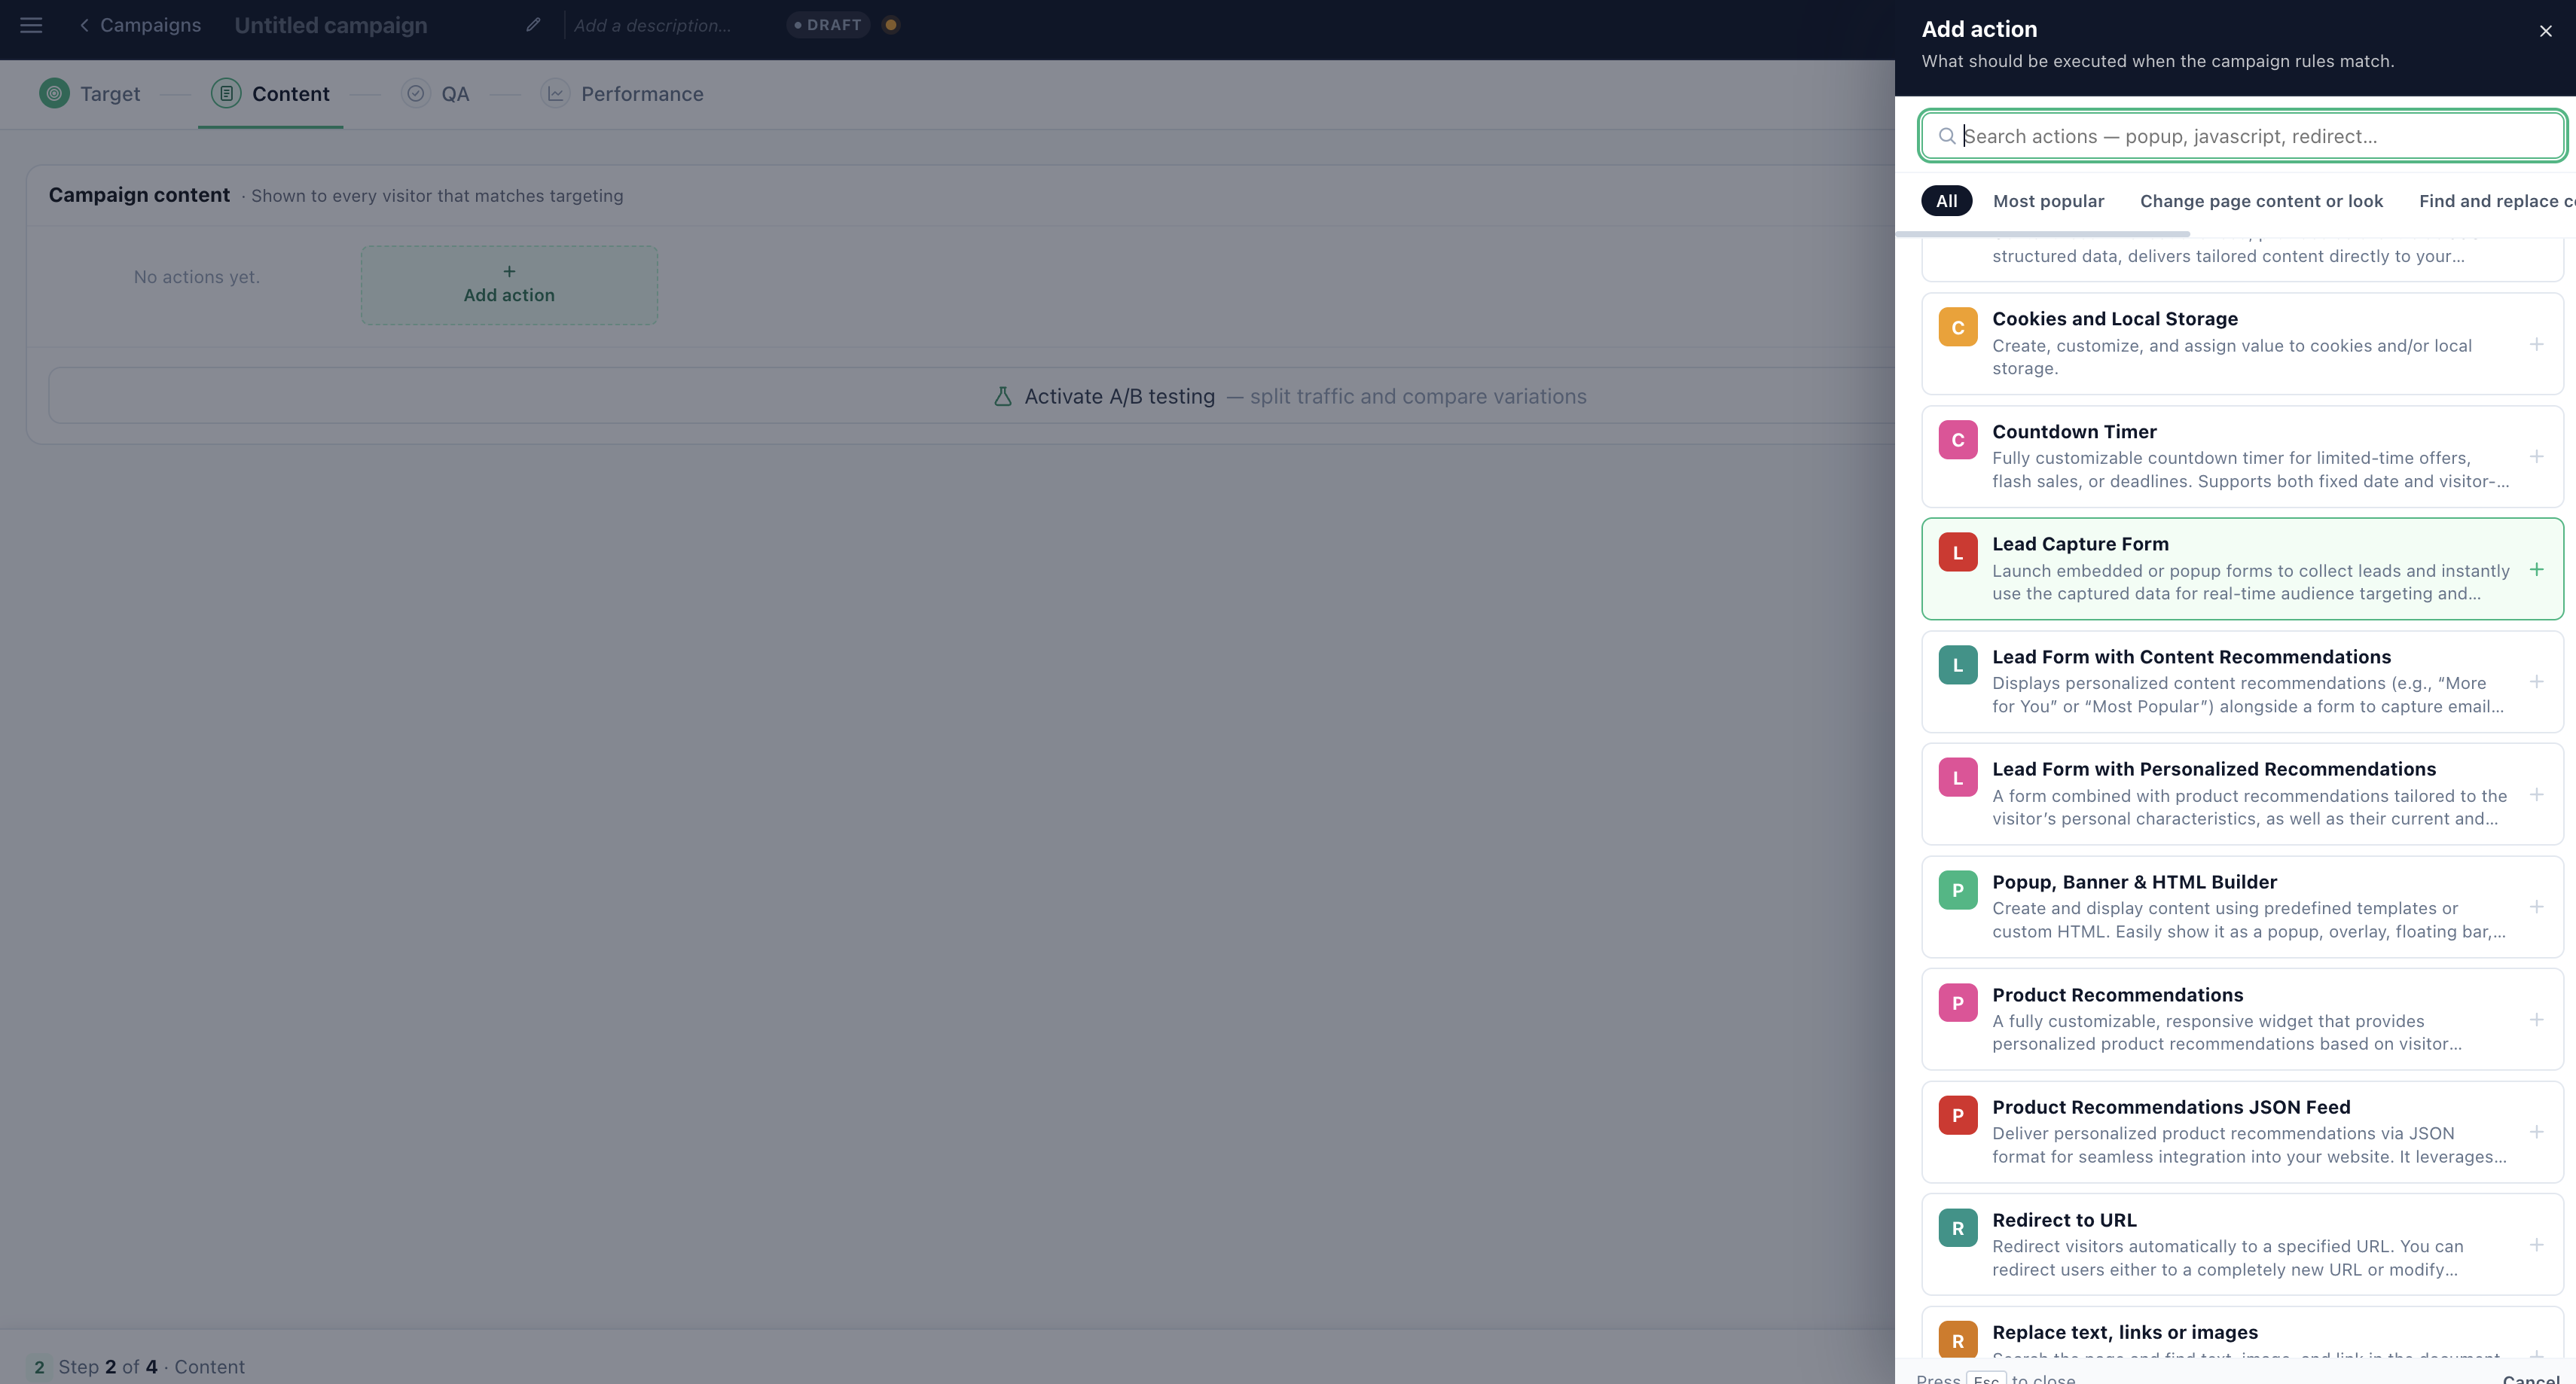
Add an action
Click Add action to open the picker. Choose what runs when the campaign matches: popups and banners, lead-capture forms, product and content recommendations, countdown timers, redirects, custom JavaScript, and more.
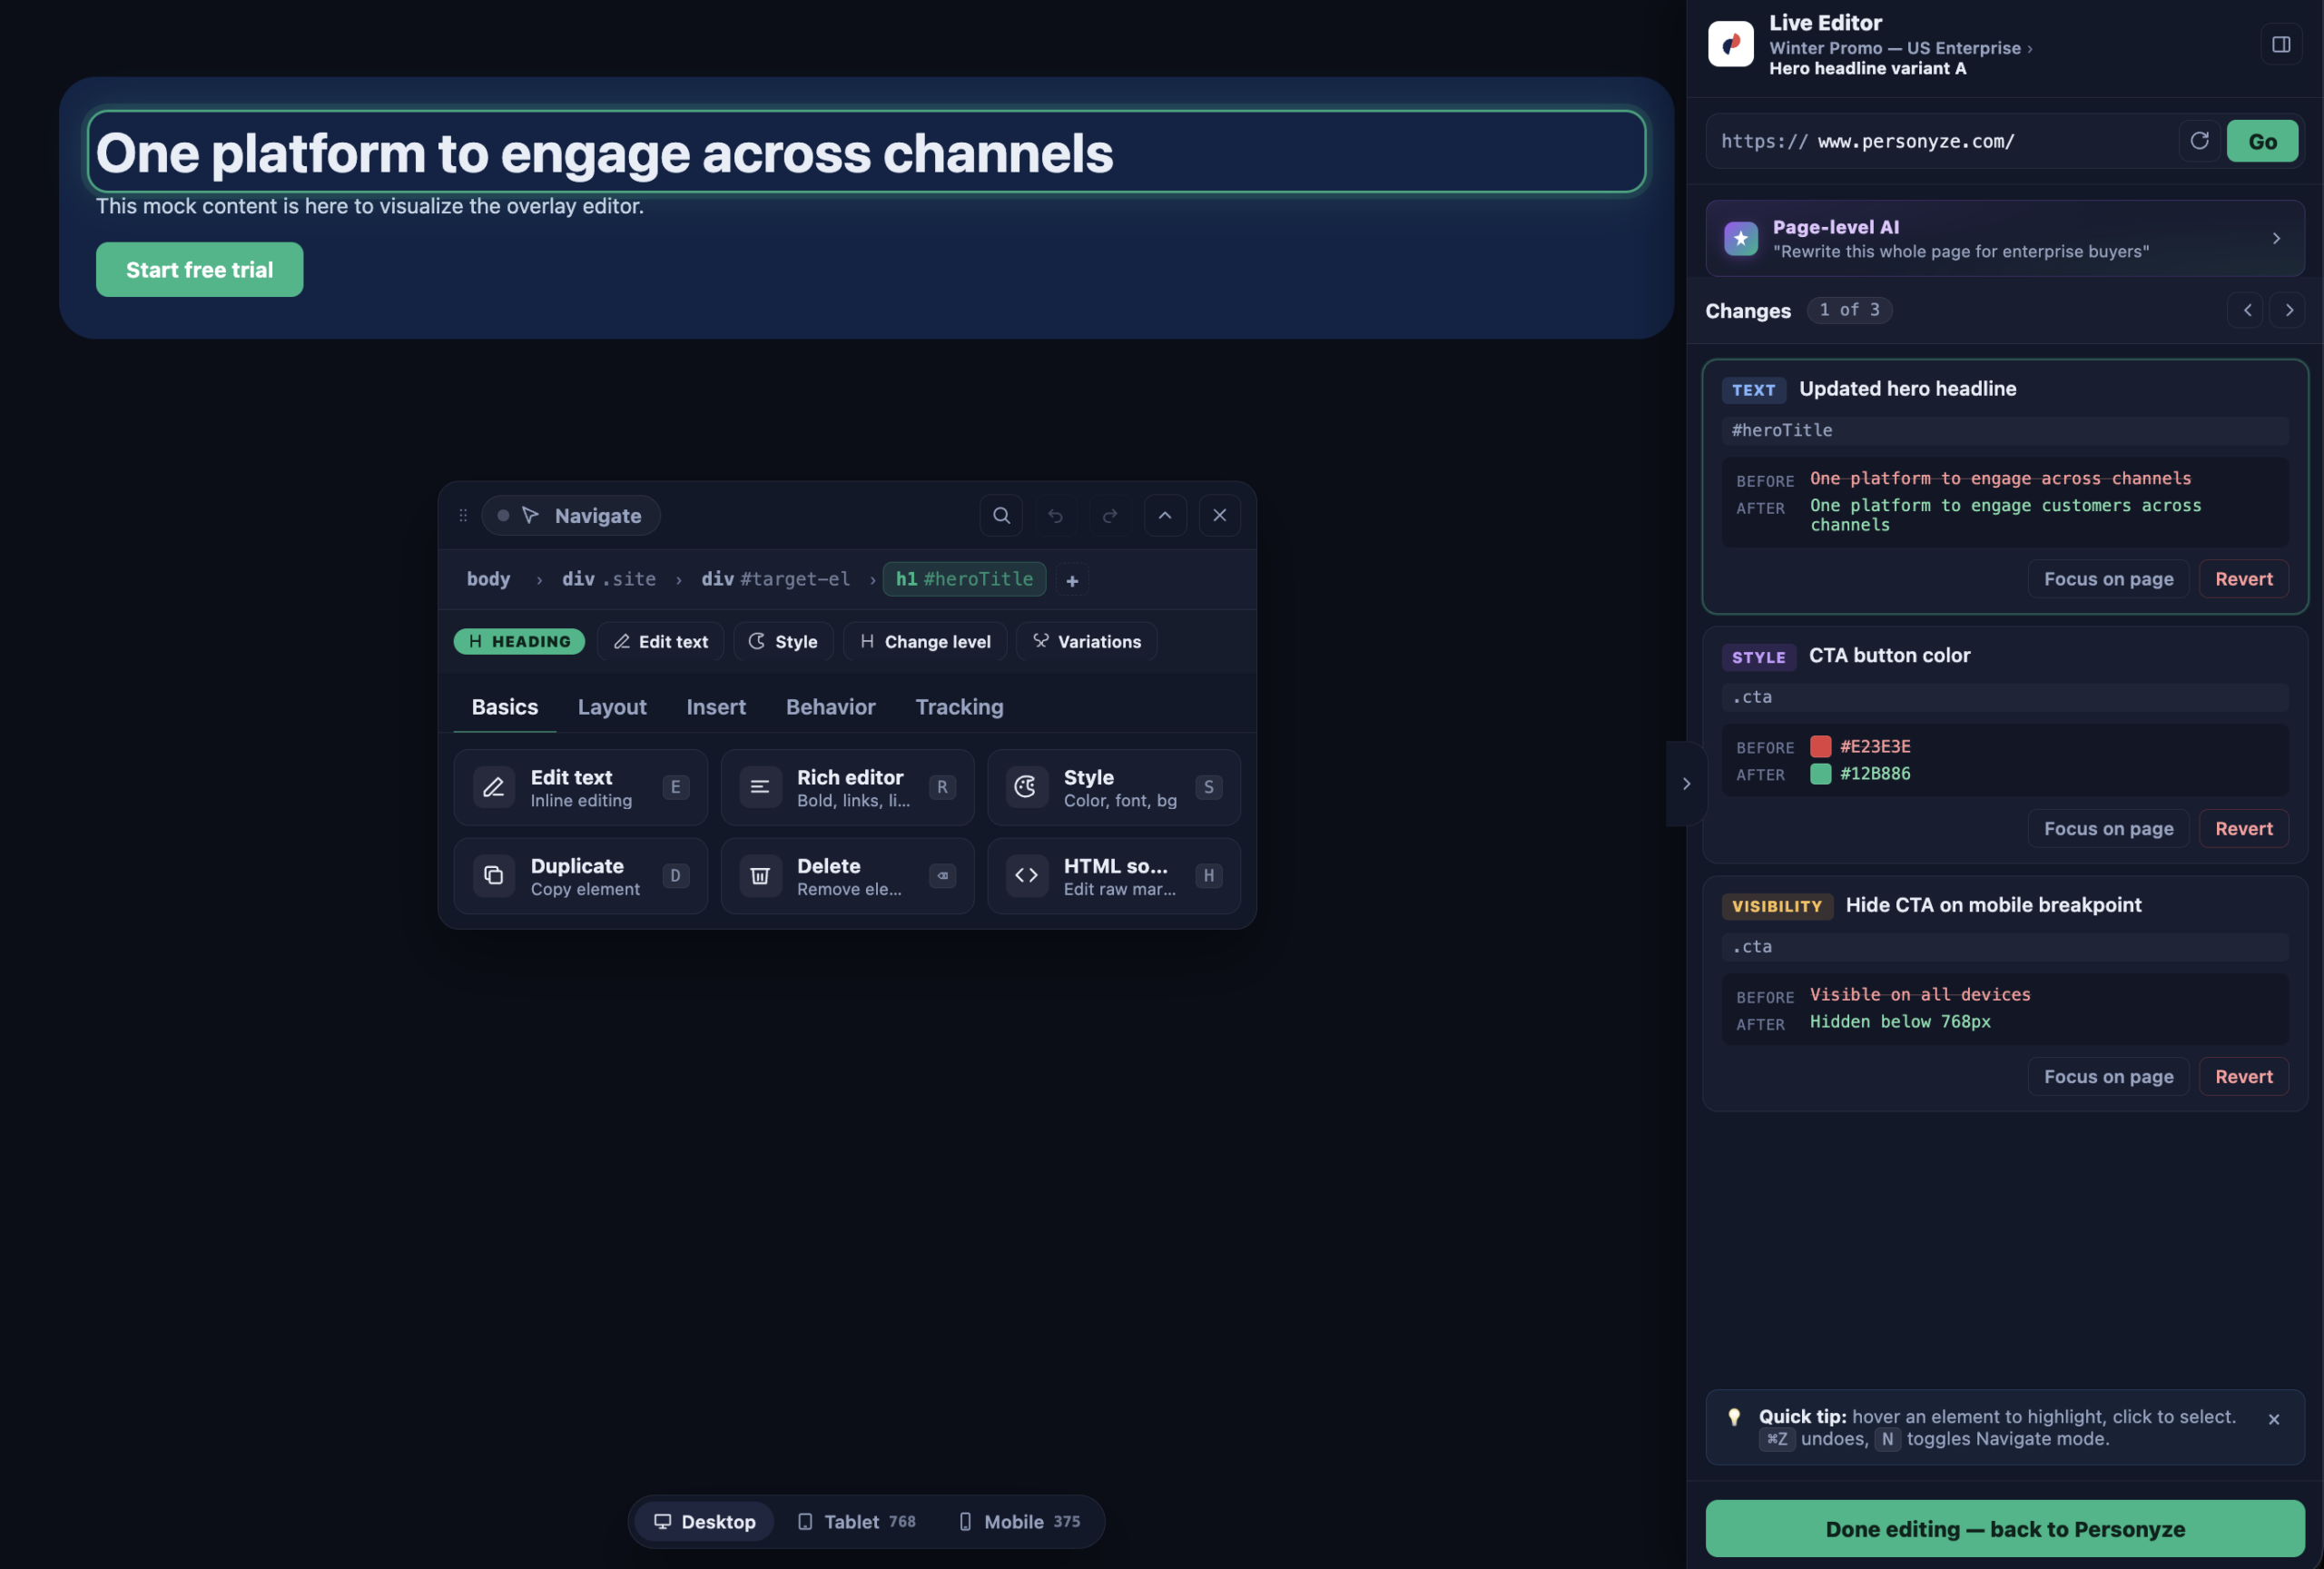
Edit anything on the page — Live Editor
For on-page changes, the Live Editor lets you edit any element of your real site — click an element to select it, then change its text, style (color, font, background), or visibility per breakpoint. Every change is tracked in a list you can revert. You can even use Page-level AI to rewrite a whole page (e.g. “rewrite this page for enterprise buyers”).
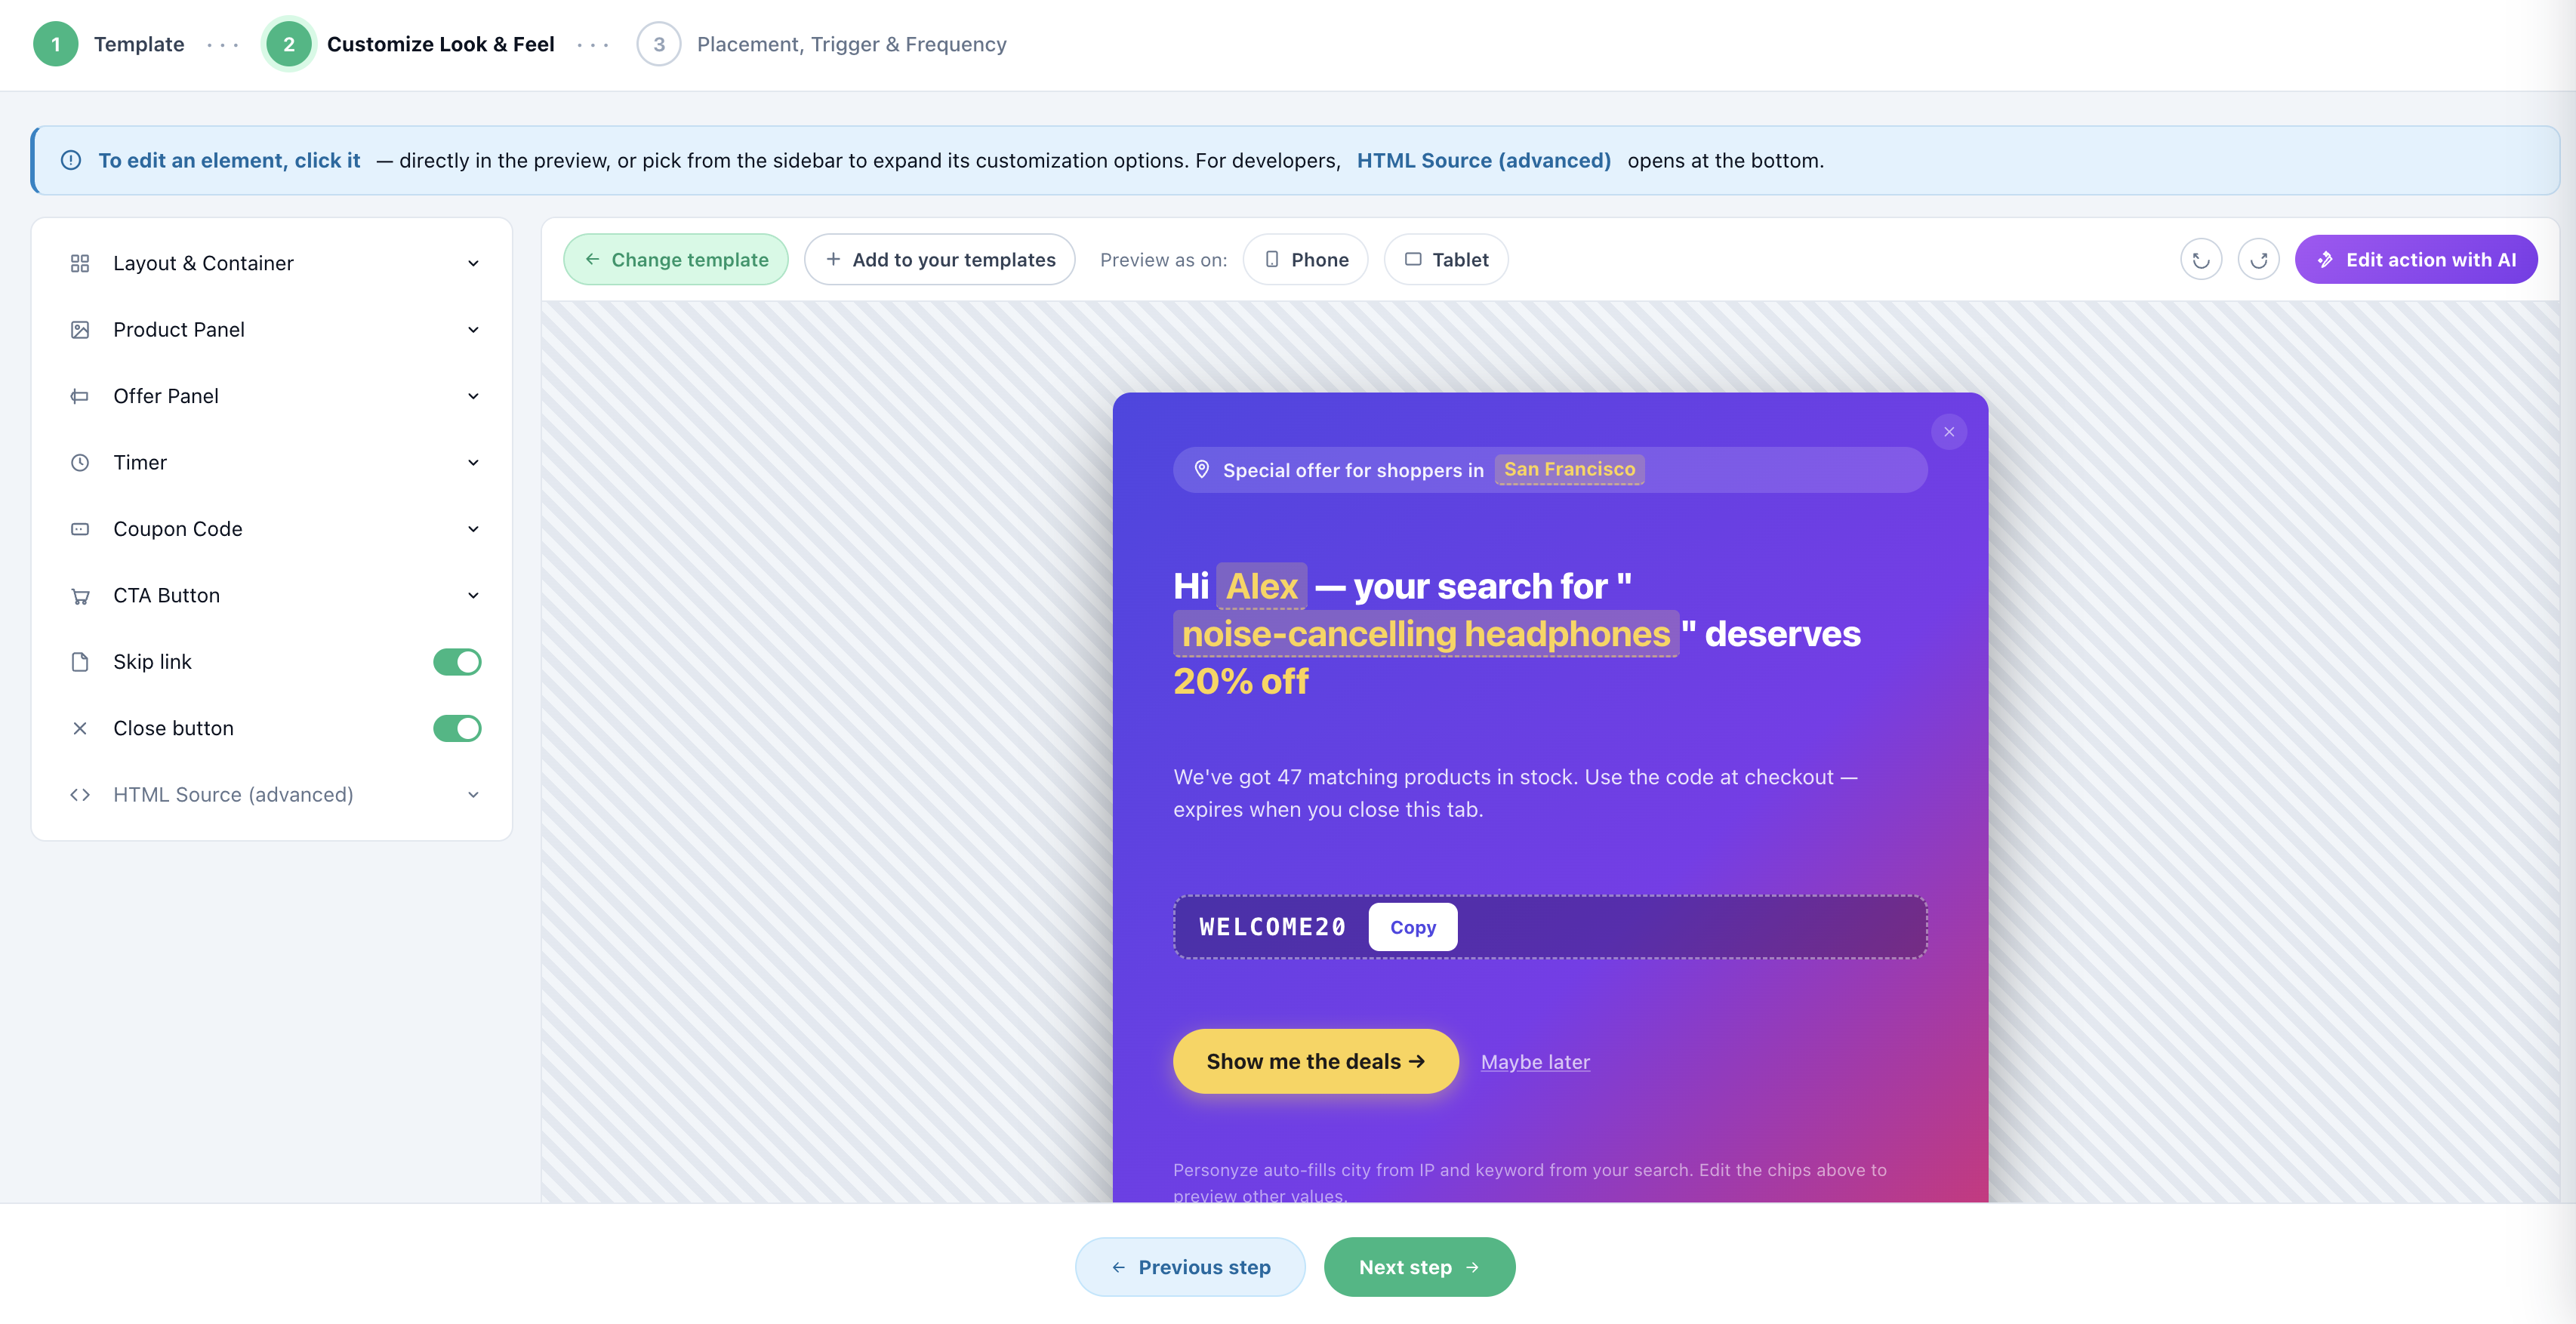
Or build a popup / banner
To create standalone content, use the Popup, Banner & HTML Builder. Pick a template, then customize layout, product panel, offer, timer, coupon, and CTA in the visual editor. Personyze auto-fills dynamic values like city and search keyword so you preview real personalization.
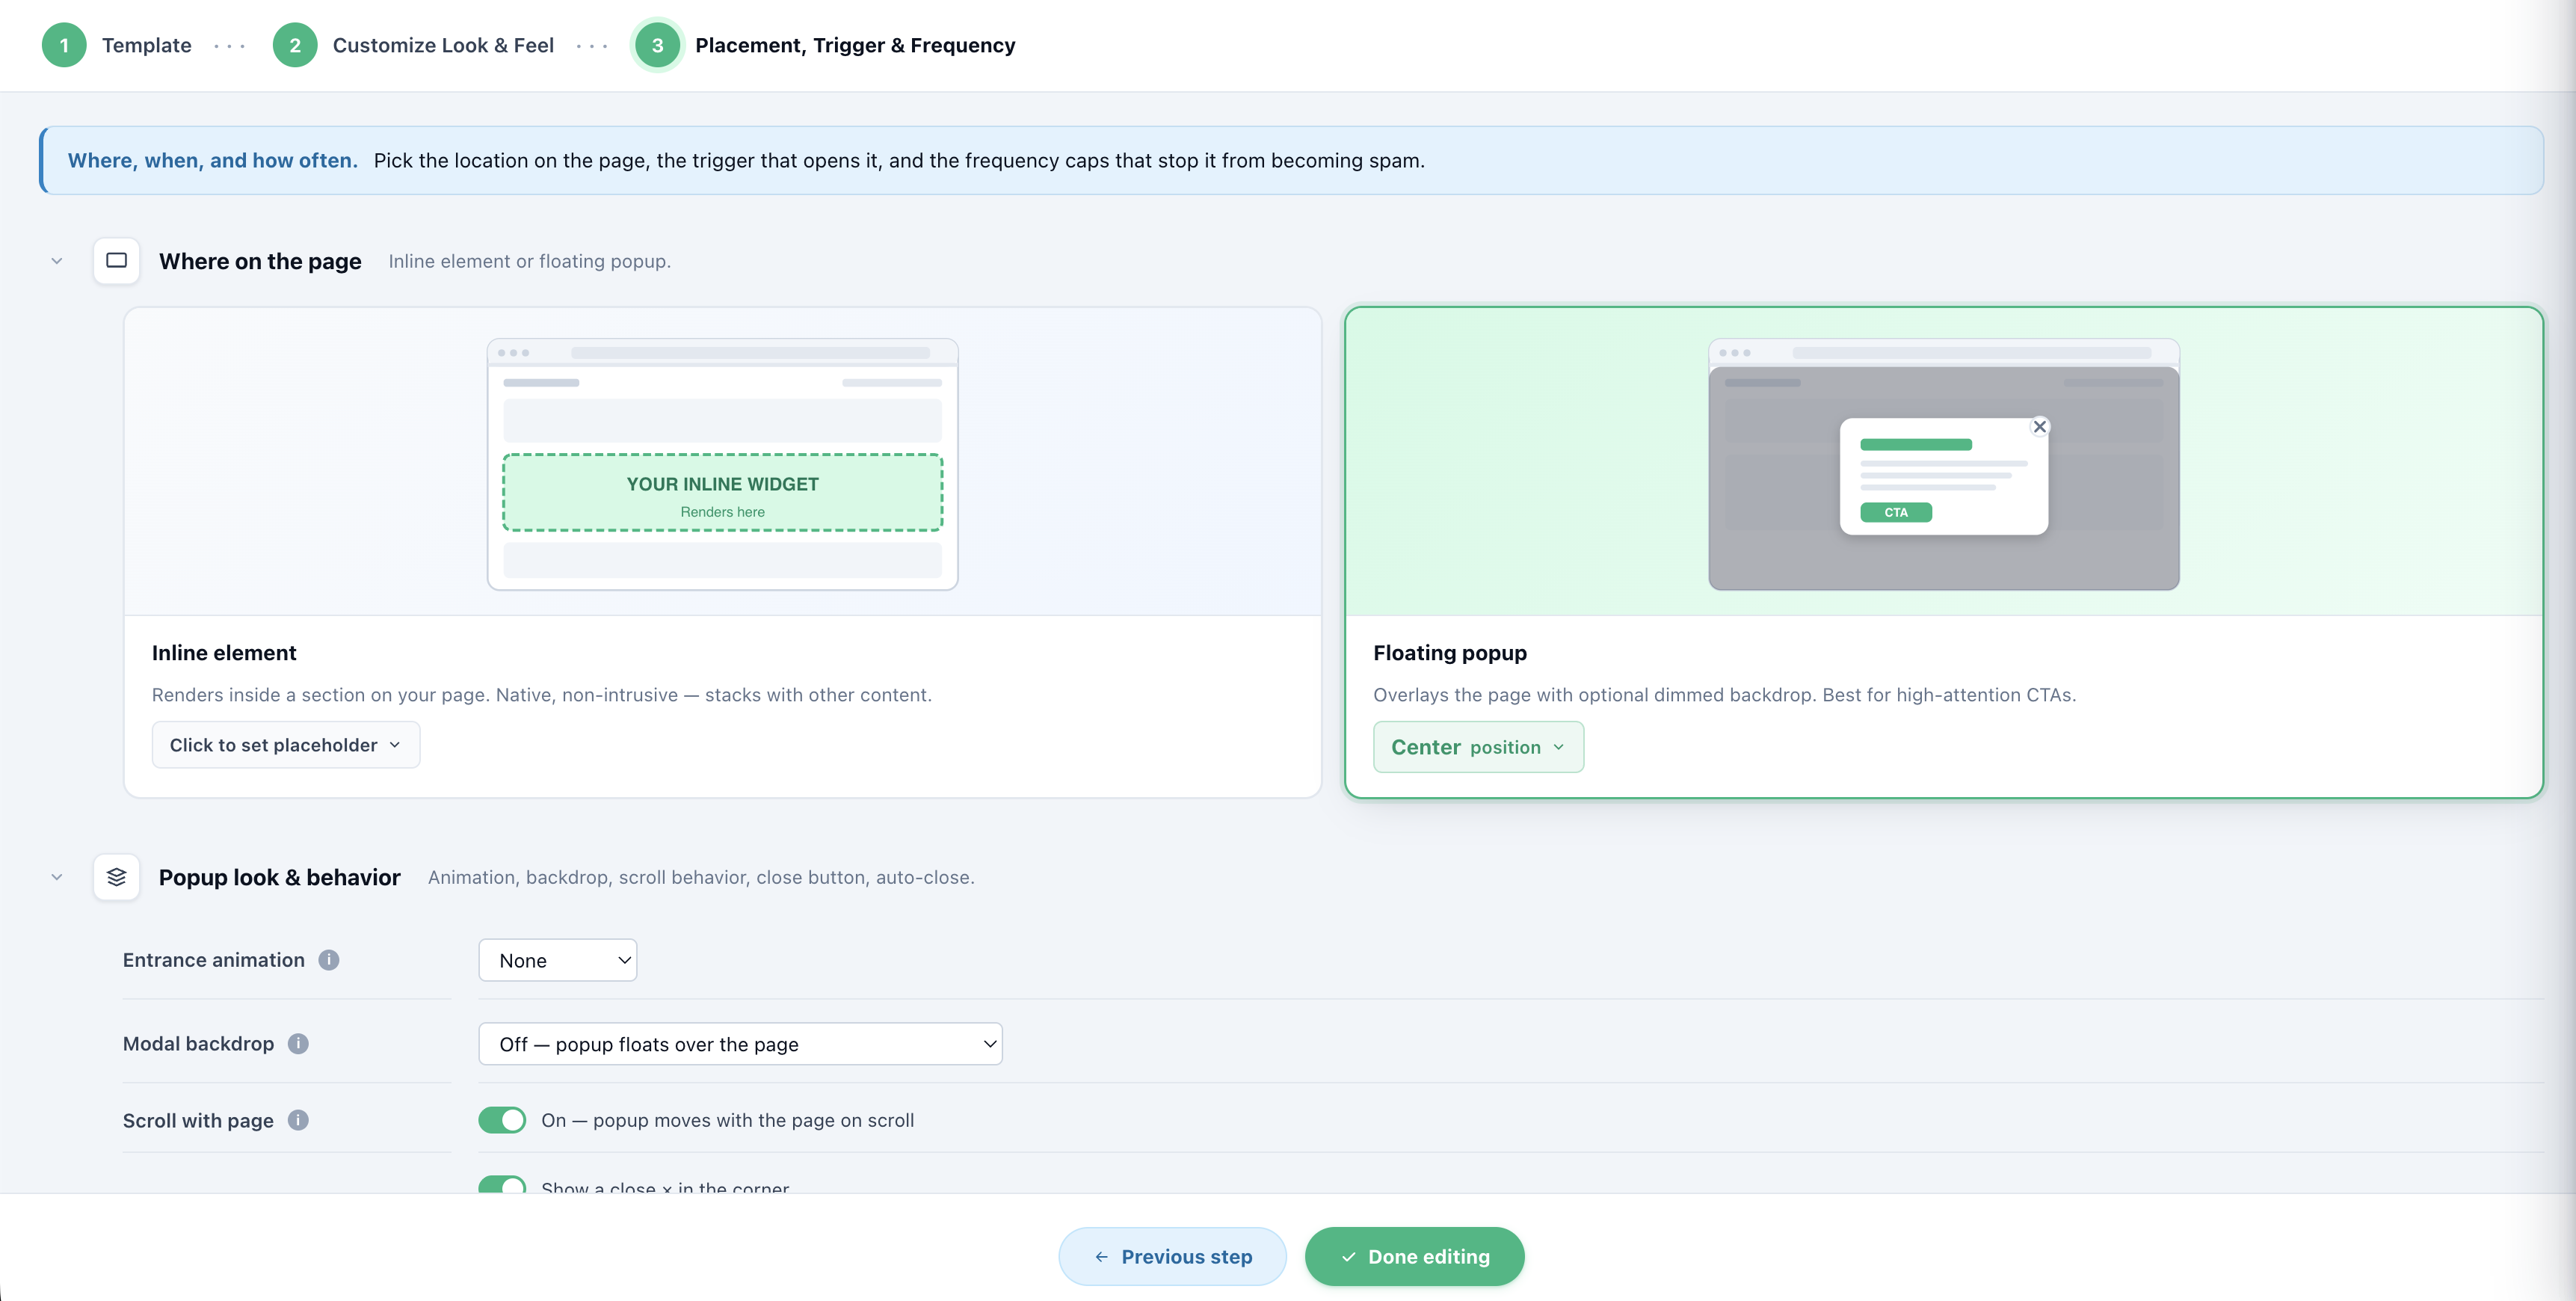
Set placement & trigger
Choose where it appears — an inline element inside your page, or a floating popup overlay — and set the entrance animation, backdrop, scroll behavior, trigger, and frequency caps.
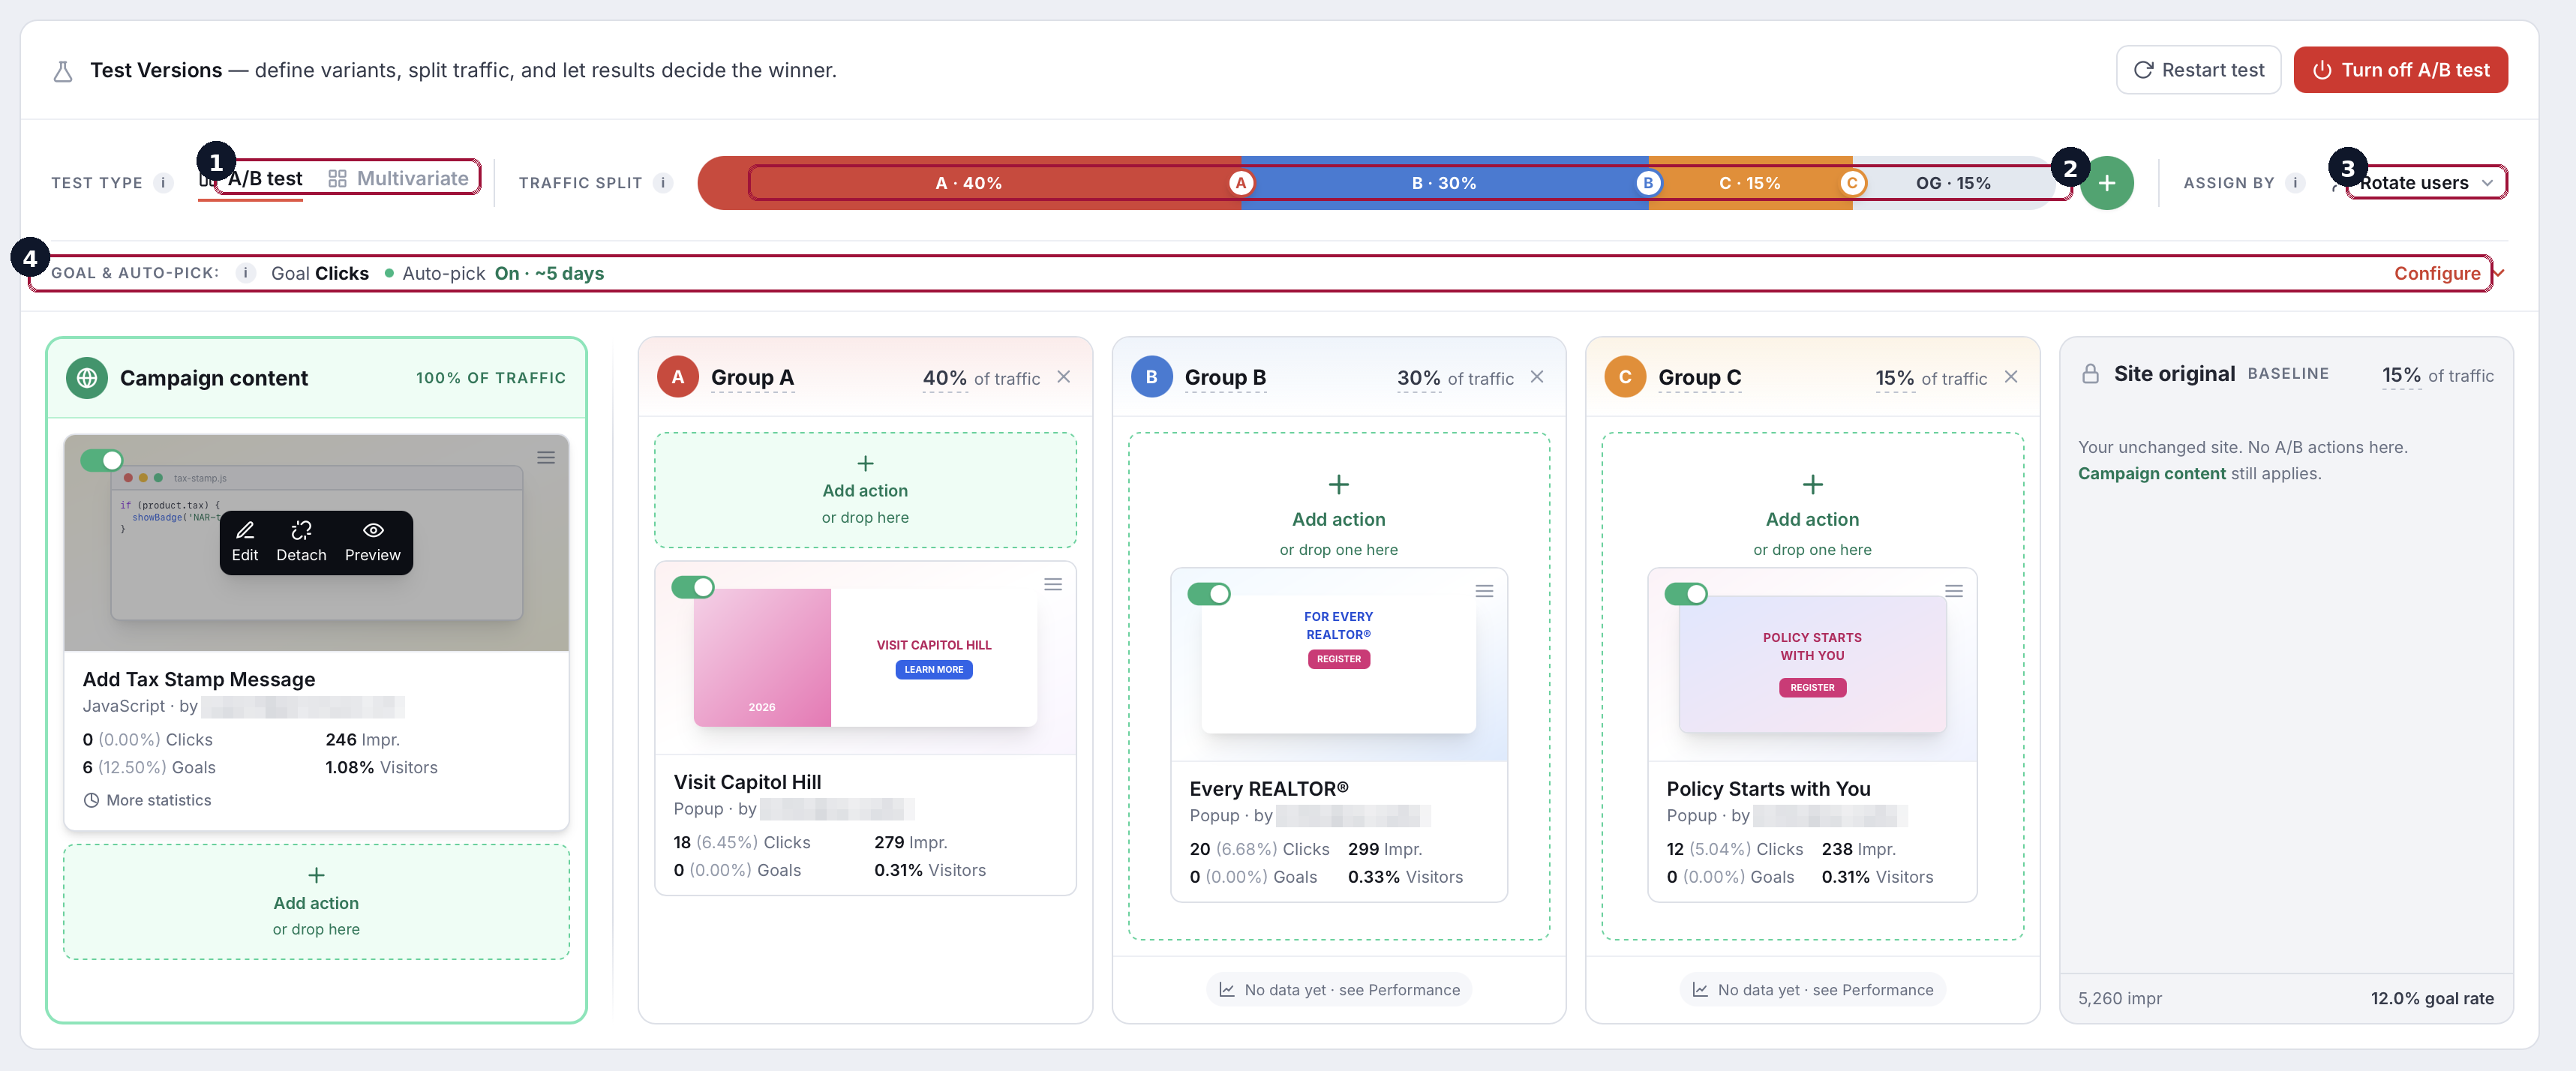
Activate A/B testing
With your variations built, turn on A/B testing. Personyze splits traffic across the variations and tracks impressions, clicks, and conversions for every one.
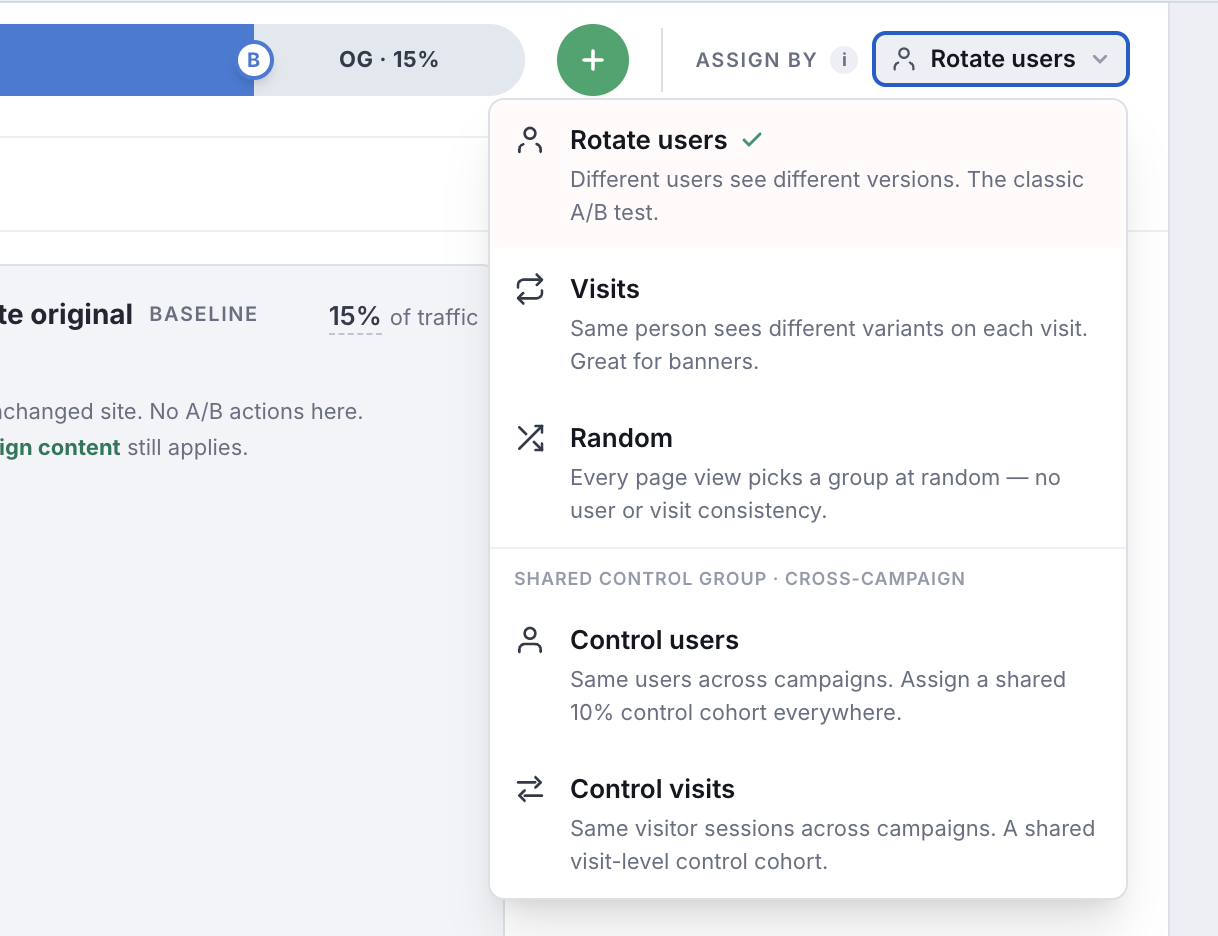
Assign visitors
Choose how traffic is split — rotate by users or by visits, weight the split, and optionally hold back a control group that sees nothing, so you can measure true lift versus no personalization.
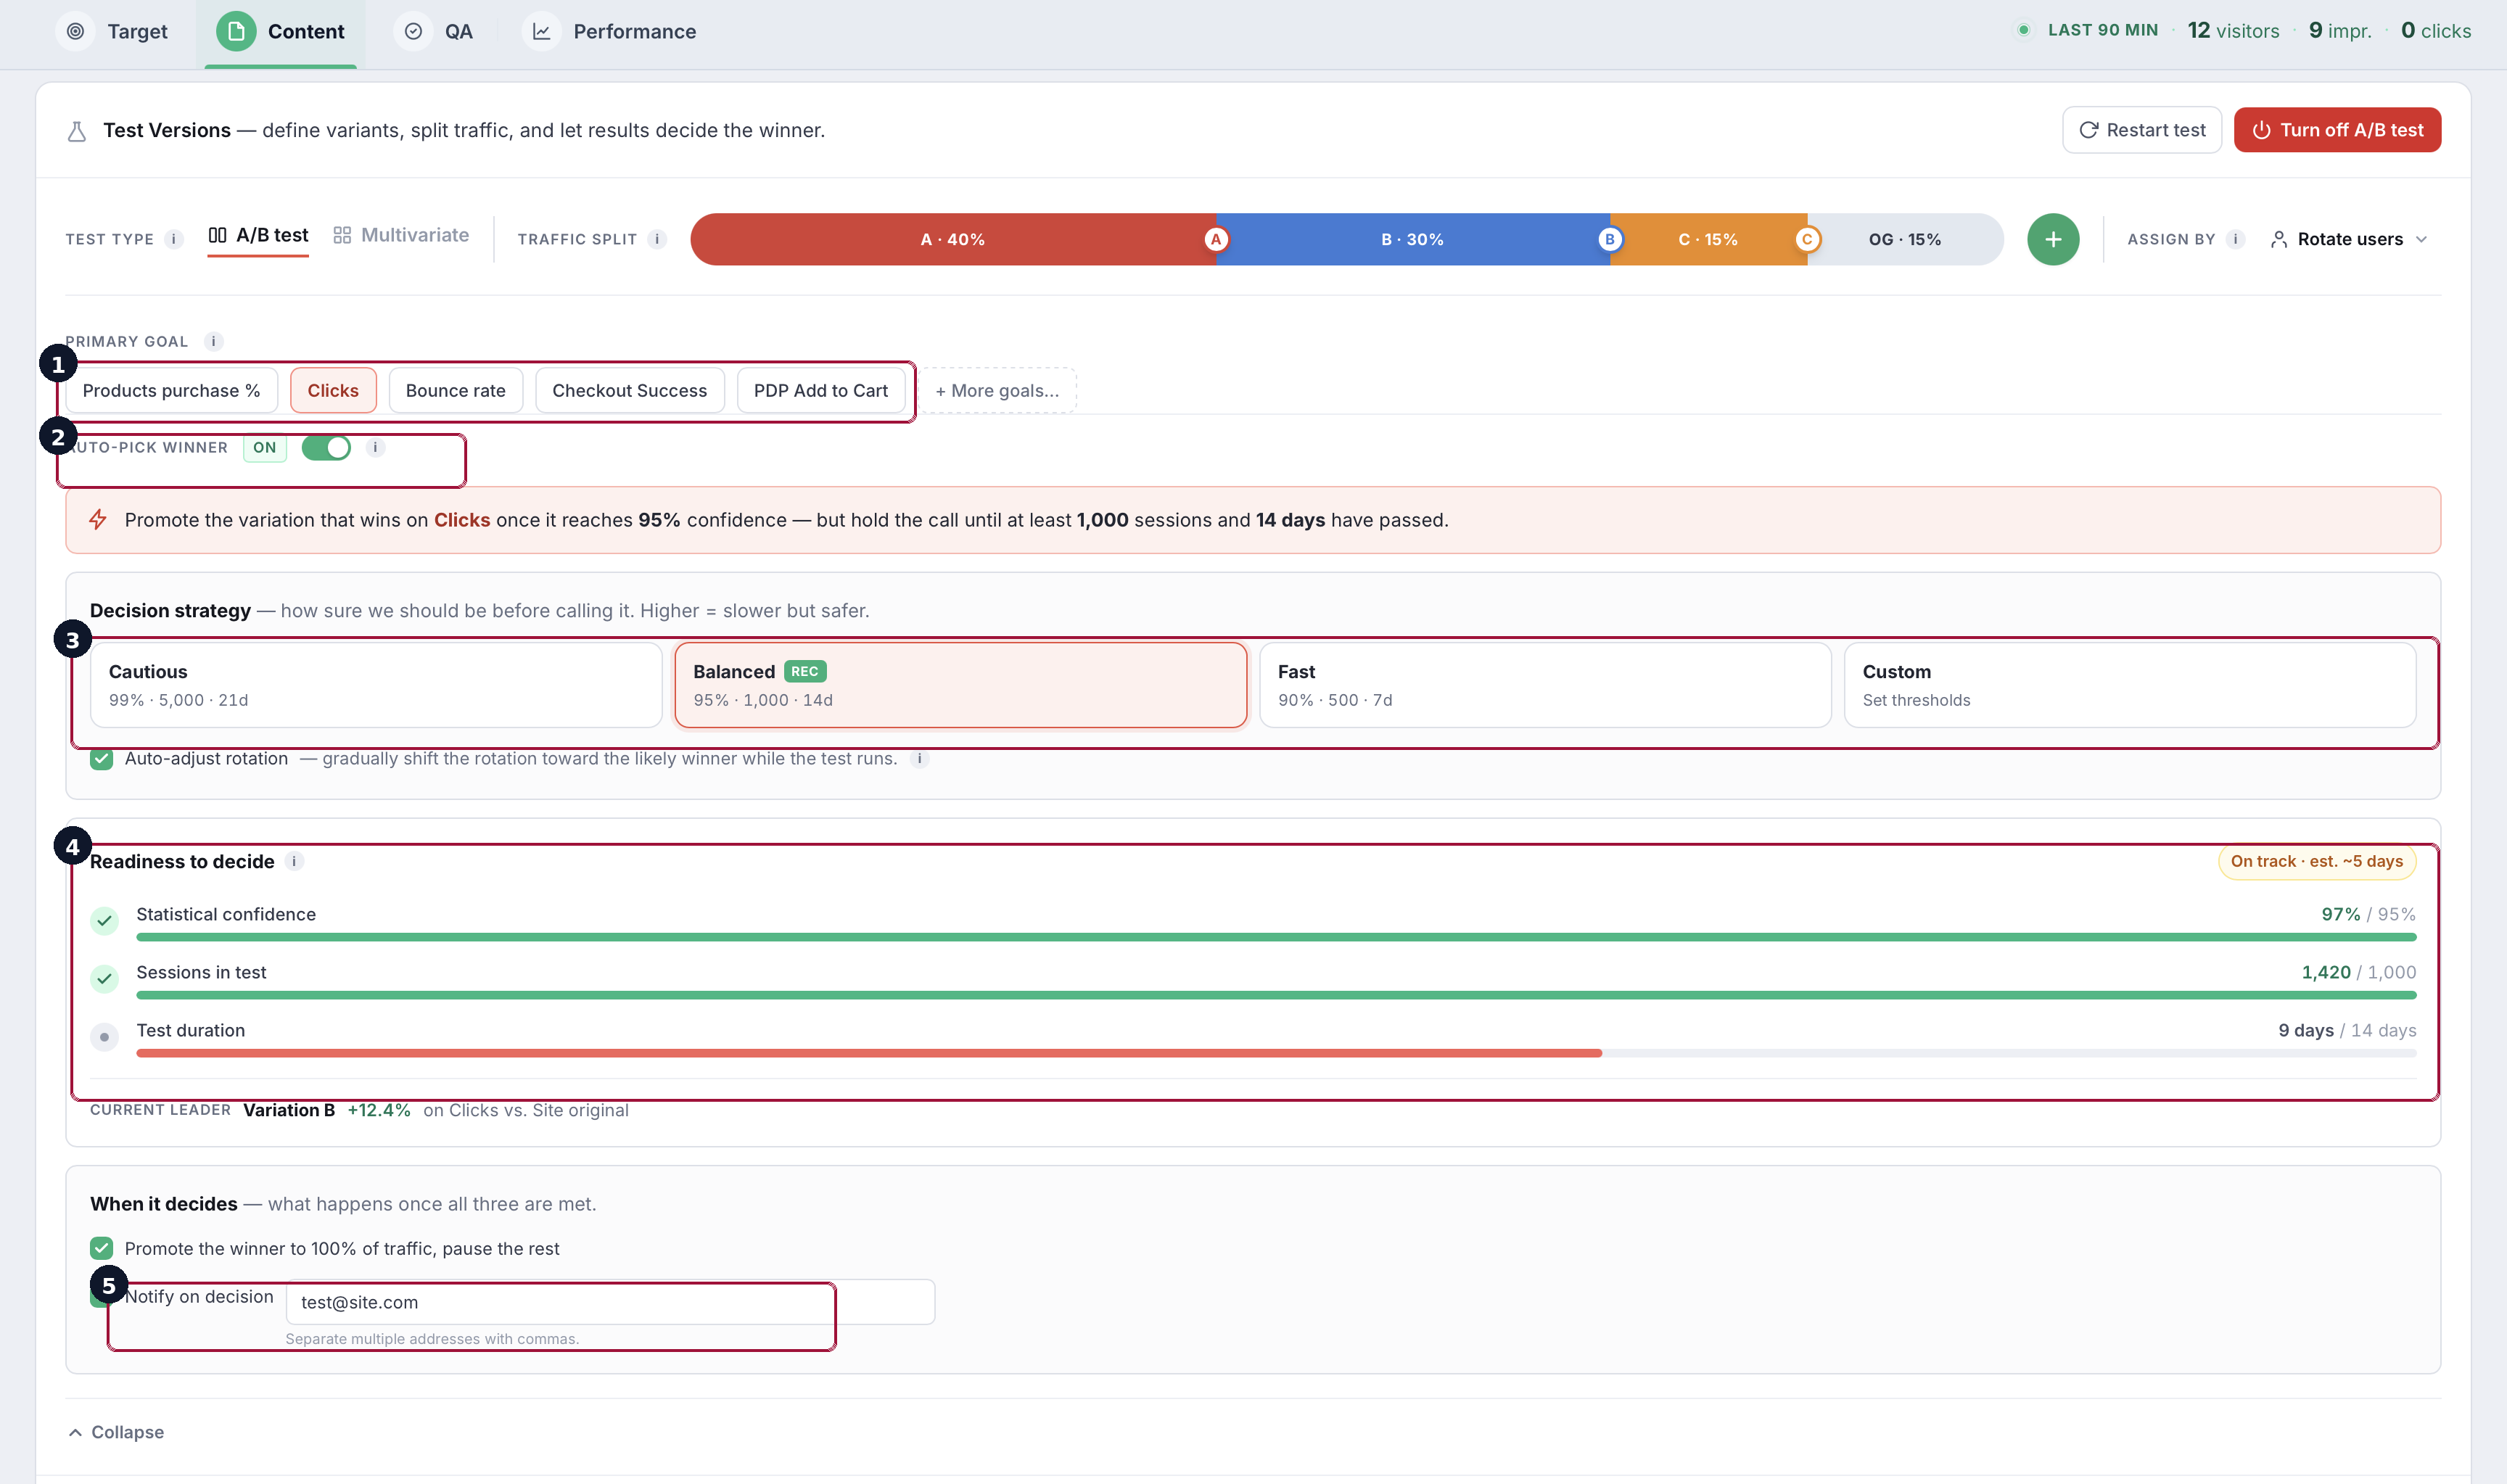
Choose the decision strategy
Tell Personyze how to call a winner — a preset (Cautious, Balanced, or Fast), or custom thresholds for statistical confidence, minimum sessions, and minimum duration. When a variation wins, Personyze can automatically reallocate traffic to it.
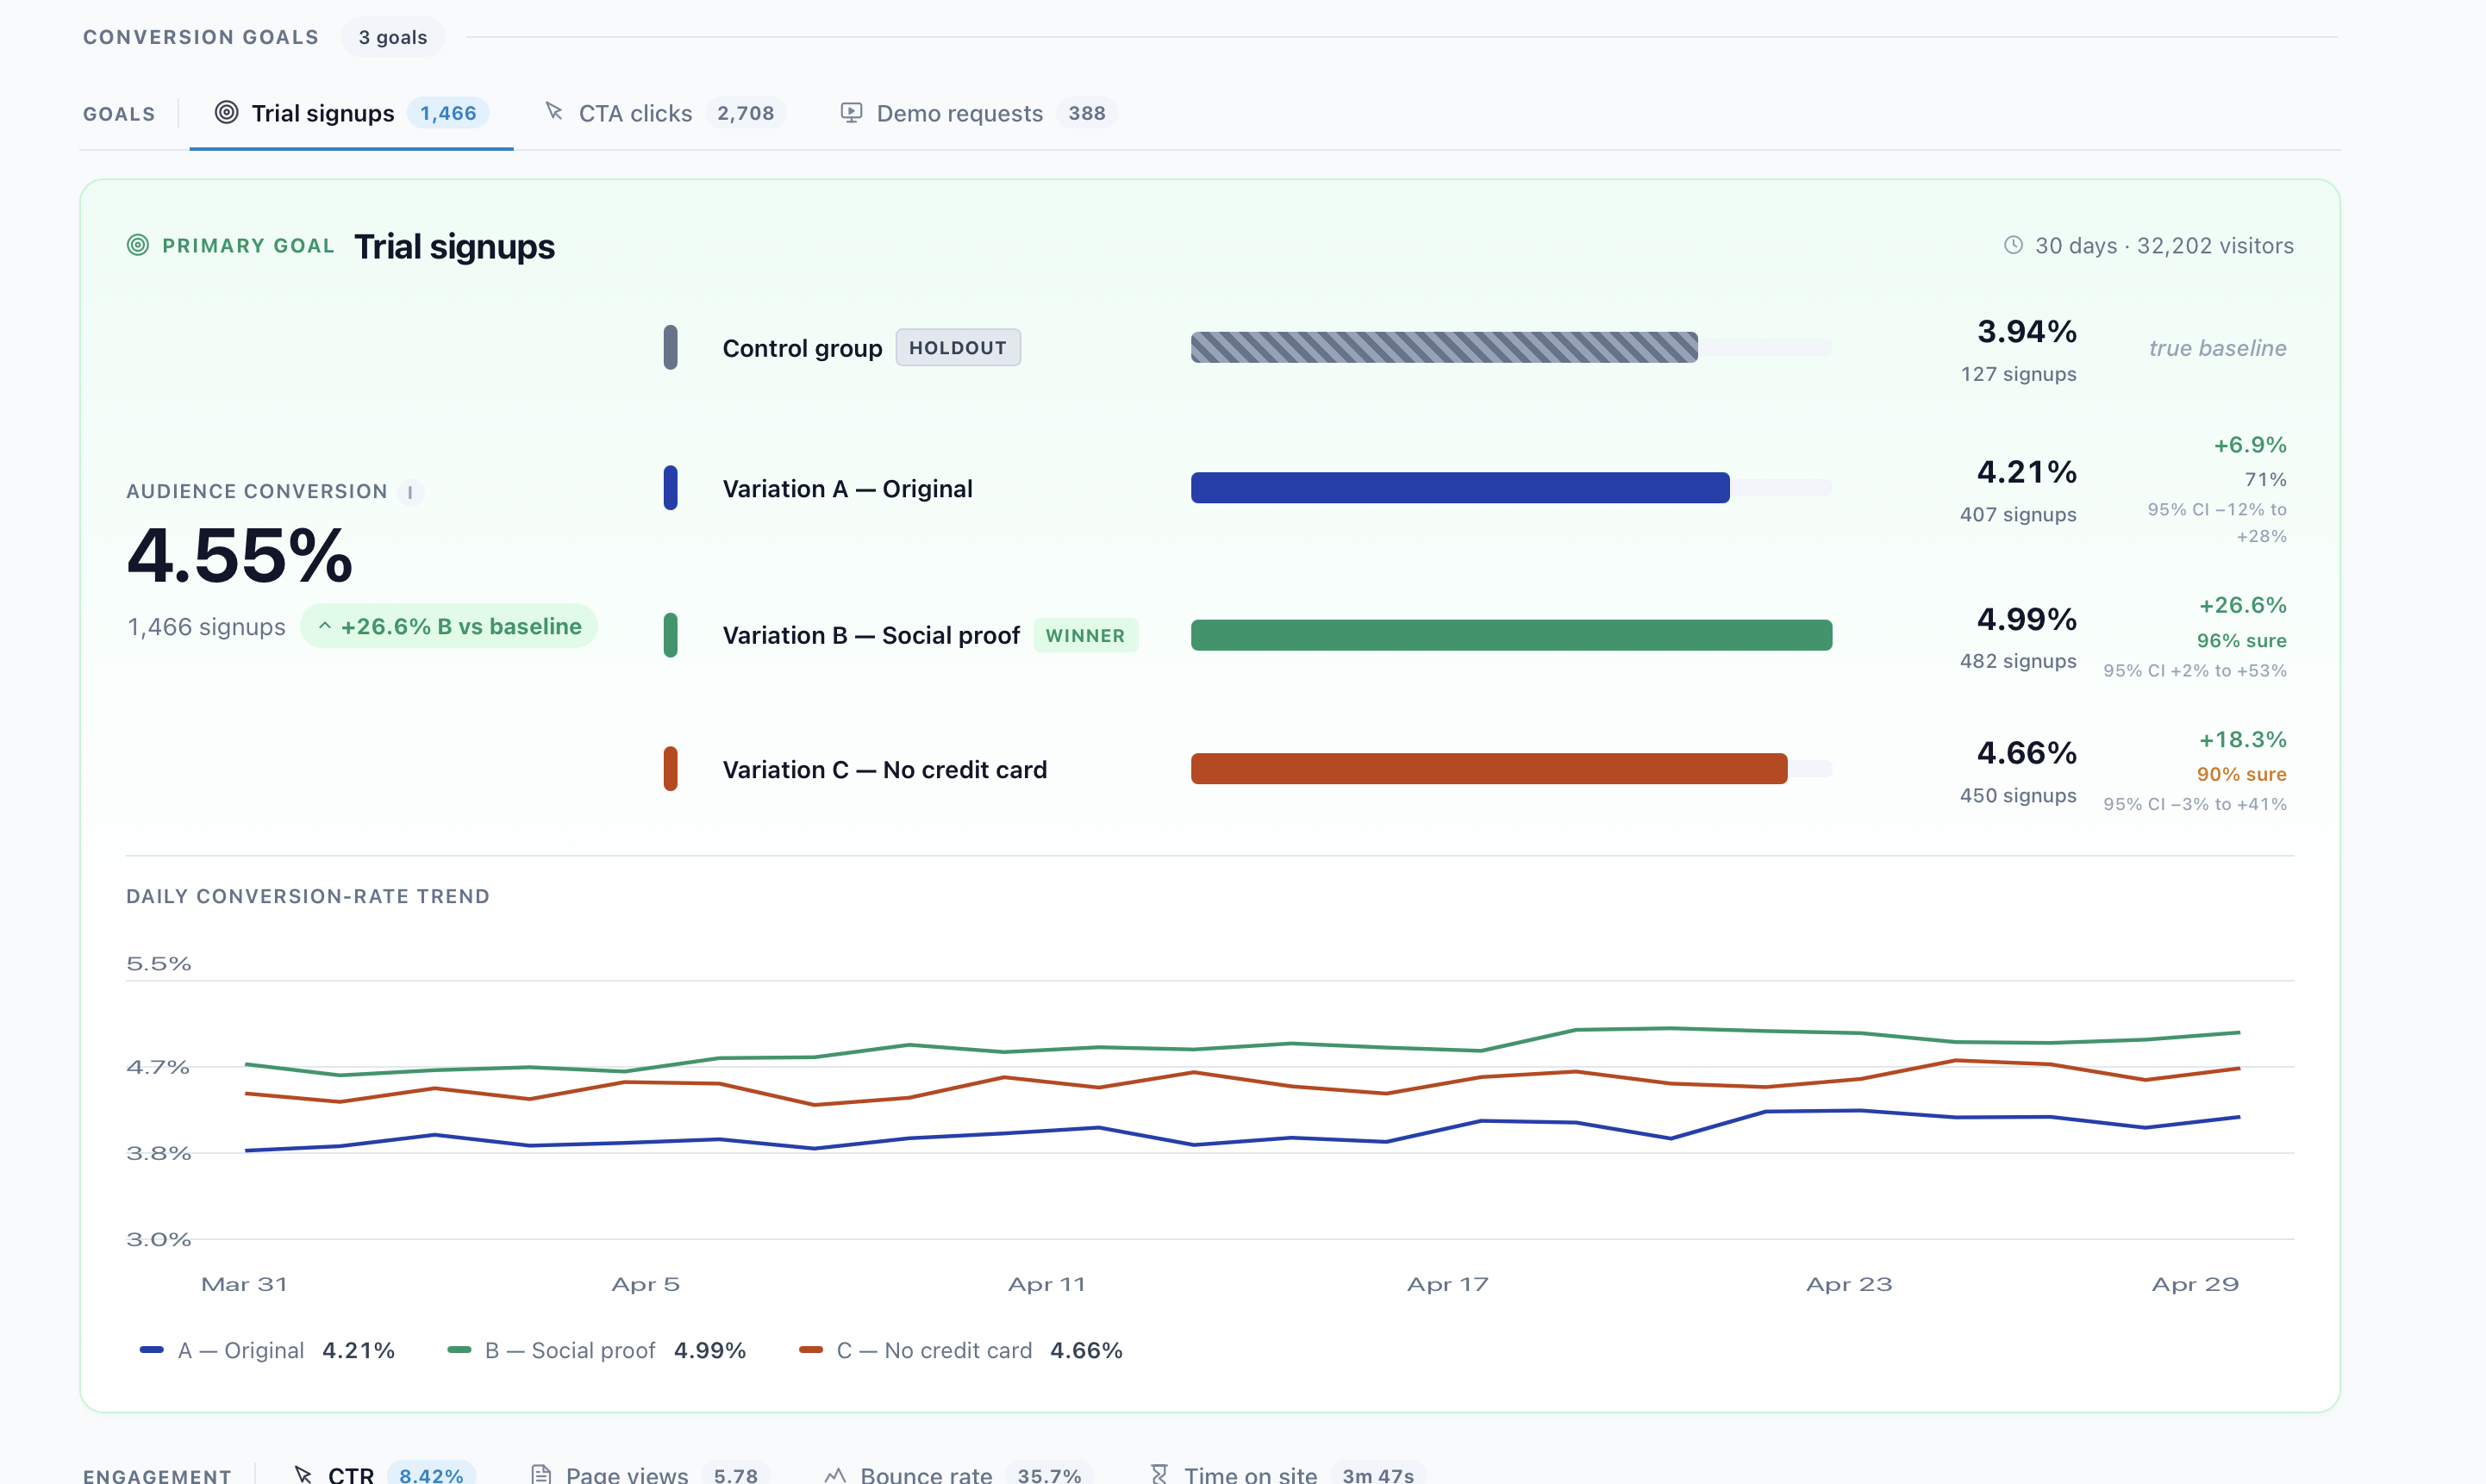
Read the results
The results view shows each variation’s visits, conversions, conversion rate, and uplift, with confidence and readiness-to-decide indicators so you know when a result is trustworthy.
Promote the winner
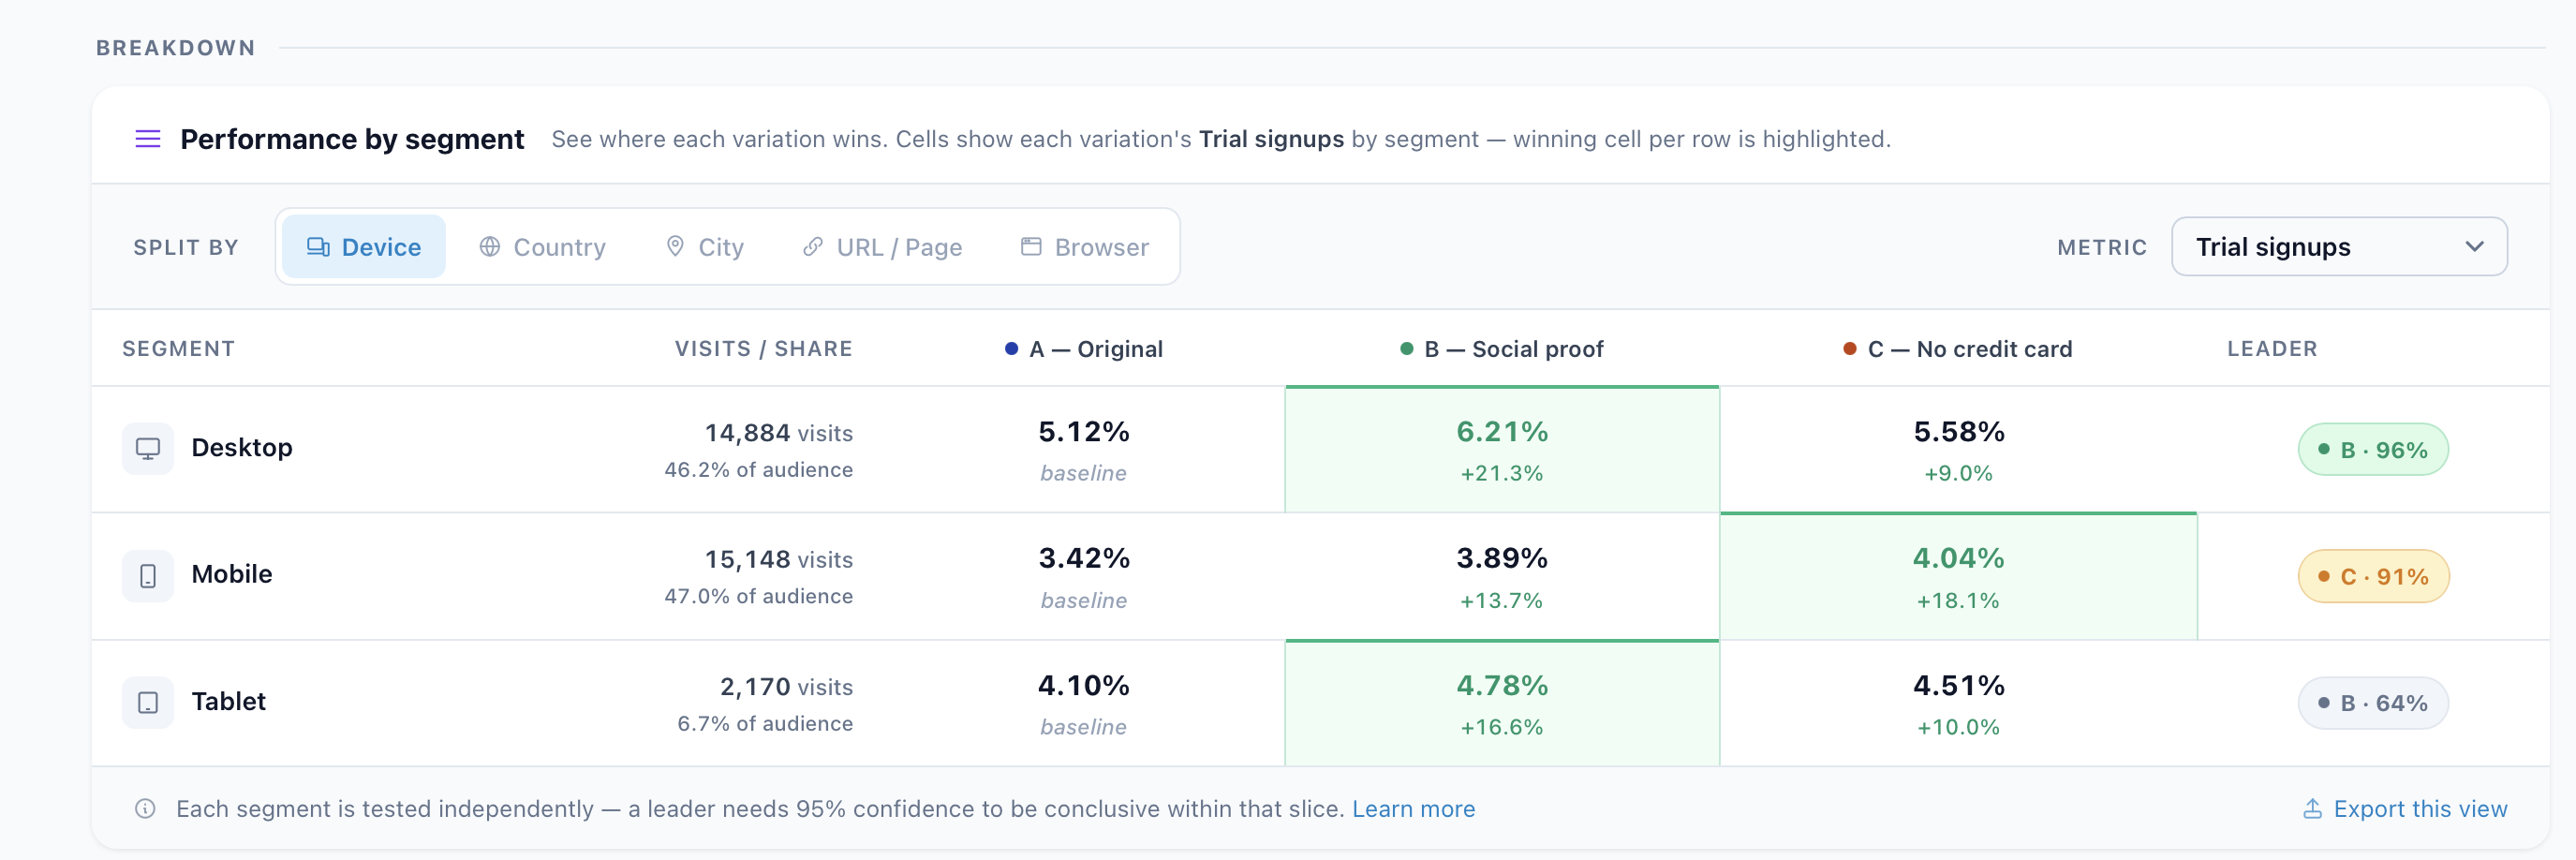
Break results down by segment to see which audiences prefer which variation, then promote the winner — Personyze shifts traffic to it. Make the winner your new baseline and test the next idea against it for continuous improvement.
Start with targeting
Every A/B test begins on the Target step. Here you define who enters the test — each rule narrows the audience, and the live Audience Forecast on the right shows how many visitors qualify as you build. Testing a focused audience produces cleaner results that reach significance faster.
Add & configure your rules
Click Add audience rule and pick from dozens of rule types — location, device, pages viewed, behavior, referrer, UTM, and CRM data. Combine conditions and groups with AND / OR / XOR, and set any group to Include or Exclude.
Build your variations
Move to the Content step. This is where you create the versions you want to compare. It starts empty — you add actions here, then create variations of them. Each variation is what one slice of your audience will see.
Add an action
Click Add action to open the picker. Choose what runs when the campaign matches: popups and banners, lead-capture forms, product and content recommendations, countdown timers, redirects, custom JavaScript, and more.
Edit anything on the page — Live Editor
For on-page changes, the Live Editor lets you edit any element of your real site — click an element to select it, then change its text, style (color, font, background), or visibility per breakpoint. Every change is tracked in a list you can revert. You can even use Page-level AI to rewrite a whole page (e.g. “rewrite this page for enterprise buyers”).
Or build a popup / banner
To create standalone content, use the Popup, Banner & HTML Builder. Pick a template, then customize layout, product panel, offer, timer, coupon, and CTA in the visual editor. Personyze auto-fills dynamic values like city and search keyword so you preview real personalization.
Set placement & trigger
Choose where it appears — an inline element inside your page, or a floating popup overlay — and set the entrance animation, backdrop, scroll behavior, trigger, and frequency caps.
Activate A/B testing
With your variations built, turn on A/B testing. Personyze splits traffic across the variations and tracks impressions, clicks, and conversions for every one.
Assign visitors
Choose how traffic is split — rotate by users or by visits, weight the split, and optionally hold back a control group that sees nothing, so you can measure true lift versus no personalization.
Choose the decision strategy
Tell Personyze how to call a winner — a preset (Cautious, Balanced, or Fast), or custom thresholds for statistical confidence, minimum sessions, and minimum duration. When a variation wins, Personyze can automatically reallocate traffic to it.
Read the results
The results view shows each variation’s visits, conversions, conversion rate, and uplift, with confidence and readiness-to-decide indicators so you know when a result is trustworthy.
Promote the winner
Break results down by segment to see which audiences prefer which variation, then promote the winner — Personyze shifts traffic to it. Make the winner your new baseline and test the next idea against it for continuous improvement.
1. Start with targeting — aim the test at the right audience
Every campaign begins on the Visitor Targeting screen, where you define who the campaign — and therefore the test — applies to. For a test this is the most important step, because the audience is what keeps your data clean.
The tighter and more relevant your audience, the less noise in the results. Testing a pricing headline on everyone mixes in visitors who’d never buy, diluting the signal and slowing you down. Testing it only on high-intent visitors to the pricing page means:
- No data pollution — the people in the test are the people the change is for, so the winner reflects real intent, not random traffic.
- Faster significance — with less noise, each variation reaches a trustworthy result sooner.
- Decisions you can act on — “B won for pricing-page visitors on mobile” is far more useful than “B won for all traffic.”
Everything below is the full targeting toolkit — the same rules, forecast, and controls available to any campaign.
The Visitor Targeting screen is where you define who the campaign applies to. Rules combine 70+ real-time visitor attributes into an expression that Personyze evaluates on every page view.
Adding rules: start empty, then pick the signals you need
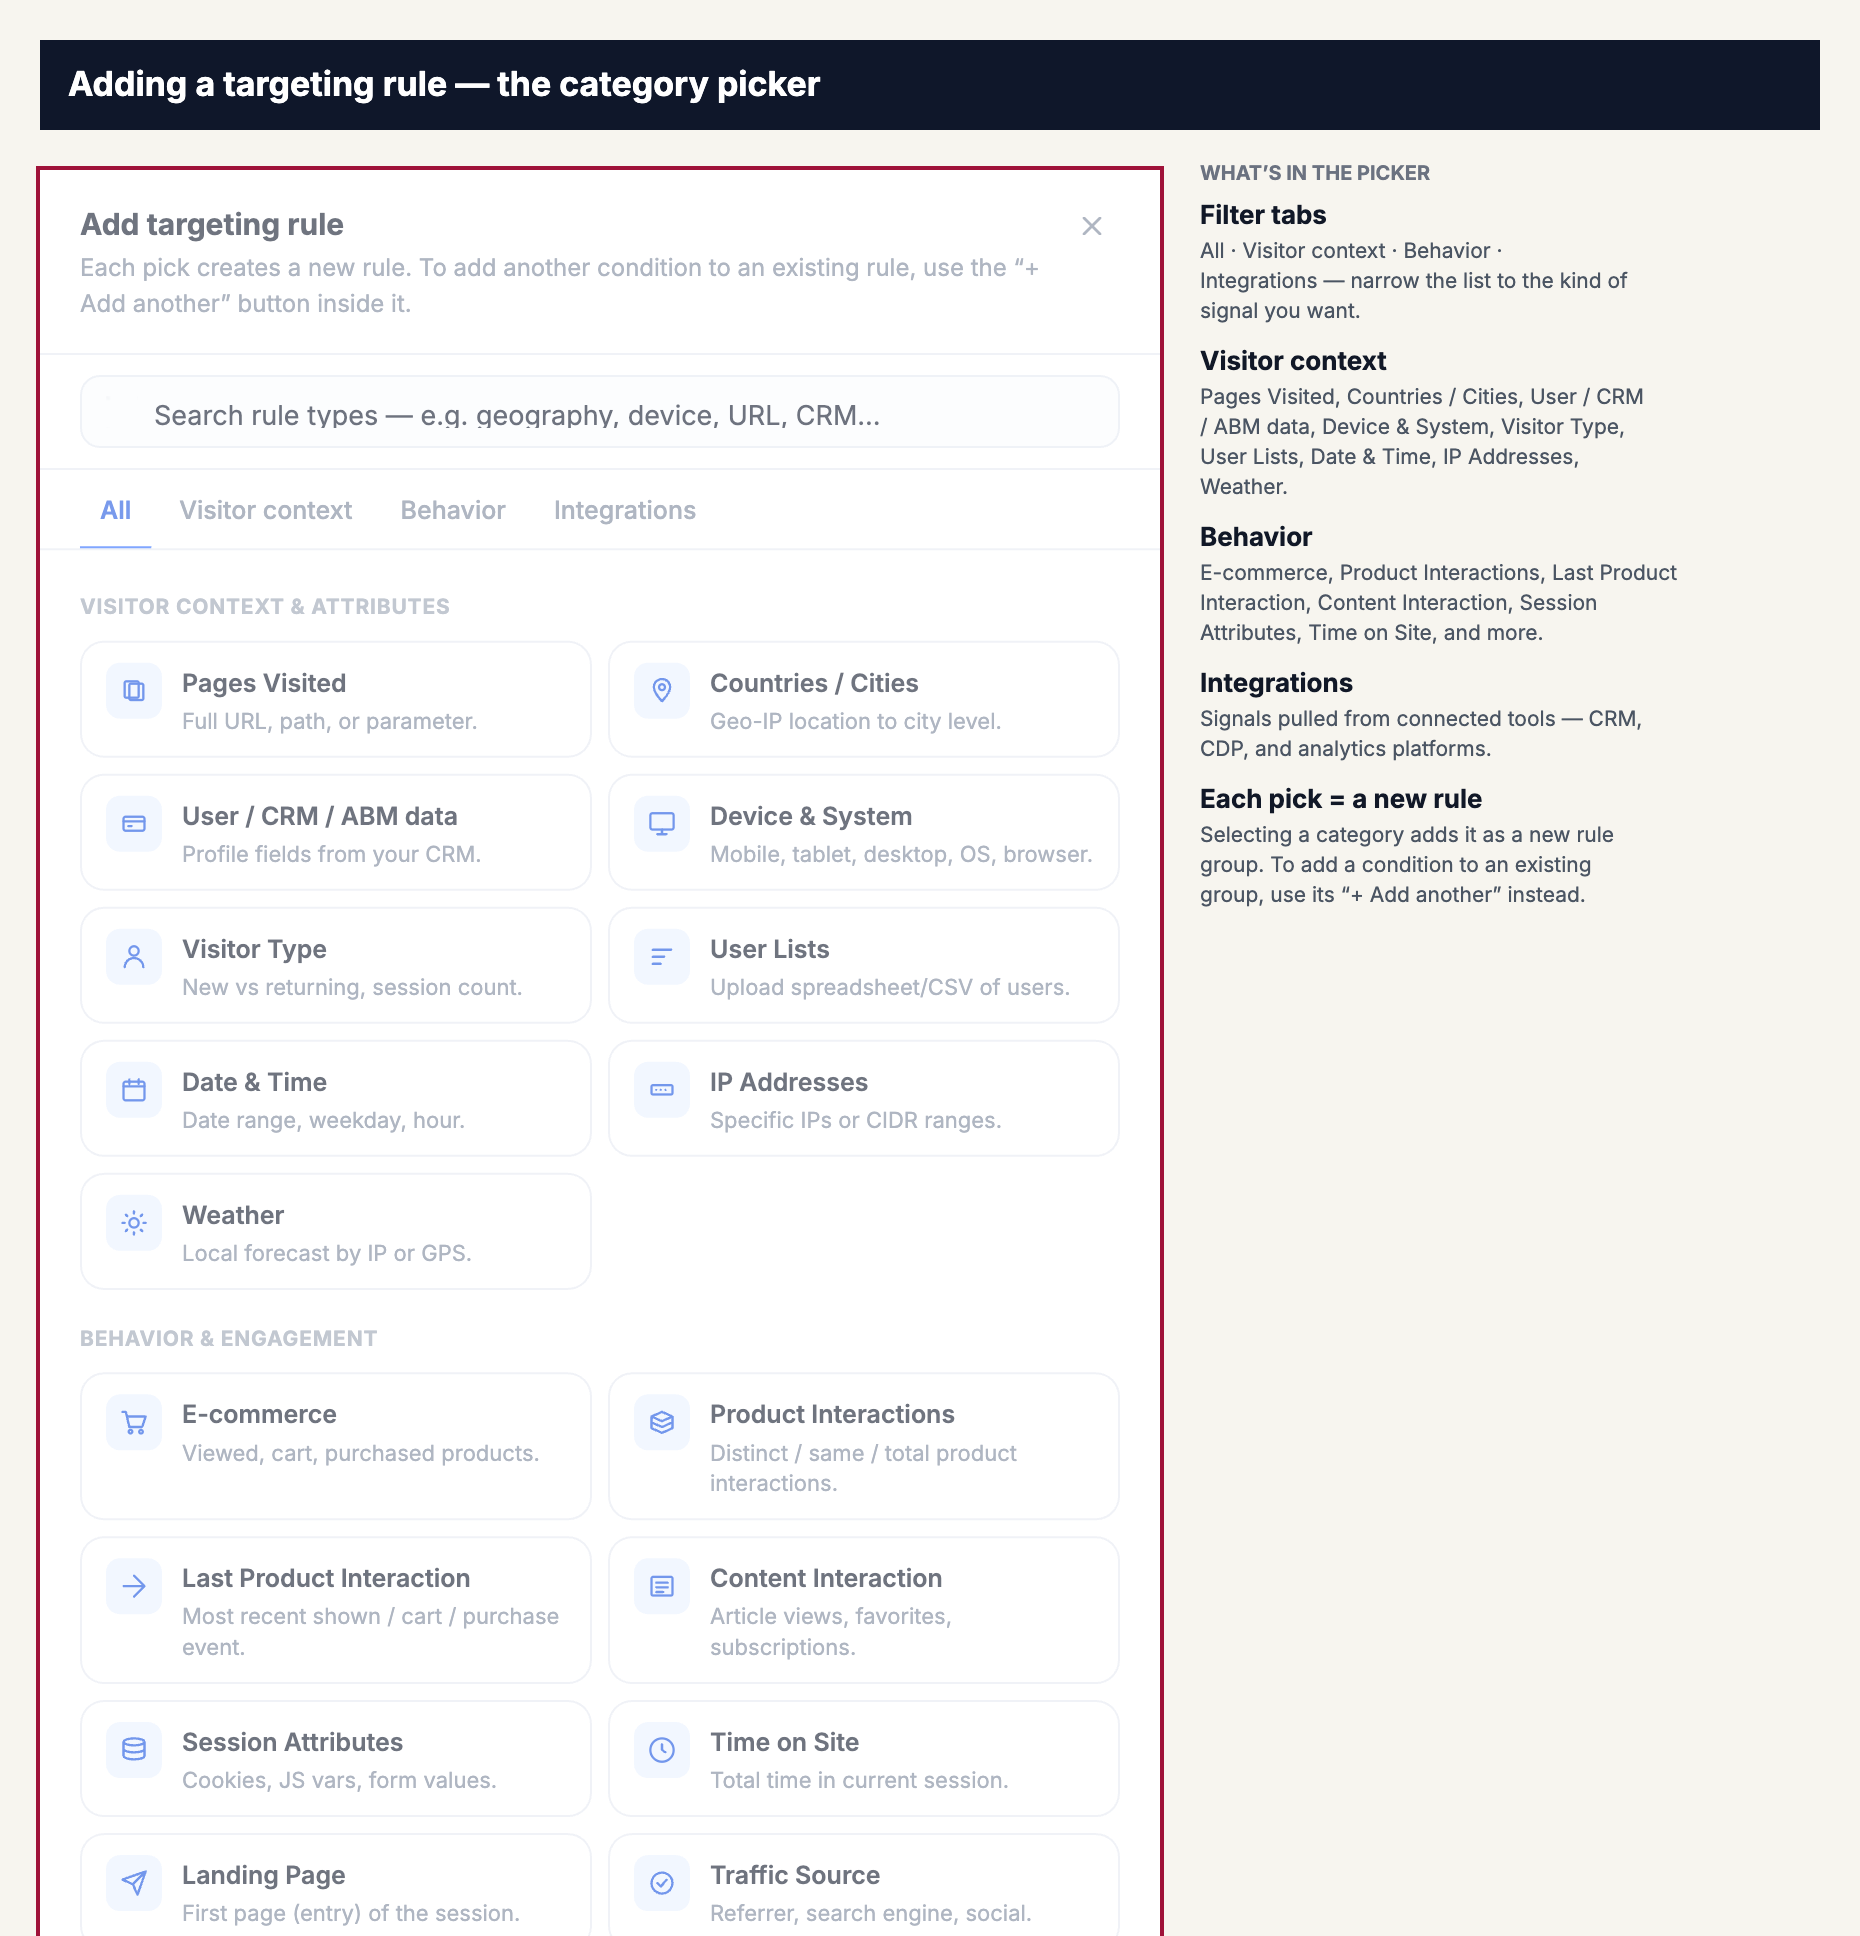
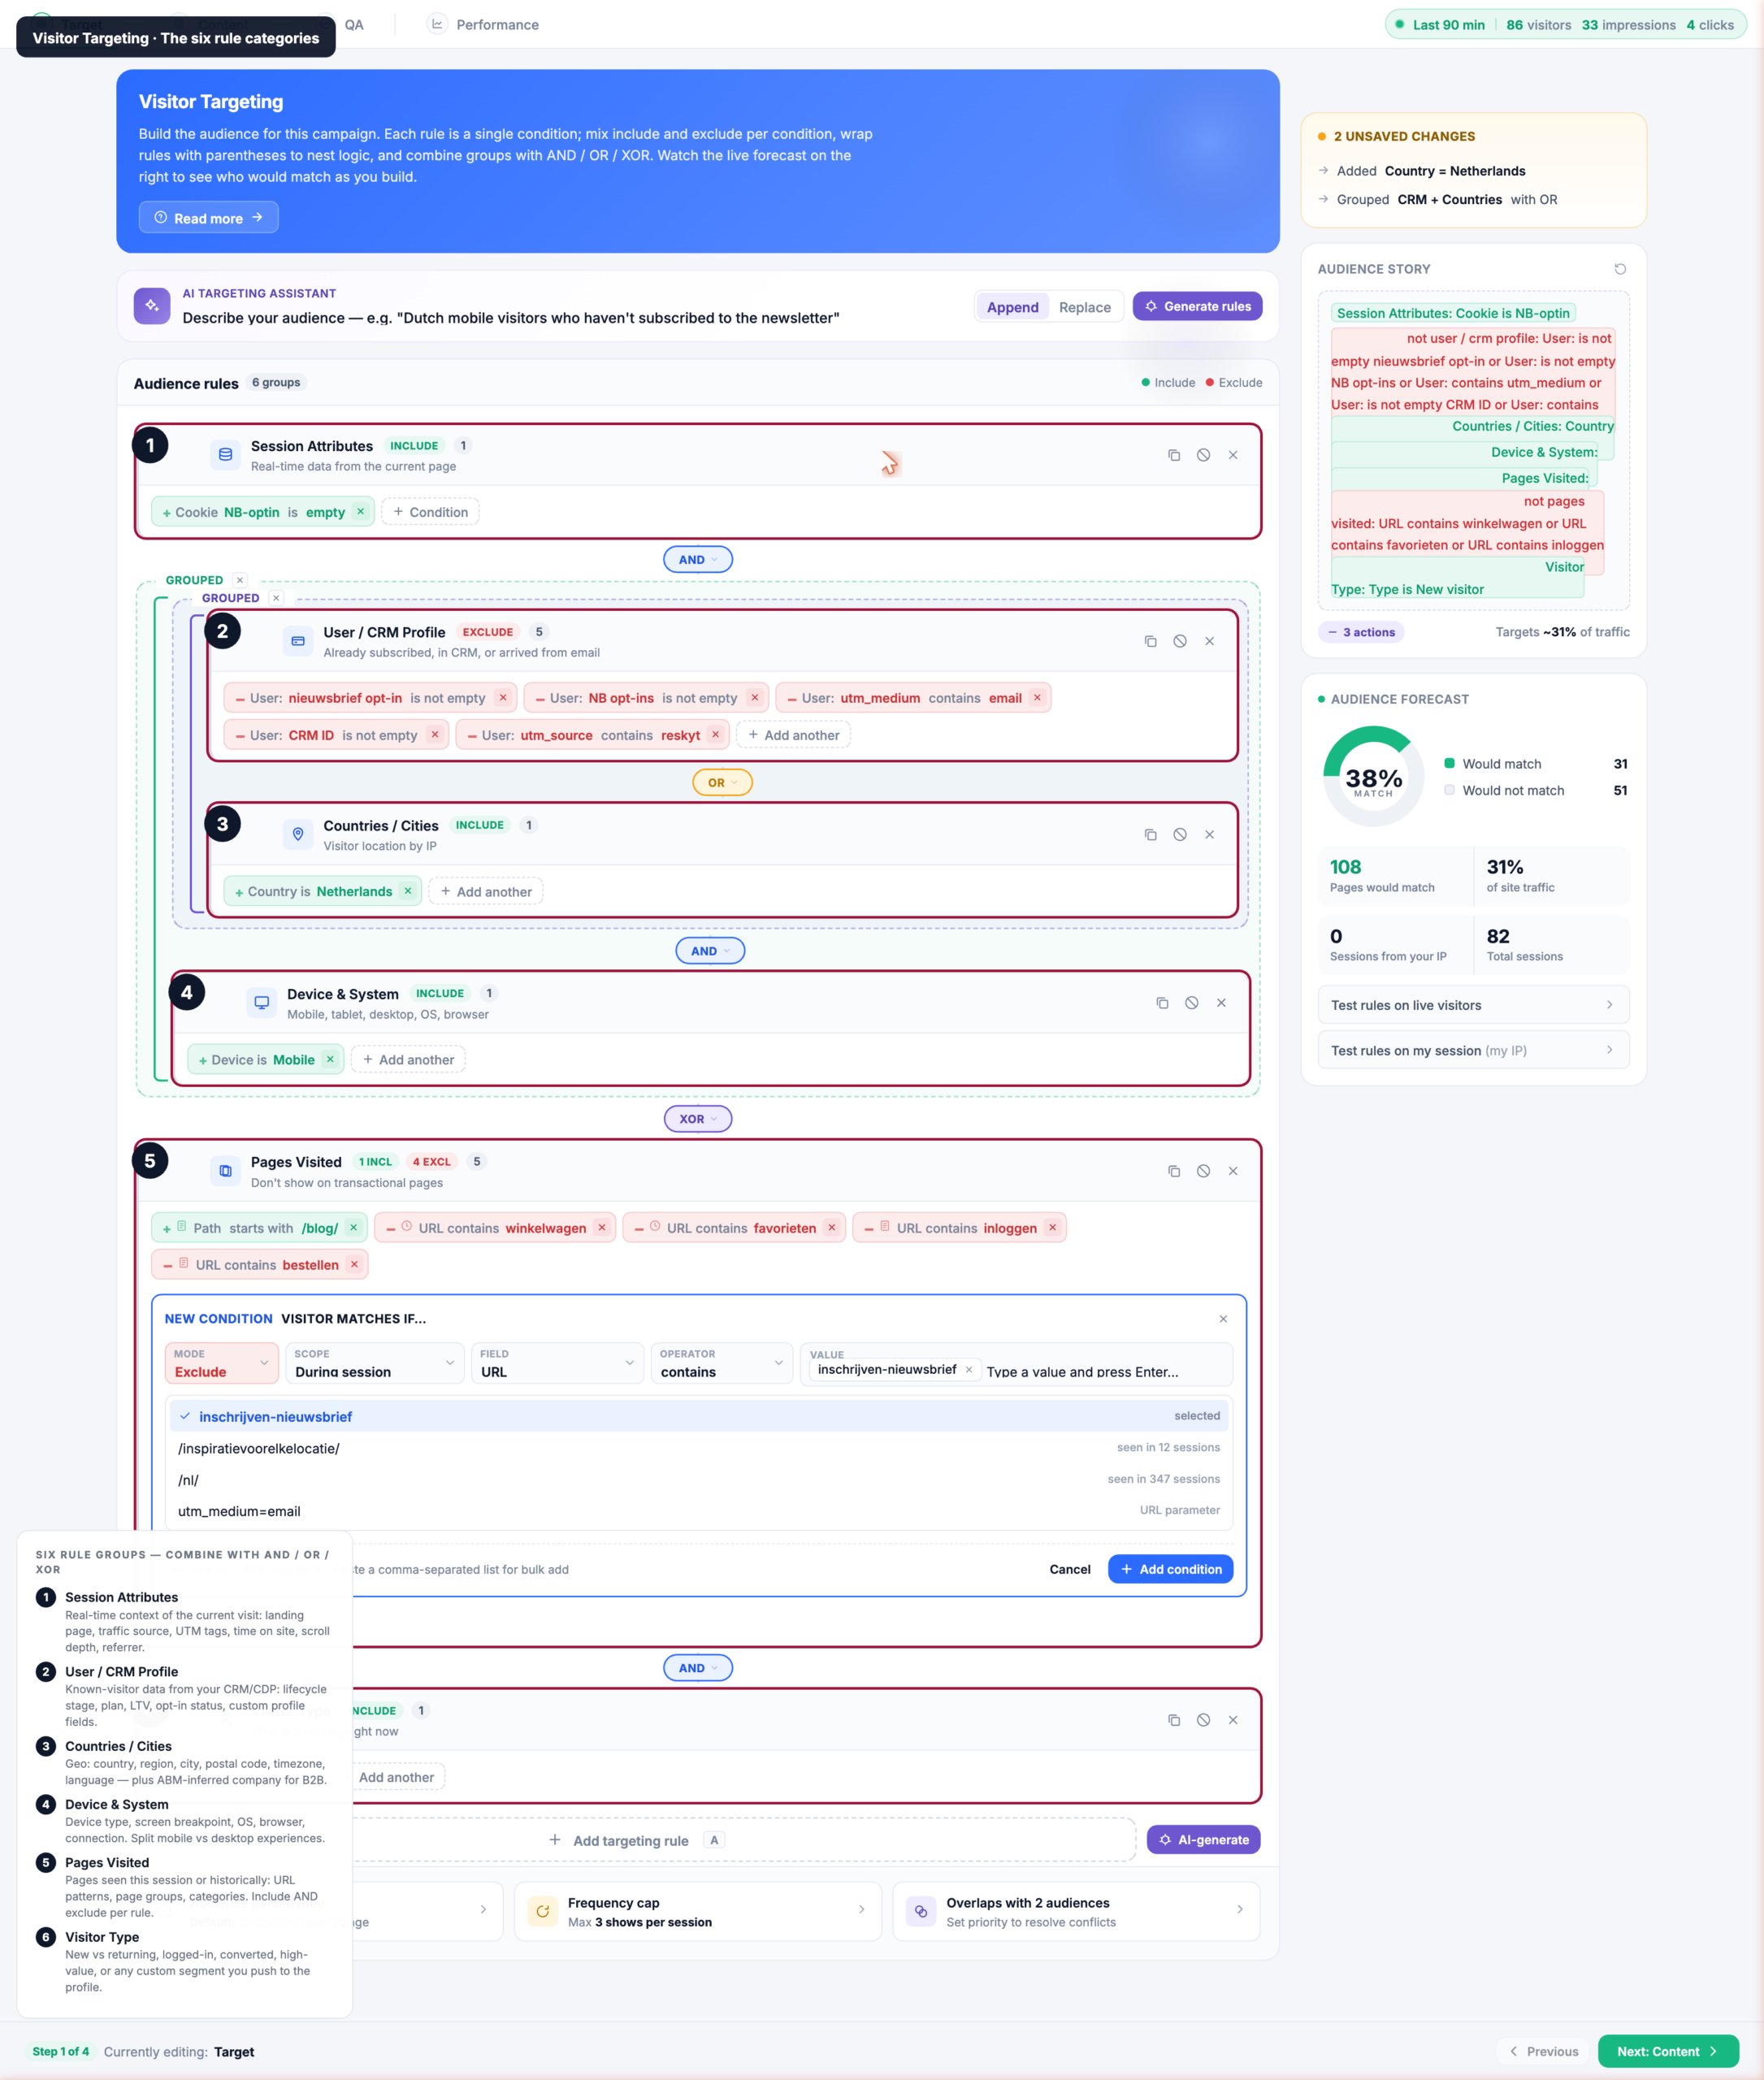
A new campaign’s audience starts empty — it would match every visitor until you narrow it. You build the audience by clicking Add targeting rule and choosing from the rule categories in the picker. Each category you add becomes a rule group on the screen; a campaign only shows the groups you’ve actually added, in whatever combination you need.
The picker organizes rules under three tabs — Visitor context, Behavior, and Integrations — so you can jump straight to the kind of signal you want. Every rule answers a different question about the visitor:
Visitor context & attributes — who and where the visitor is, right now:
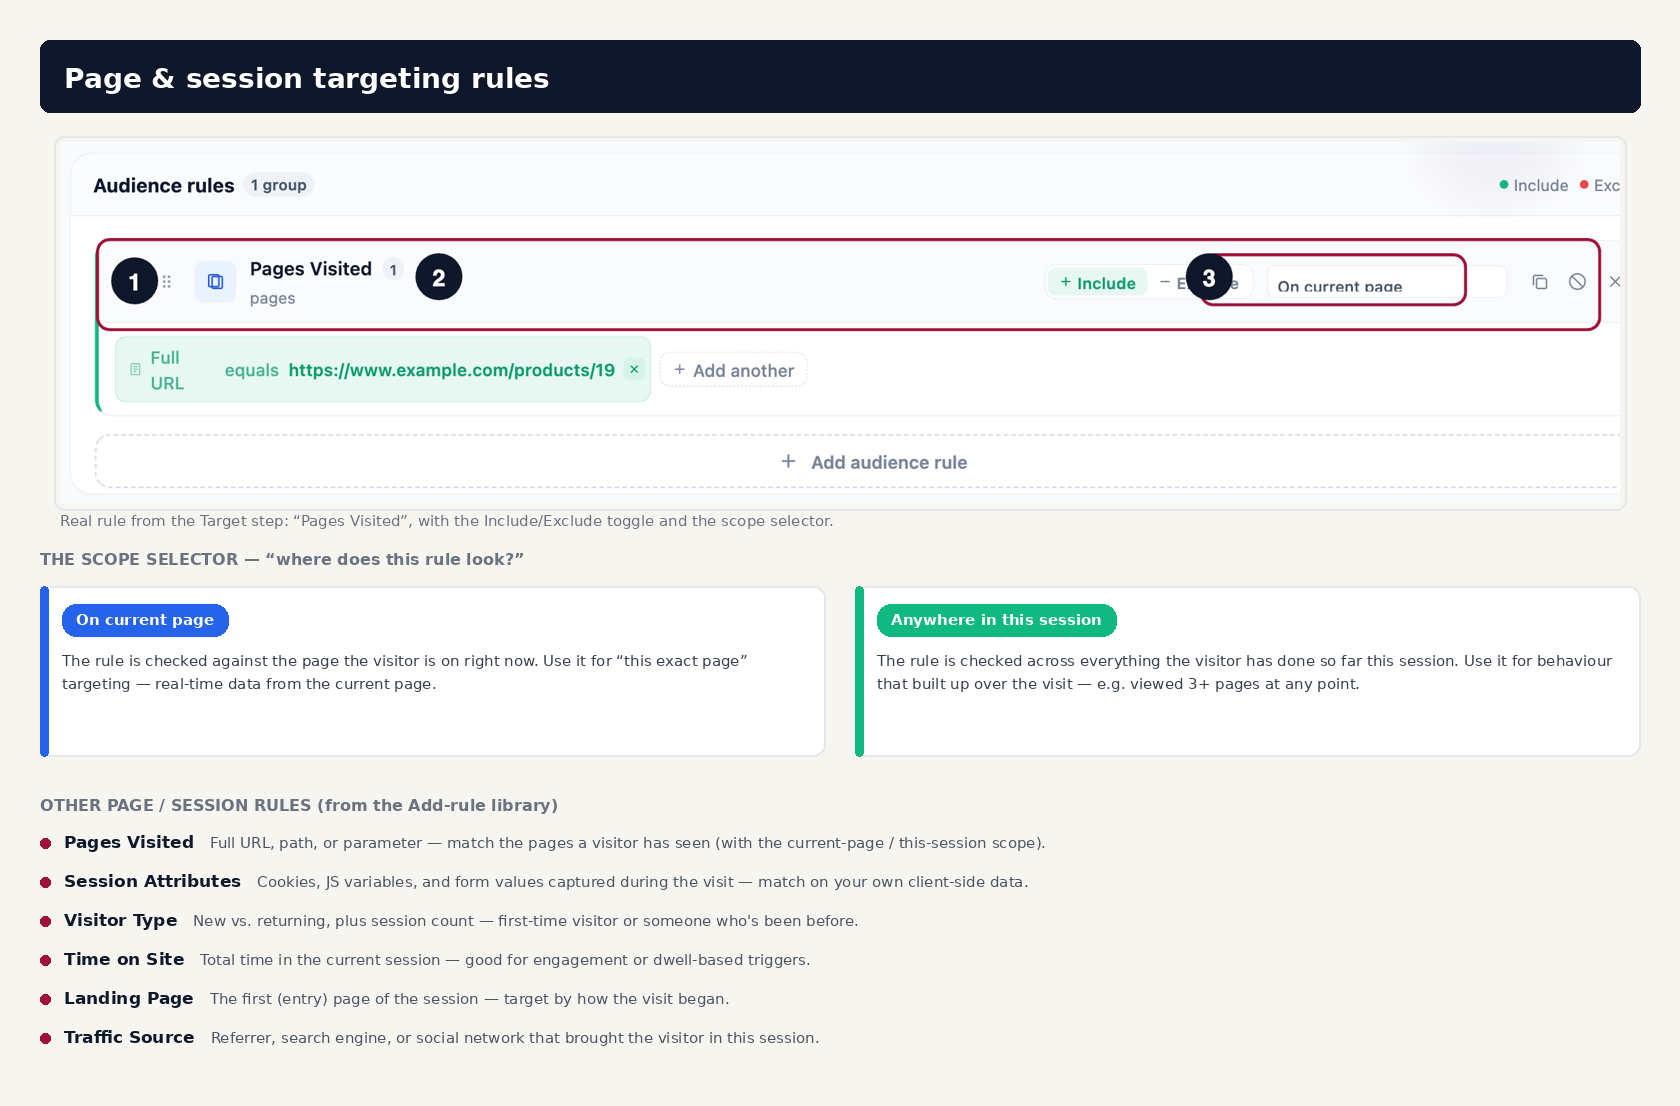
- Pages Visited — match on the full URL, a path, or a query parameter; scope it to the current page or anywhere in the session.
- Countries / Cities — geo-location down to city level from the visitor’s IP.
- User / CRM / ABM data — known-visitor profile fields synced from your CRM or CDP (lifecycle stage, plan tier, lifetime value, industry, and custom fields).
- Device & System — device type (mobile, tablet, desktop), operating system, and browser.
- Visitor Type — new vs. returning, plus session count.
- User Lists — match against a spreadsheet/CSV of users you upload.
- Date & Time — a date range, day of week, or hour of day (useful for launches, sales windows, and business hours).
- IP Addresses — specific IPs or CIDR ranges (handy for internal QA or named accounts).
- Weather — the visitor’s local conditions by IP or GPS.
Behavior & engagement — what the visitor has actually done, this session or over time:
- E-commerce — products they’ve viewed, added to cart, or purchased.
- Product Interactions — counts across products (distinct, same, or total).
- Last Product Interaction — their most recent shown / cart / purchase event, for “pick up where you left off” targeting.
- Content Interaction — article views, favorites, and subscriptions.
- Session Attributes — cookies, JavaScript variables, and form values captured on the page — your own client-side data.
- Time on Site — total time in the current session.
- Landing Page — the first page of the session.
- Traffic Source — referrer, search engine, or campaign the visit came from.
Integrations — signals pulled live from connected tools. Known-visitor data flows in through our integrations with HubSpot, Salesforce, Pardot, Zoho, Tealium, Segment, and Zeotap; for anonymous B2B visitors, ABM providers can infer company name and firmographics so you can target by account before anyone fills out a form.
Each rule supports include/exclude per condition. Parentheses nest logic; rule groups combine with AND, OR, or XOR. A rule can be as simple as “is on the pricing page” or as sophisticated as “has viewed the pricing page in the last 14 days AND is on a paid plan AND has NOT opened a support ticket in the last 7 days.”
An example configured audience
Here’s what the screen looks like once several rule groups have been added and configured. This is one example — not a default or a required set — combining session, CRM, geo, device, pages-visited, and visitor-type rules:
AI Targeting Assistant
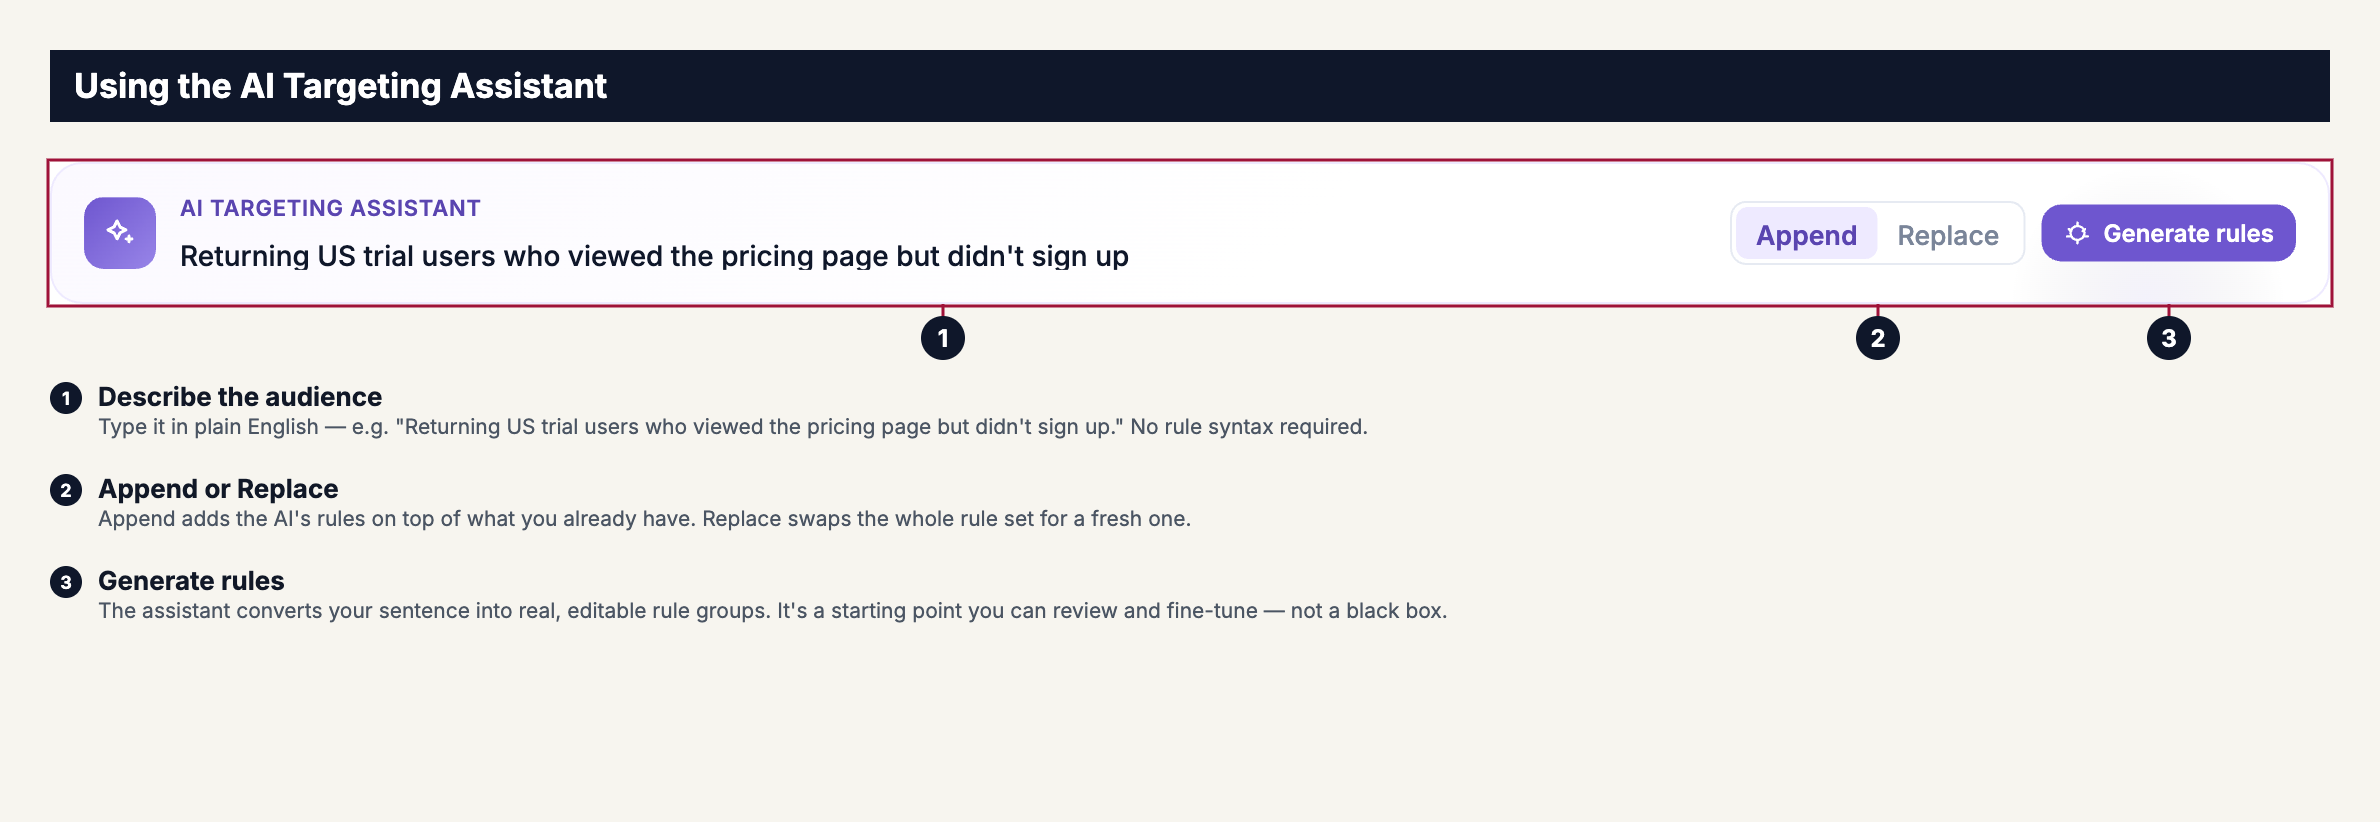
If you already know the audience you want in plain English, describe it to the AI assistant and it generates a matching rule set. You review, edit, and refine before saving — it’s a starting point, not a black box.
For example, typing “returning US visitors who viewed the pricing page but didn’t sign up in the last 30 days” produces a rule set like: Visitor Type is returning AND Countries is United States AND Pages Visited contains /pricing (in this session) AND NOT a sign-up event in the last 30 days — each as an editable rule group you can adjust.
The assistant has two modes, shown on the bar: Append adds the generated rules to whatever you already have, while Replace swaps in a fresh rule set. Use Append to layer on an extra condition, Replace to start over from a description.
The live audience forecast
As you edit rules, the forecast updates continuously, showing how much of a rolling sample of your recent traffic would match versus would not match. But the counters are only the summary — the real value is opening the forecast to see the actual visitors behind the numbers.
Expand it and you get two lists: the visitors who would match your current rules and the ones who would not. Click into any visitor to see their full detail — the pages they viewed, their session and device, their CRM/profile attributes, and exactly which of your rules they passed or failed. That’s how you confirm you’re targeting the right people, not just the right number of them: you can spot a visitor who slipped into the audience by accident, or a visitor you expected to match who didn’t, and trace it straight to the rule responsible.
Used this way, the forecast prevents the two most common audience mistakes before the campaign ever goes live:
- Too narrow — a compound rule set that matches only a handful of visitors. The campaign runs but nobody sees it. An empty would-match list makes this obvious immediately, instead of weeks later.
- Too broad — a rule you thought was specific that actually matches half your traffic. Reading the would-match list surfaces visitors who clearly don’t belong, so you can tighten the rules before launch.
- Right count, wrong people — the number looks healthy but the audience is the wrong crowd. Only inspecting individual visitors catches this, and it’s the mistake the counters alone can never reveal.
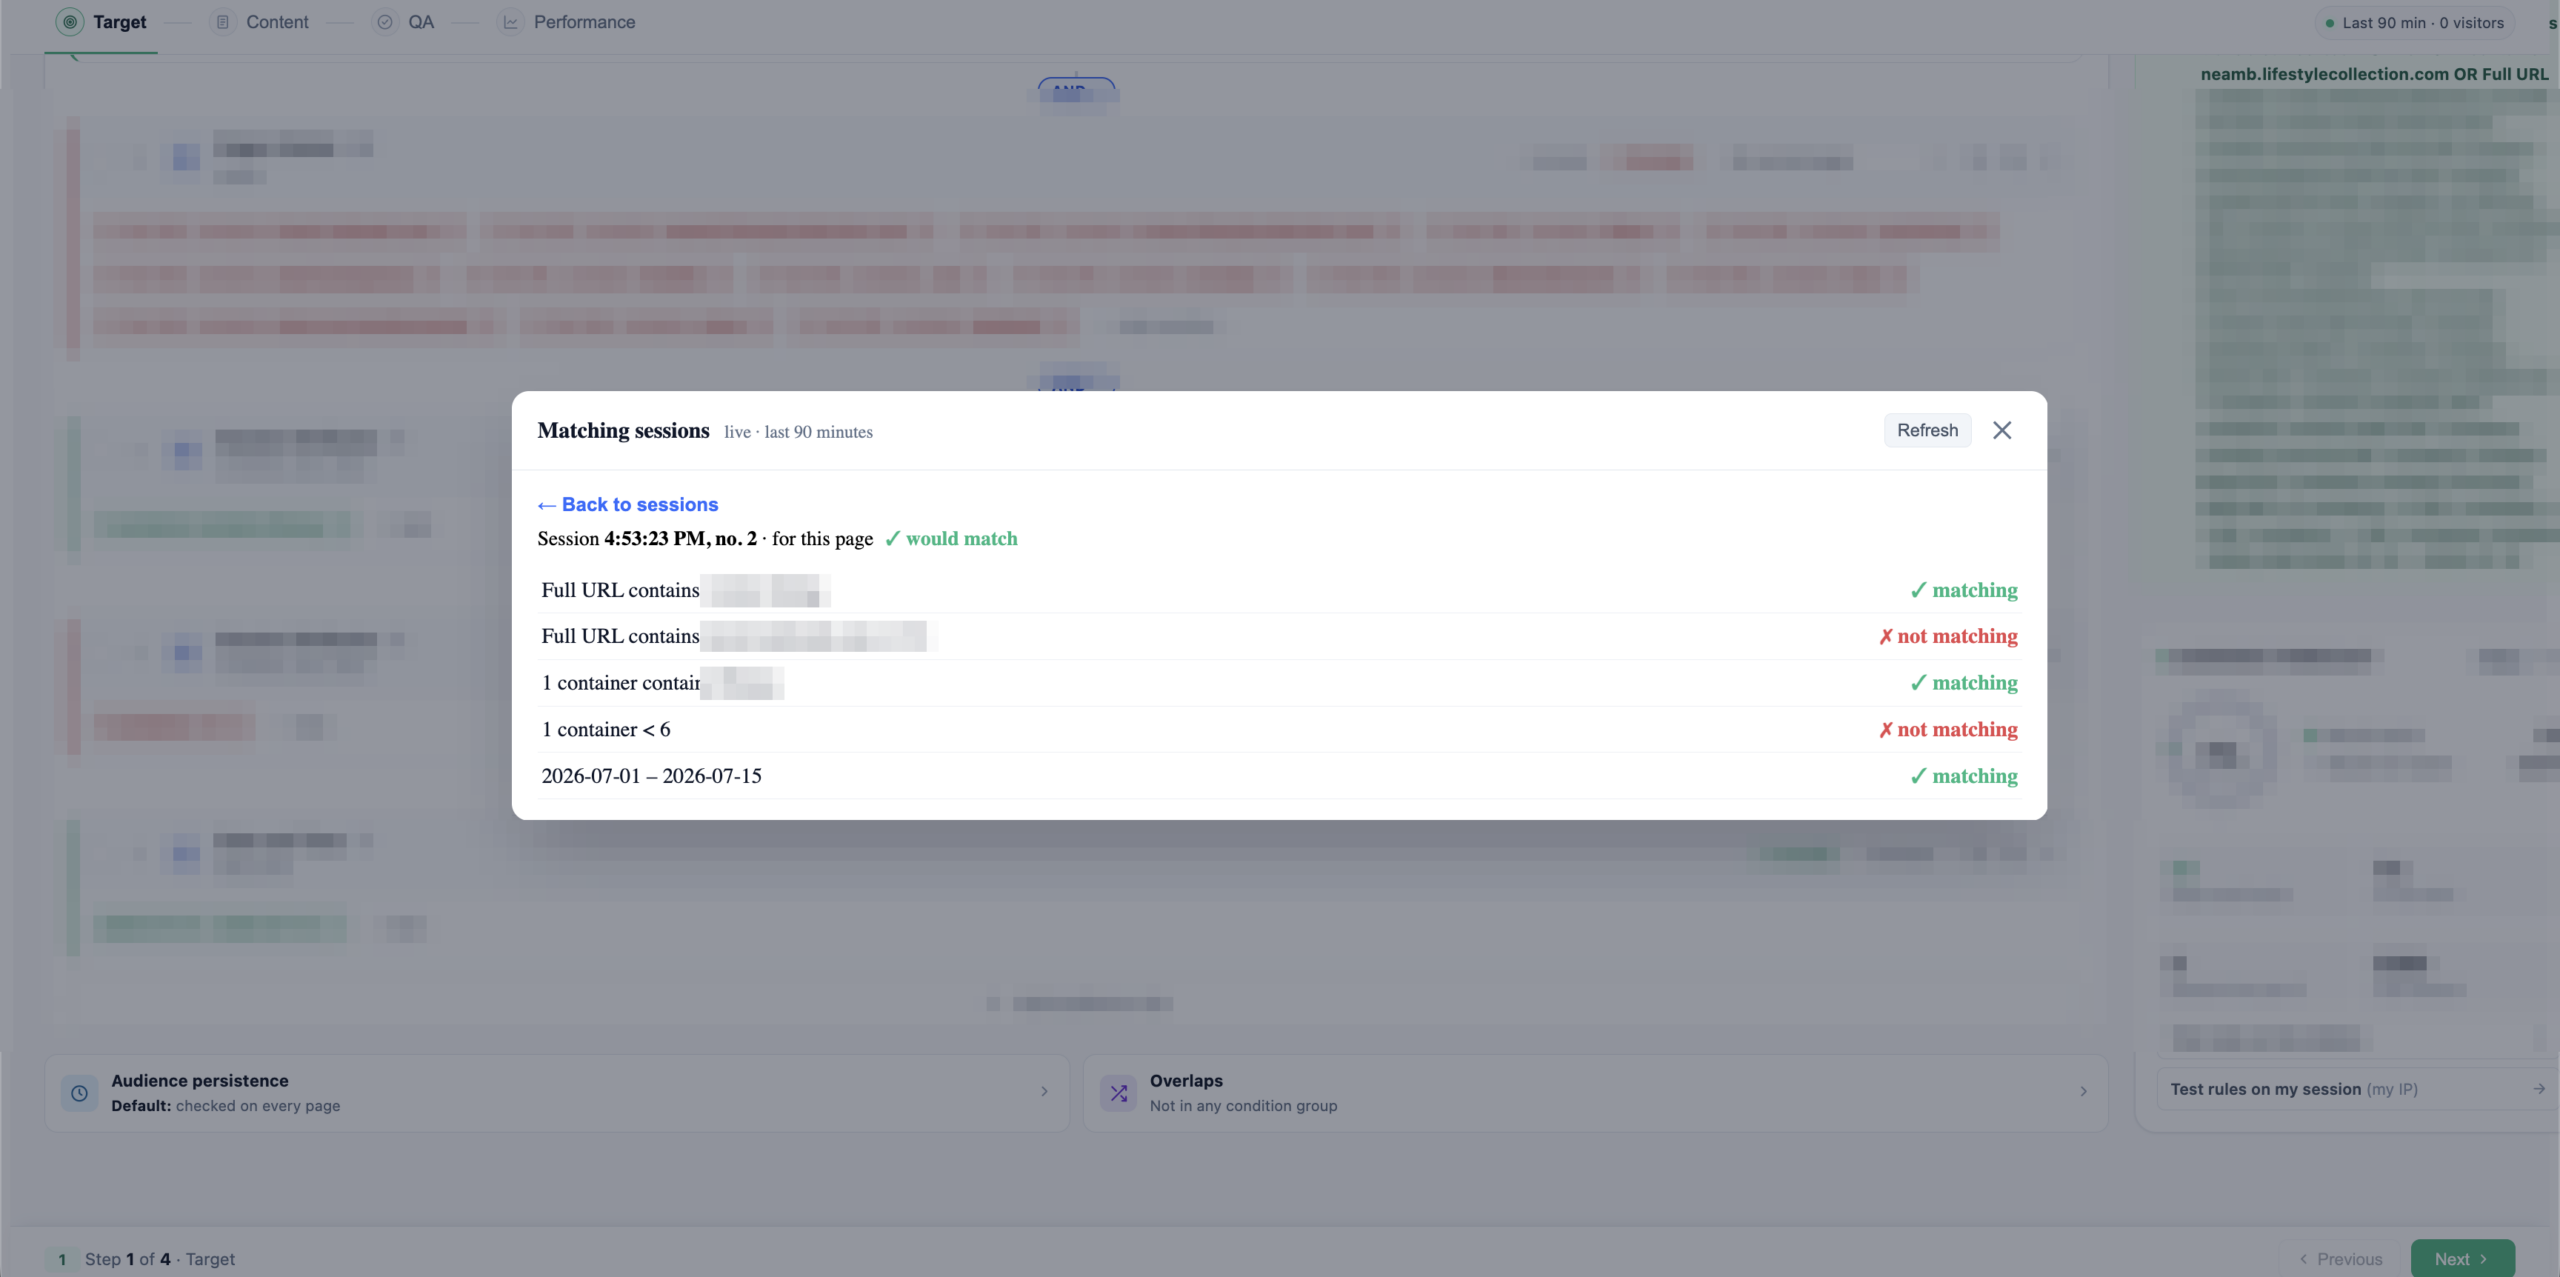
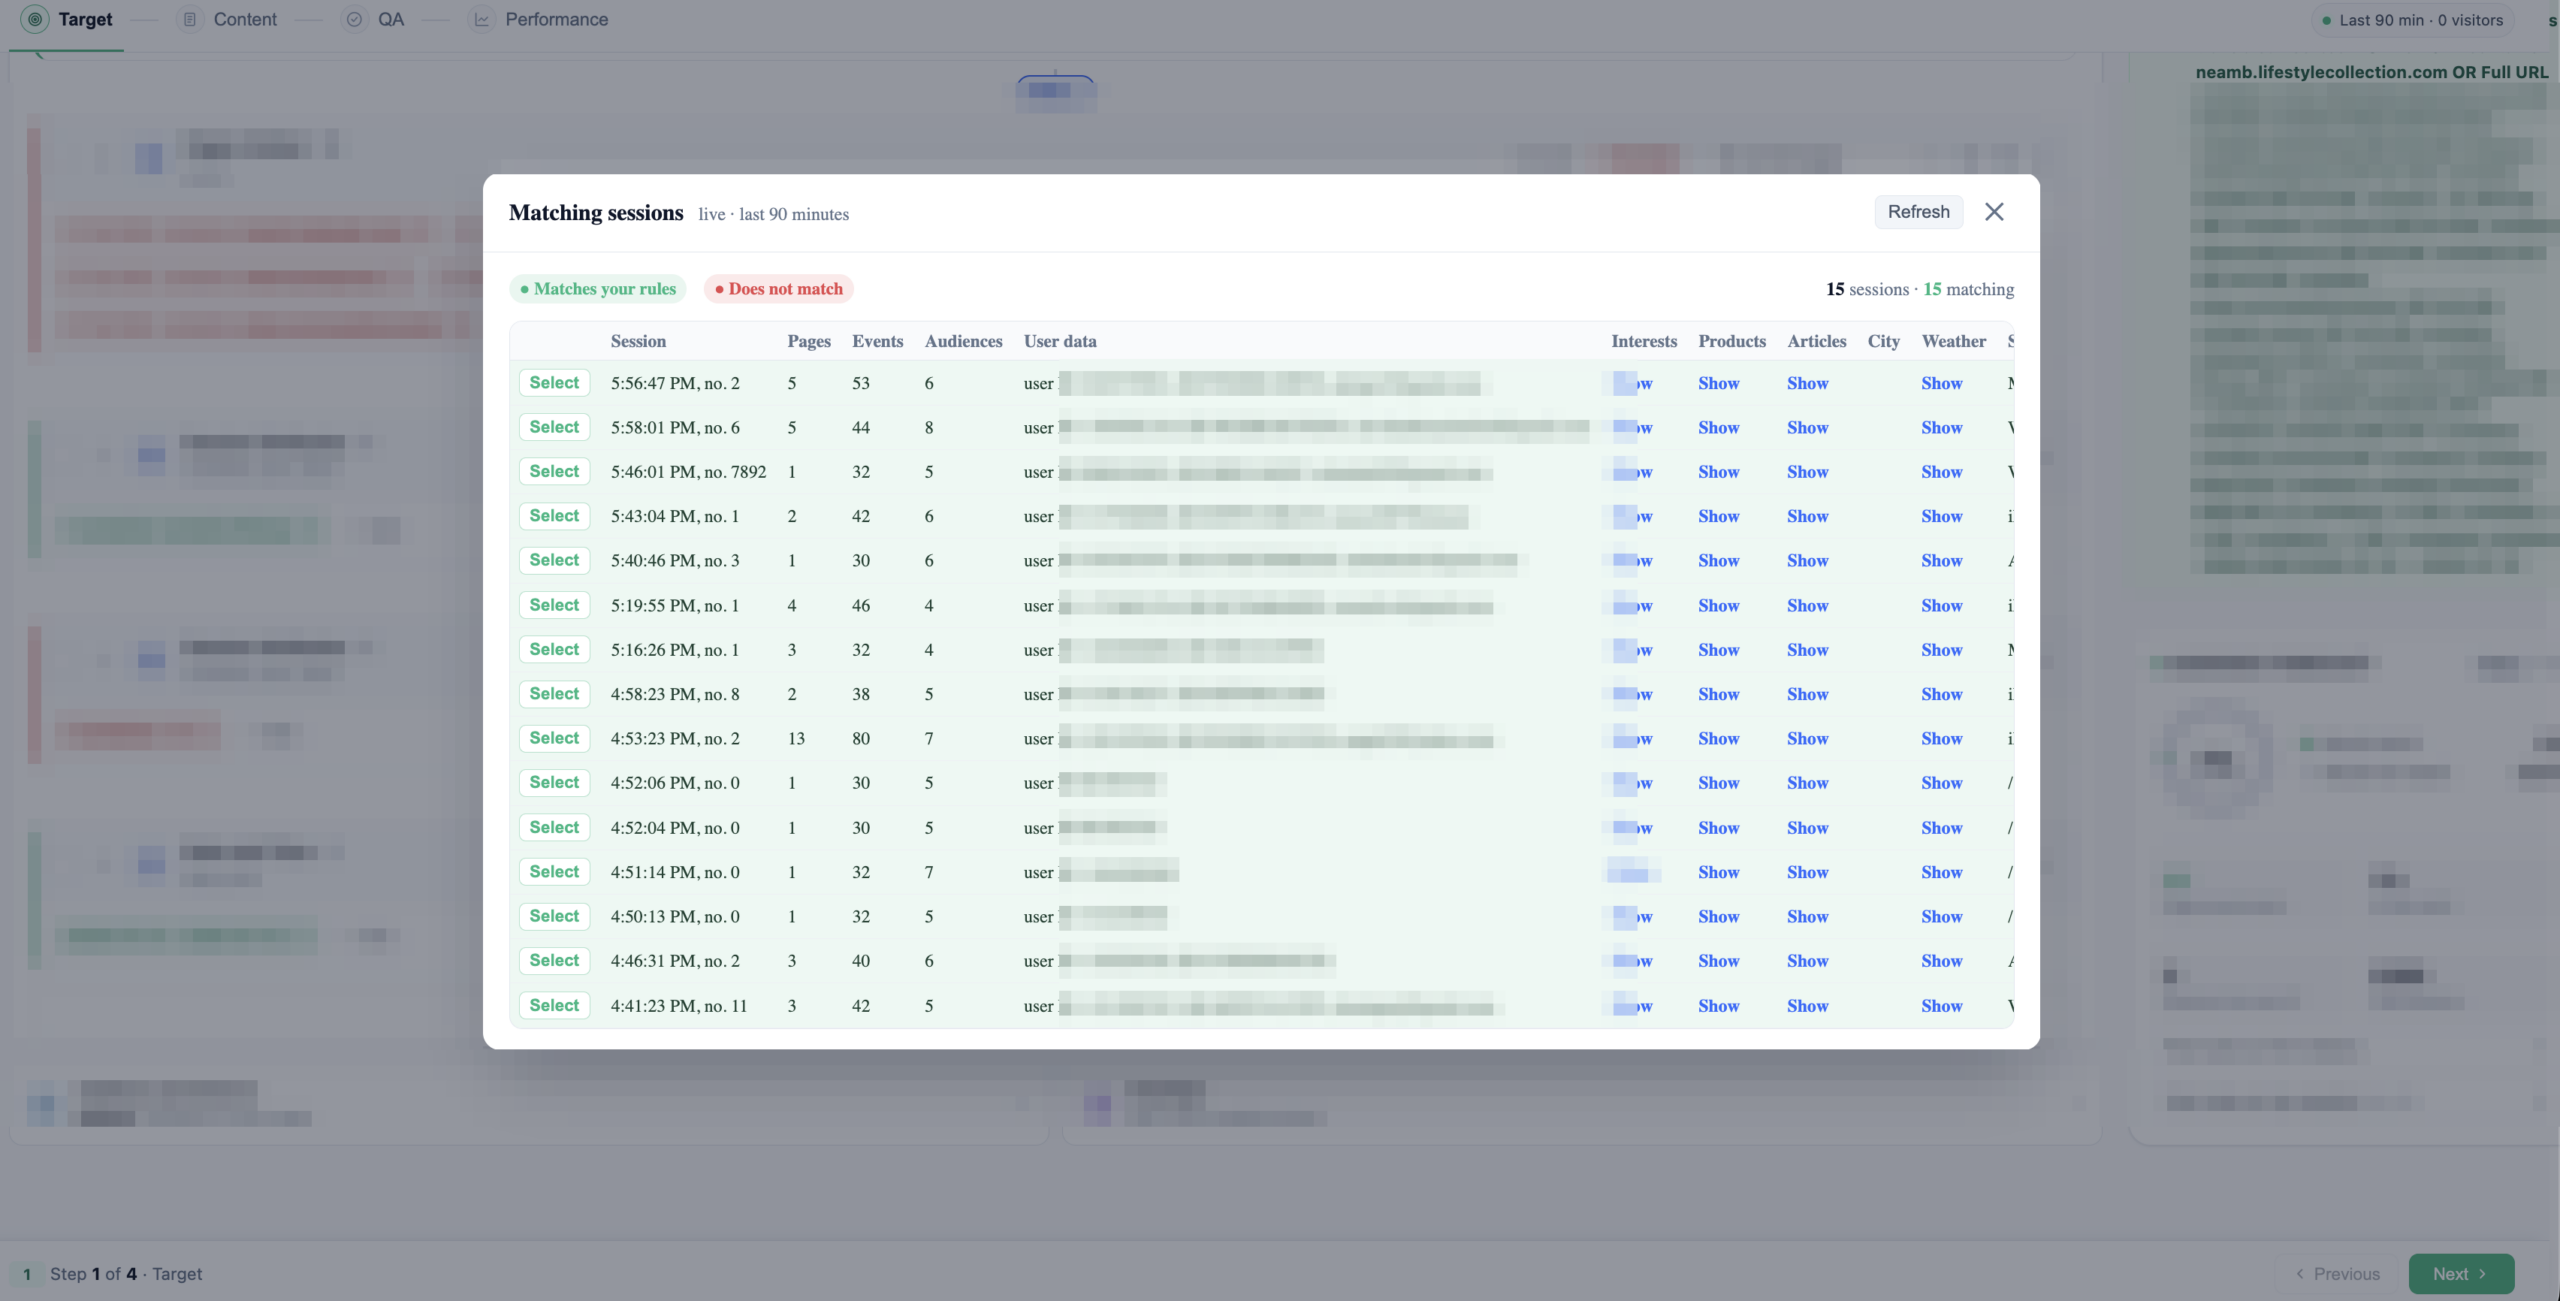
The forecast also has a live-traffic mode — “Test rules on live visitors.” Instead of a rolling sample, Personyze evaluates your rule set against visitors arriving in real time and shows which ones would qualify, without saving anything. You can open a single live session and see it checked rule-by-rule, or scan the whole list of recent sessions flagged as matching or not — a final sanity check before you publish.
Group priority for overlapping audiences
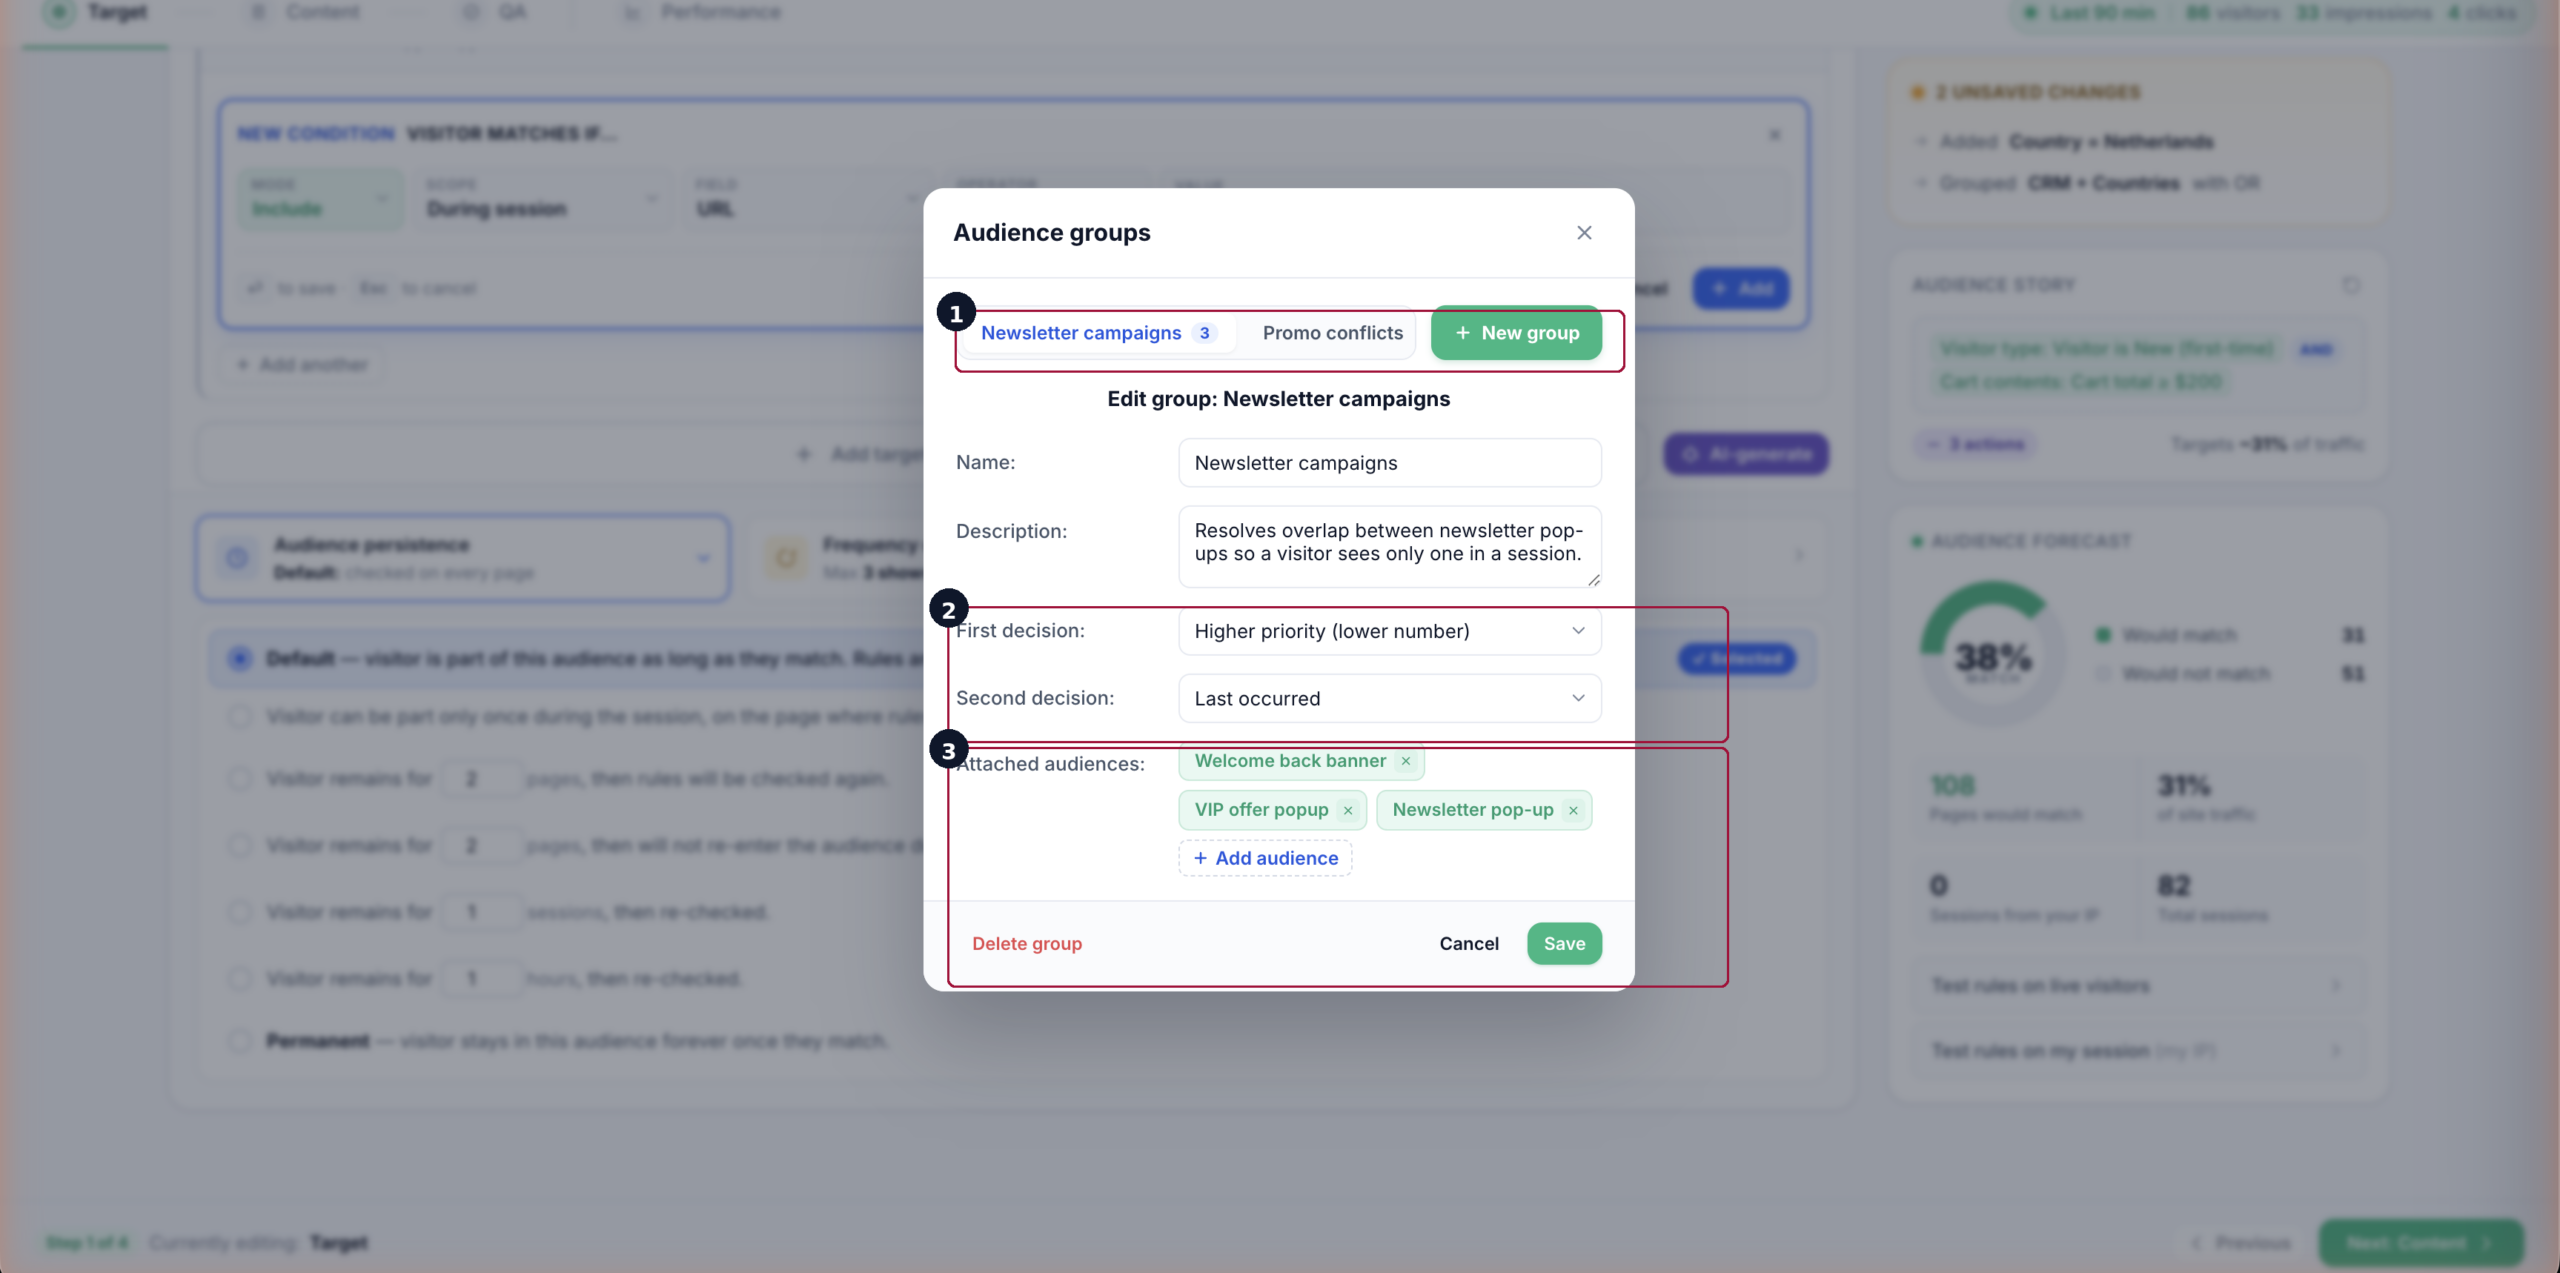
When two campaigns can match the same visitor, an audience group decides which one wins. Add the overlapping audiences to a shared group and give each a priority (lower number = higher precedence). The group’s conflict-resolution rule then picks the winner for a shared visitor — higher priority first, with ties broken by “first occurred” or “last occurred” — so a visitor who qualifies for both sees only the intended content.
Audience persistence & frequency cap
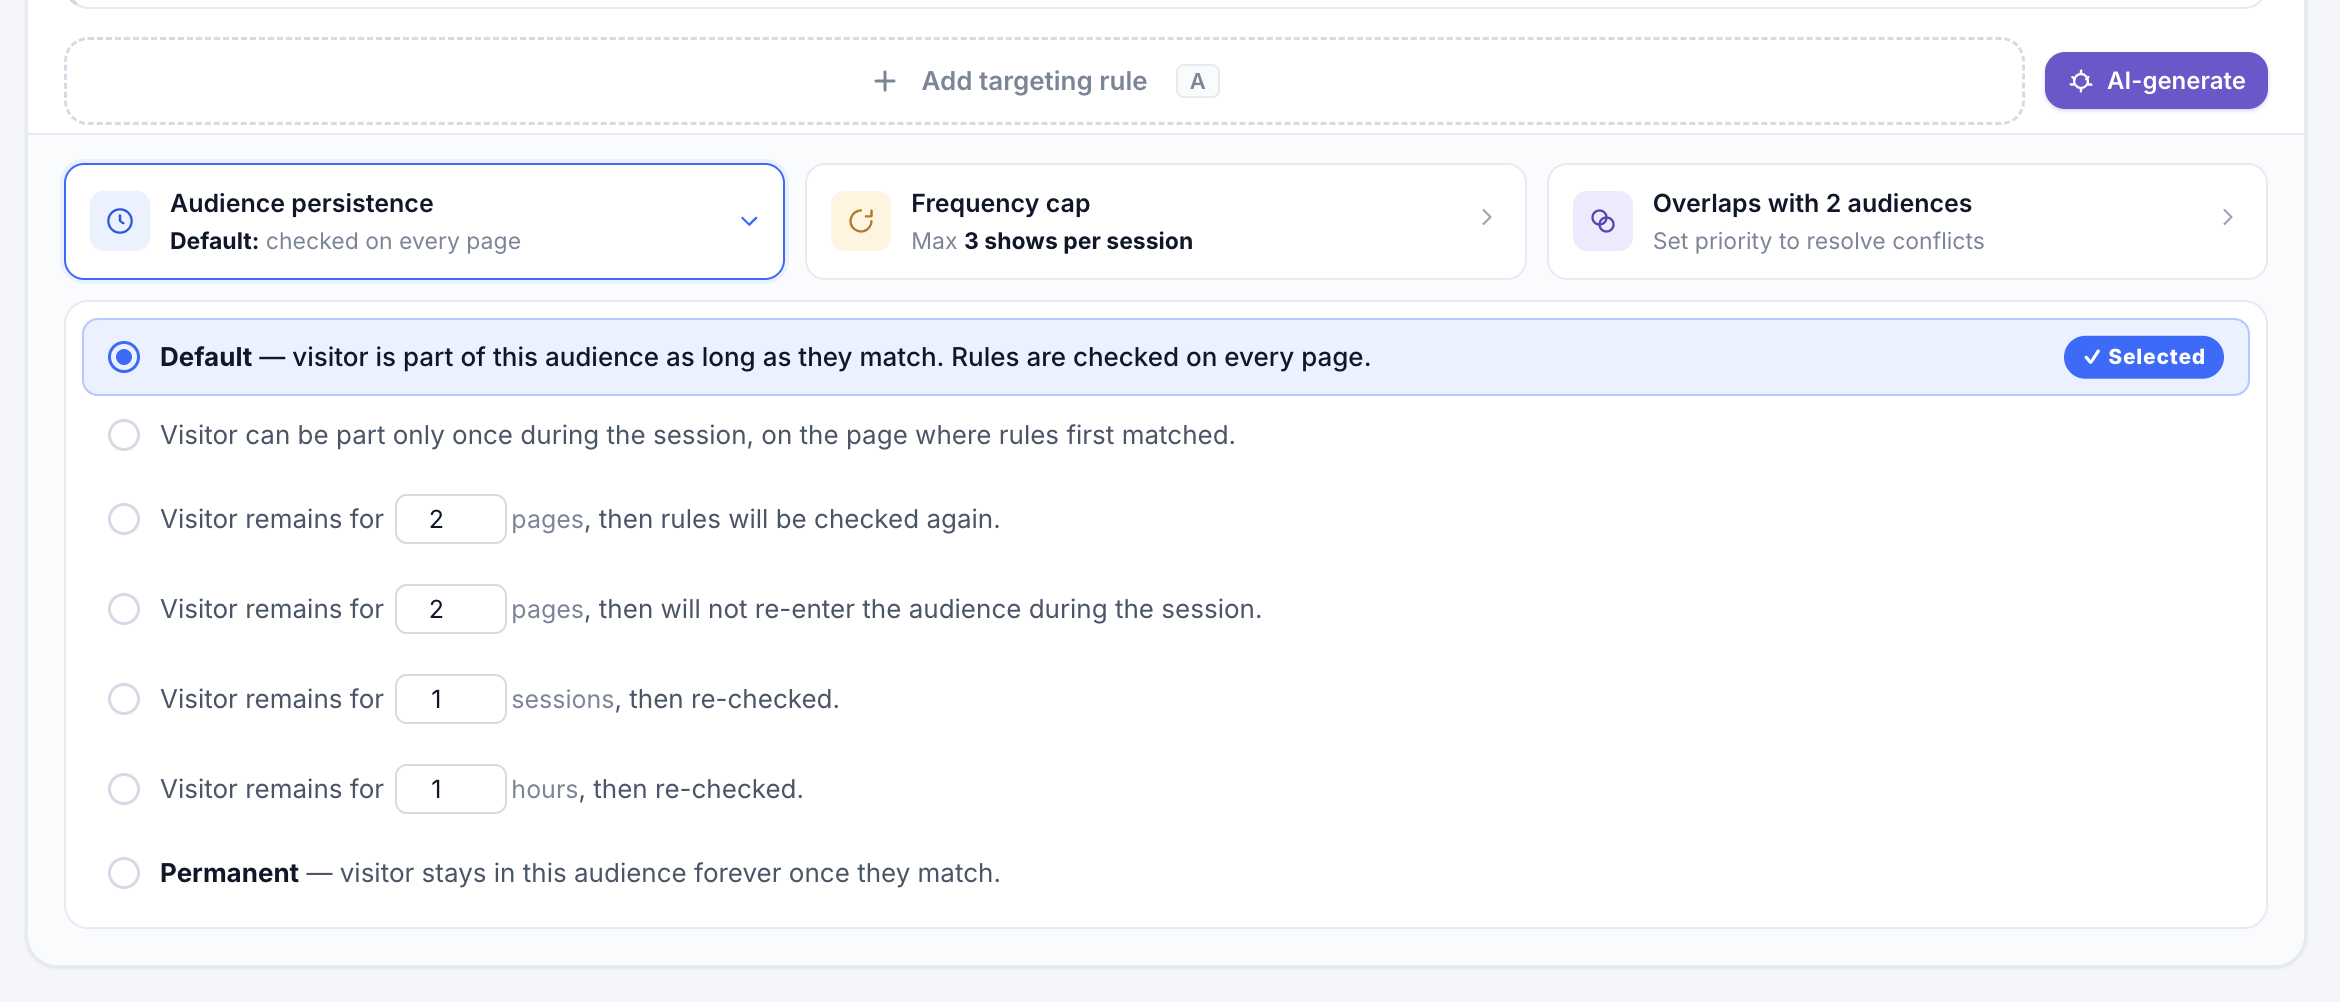
Audience persistence controls how long a visitor stays in the audience after they match. Options range from “just this page view” (re-evaluate on every page) to “this session” to “for N hours” to “for N sessions” to “permanently once matched.” For most acquisition campaigns you want per-session persistence; for retention or loyalty campaigns you often want persistent membership so the experience follows the visitor across future sessions.
Frequency cap limits how often the campaign is allowed to show to a single visitor. Per-session caps prevent the same popup from firing twice in one visit. Per-visitor lifetime caps prevent a returning visitor from seeing the same message every time they come back. You can also remove the cap for content that should run every time (a persistent header banner, for example).
Full rule-by-rule reference: Targeting Rules in Personyze.
2. Build the variations
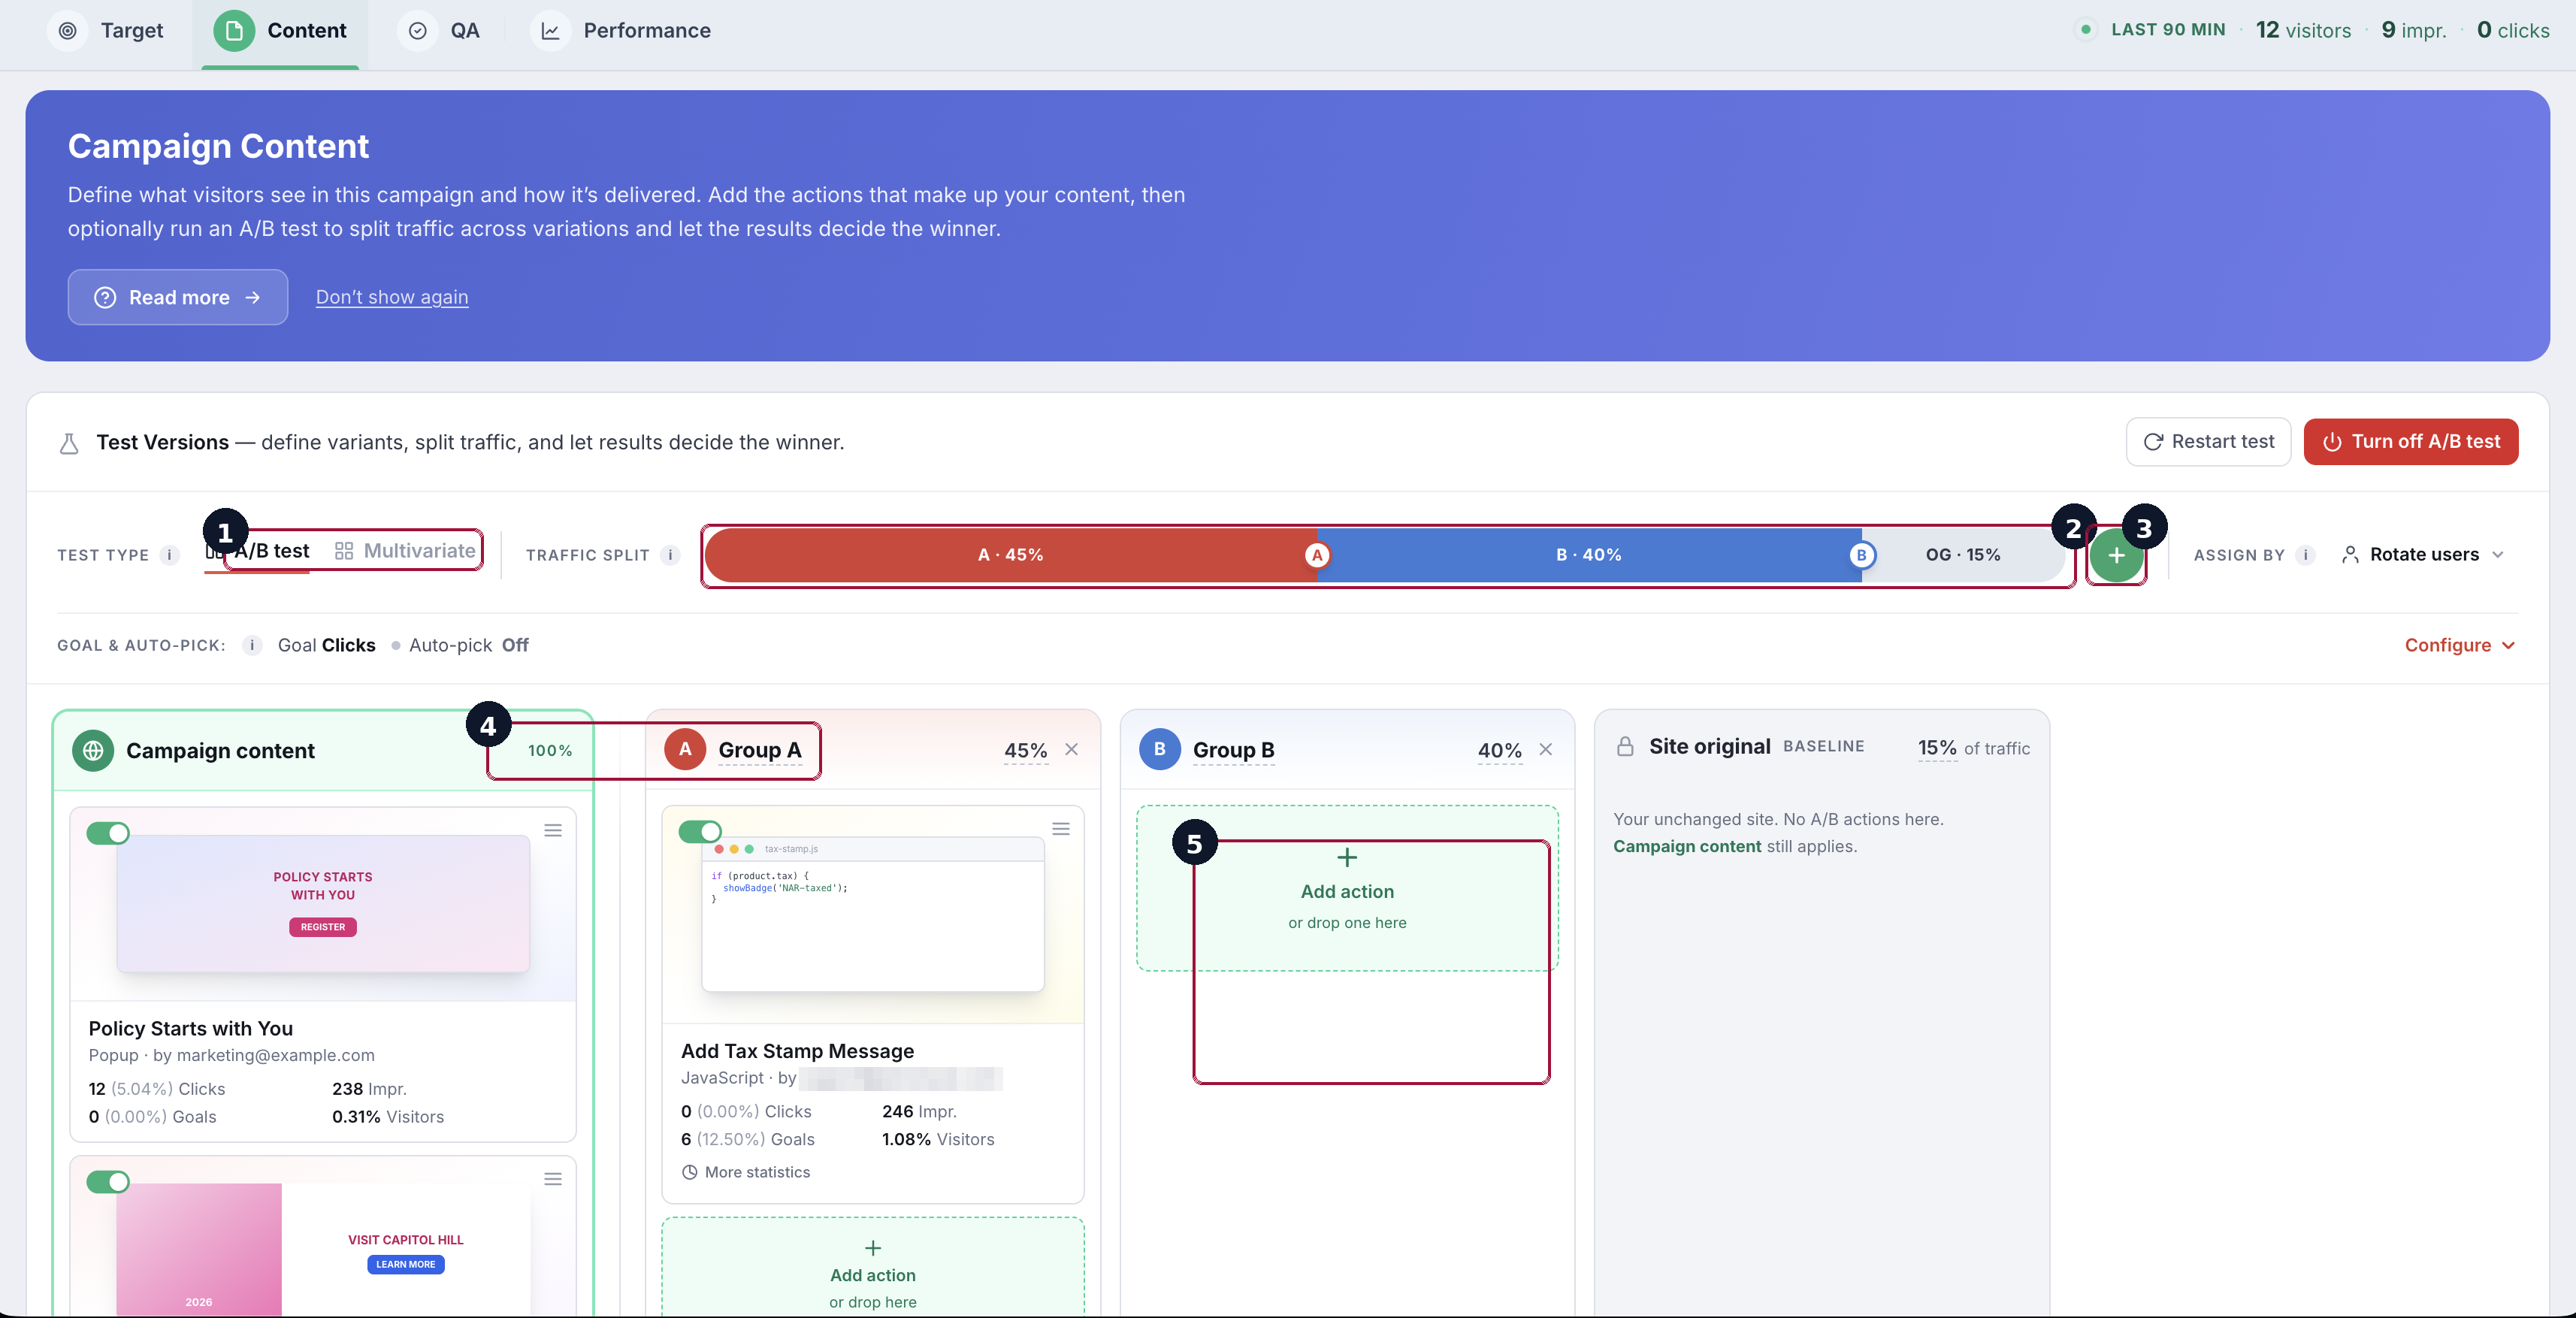
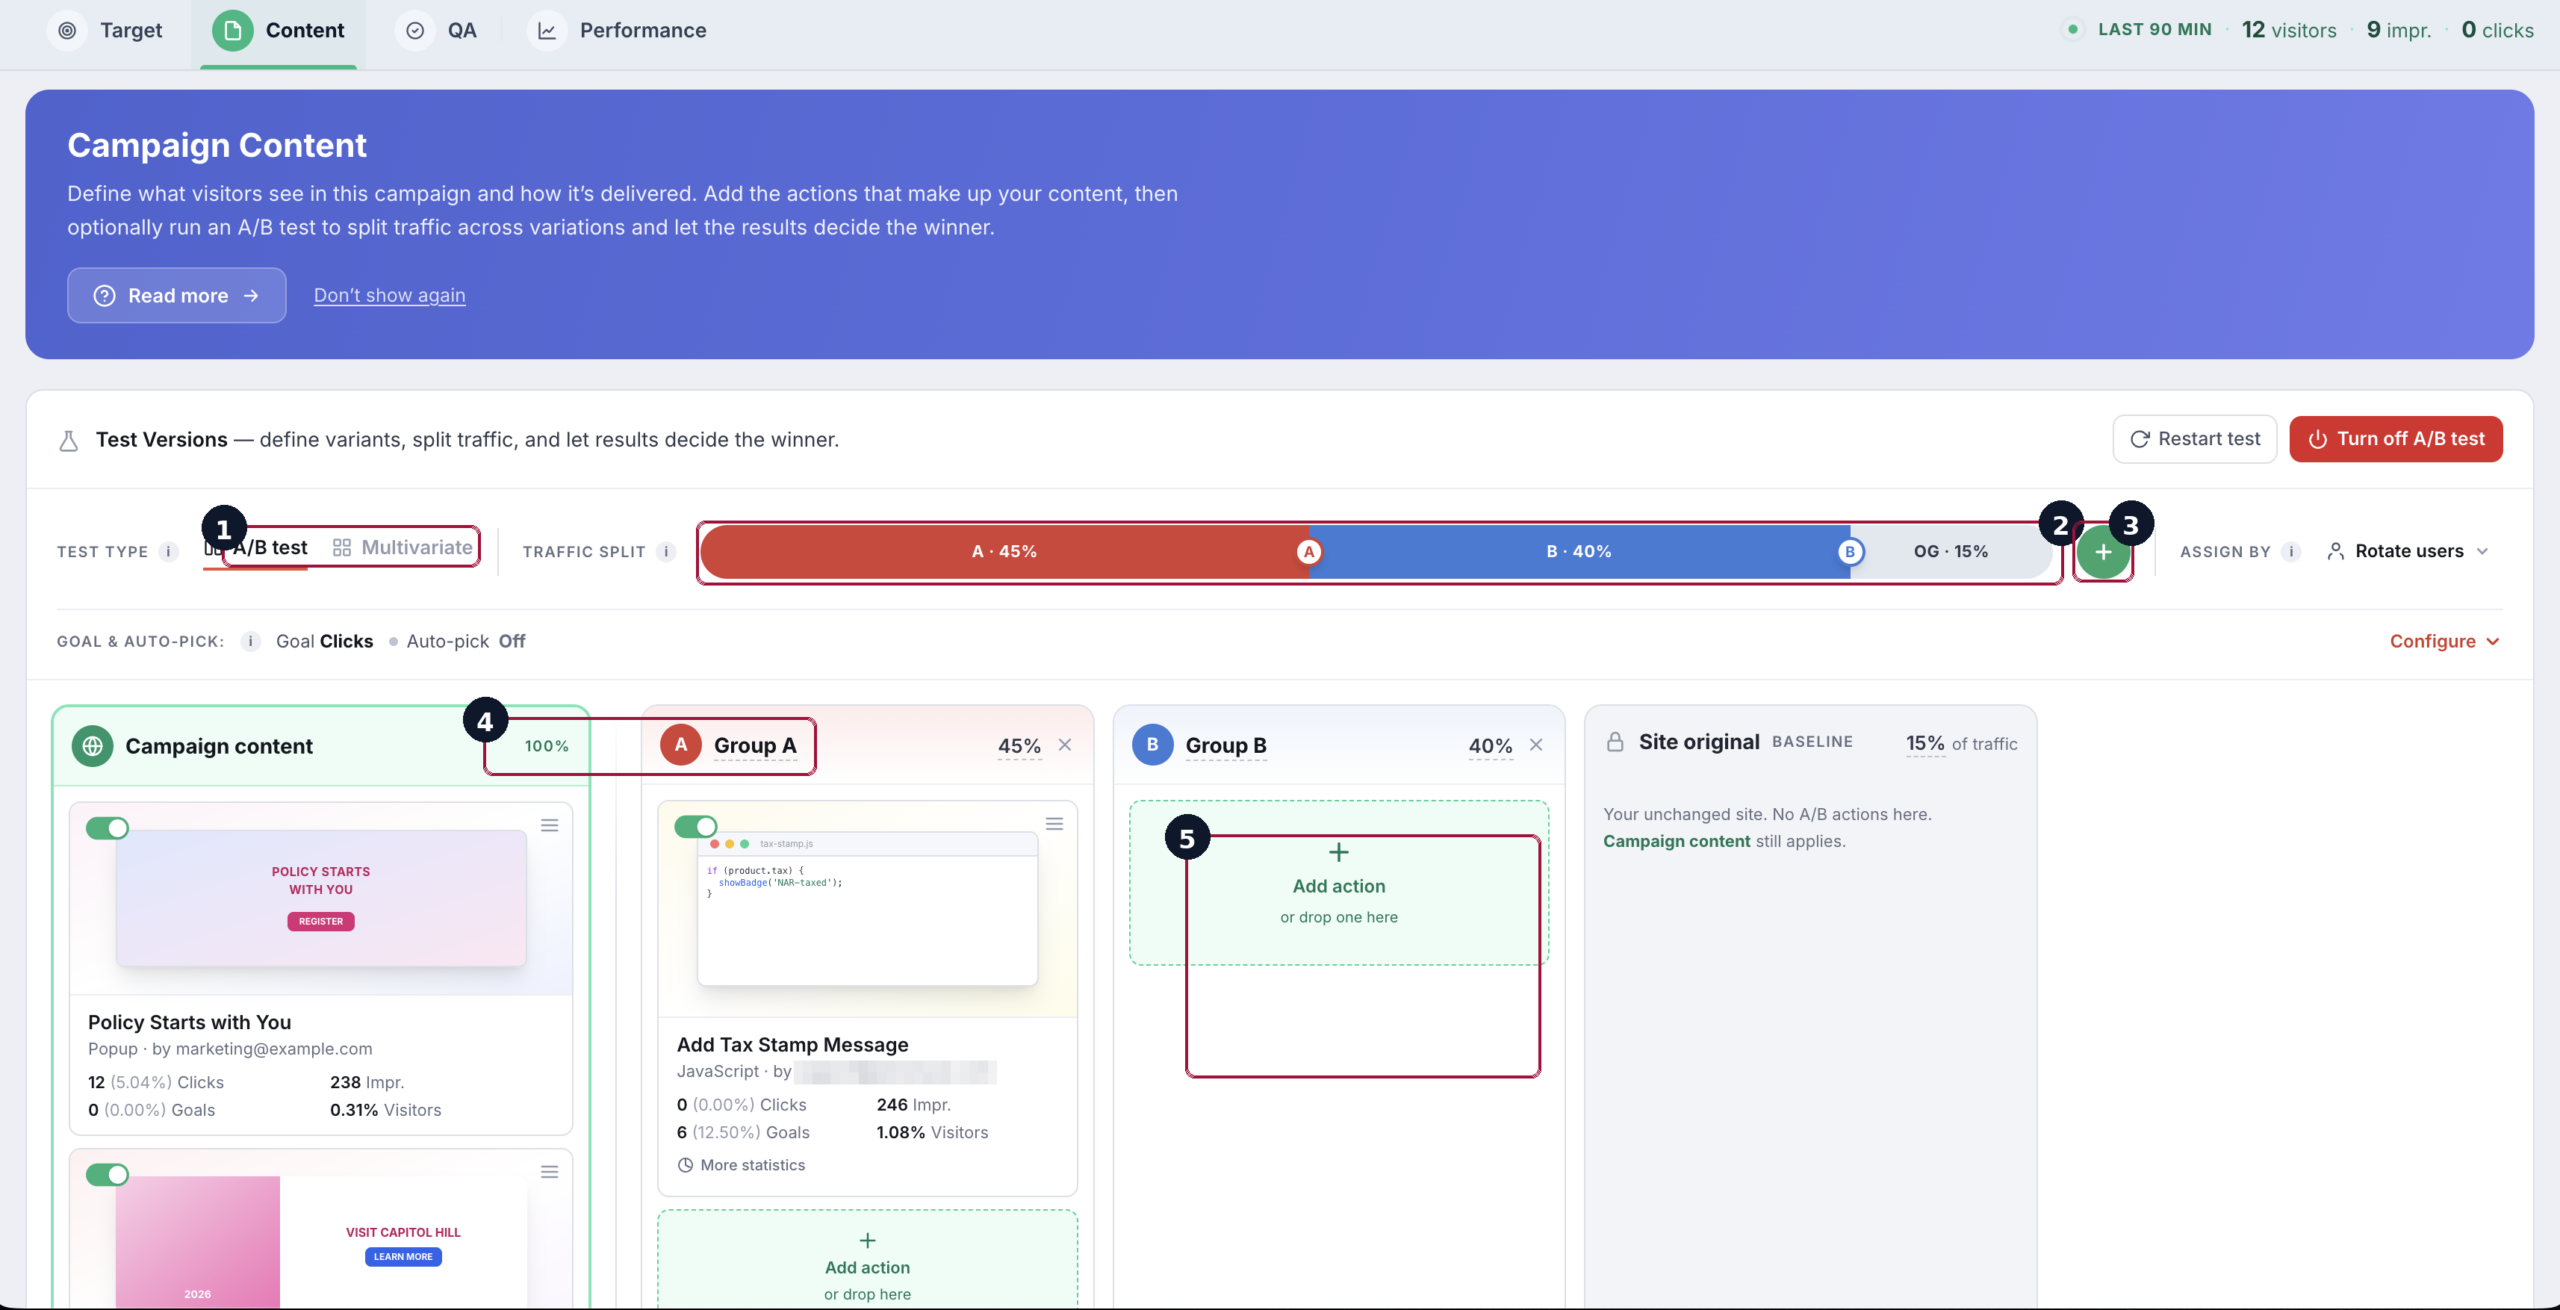
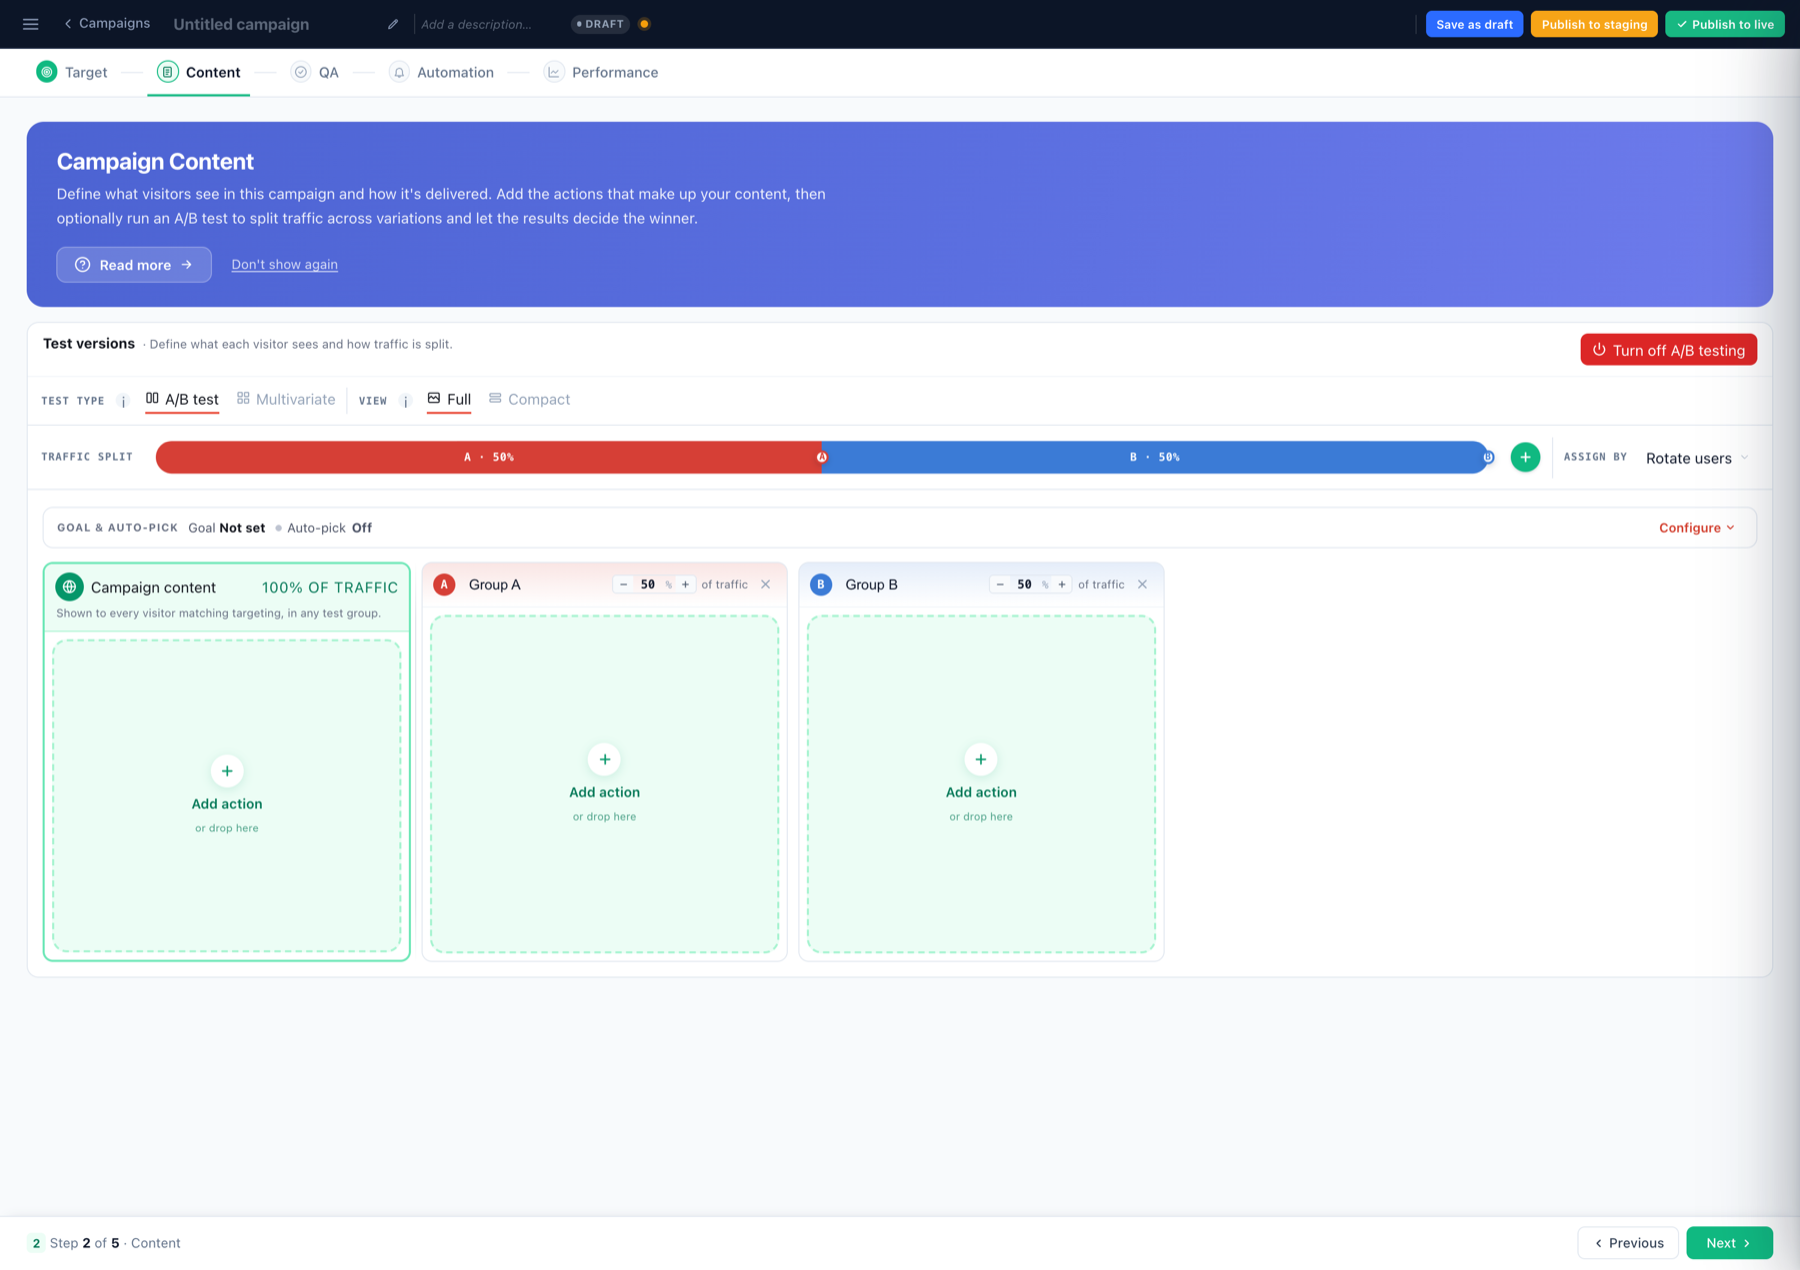
With the audience set, open the campaign’s Content step — which is already the A/B test view. A strip of variation groups runs across the top with the traffic-split bar above them; the campaign is in Test mode the moment a second variation exists. Inside each variation group you add and edit actions exactly as you would in any campaign — everything below applies per variation.
Once the audience is defined, the Content step is where you decide what those visitors actually see. Content in Personyze is built from actions — and a single campaign can hold as many as you need. A header bar, a personalized recommendation widget, a countdown timer, and an exit-intent popup can all live in the same campaign, each firing for the same audience. Every action carries its own configuration, delivery health, and click-through tracking.
Adding an action is a two-part choice: what type of action it is (which decides the editor you work in), and how it behaves (placement, trigger, timing). The rest of this step walks through the action types, starting with the two you’ll reach for most.
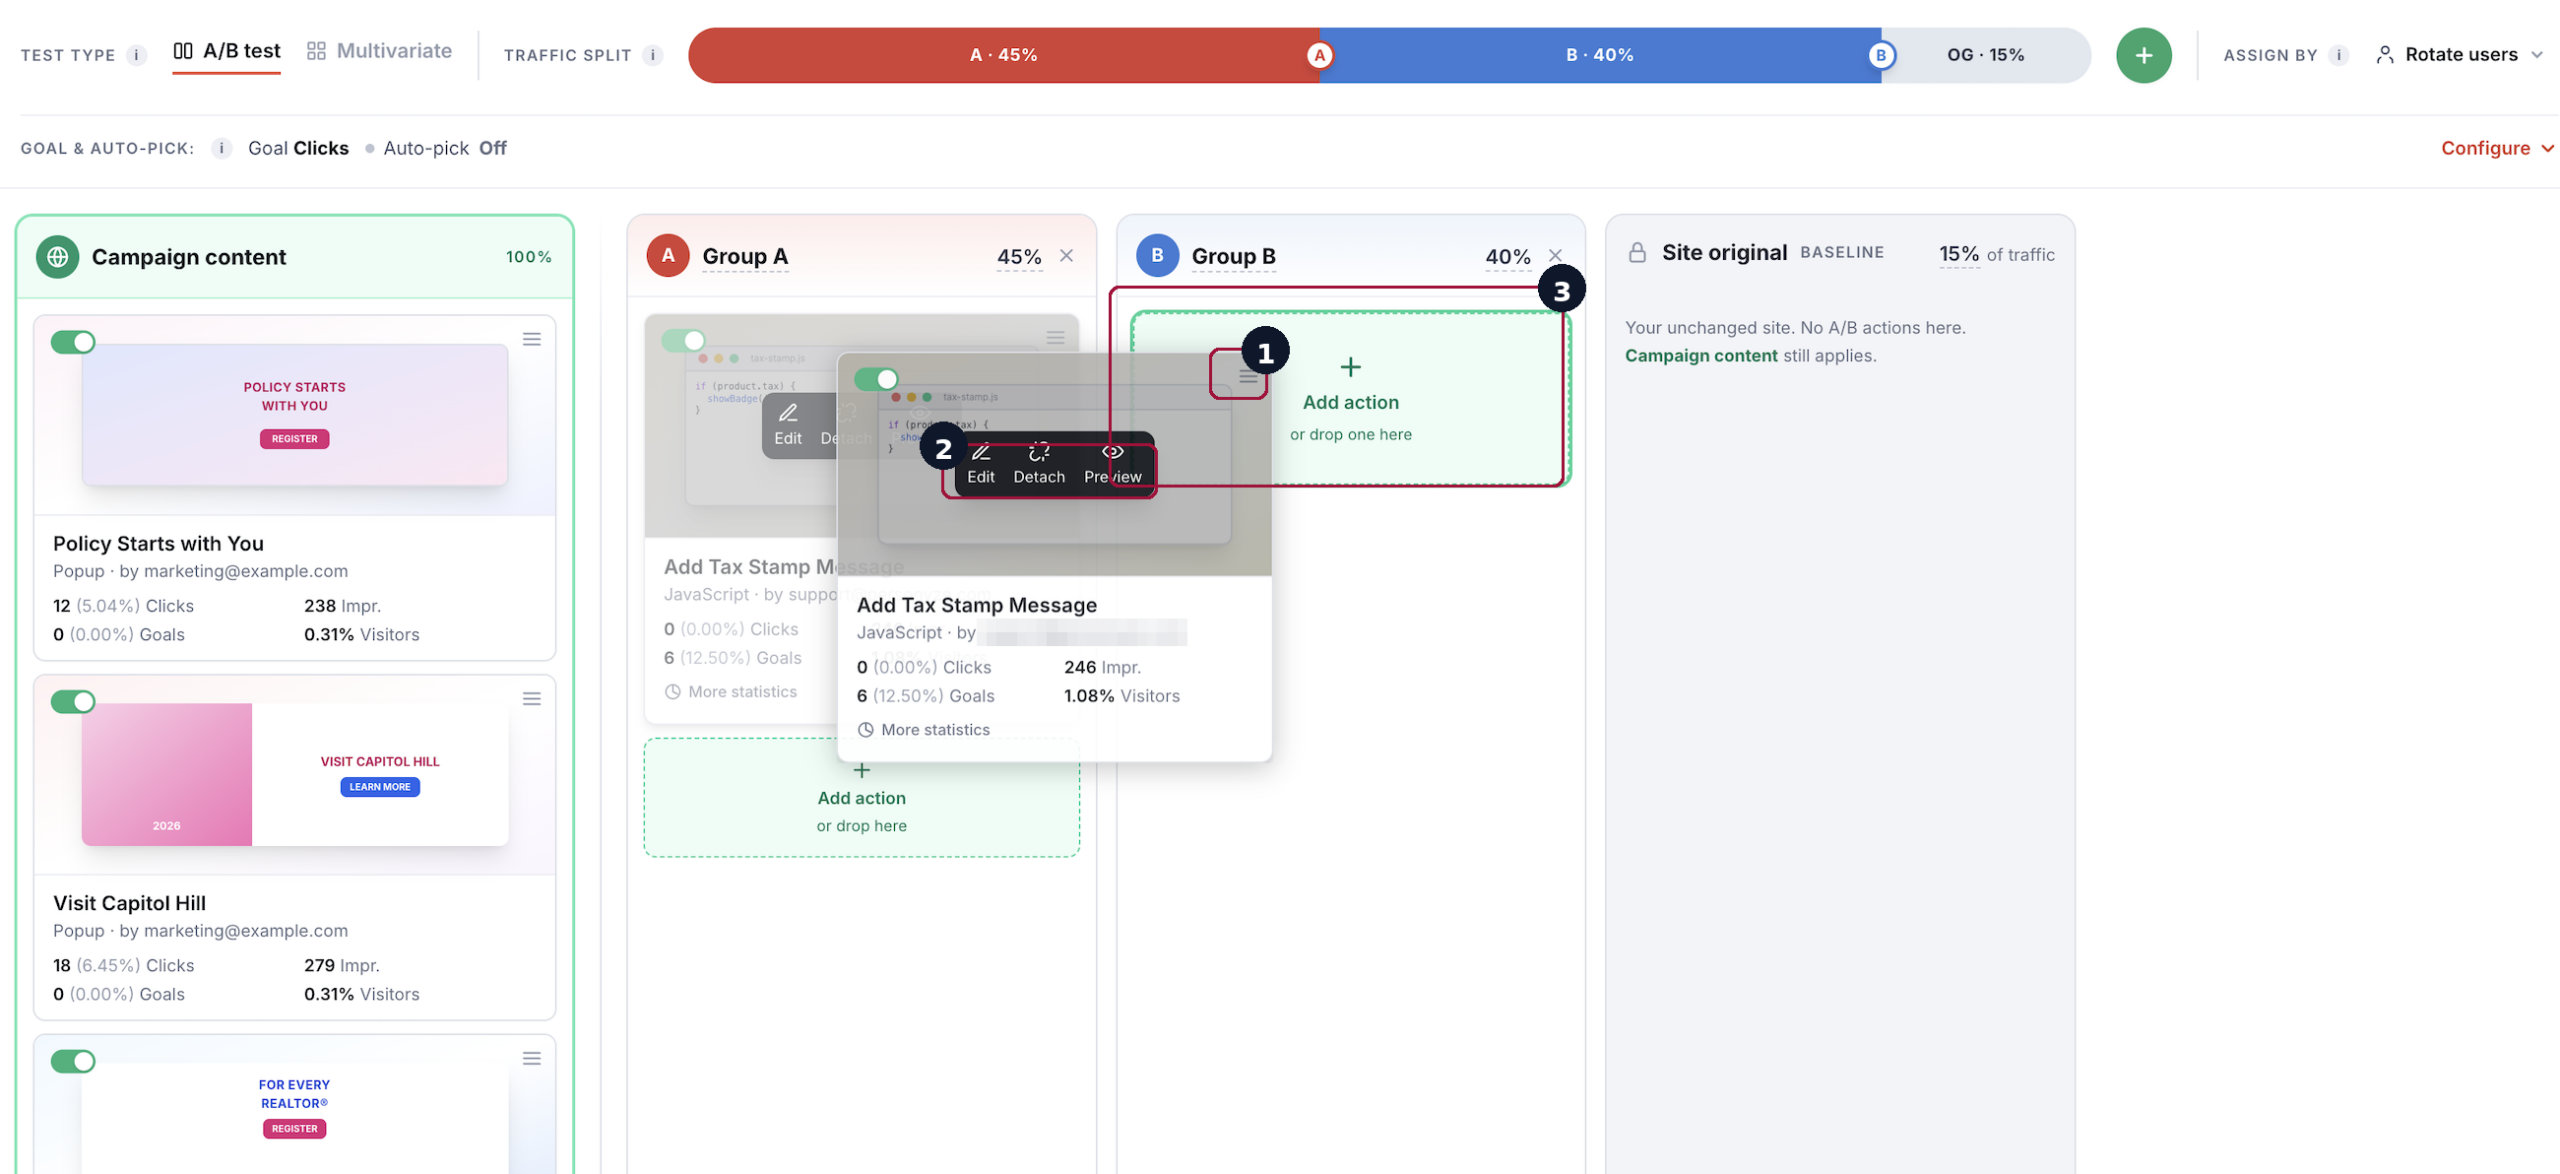
Move actions between groups. You don’t have to rebuild a variation from scratch — grab an action by its drag handle (the “≡” at the top-right of the card) and drop it into another group’s Add action zone. Hovering a card also shows quick controls to Edit, Detach, or Preview it. This makes it easy to start from the campaign’s base content and tweak just one element per variation.
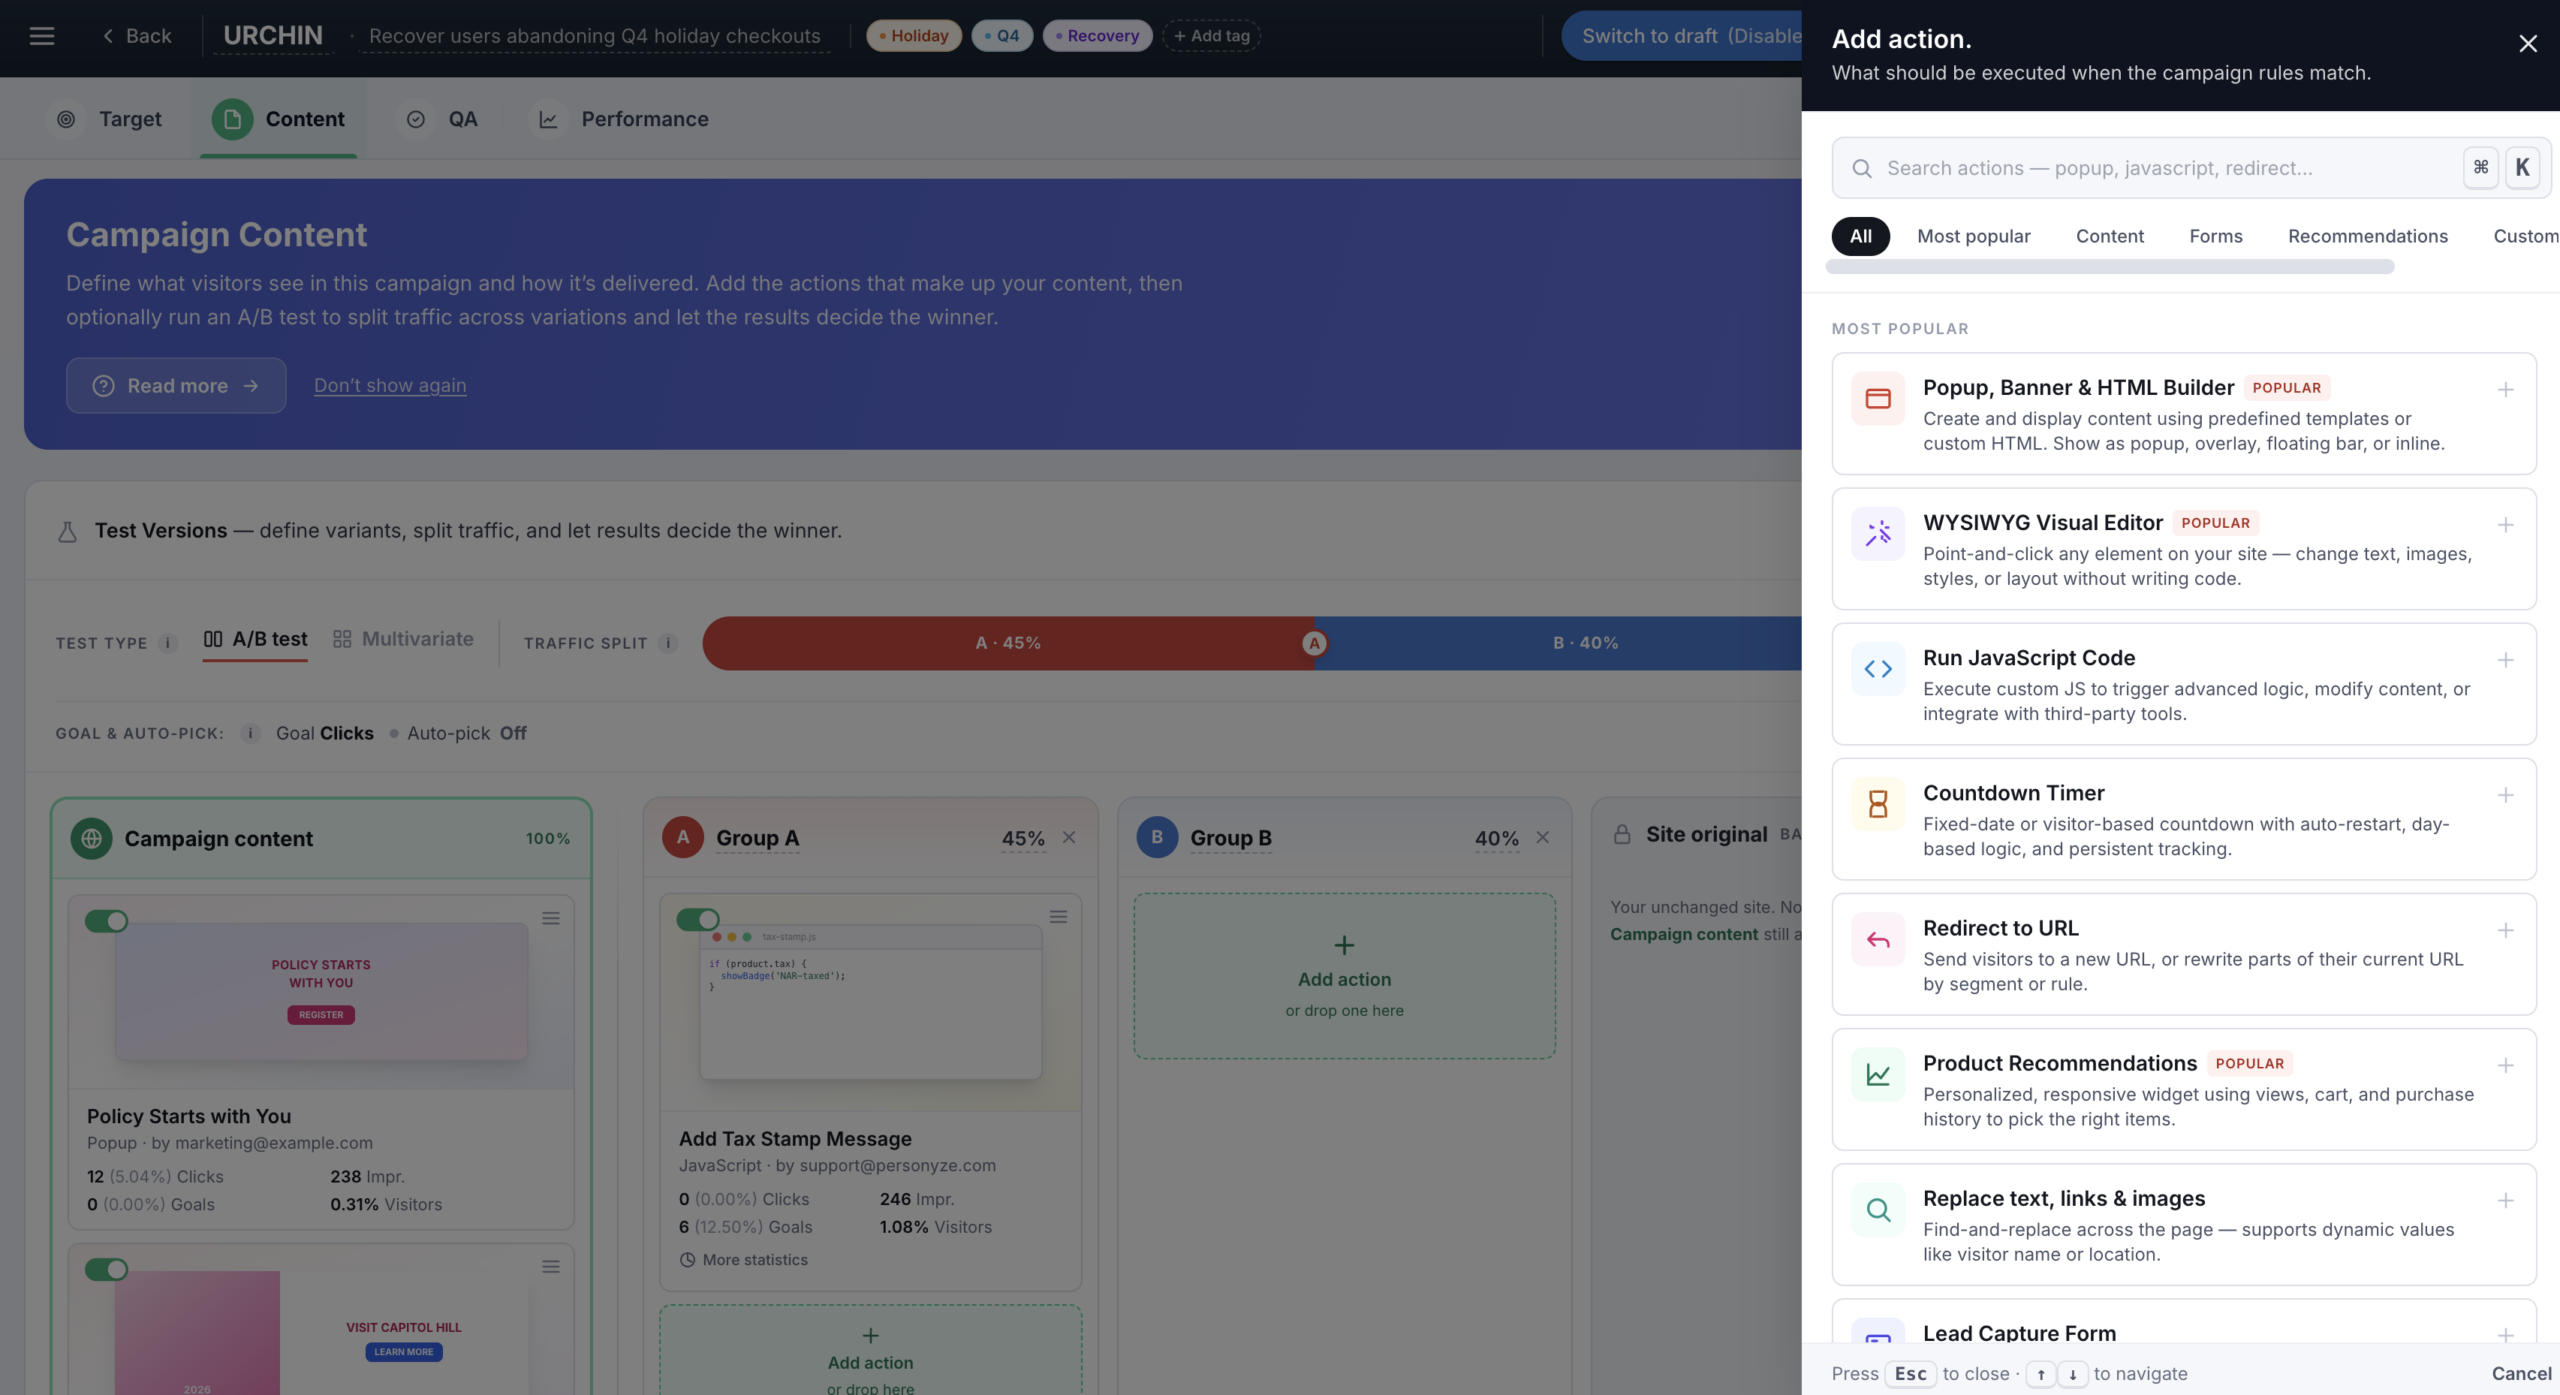
The Content screen (above) is the campaign’s control room. The main list holds every action, each with a status pill (Live / Draft / Test), its delivery health, and the last time it fired, plus quick controls to edit, duplicate, or remove it. The right-hand rail keeps the last 90 minutes of activity, the campaign’s primary conversion goal, and shortcuts to version history and the full performance report always in view. To add an action, you pick its type — which is where the two main editors come in.
The action type you pick determines the editor you work in. Two cover most campaigns — the Live Editor and the Popup, Banner & HTML Builder — with a set of specialized action types for everything else.
Live Editor (WYSIWYG)
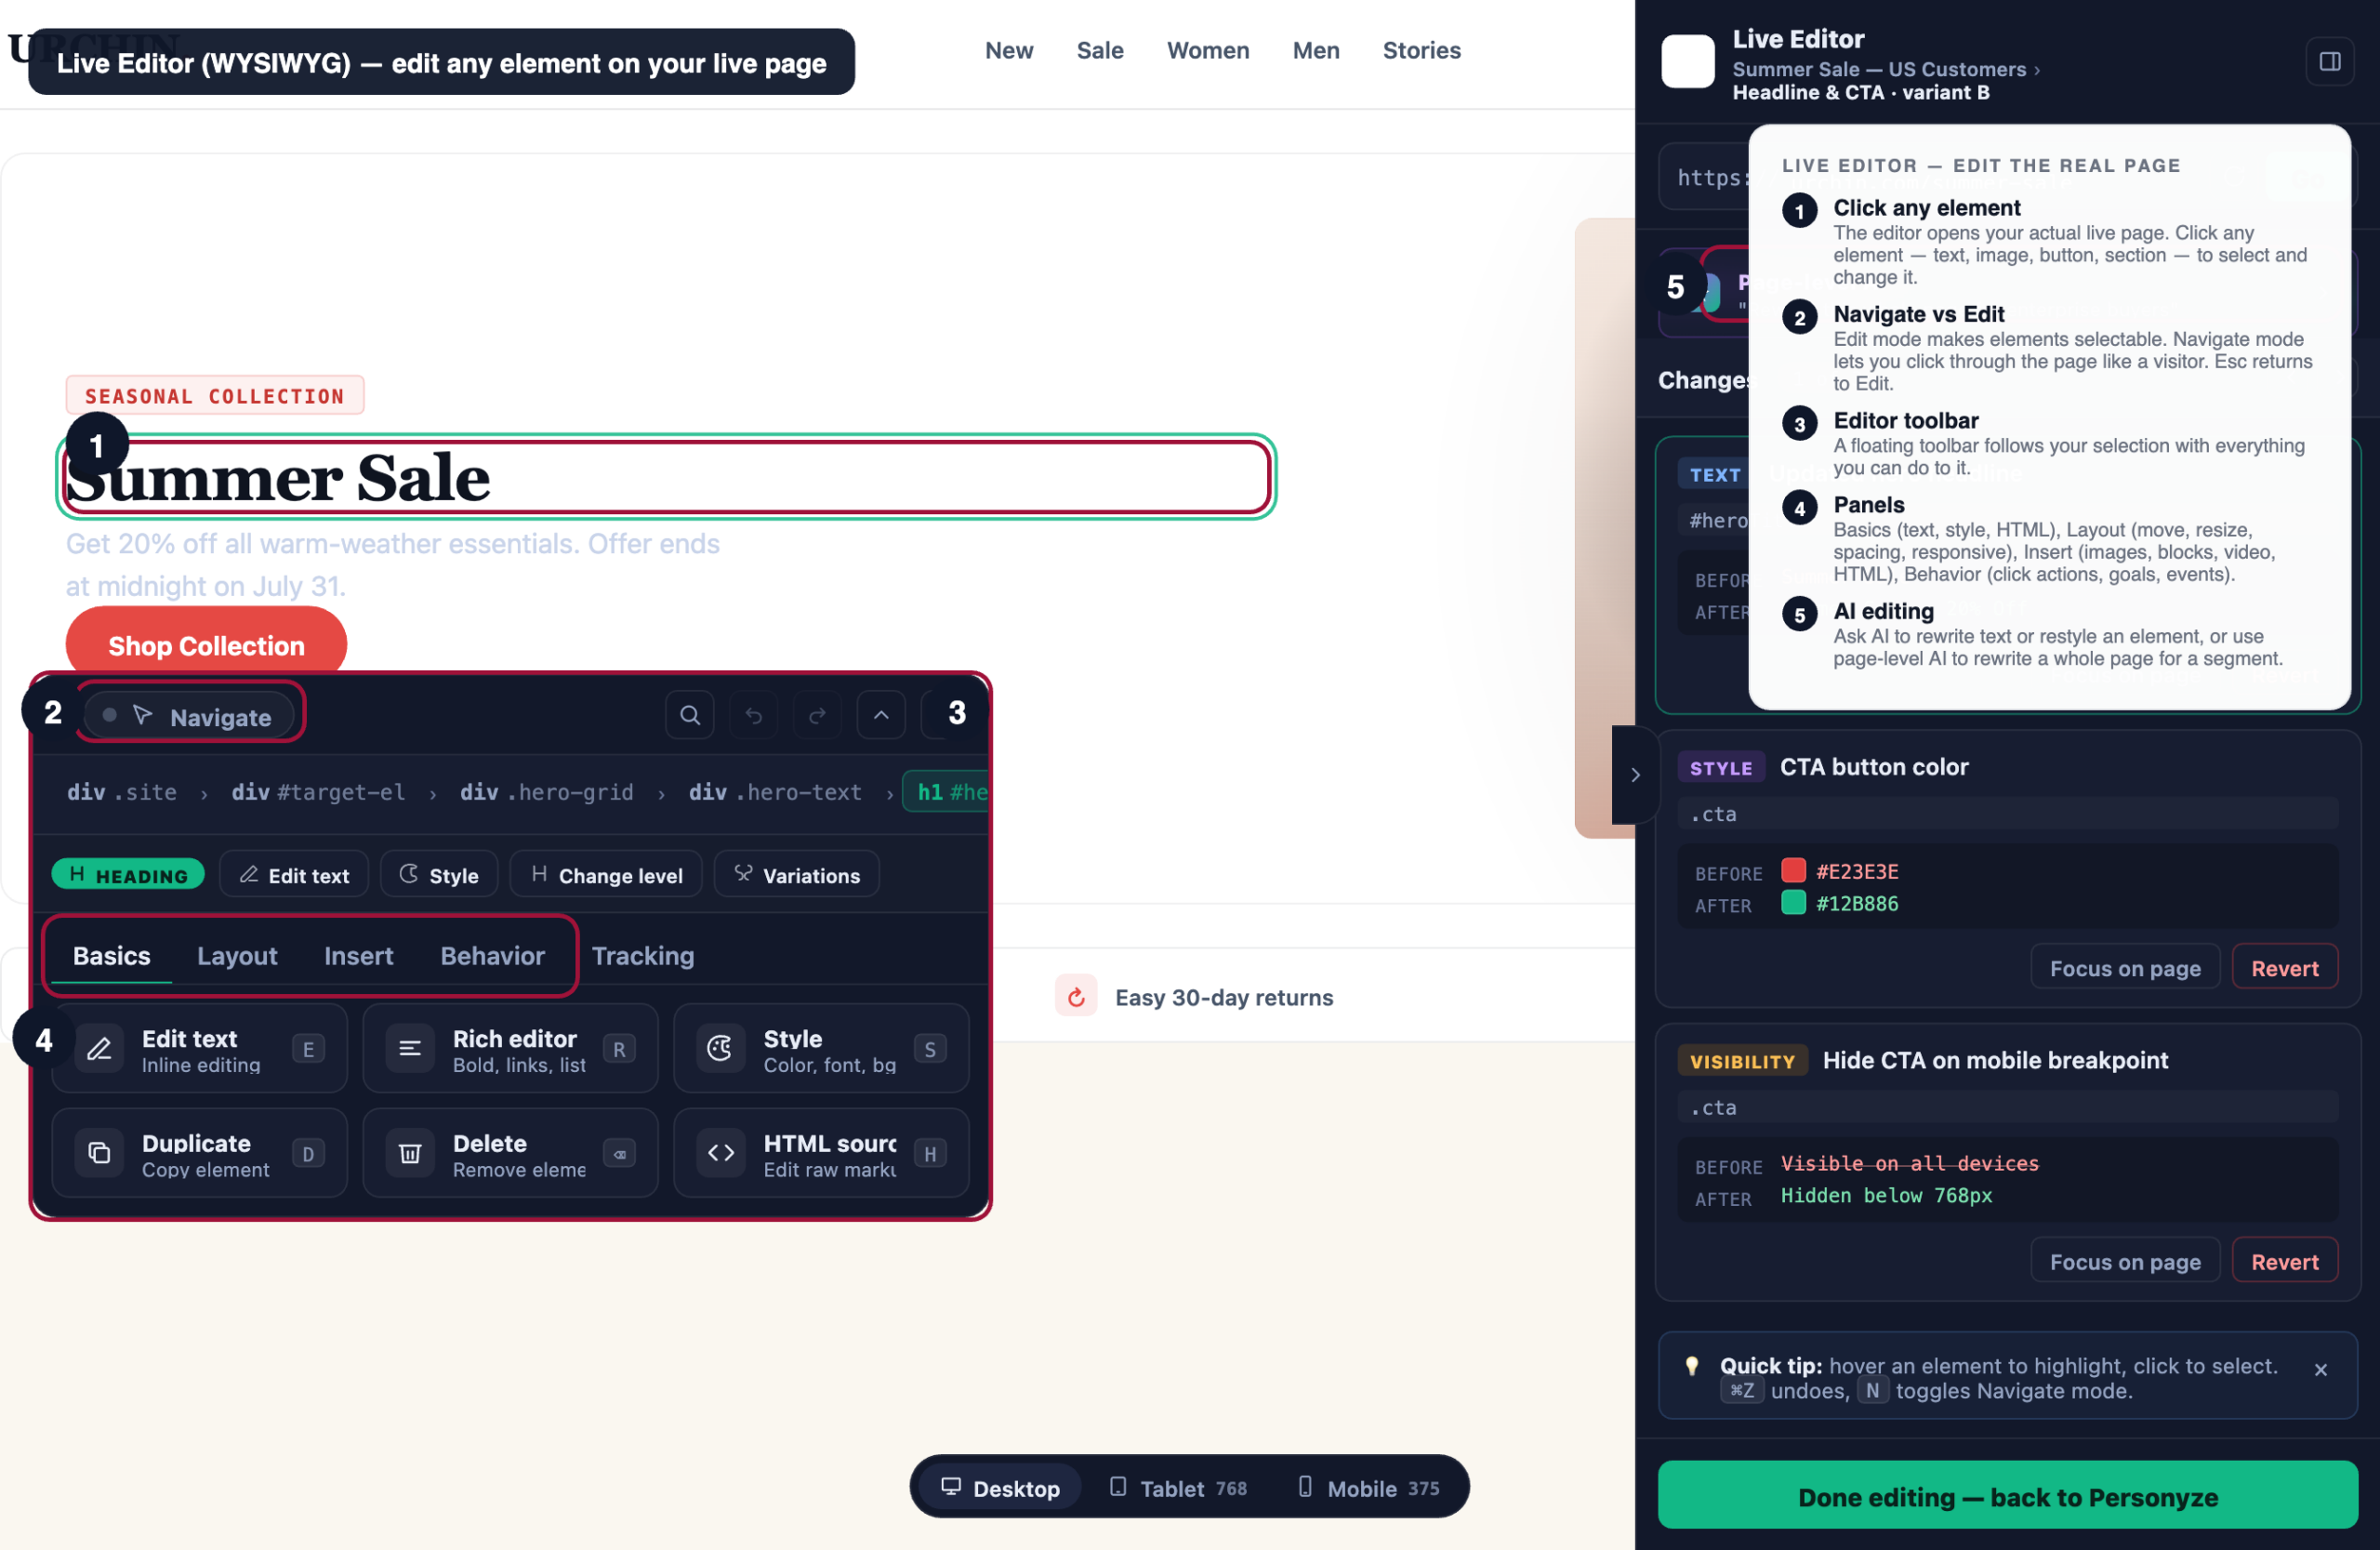
The Live Editor is Personyze’s most-used content tool: it opens your actual live site inside the editor and lets you edit any element on the page — text, style, layout, images, links, buttons — with click-to-edit precision. Changes are captured as a variation that Personyze injects for your audience only; the underlying site code isn’t touched.
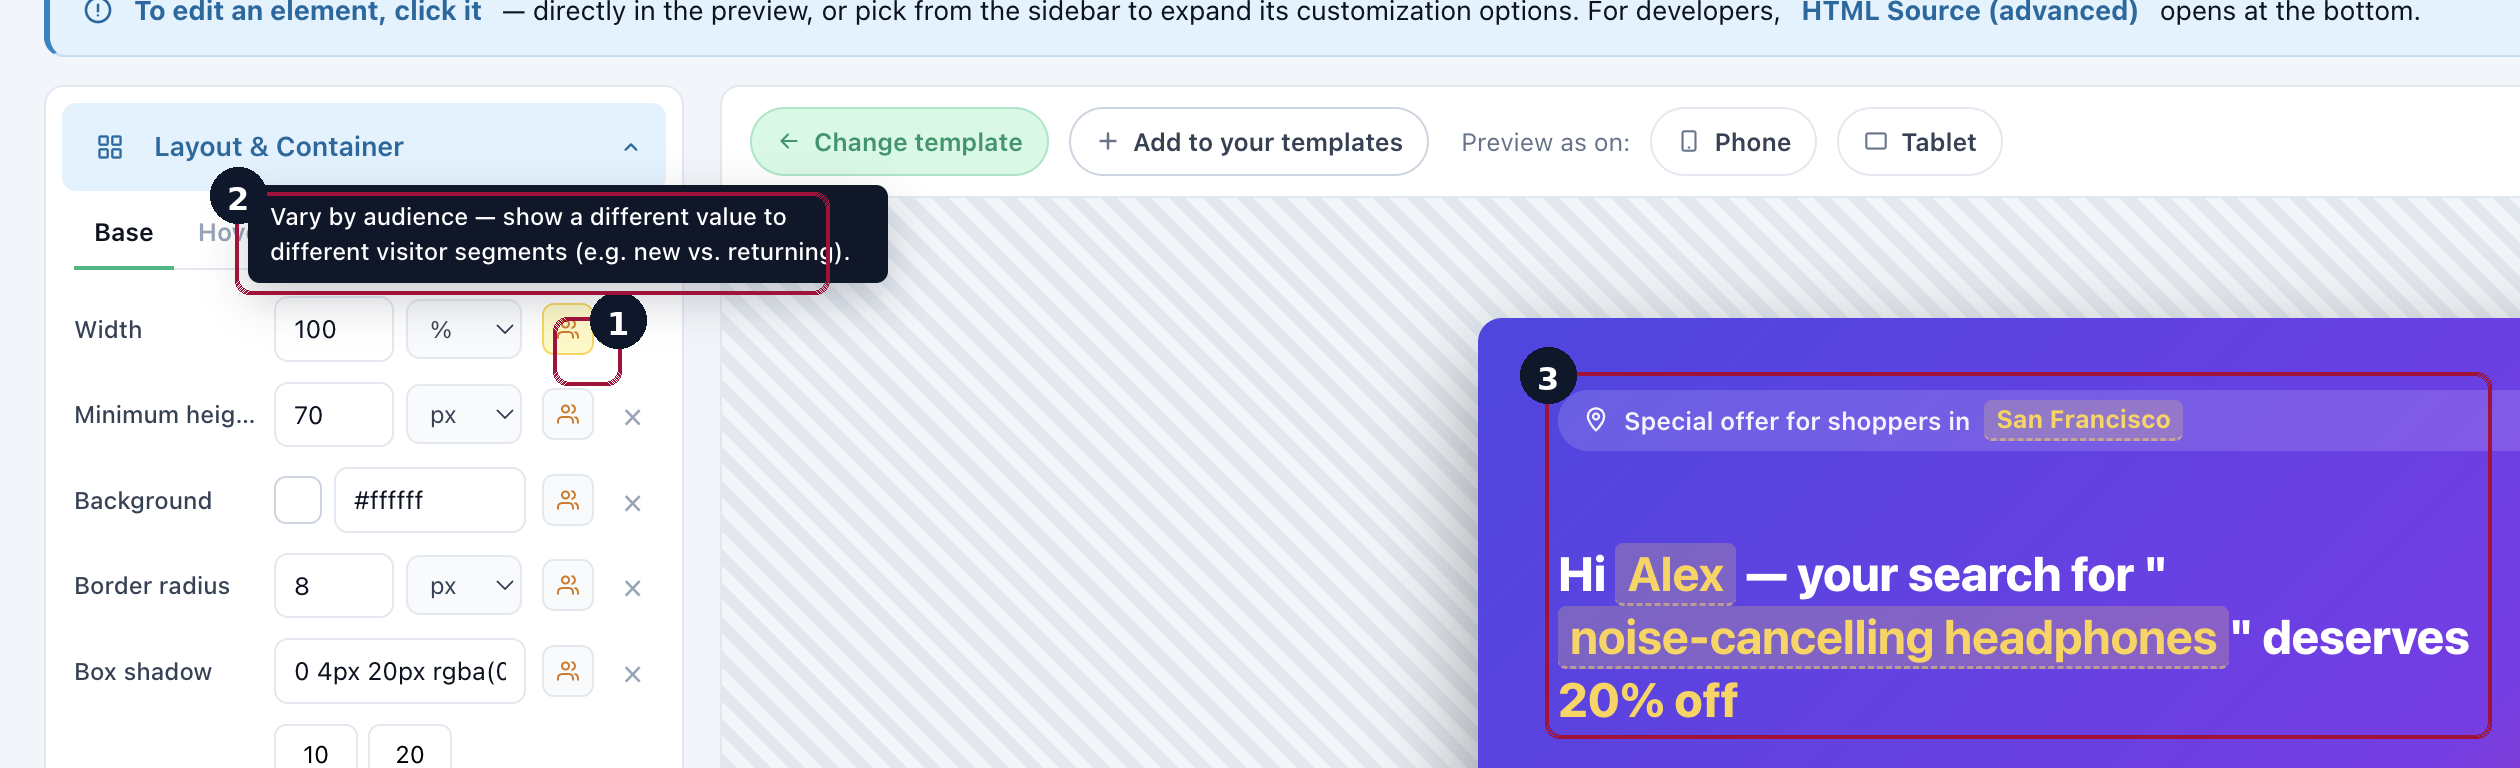
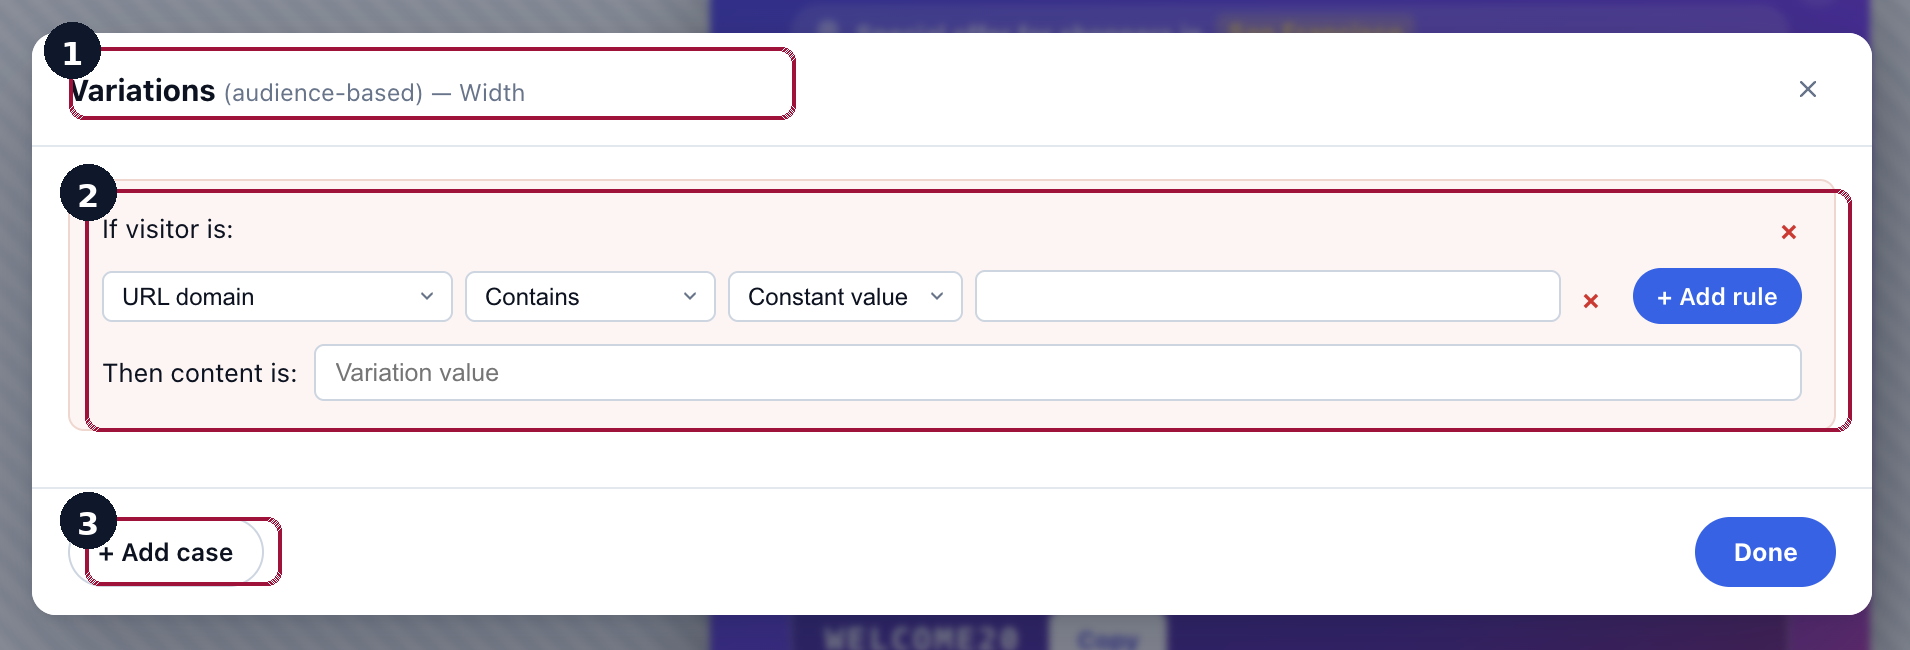
The same content can carry different versions by case. With Split Cases, a single action holds a Default version plus extra cases — each shown only when its condition is met (most often the visitor’s location, but also device, audience, language, or a CRM / feed value). You switch between cases and edit each one right in the WYSIWYG editor (the Popup & Banner editor works the same way).
What the Live Editor covers:
- Navigate vs. Edit modes — Edit mode makes every element clickable so you can pick something to change; Navigate mode disables editing so you can click links and interact with the page as a real visitor. Press Esc to return to Edit.
- Basics panel — edit text (with a rich-text editor for bold/italic/lists/links), change styling (color, font, size, background), duplicate or delete an element, or drop into raw HTML source when needed.
- Layout panel — move & resize by dragging corners, adjust spacing (margin/padding), change alignment for flex & grid layouts, hide/show per device breakpoint, preview responsive breakpoints, or reposition with z-index and pinning.
- Insert panel — drop in new elements: images (upload or URL), links, buttons, reusable blocks, videos (YouTube / Vimeo / MP4), or raw custom HTML snippets.
- Behavior panel — attach behavior to any element: run custom JavaScript on click, scroll to an anchor, delay or hover-triggered actions, count clicks toward the action’s stats, register the element as a conversion goal, or fire a custom event with a name and payload.
- AI-assisted editing — for any selected element, ask the AI for style suggestions (“Match brand accent,” “Modern sans look,” “More contrast,” “Softer, rounded”) or text rewrites (“Make it punchier,” “Shorter,” “Benefit-focused,” “More urgent,” “Match brand voice”). The AI proposes changes you review, apply, or discard.
- Page-level AI — for wholesale rewrites, describe the goal (“Rewrite this whole page for enterprise buyers”) and the AI proposes an integrated set of changes across the page.
- Variation history — every element tracks how many variations have been created and lets you switch between them for comparison.
Popup, Banner & HTML Builder
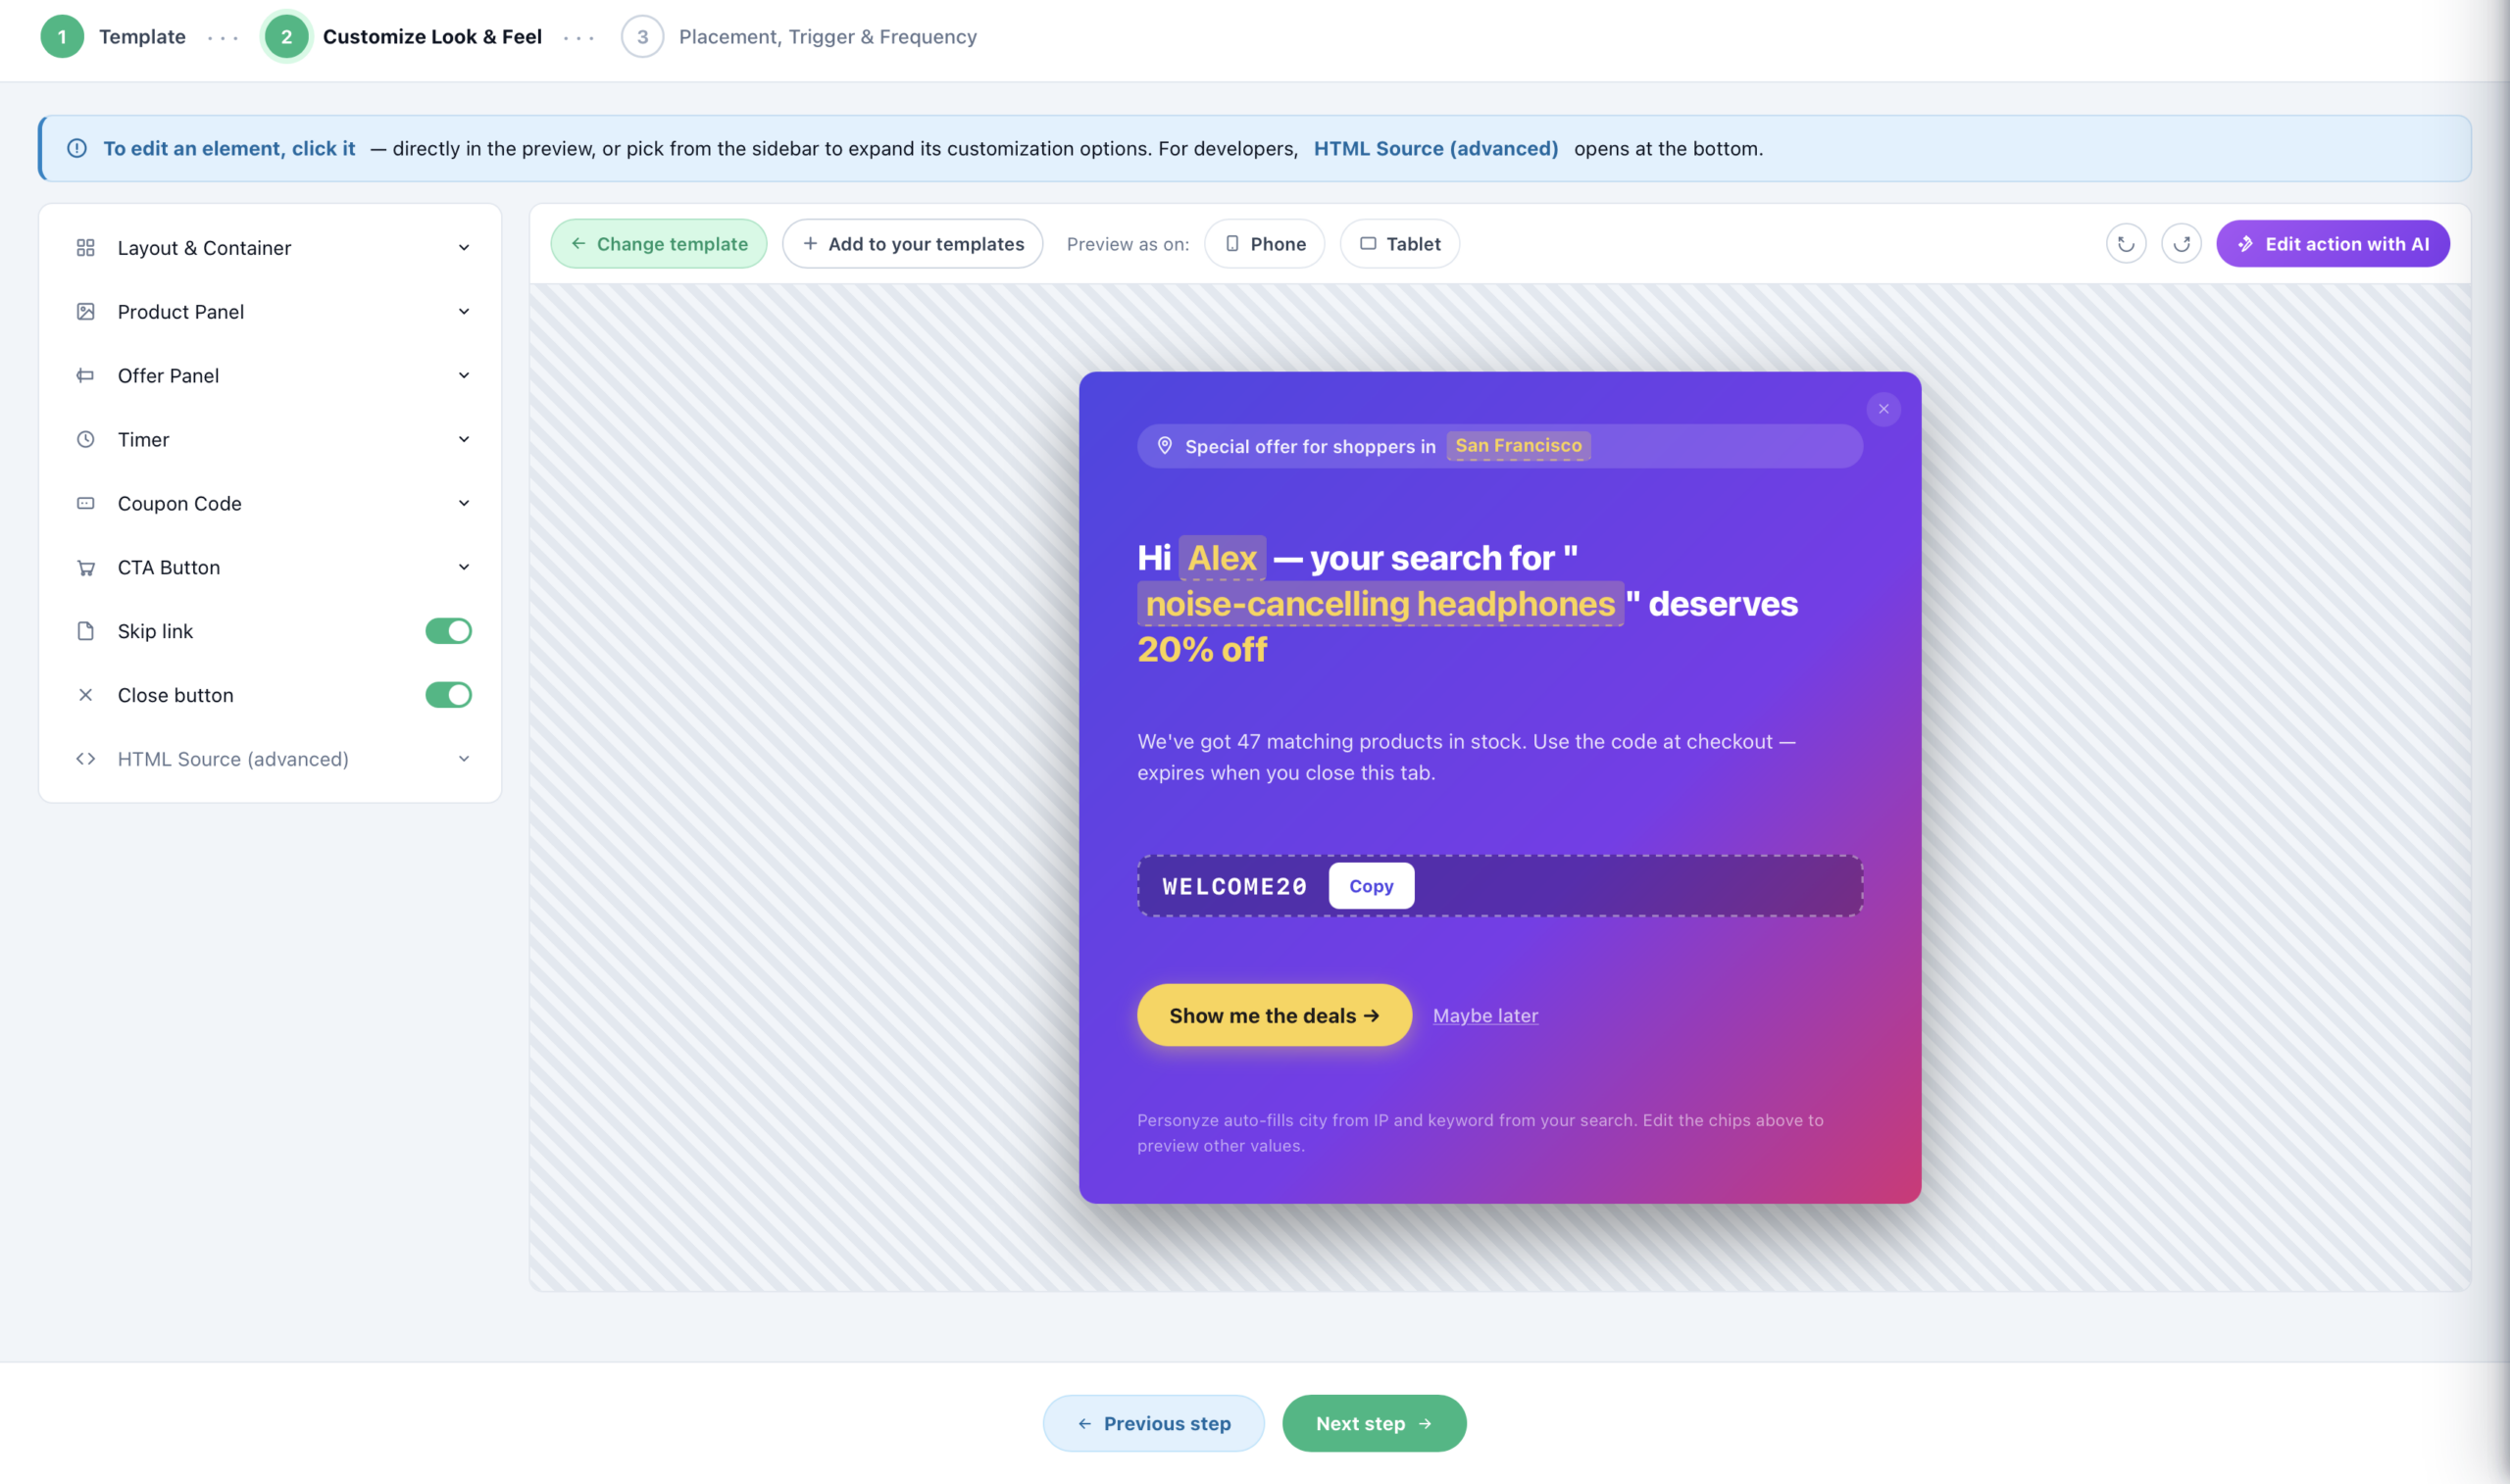
When you want to put a new element on the page — a popup, a sticky header/footer bar, a floating bubble, a slide-in notification, a message box, an embedded in-page banner, or a fully custom HTML block — use the Popup, Banner & HTML Builder. It ships with production-ready templates for each format and supports live personalization tokens (e.g., “Hi Alex — your search for ‘noise-cancelling headphones’ deserves 20% off”) that resolve at render time from the visitor’s profile, session, or CRM data.
Despite the name, this builder isn’t limited to overlays that float on top of the page. Every content item can be pinned to a placeholder — a CSS selector you point at any element on your site. Set a placeholder and the content is injected at that spot, and it can replace the existing content there rather than only adding alongside it. That makes the same builder useful both for classic overlays (a popup, a corner toast) and for swapping in-page content (a hero banner, a promo strip, a block inside a product page) without touching your site’s code.
Edit any action with AI
Any action — a popup, banner, WYSIWYG edit, or block of HTML — can be edited with AI instead of by hand. Click Edit action with AI, describe the change in plain English, and Personyze rewrites the action’s HTML for you to review and apply.
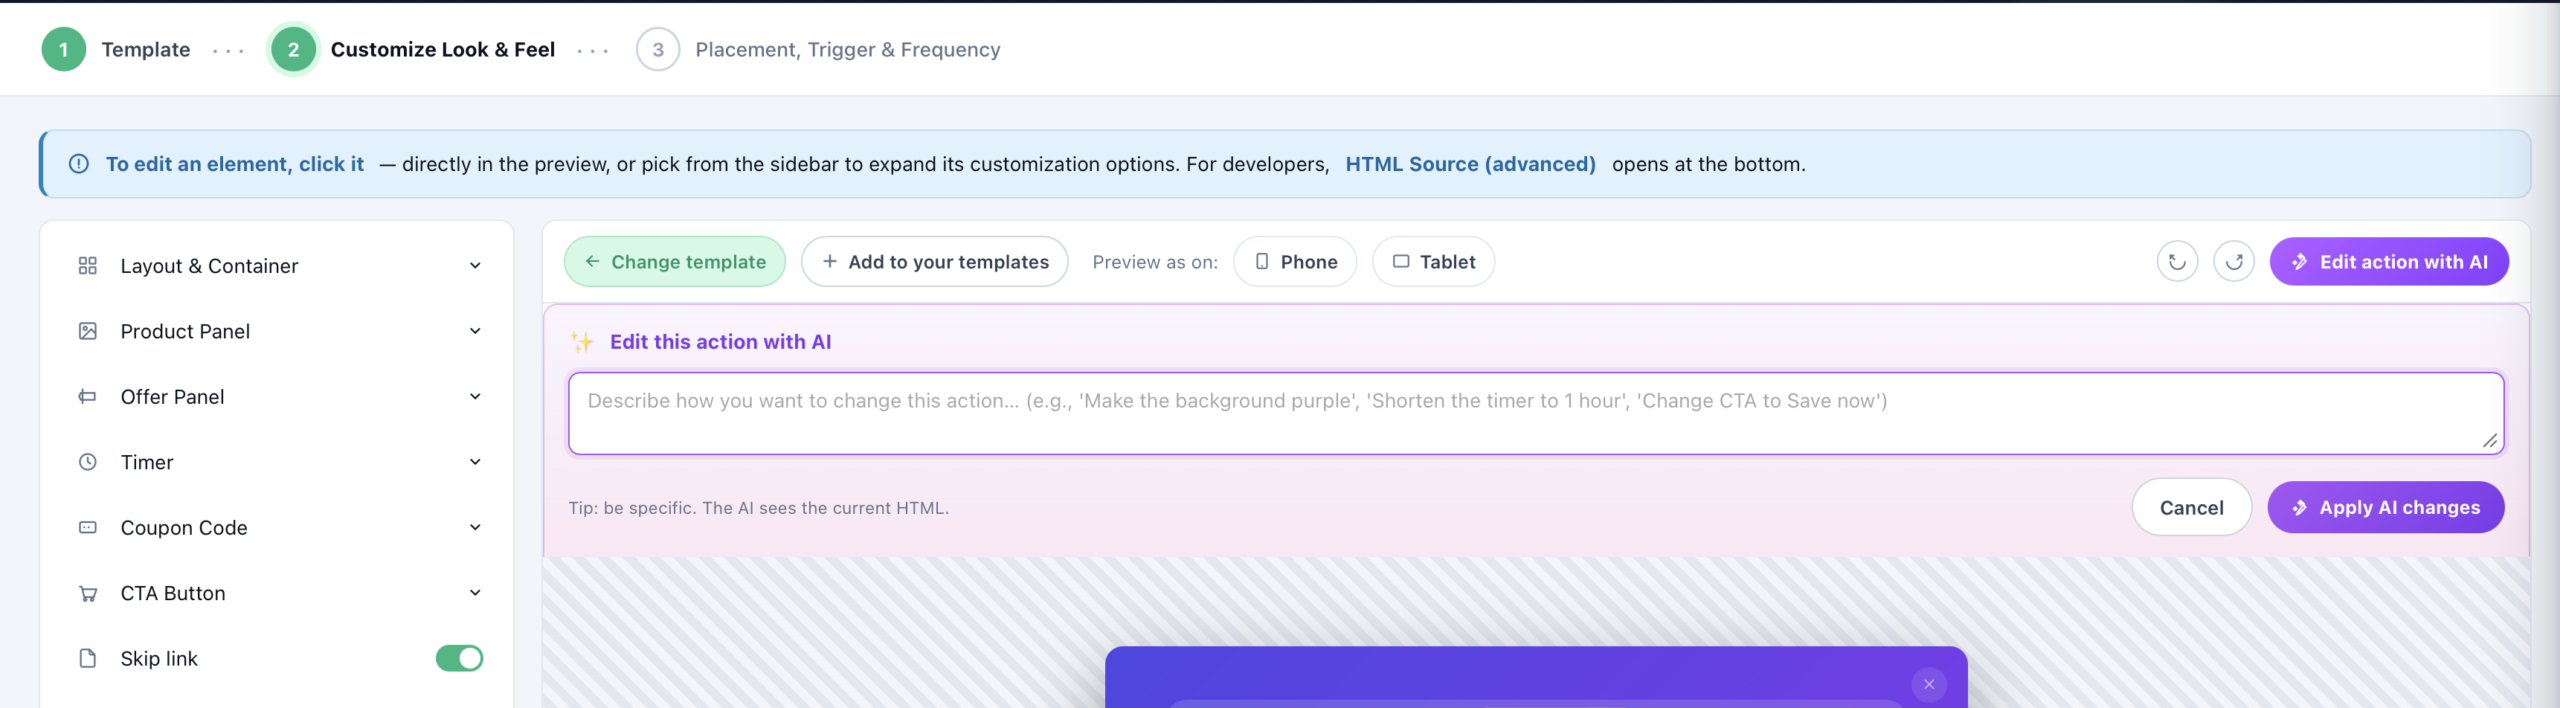
The AI can:
- Restyle — colors, fonts, spacing, layout, button styles (“match our brand accent,” “more contrast,” “modern sans look”).
- Rewrite copy — headlines, body, CTAs (“make it punchier,” “benefit-focused,” “more urgent,” “match brand voice”).
- Change the creative — swap or adjust images, timers, coupon codes, and other template elements.
- Insert personalization — add Personyze variables like the visitor’s first name, city, or a searched keyword so the action fills in per visitor.
The AI proposes the change; you review, apply, or discard — nothing goes live until you accept it.
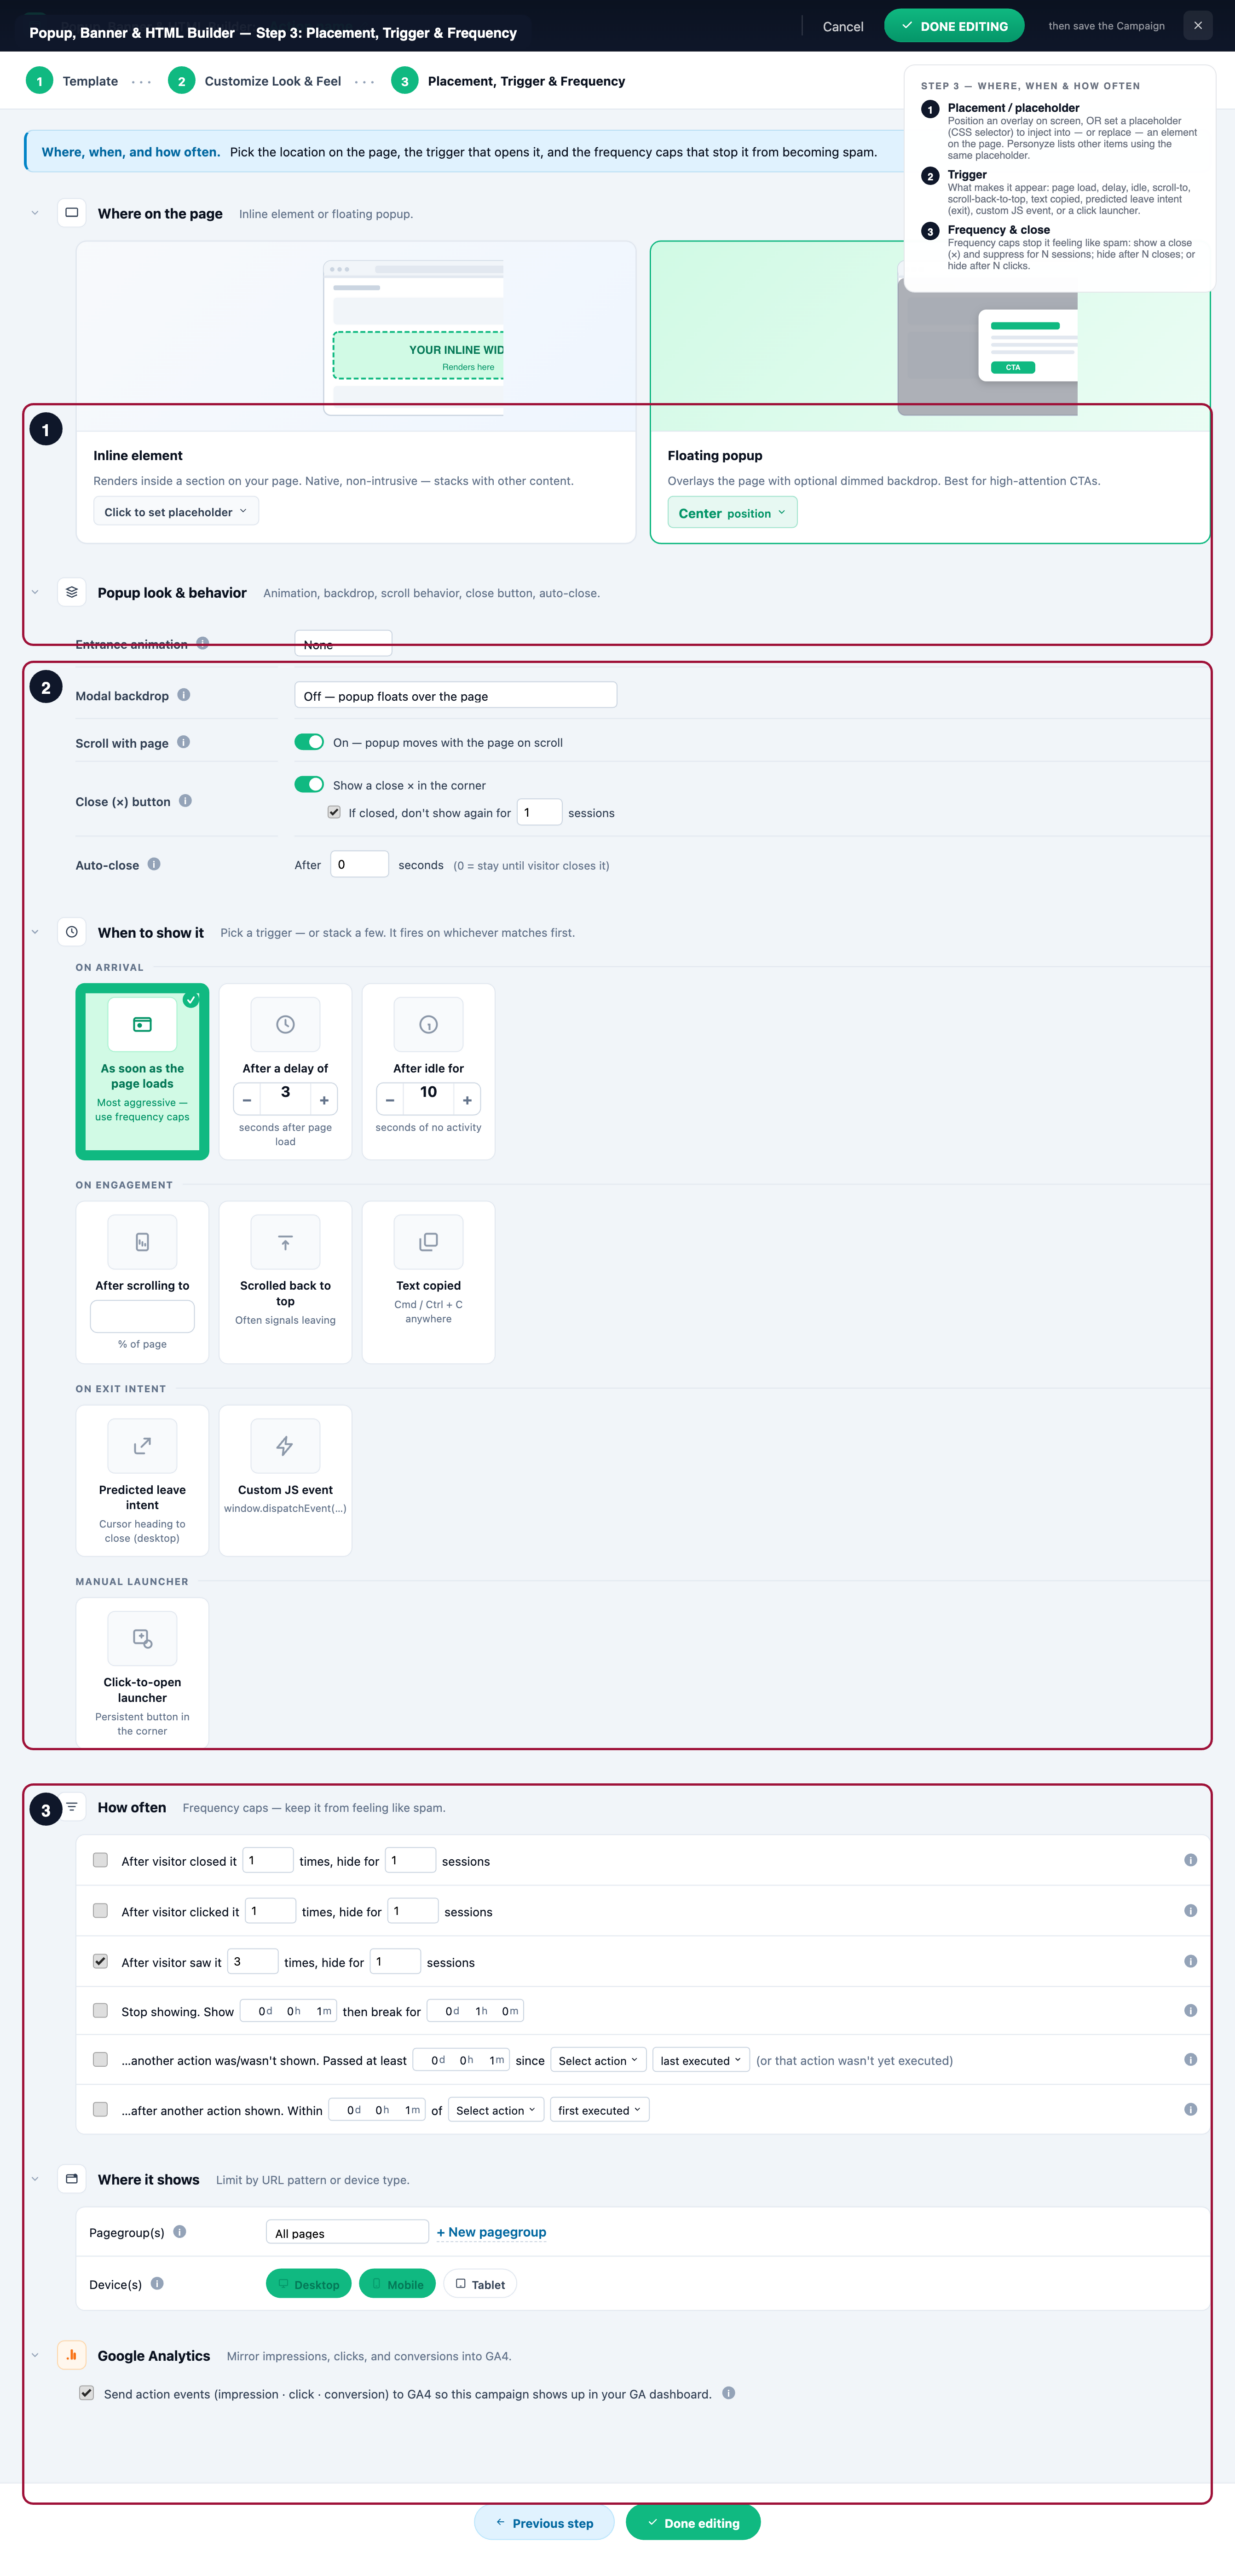
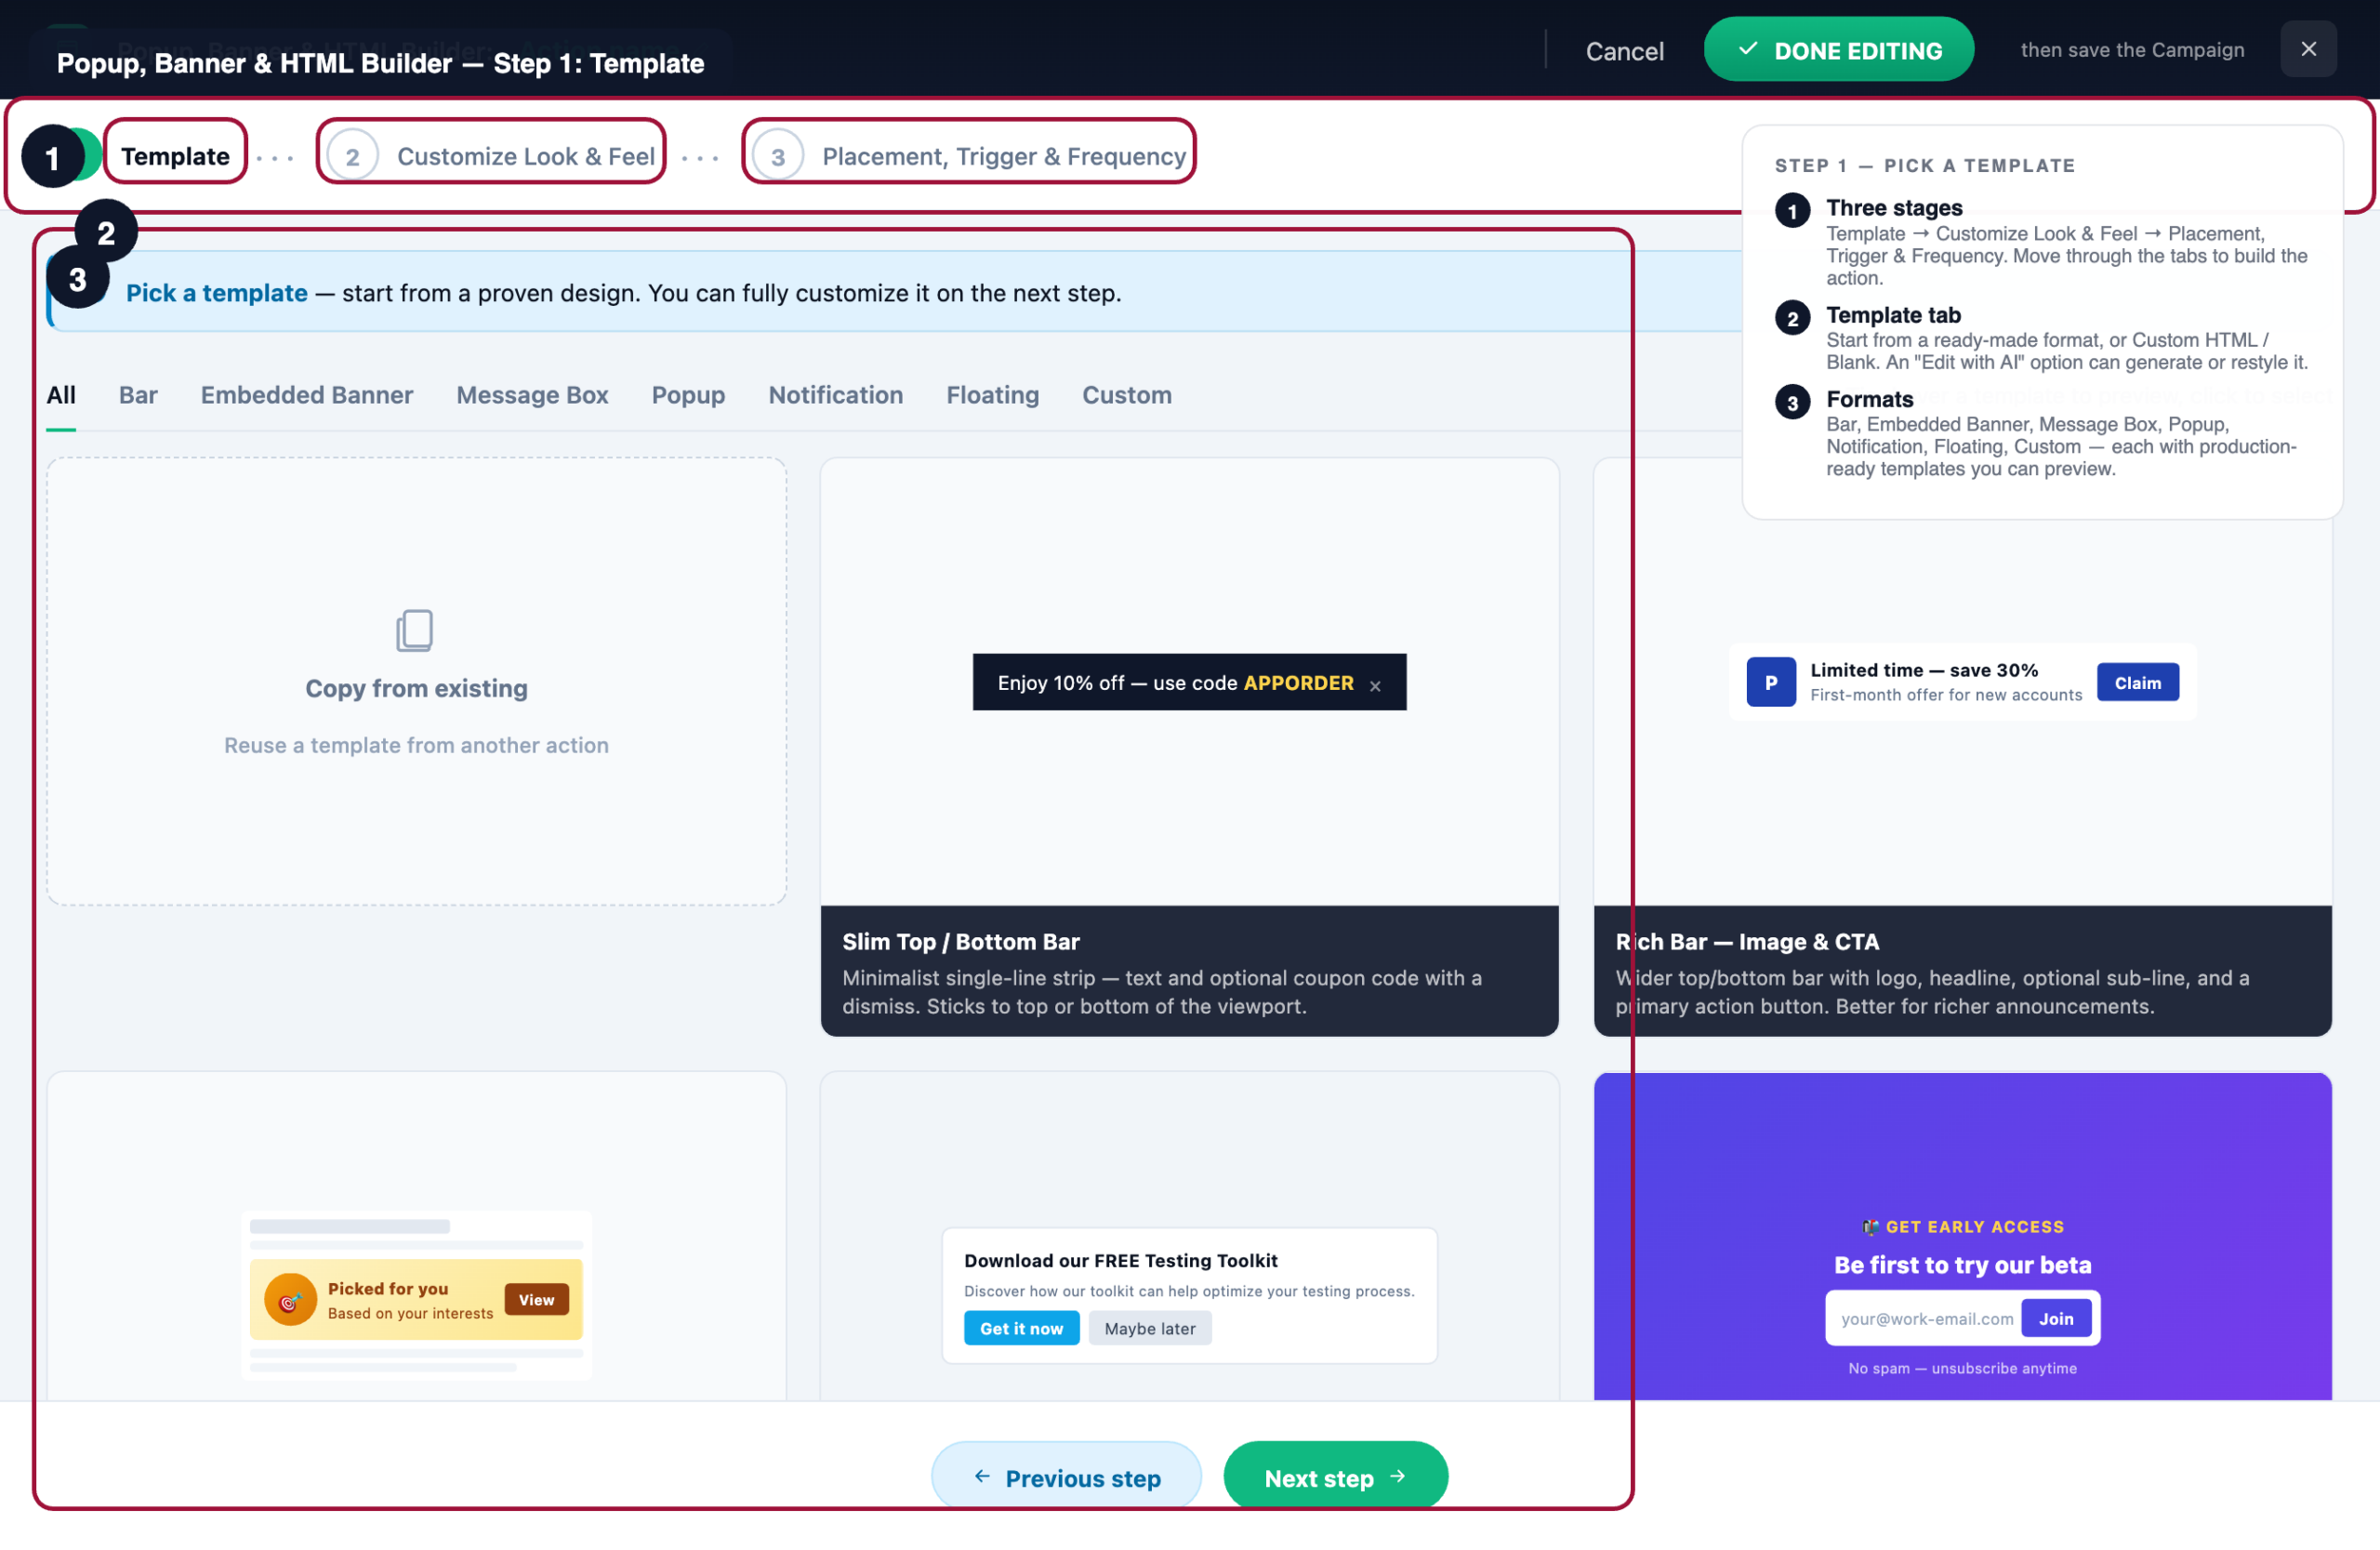
The builder walks through three stages:
1 · Template. Start from a format-specific template, filterable by type: Bar (slim sticky top/bottom bar, or a rich bar with image & CTA), Embedded Banner (inline in a specific page slot), Message Box (inline messaging with CTAs), Popup (modal overlay — signup / lead form, or countdown promo), Notification (slide-in corner toast), Floating (floating bubble / launcher), and Custom HTML / Blank (raw markup). Any template can embed a product-recommendation widget powered by your catalog (Bought Together, Countdown, Grid, Slider, and more), and there’s an “Edit this action with AI” option to generate or restyle it from a prompt.
2 · Customize look & feel. Adjust the design — layout, colors, fonts, imagery, buttons, and responsive behavior across base / hover states and phone / tablet / desktop breakpoints — and drop in personalization tokens that resolve per visitor.
3 · Placement, trigger & frequency. This stage decides where, when, and how often the content shows:
- Placement — for overlays, choose a screen position (top/bottom, left/center/right, or centered). For in-page content, set a placeholder selector to inject into — or replace — an element on the page. Personyze also lists every other content item already using that same placeholder, so you can see what competes for the slot.
- Trigger — what makes it appear: as soon as the page loads, after a delay, after the visitor is idle for a while, after scrolling to a point, when they scroll back to the top, when text is copied, on predicted leave intent (exit intent), on a custom JS event, or from a click-to-open launcher.
- Frequency & close behavior — frequency caps keep it from feeling like spam: show a close (×) button and, if closed, suppress it for N sessions; hide it after the visitor has closed it a set number of times; or hide it after they’ve clicked it a set number of times.
Full guide: Popup & Banner Action Guide.
Other action types
Personyze also supports these action types, each with its own dedicated guide:
- Product Recommendations — dedicated recommendation widgets (Bought Together, Also Viewed, Trending, Personalized by browsing history, Category-based, and more) powered by your product catalog feed.
- Countdown Timer — add urgency with a live countdown to a specific date/time, a per-visitor session countdown, or a rolling window.
- Redirect to URL — send matching visitors to a different URL entirely. Useful for A/B testing landing pages or routing paid traffic to a segment-specific page.
- JavaScript Action — run arbitrary JavaScript when the audience matches. Used for anything the built-in action types don’t cover — talking to a third-party API, mutating page state, firing tracking events, or wiring up something custom.
- Email actions — personalized email sends including cart abandonment, re-targeting, and campaign-driven sends, with recommendations embedded at open-time.
- Web Push Notifications — reach visitors who’ve granted push permissions with time-of-day or event-triggered notifications.
3. Configure the test
The test controls sit at the top of the variations.
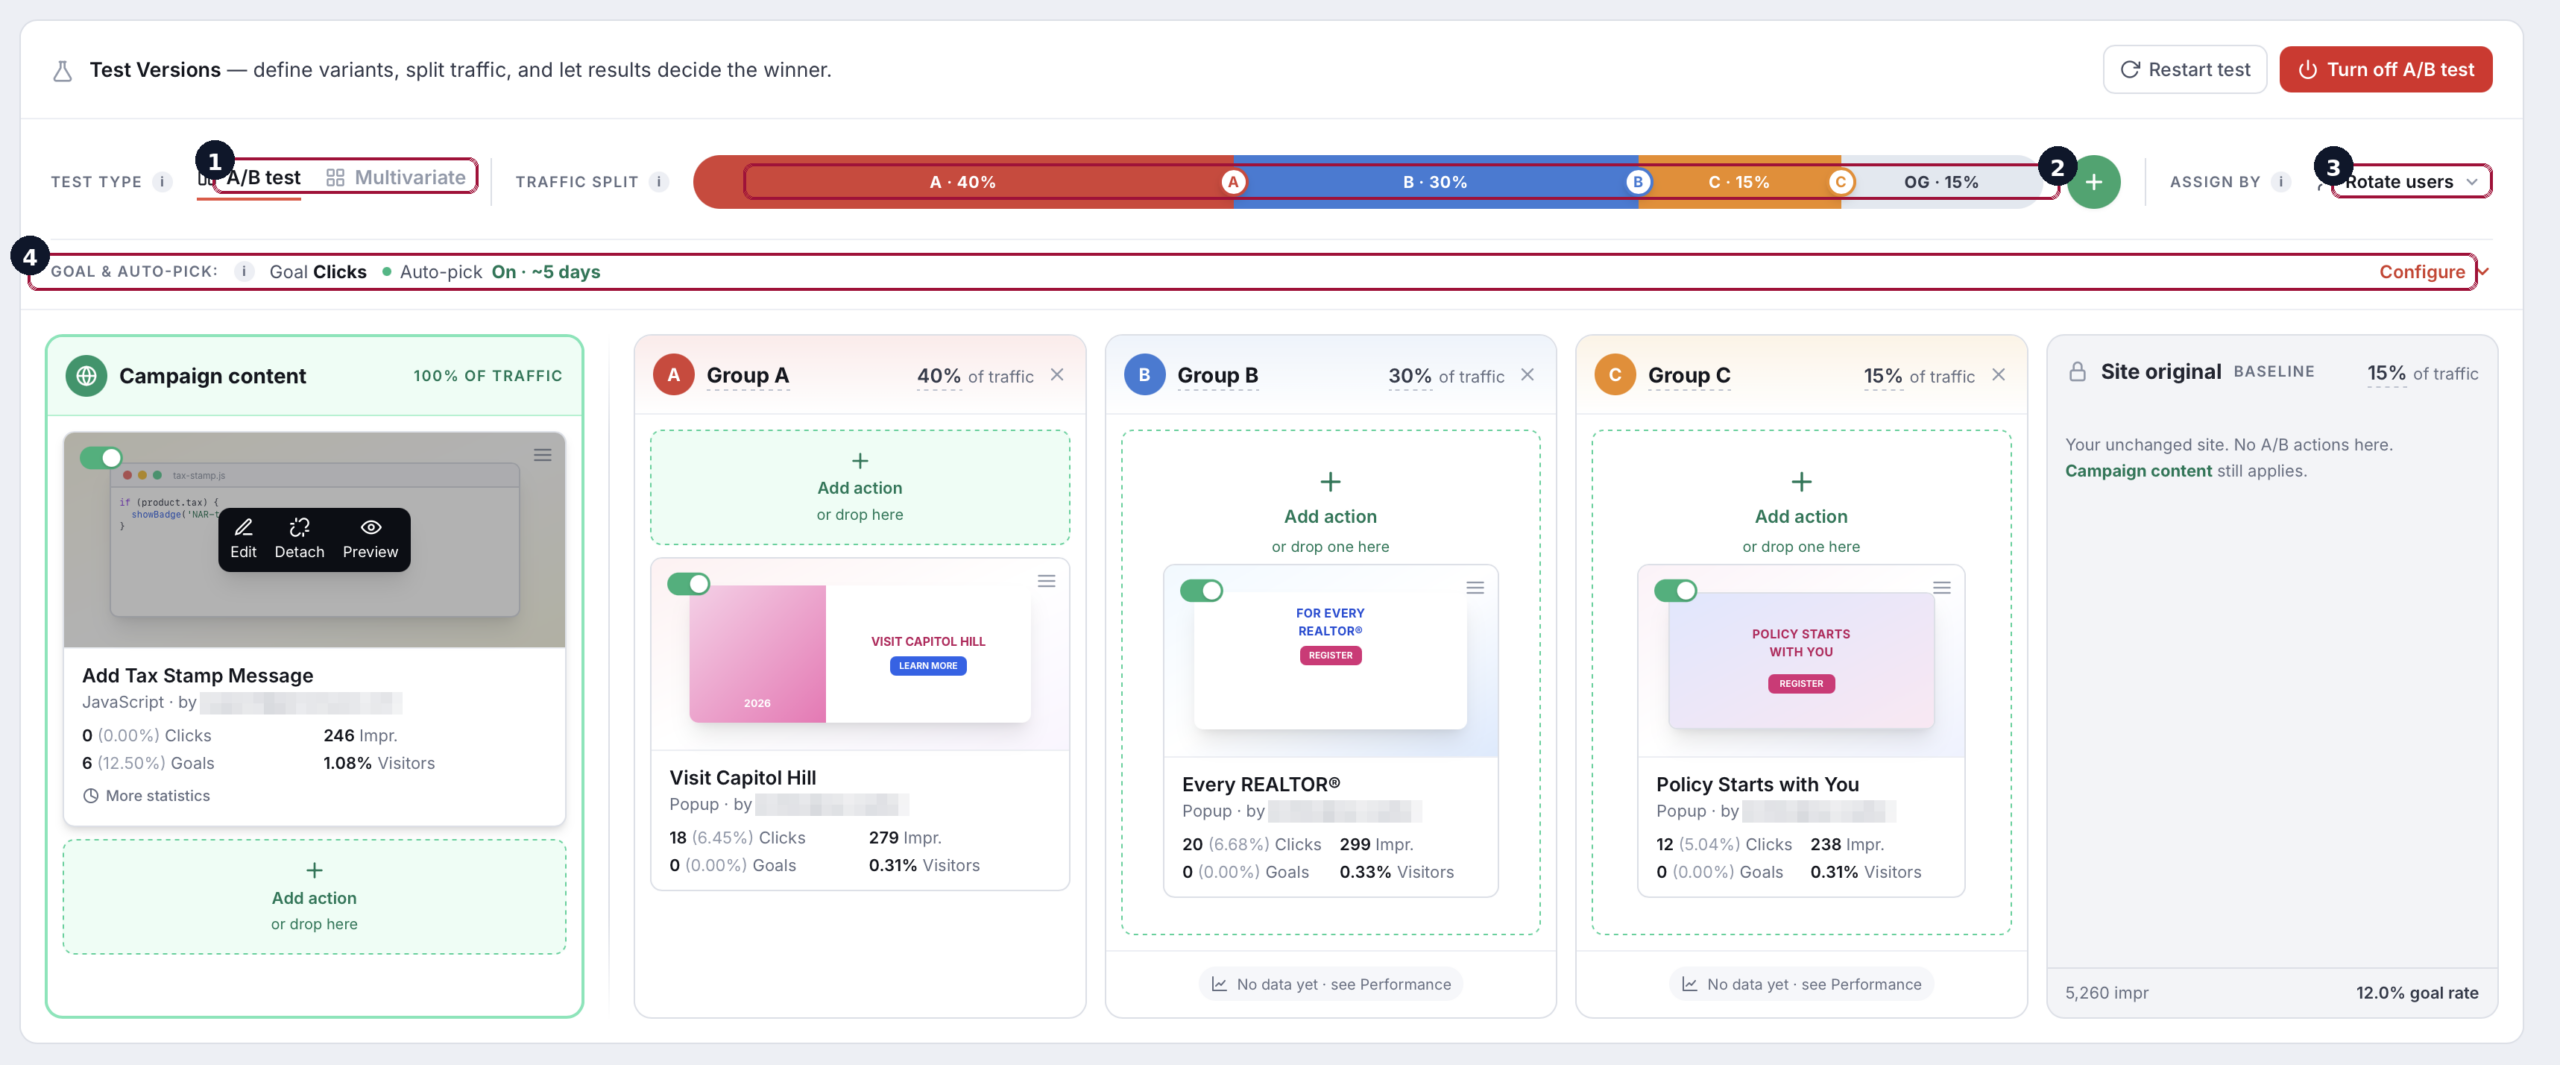
- Traffic split — drag the handles on the colored bar to set each variation’s share (they always total 100%). Holding some traffic on the original measures lift against doing nothing. Use “+” to add a variation and “×” to remove one.
- Goal & auto-pick — choose the KPI the test optimizes for (clicks, a conversion goal, revenue) and whether Personyze auto-picks the winner or leaves it to you.
- Reset test data — if you change variations, the split, or an action mid-flight, reset so measurement restarts cleanly rather than mixing old and new numbers.
How visitors are assigned
The Assign by control decides how visitors are bucketed into variations — and how a shared control cohort is held out across campaigns.
- Rotate users — different users see different versions, and each user stays on the same version. The classic A/B test; use it for most experiments where you want a consistent per-visitor experience.
- Visits — the same person can see different variants on each visit. Good for banners and creative where per-visit variety is fine and you care about impressions more than a stable per-user experience.
- Random — every page view picks a variation at random, with no user or visit consistency. Use only when consistency doesn’t matter.
The bottom of the menu sets up a shared control group across campaigns — a hold-out cohort that never sees any of your personalization, so you can measure the total lift of your whole program, not just one test:
- Control users — the same users are held out across every campaign (for example, a shared 10% control cohort everywhere).
- Control visits — a shared visit-level control cohort across campaigns.
The decision strategy
The decision panel controls how sure Personyze must be before it calls a winner — and what happens when it does. It turns “is B really better?” into explicit, auditable rules instead of a gut call.
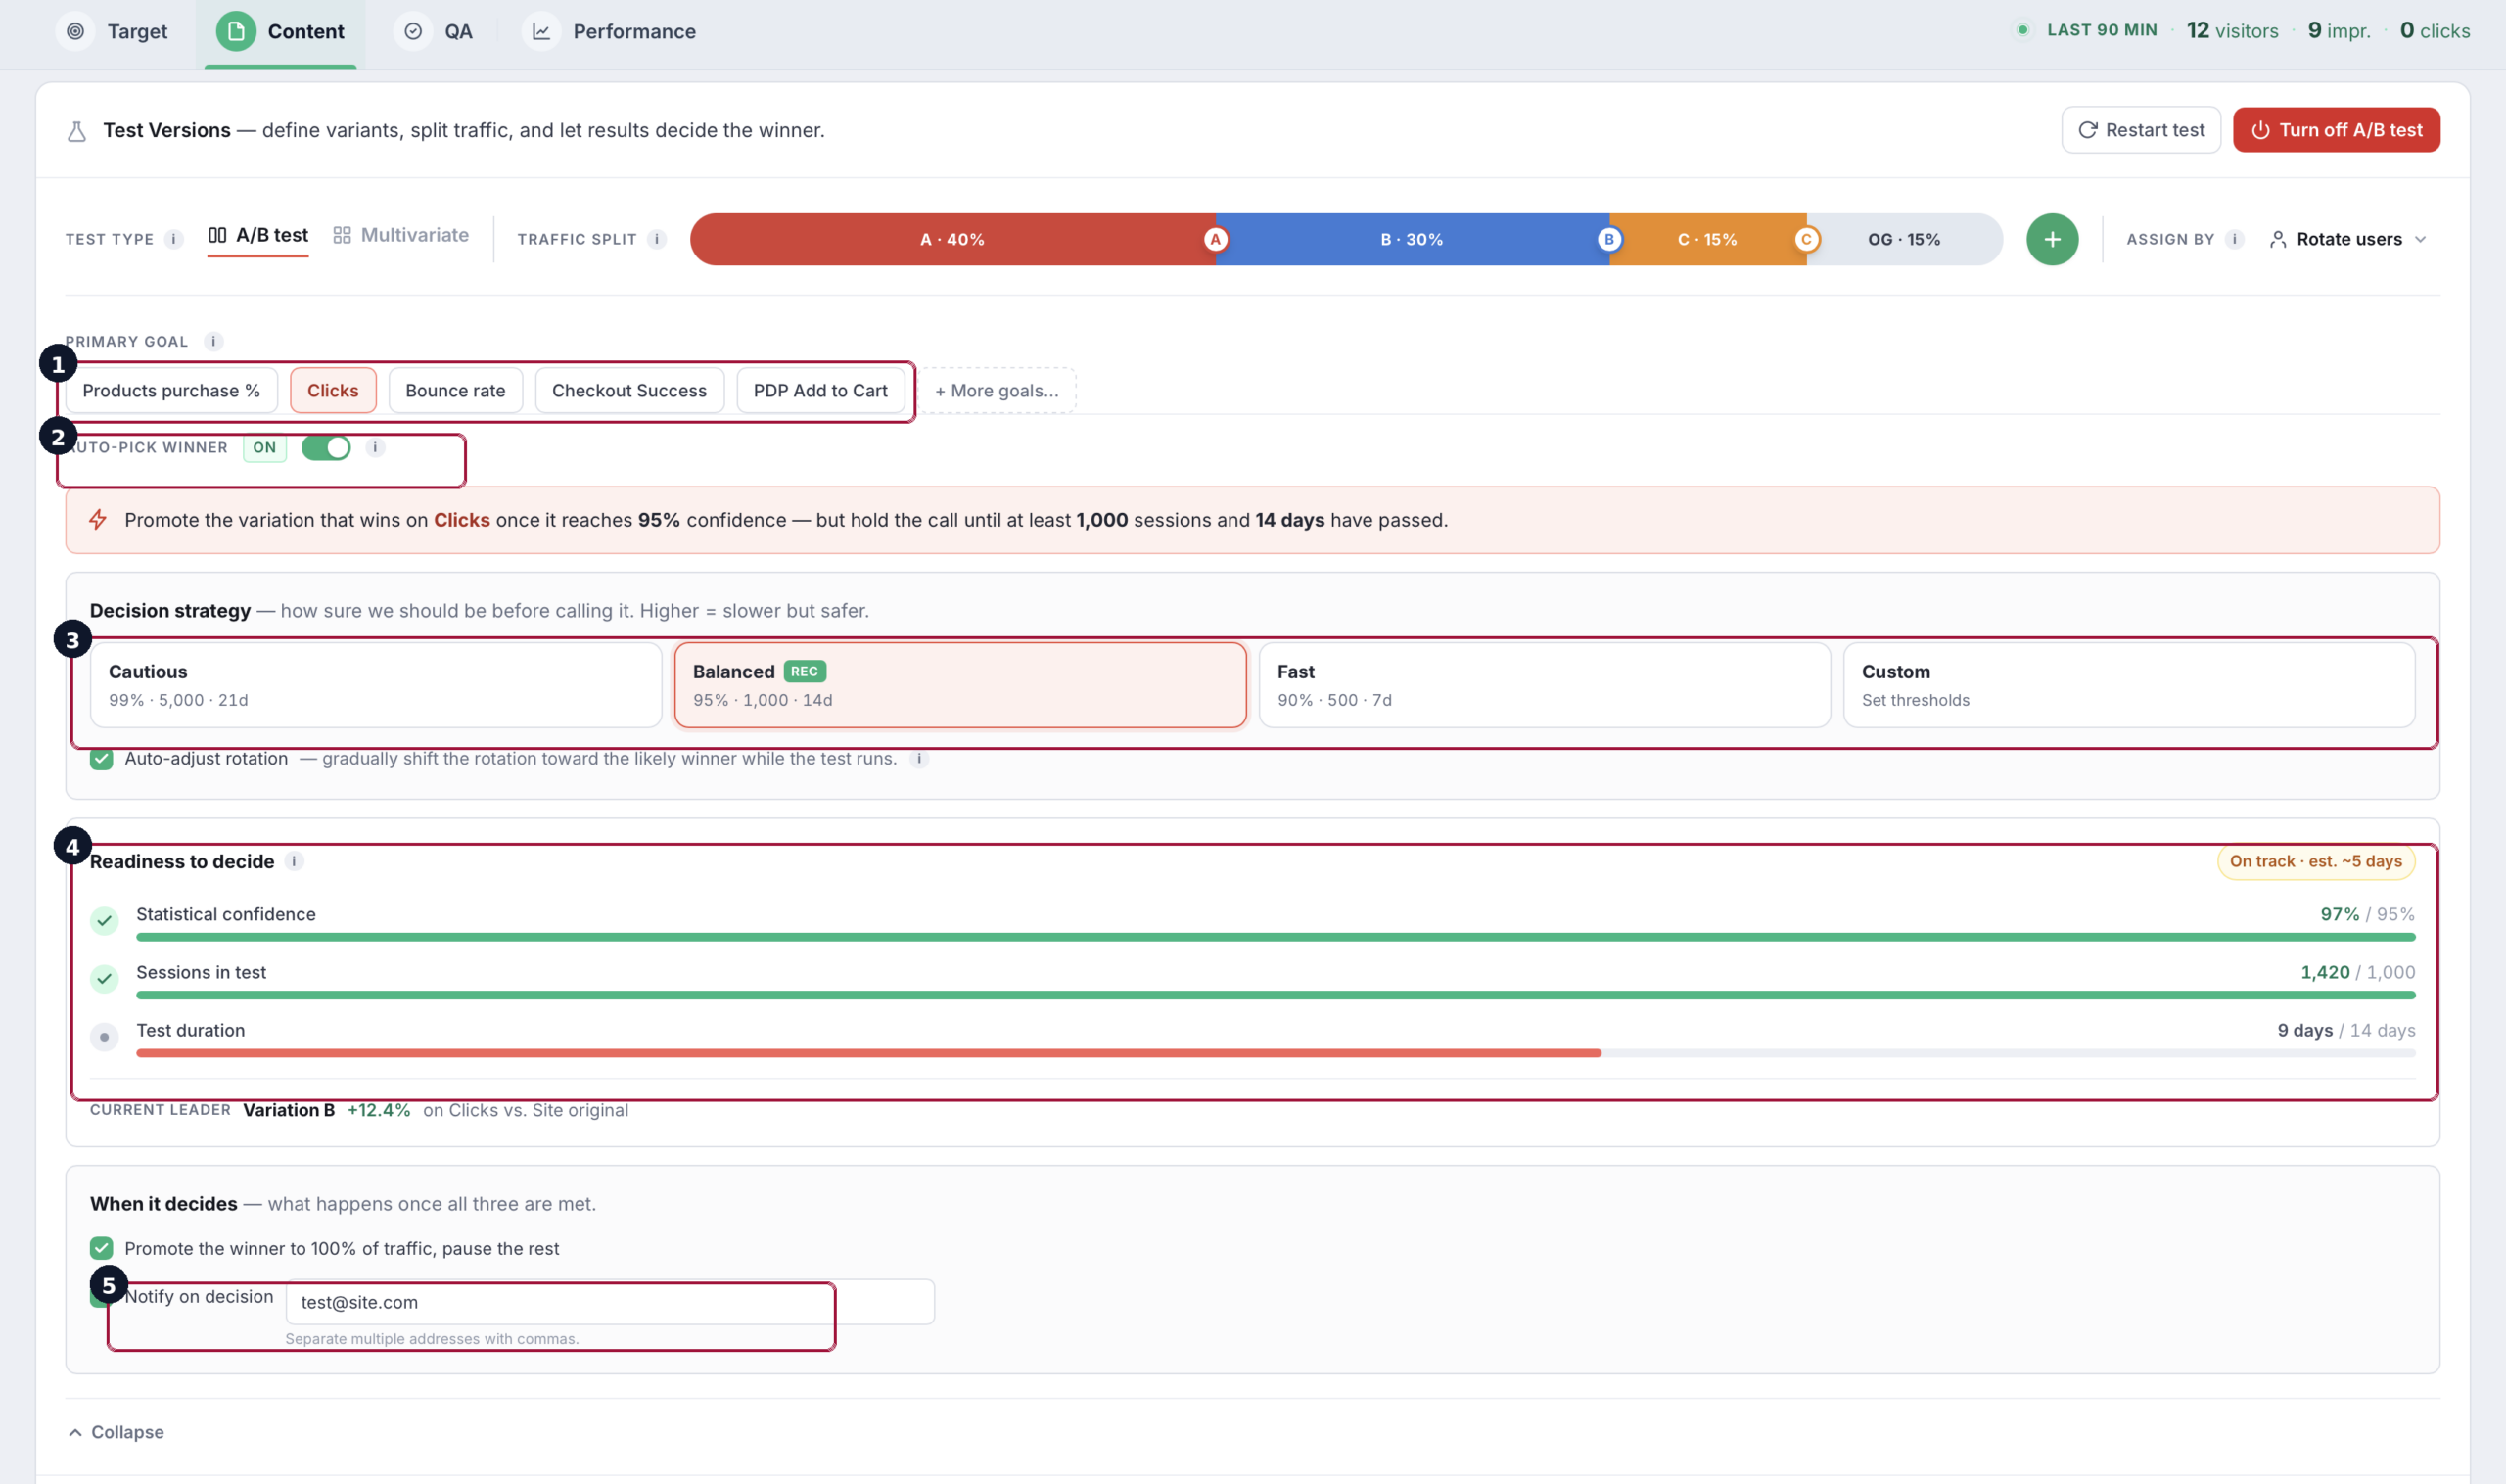
It has four parts:
- Primary goal — the single metric the winner is judged on (a conversion goal, clicks, or revenue). Supporting KPIs are still tracked, but the decision is made on this one so a test can’t “win” by trading your real objective for a vanity metric.
- Auto-pick winner — a toggle. On, Personyze promotes the winner automatically the moment the thresholds below are met. Off, it only flags the recommendation and waits for you to promote manually.
- Decision preset — how strict the bar is, as a trade-off between speed and certainty:
- Cautious — highest confidence and the most data before deciding; fewest false winners, slowest to call. Best for high-stakes changes (pricing, checkout).
- Balanced — the default; a sensible middle ground for most tests.
- Fast — lower thresholds so you decide sooner; good for low-risk copy or creative tweaks where a wrong call is cheap.
- Custom — set the exact thresholds yourself (see below).
- Notifications — who gets told when a winner is picked, so a decision never happens silently.
Each preset is really a combination of three thresholds, all of which must be satisfied before a winner is declared:
- Confidence — the statistical certainty that the leader’s lift is real and not noise (for example, 95%). Higher confidence = fewer false positives, but more data needed.
- Minimum sessions — a floor on how many sessions each variation must collect, so a tiny early sample can’t trip a decision on a lucky streak.
- Minimum duration — a floor on how long the test runs, so it spans full weekly cycles (weekday vs. weekend behavior) rather than a single unrepresentative day.
The readiness-to-decide meter shows how close the current leader is to clearing all three at once. A variation can lead on conversion yet still be “not ready” because it hasn’t hit the session floor or the minimum run time — which is exactly the mistake the thresholds exist to prevent. When every condition is met, this is where the decision actually takes effect.
What happens when a winner is decided. Promoting a winner isn’t just a notification — it changes how traffic is served:
- Traffic shifts to the winner. The winning variation’s share is raised — up to 100% of the targeted audience — so the losing variations stop being served and every matching visitor now gets the winner. The original/baseline is retired along with the other losers.
- The winner becomes the campaign’s content. Once promoted, that variation is effectively the live experience; you can keep the campaign running as a normal (non-test) campaign from there.
- With auto-pick on, Personyze does this reallocation automatically the instant the thresholds are cleared, and notifies whoever you listed. With auto-pick off, nothing shifts on its own — you get the recommendation (and the notification), and the traffic only moves when you click to promote. If you never allocate, the variations keep splitting traffic as before; the “decision” without promotion is just an alert.
If you promoted early on bad data, or changed the content afterward, reset the test data so measurement — and any future auto-decision — starts clean.
Multivariate: test several elements at once
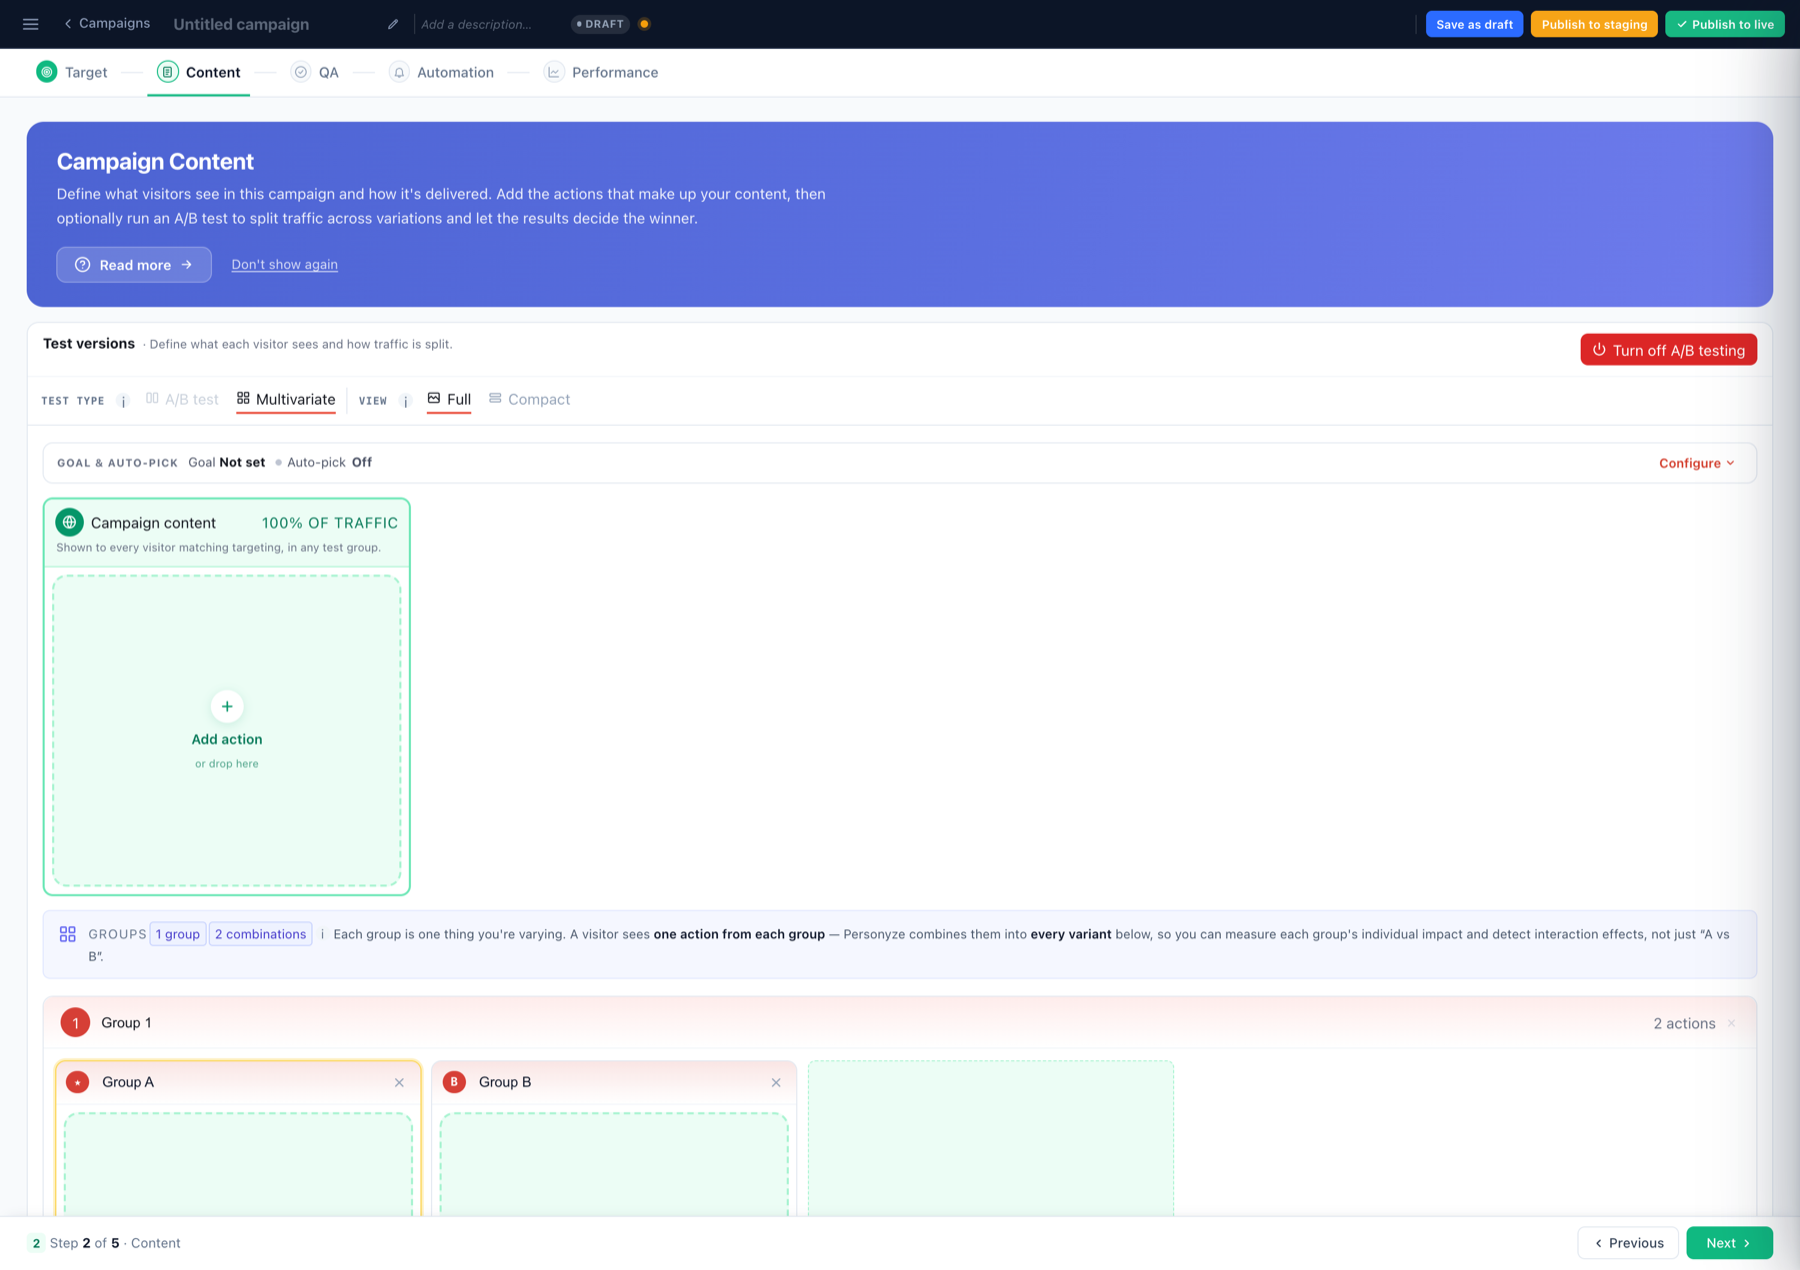
An A/B test compares whole variations. Multivariate tests individual elements in combination: you create groups — each group is one thing you’re varying — and drag the alternative actions into each. A visitor sees one action from each group, and Personyze combines the groups into every possible variant.
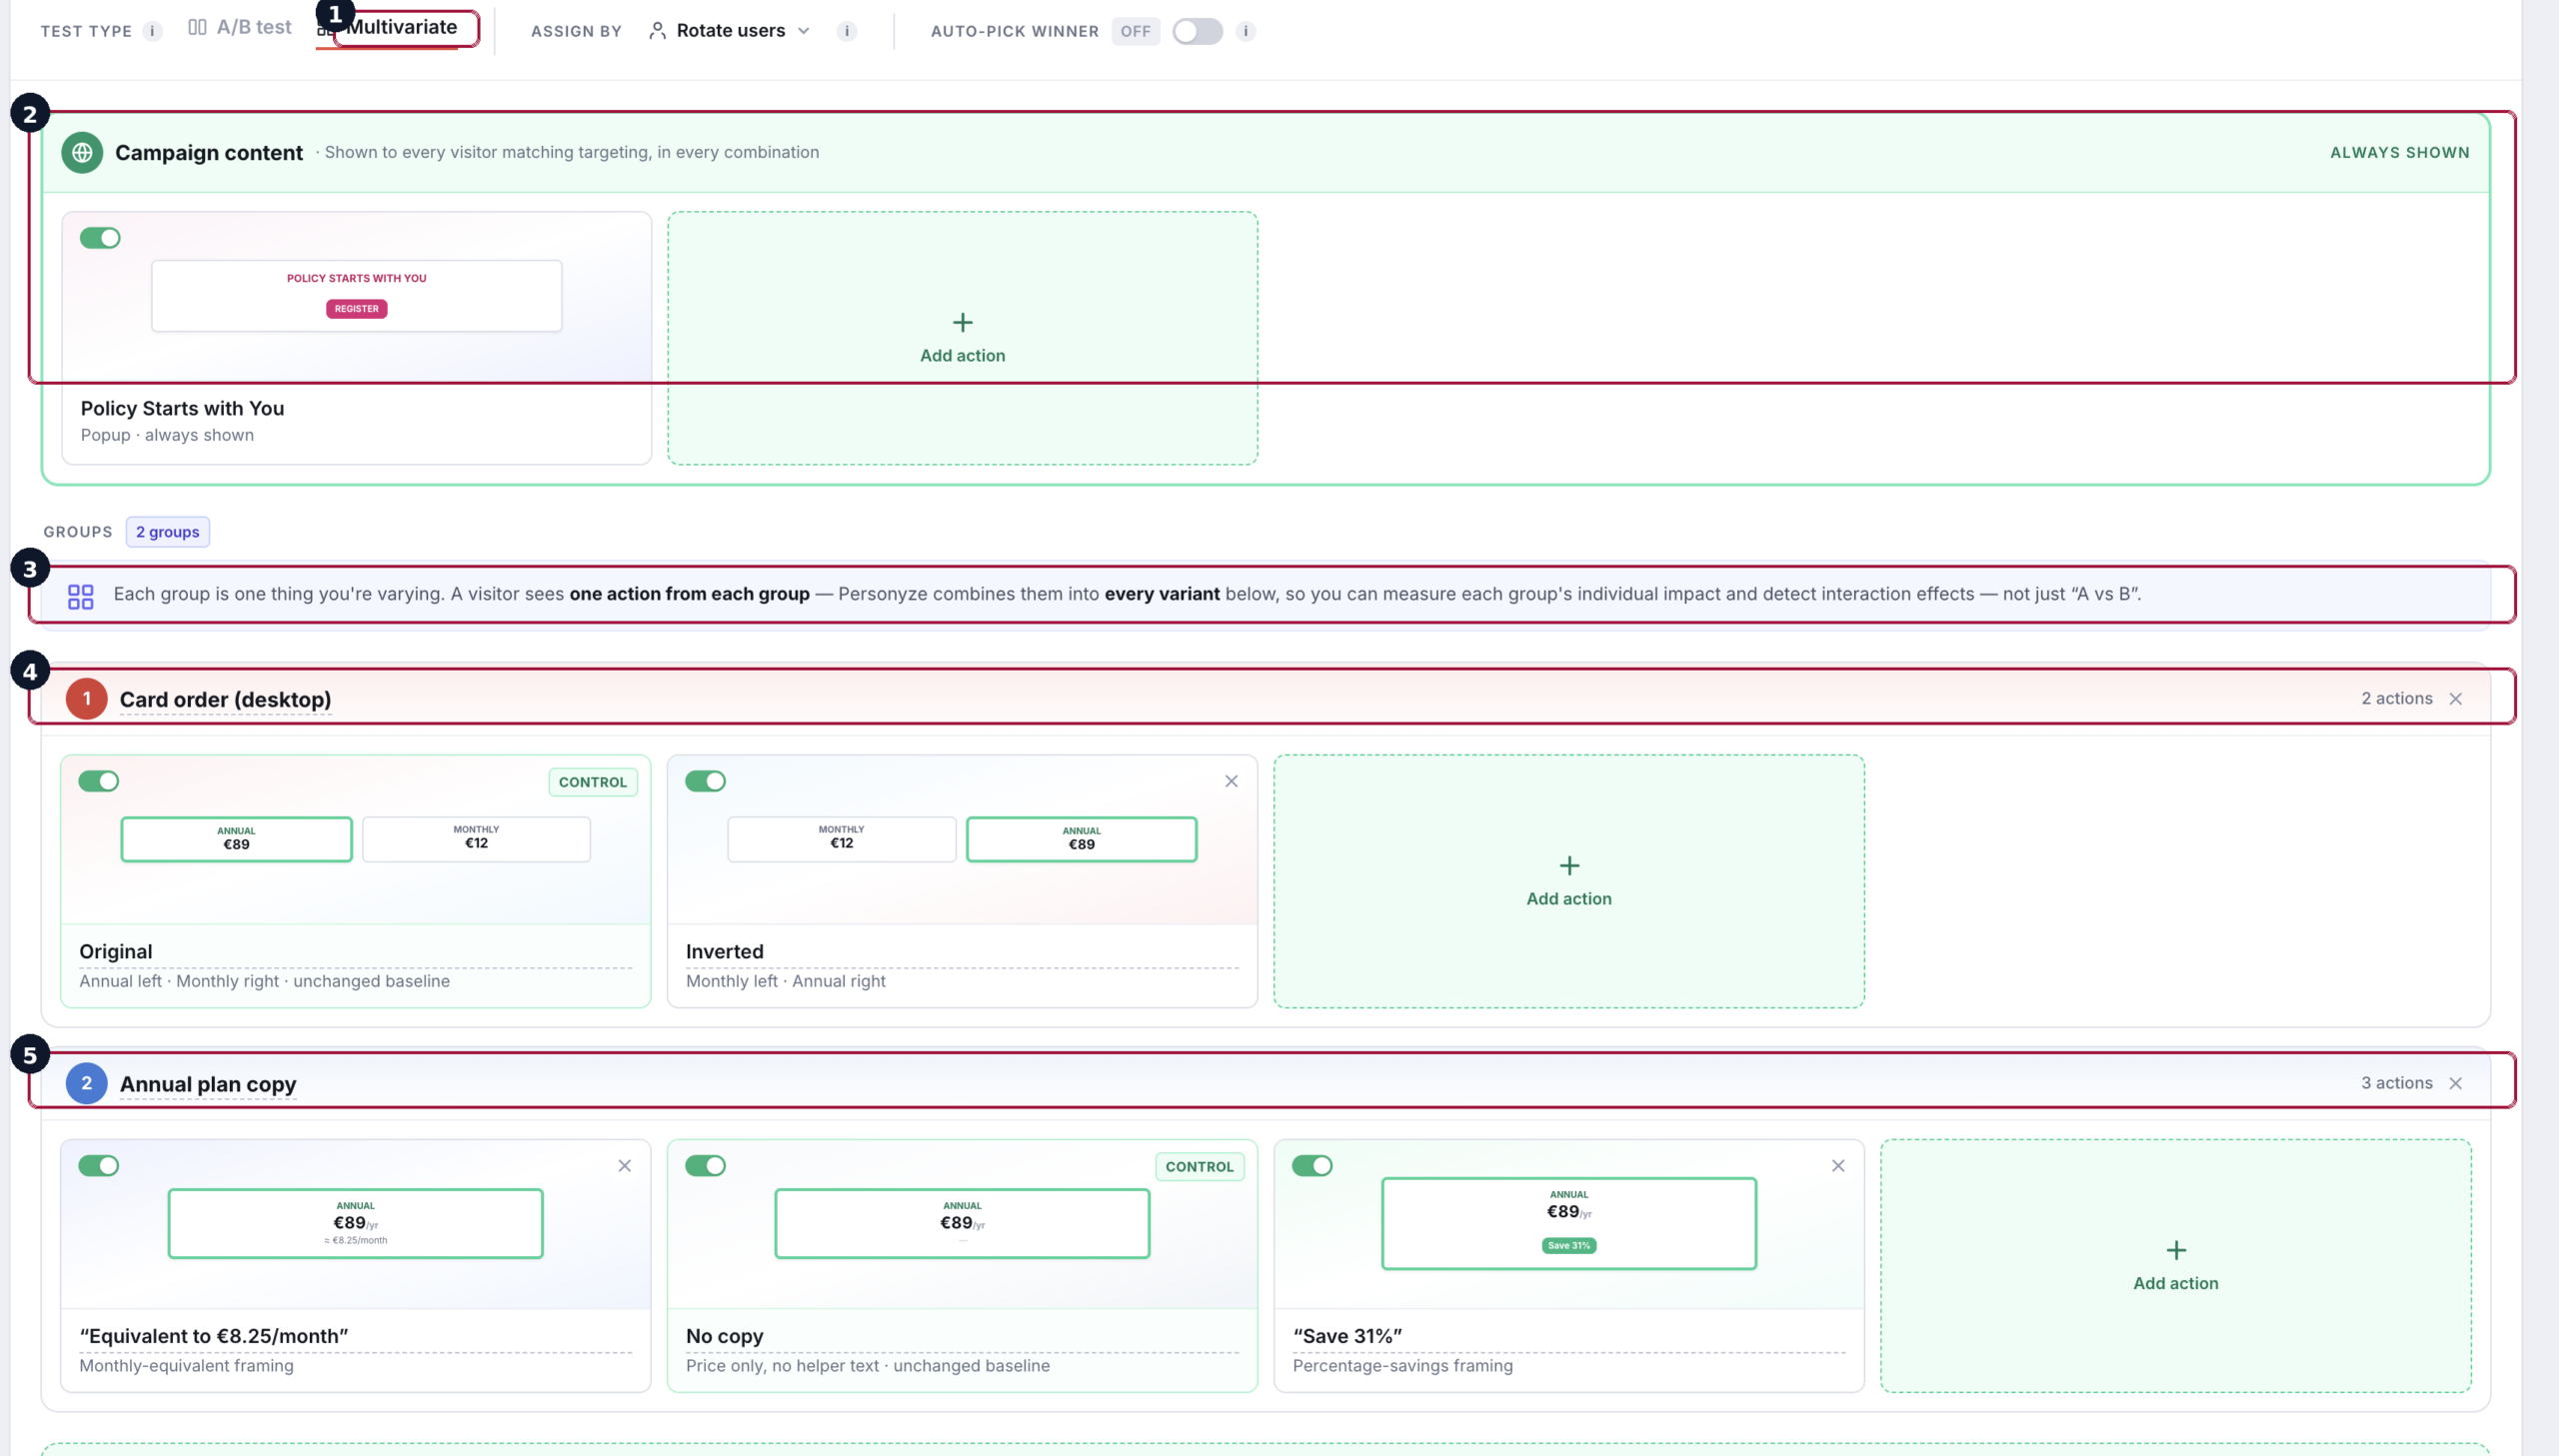
Multivariate measures each element’s individual impact and how elements interact, so you learn which specific change drove the result — at the cost of needing more traffic, since every combination has to accumulate enough data.
4. Read the results
The results dashboard is built to answer one question first — which variation won, and can I trust it?
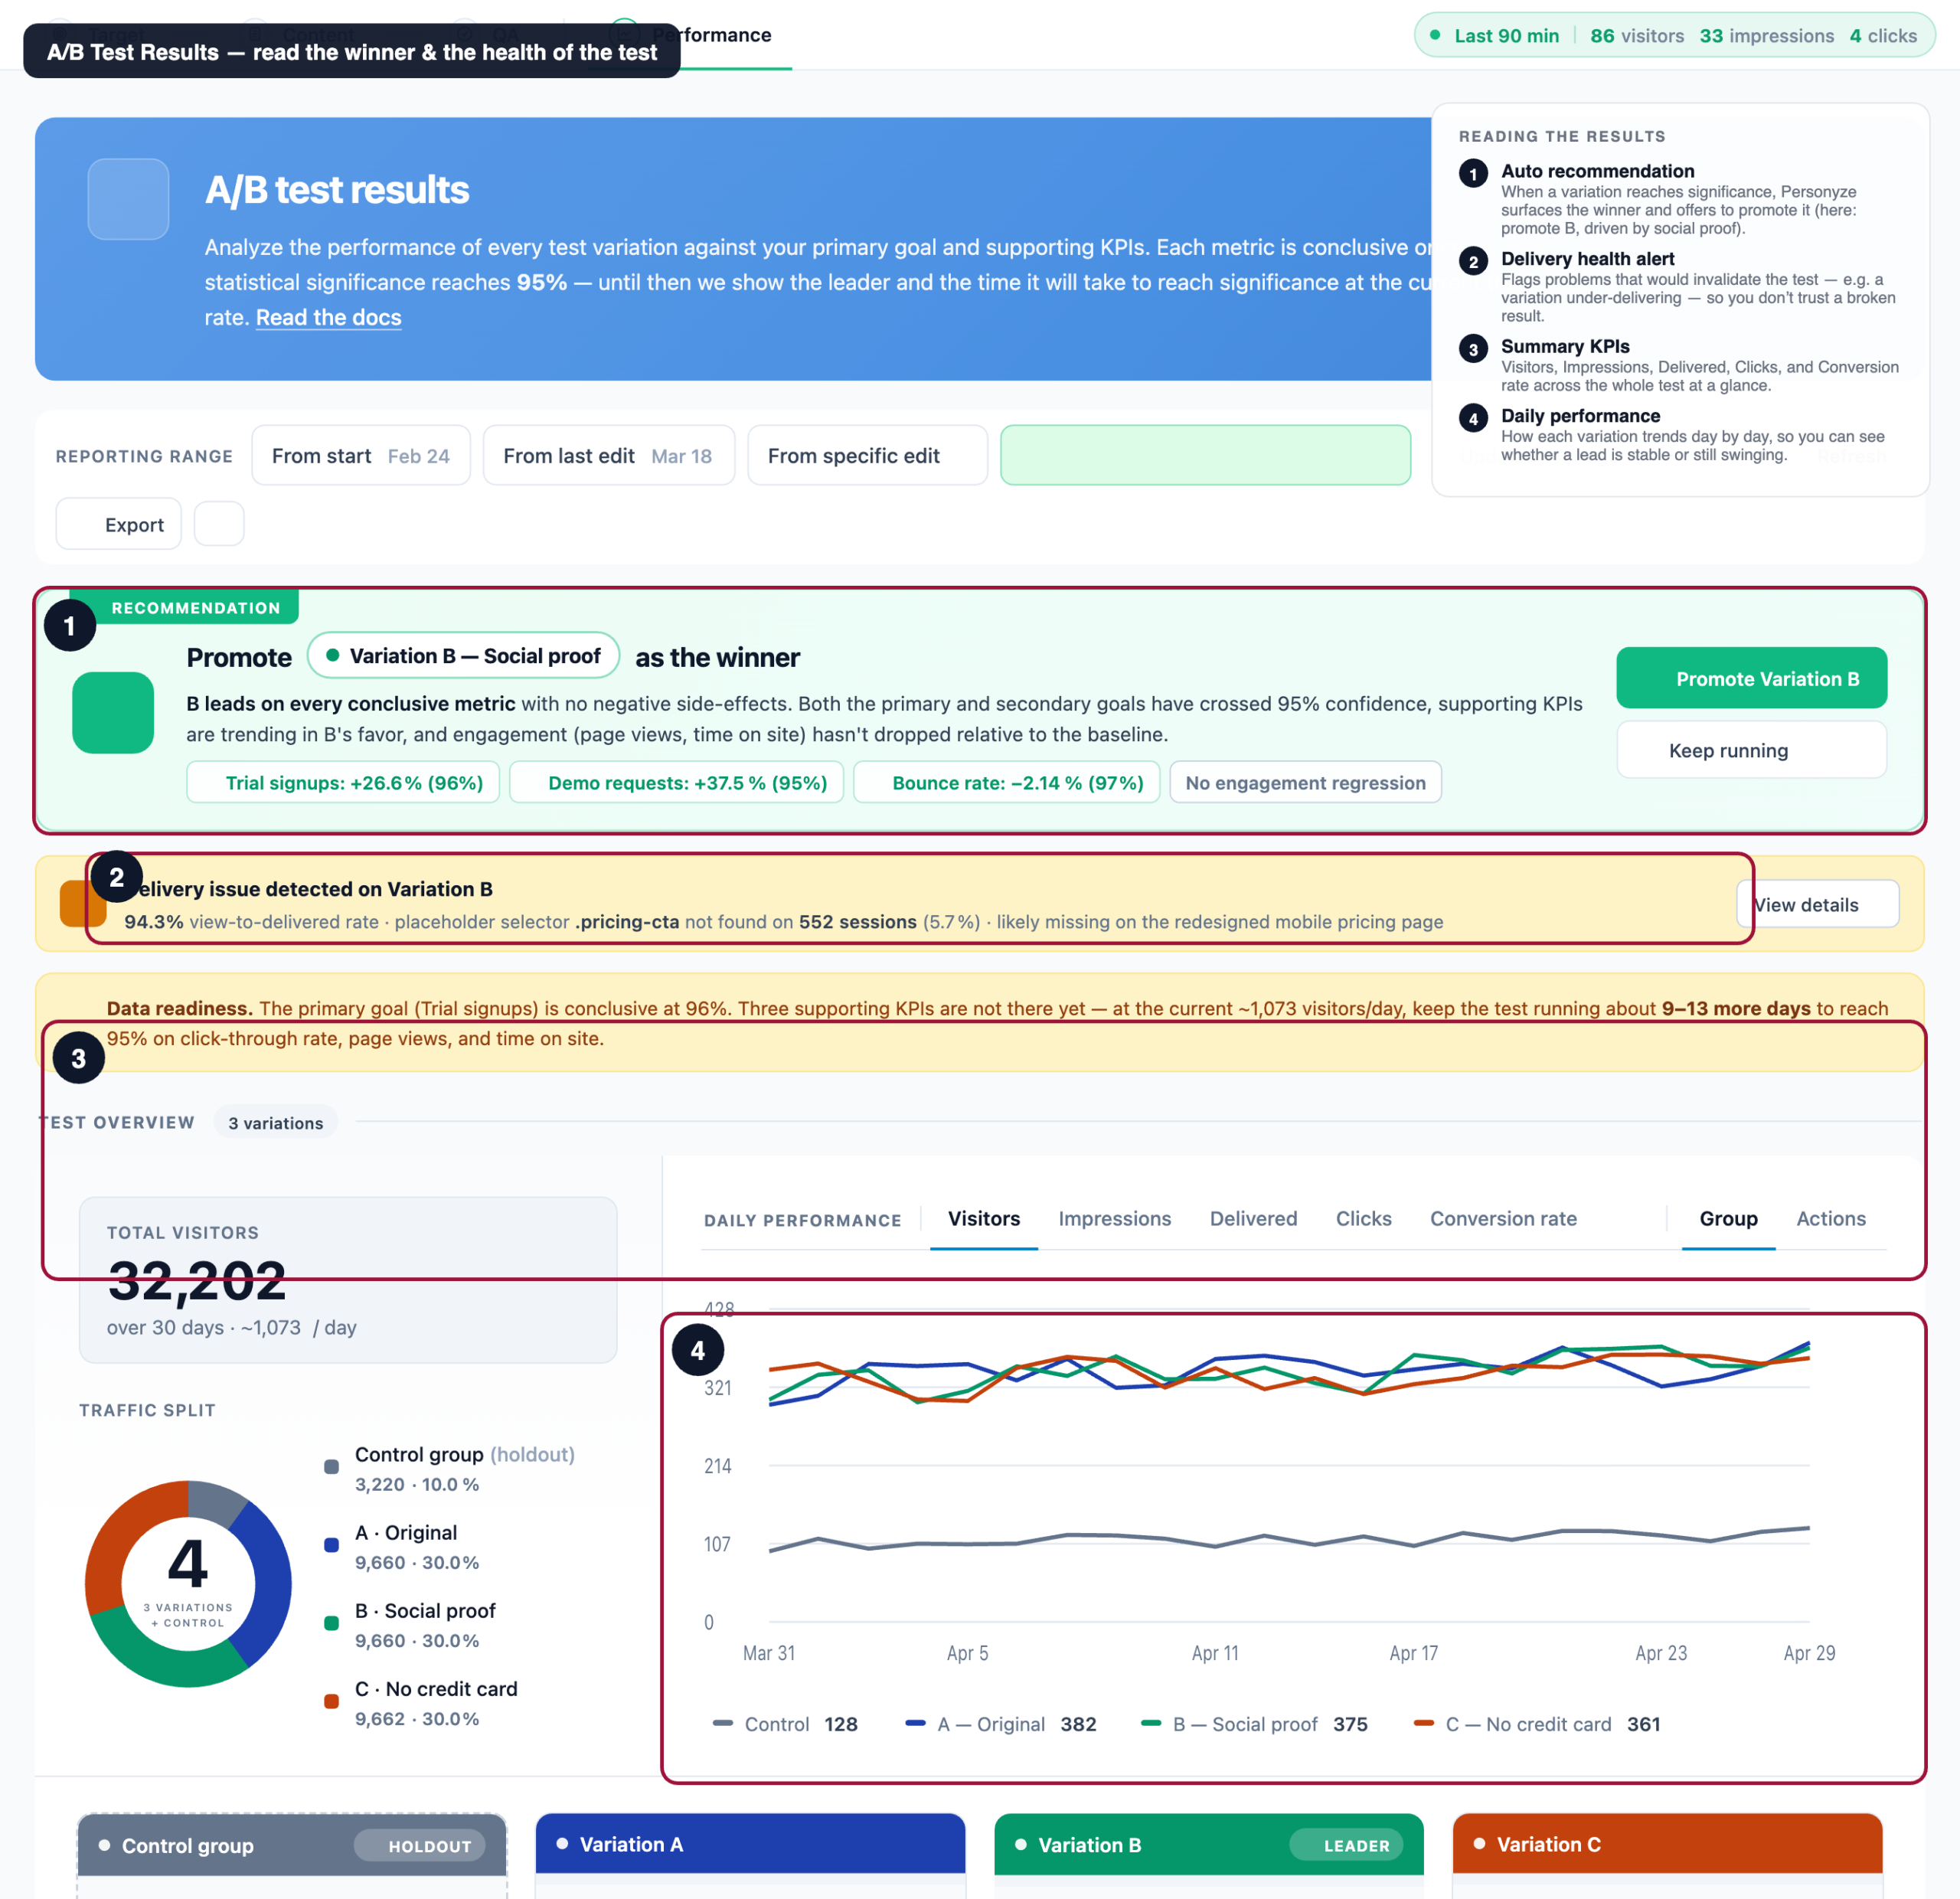
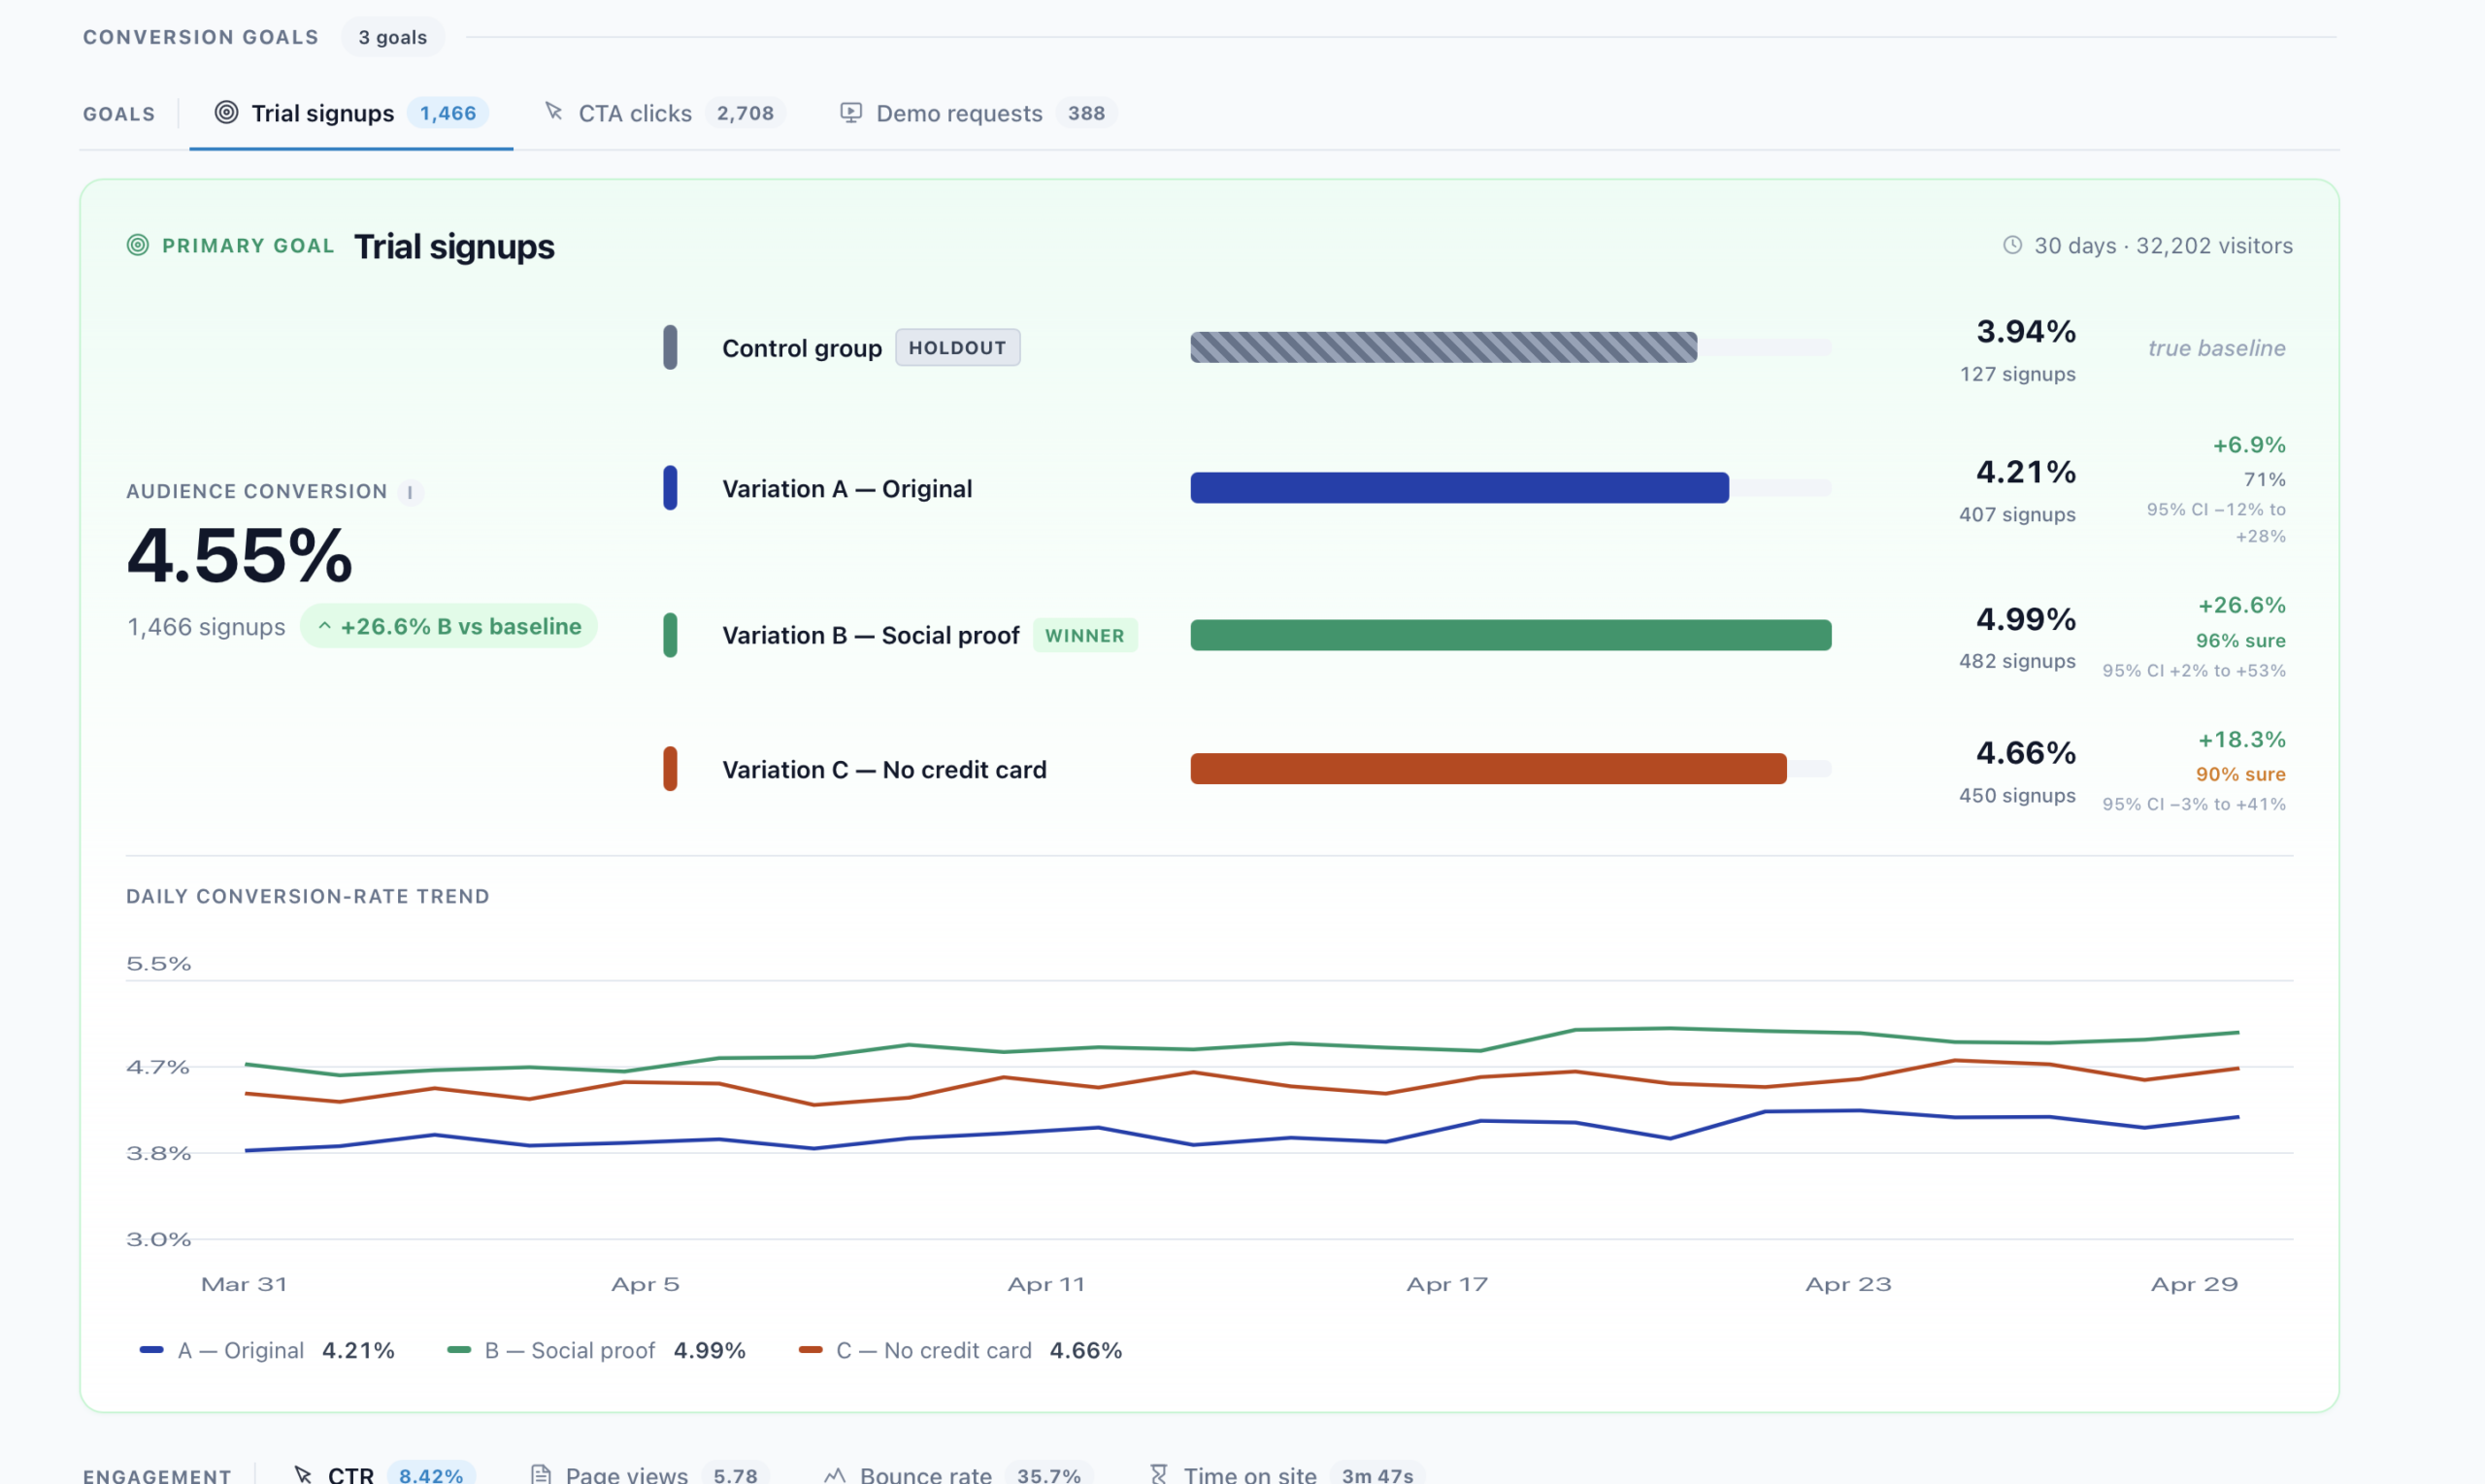
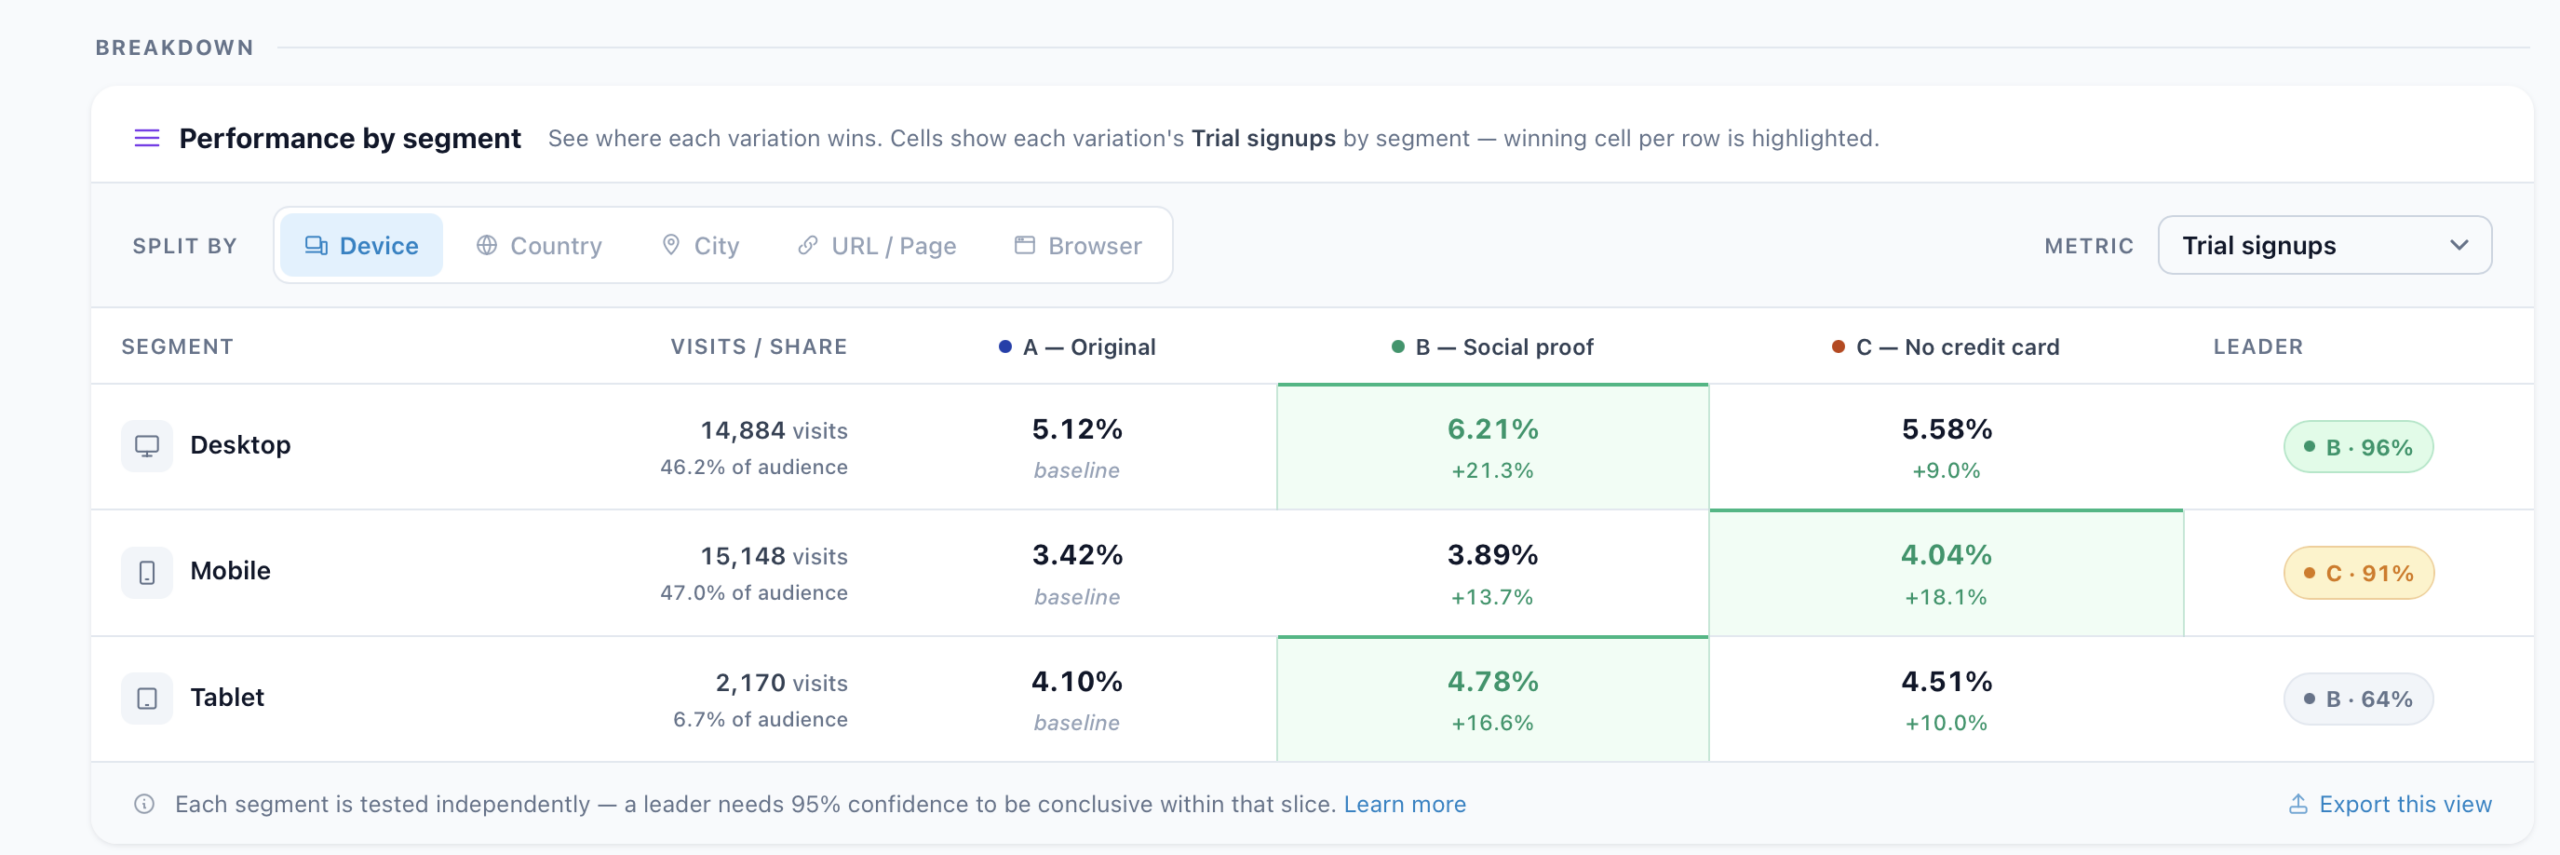
- Tab per KPI — the primary goal first, then supporting KPIs (clicks, conversions, revenue).
- Winner recommendation — surfaced when one variation leads on every conclusive metric with no negative side effects.
- Delivery health — confirms each variation was actually injected, so a “loser” isn’t just a variation that failed to render.
- Data readiness — for any KPI short of 95% confidence, an estimate of how much longer it needs.
- By segment — break results down by new vs. returning, country, device, and more.
5. Promote the winner
- Manual — review the dashboard and promote the recommended variation; it becomes the campaign’s content and the others stop.
- Auto-pick — turn on auto-promote and Personyze does the same automatically once the test is conclusive under your decision strategy.
If results are inconclusive or you cleared bad early data (say, after fixing a selector), reset the test data and let it gather cleanly.
What to test
- Copy — headlines, CTAs, value props, social-proof badges.
- Design — hero images, layouts, color schemes, button styles.
- Offers — discount sizes, trial length, “no credit card” framing, urgency.
- Recommendations — different recommendation algorithms against each other.
- Targeting — the same content against different audience definitions, to find which segment converts.
QA before going live
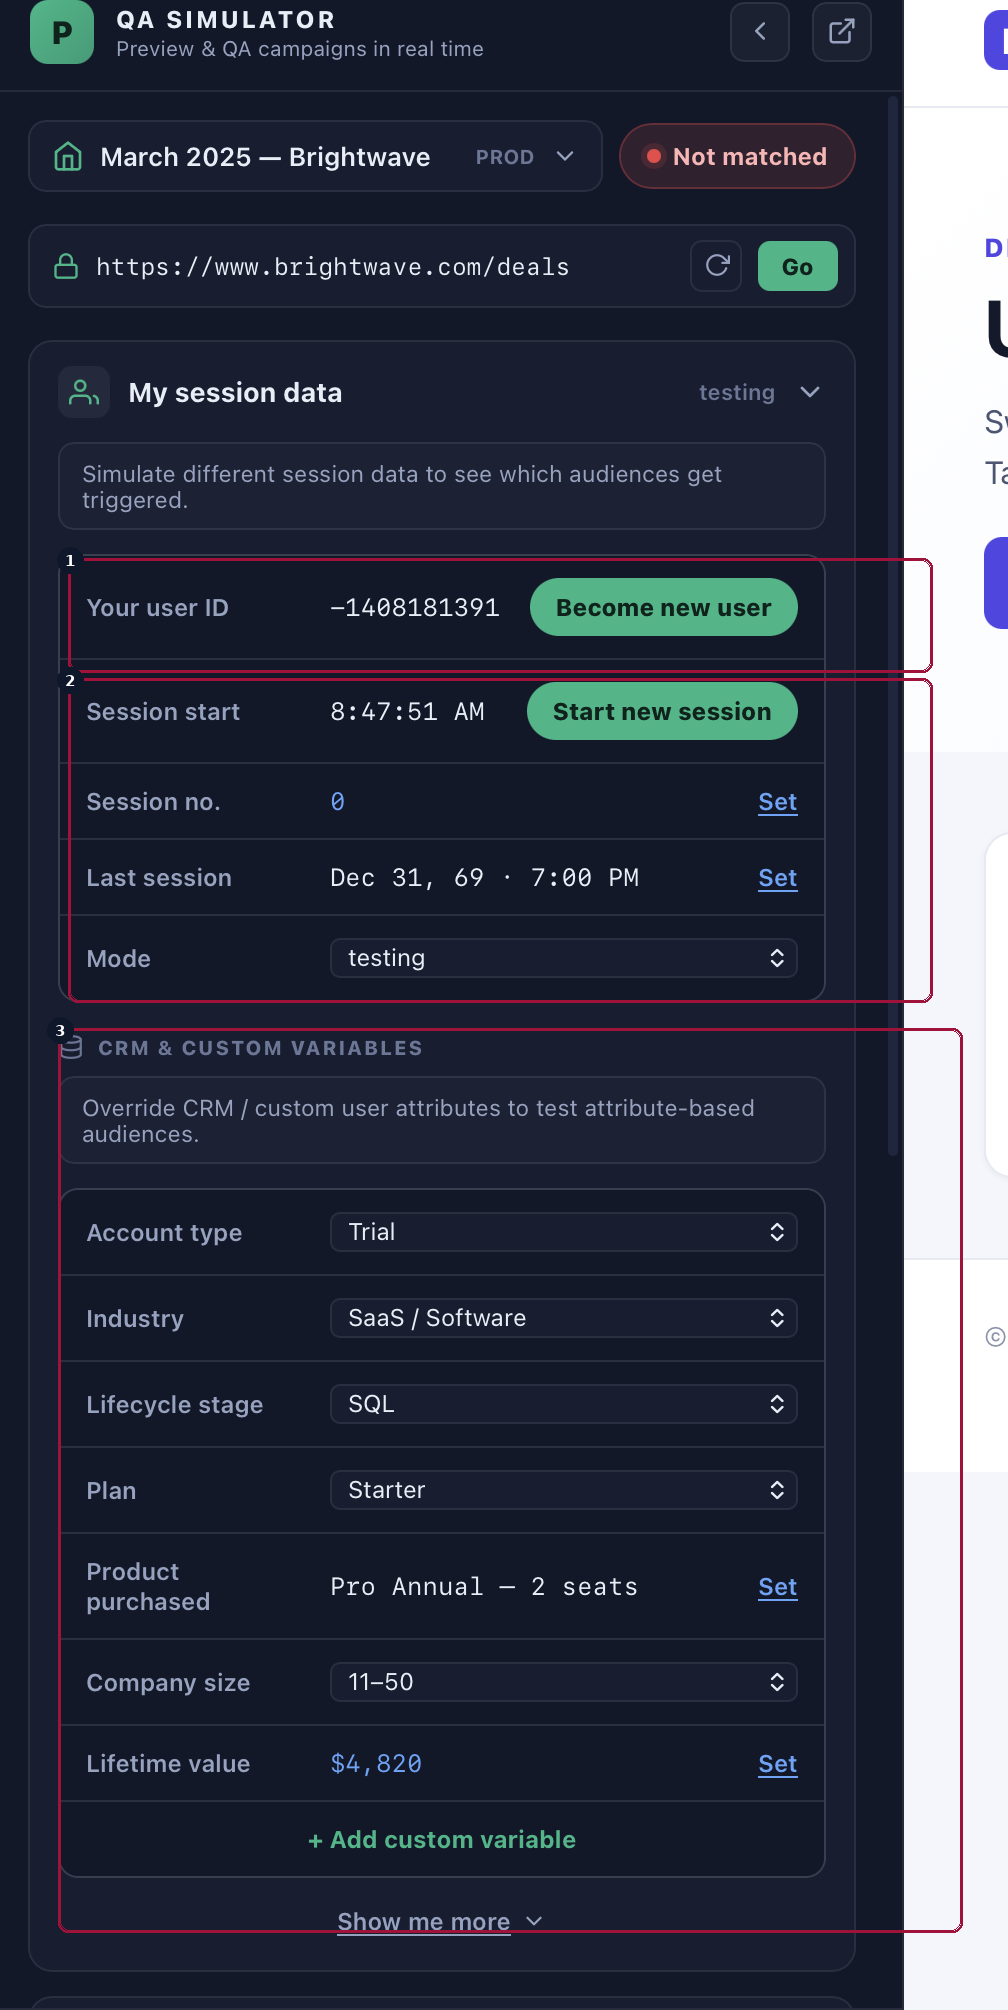
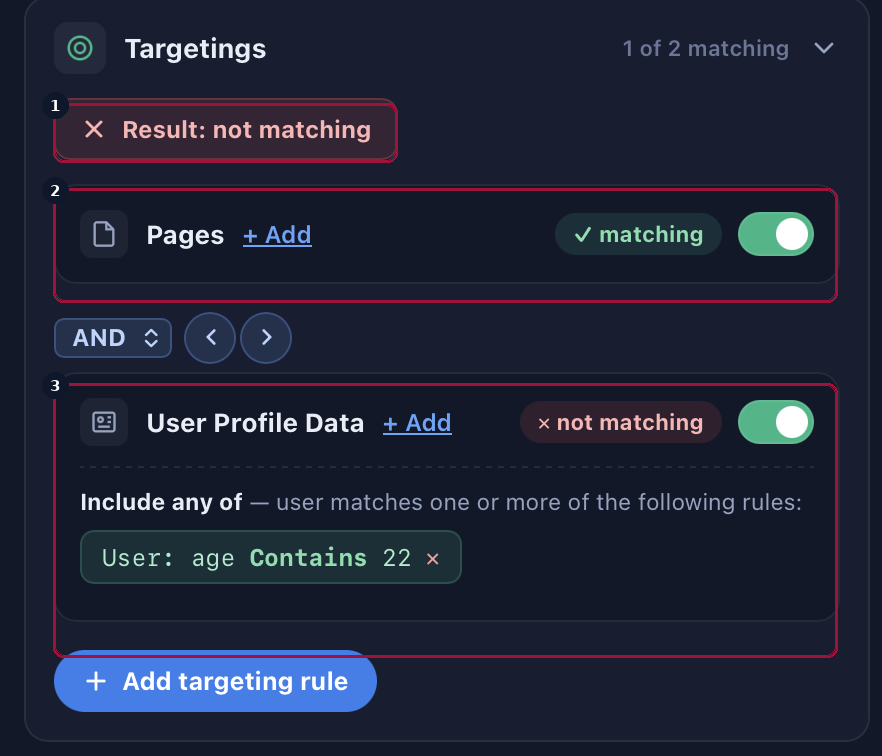
Before switching a test to Live, use the QA Simulator to preview each variation as different visitor profiles — confirming the right variation shows for the right audience on the real page.
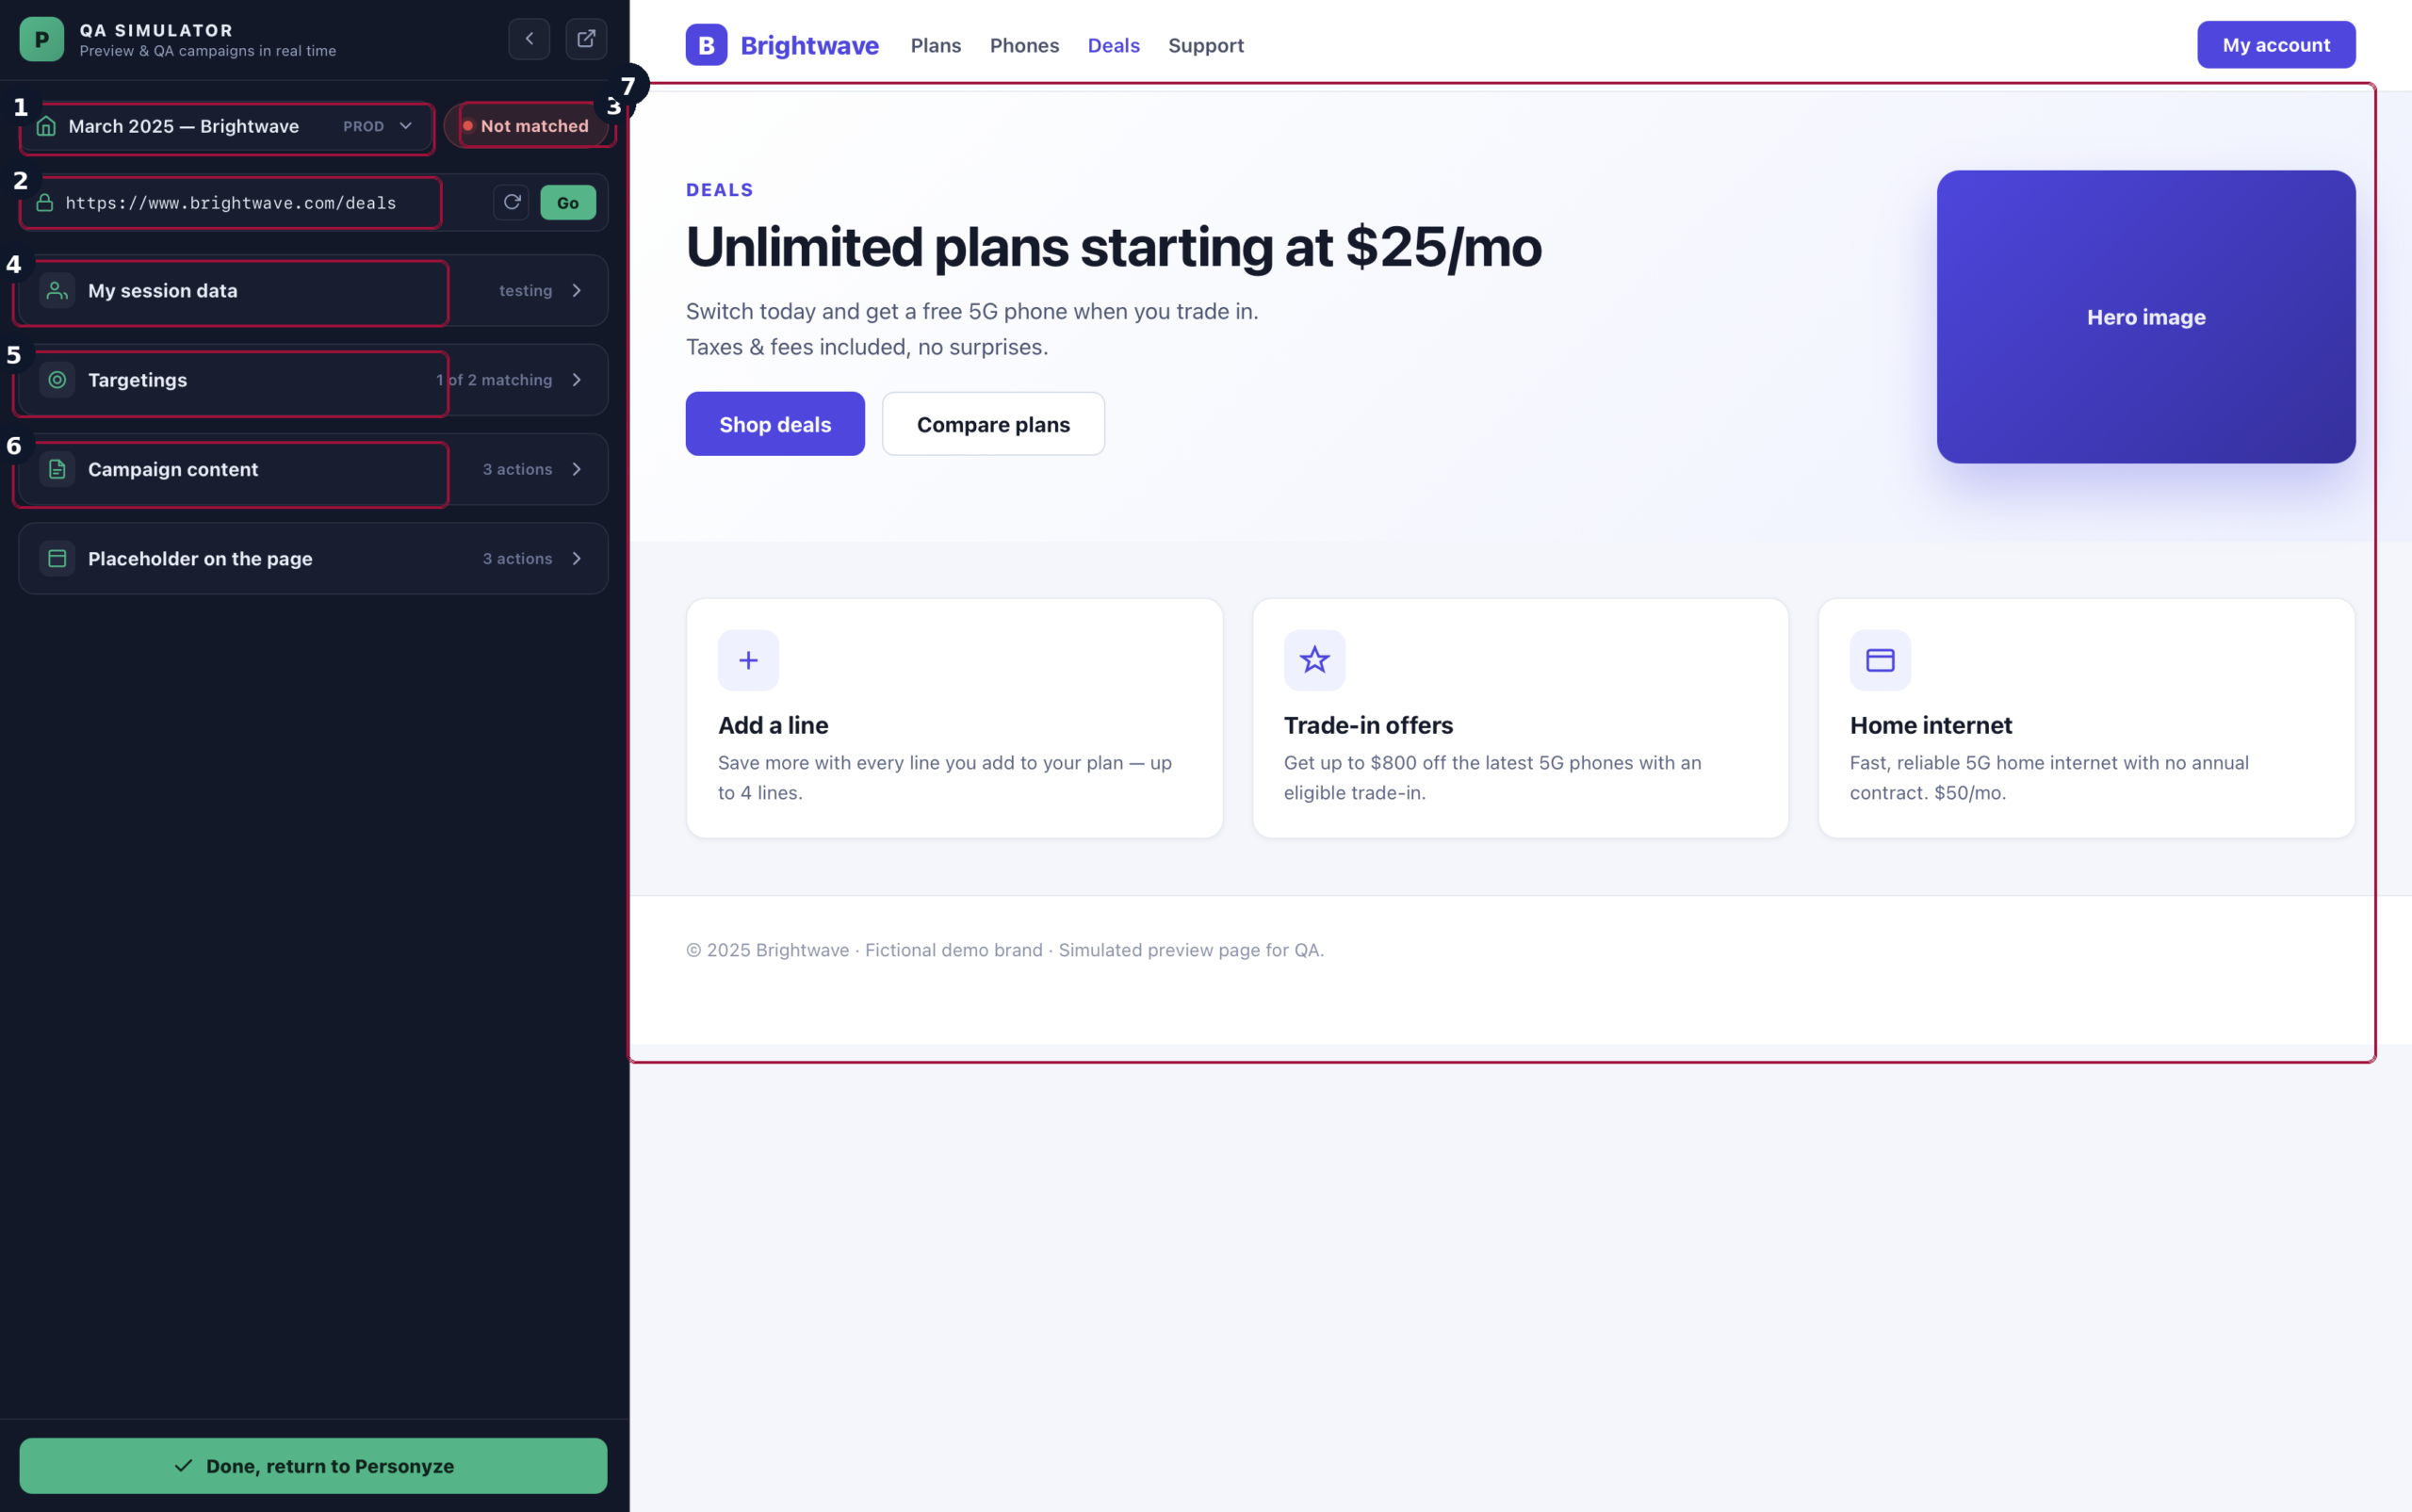
Impersonate the visitor profiles each variation is meant for, and confirm the right one shows:
You can also confirm the variation’s actions actually fire and render on the real page:
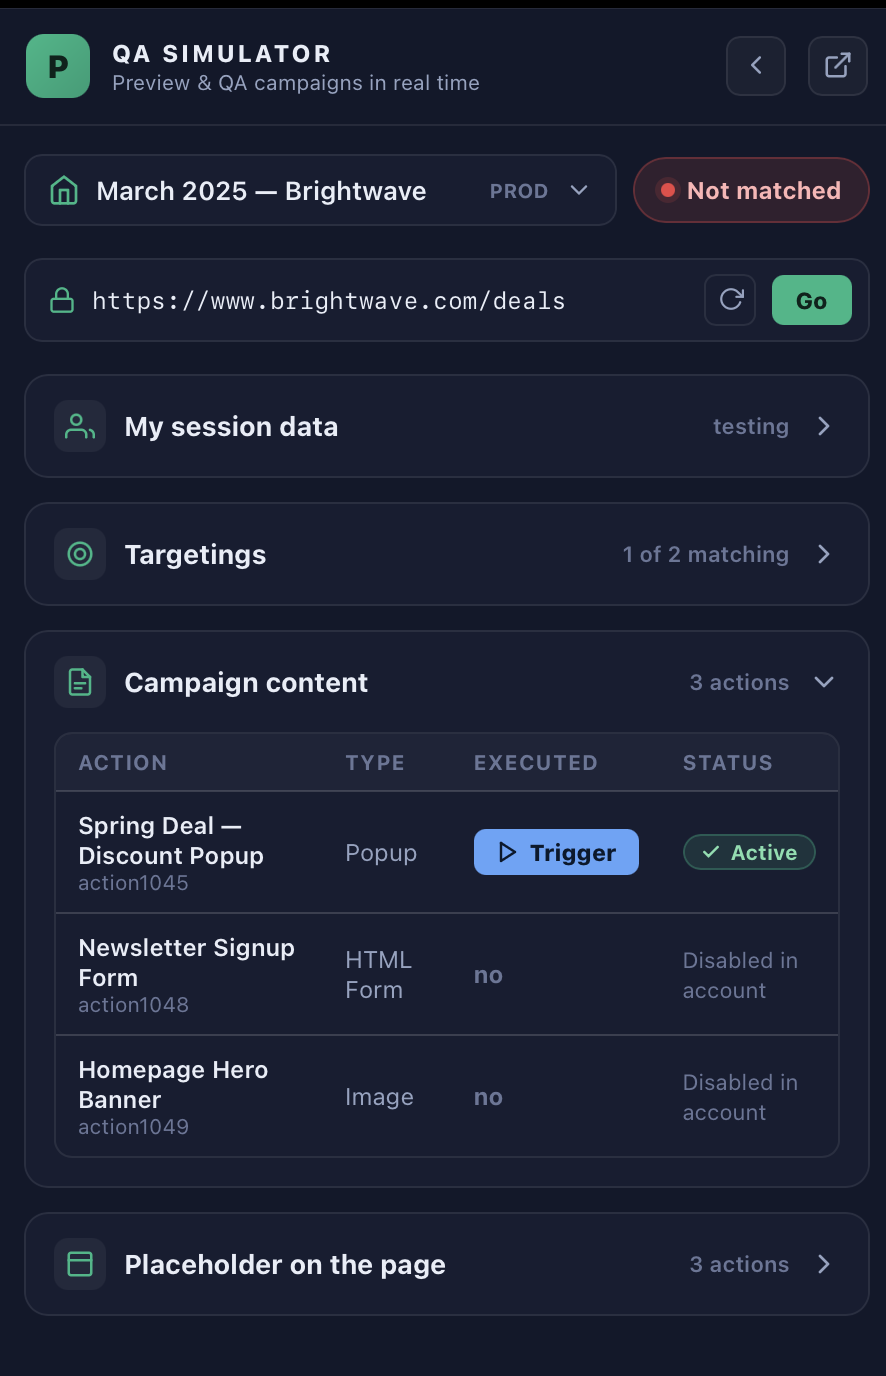
QA in Test mode first, fix anything the simulator surfaces, then switch the campaign to Live.
Frequently asked questions
How does A/B testing work in Personyze?
Build two or more variations of your content, then turn on A/B testing to split your targeted audience across them. Personyze tracks impressions, clicks, and conversions per variation and reports which performs best, with statistical confidence.
What can I A/B test?
Anything you can build as a Personyze action – popups, banners, in-page content changes, product and content recommendations, landing page elements, CTAs, and more. You can also test personalization against a control group that sees nothing.
How are visitors assigned to variations?
You choose: rotate by user (a visitor always sees the same variation) or by visit. You can weight the split and hold back a control group to measure true lift versus no personalization.
How does Personyze decide the winner?
You set a decision strategy – a preset (Cautious, Balanced, Fast) or custom thresholds for statistical confidence, minimum sessions, and minimum duration. When a variation meets the bar, Personyze can automatically shift traffic to it.
What is a control group and should I use one?
A control group is a slice of your audience that sees no personalization. Including one lets you measure the real lift your variations produce versus doing nothing – recommended whenever you want to prove impact.
What’s the difference between A/B and multivariate testing?
A/B testing compares whole variations against each other. Multivariate testing varies several elements at once and measures how combinations perform, helping you find which specific elements drive results.
Related
- Targeting and Personalization — the full campaign lifecycle.
- Targeting Rules in Personyze — every audience rule type.
- Personyze QA Simulator — preview as different visitor profiles before going live.
A/B or Multivariate — two test types
The Content step’s Test type toggle picks the experiment shape:
- A/B test — compares whole variants (A vs B vs C). Each group holds its own set of actions, the traffic split slider divides visitors, and Assign by chooses the rotation: Rotate users (the classic — each person keeps their variant), Visits (same person can get a different variant per visit — good for banners), or Random (every page view draws fresh).
- Multivariate — names the individual things you’re changing and tests every combination.
How multivariate works
A group is one thing you are changing — the layout, the headline, the price line — and each action in it is one way that thing could look. Personyze builds every combination: two groups of two actions make 2 × 2 = 4 variants, and each visitor lands in exactly one, seeing one action from each group. Because every action is tried alongside every other, the results can say what each group did on its own — pooled across all combinations it appears in — and where two changes only work together, which comparing whole variants cannot separate.
The cost is traffic: every combination needs its own sample, so adding a group multiplies what the test needs, while adding an option to an existing group only adds to it. The editor shows the live combination count, lets you mark a control per group, switch options off (they leave the split but keep their history), and estimates how long the test will take at your traffic.
Building the variations — with the live editor and AI
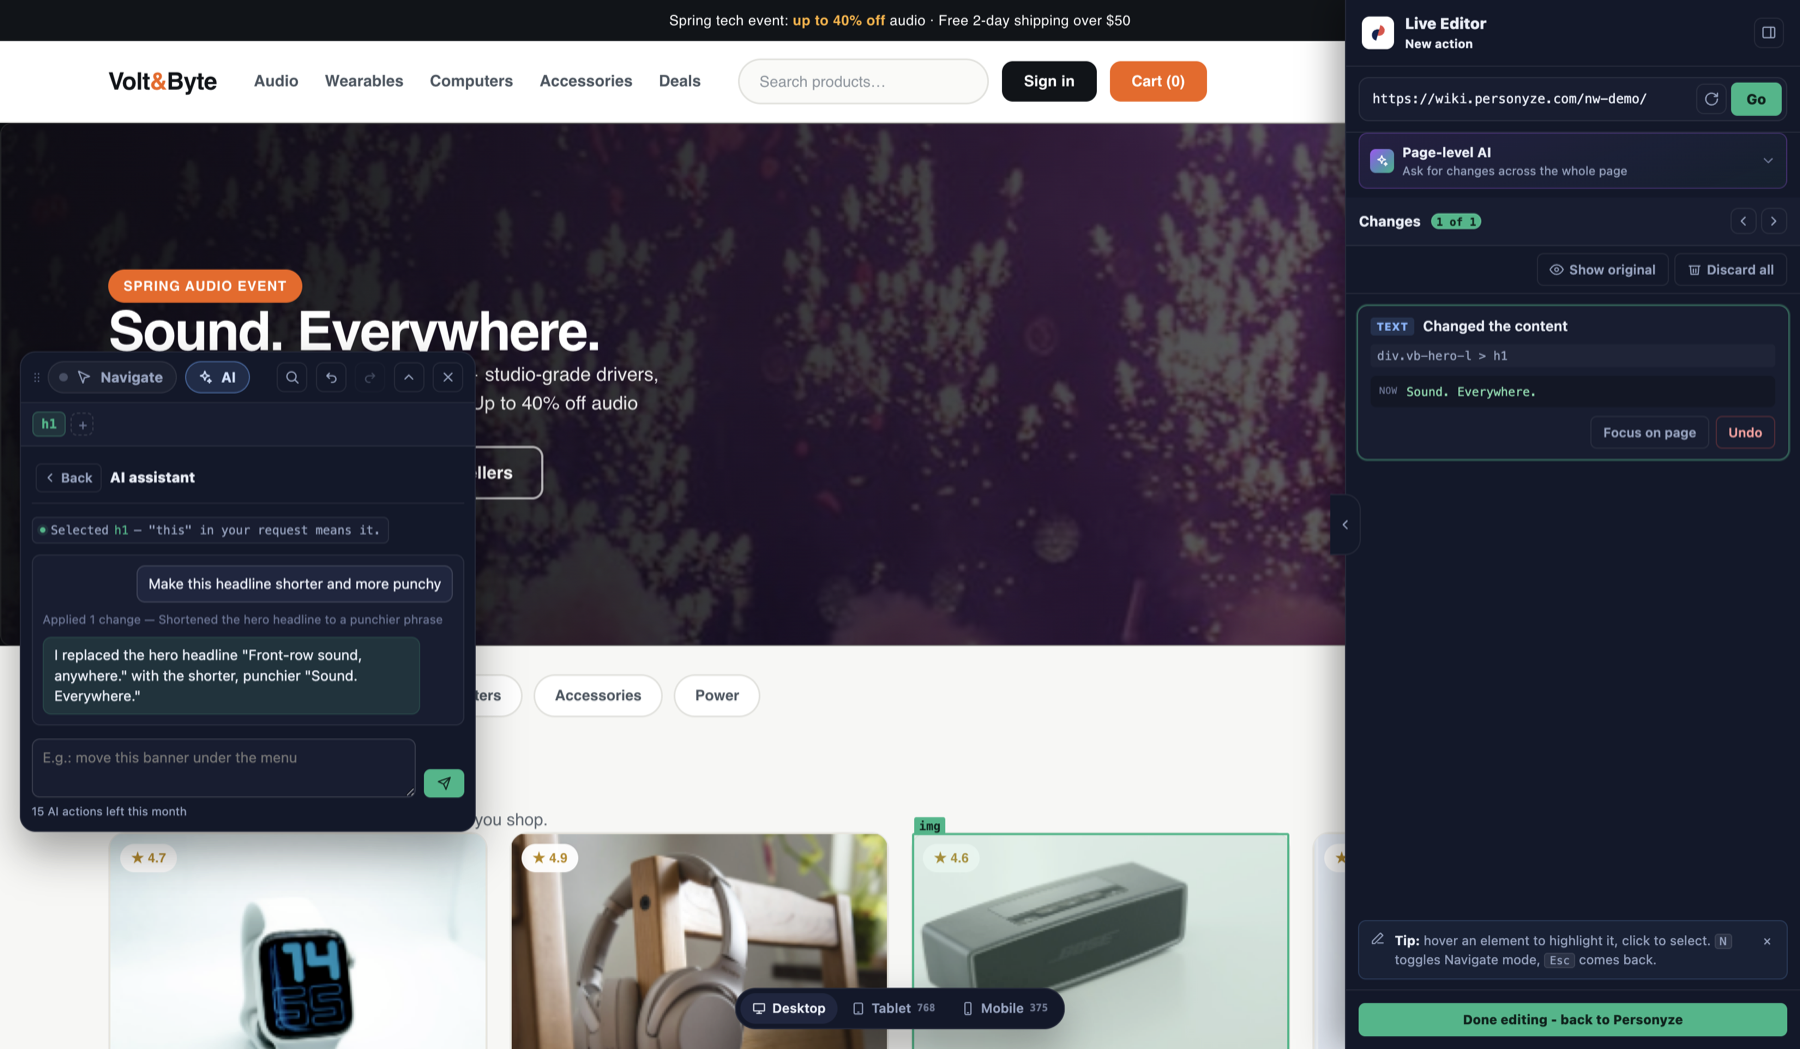
Variants don’t have to be popups: a test group can hold a WYSIWYG live-editor action that changes your page itself — and the new live editor does much of the work for you:
- Page-level AI — one prompt per variant: “rewrite this page for enterprise buyers” for group B, “make the calls to action more urgent” for group C. Every AI edit lands as a reviewable, undoable change.
- Per-field AI — ask for a replacement headline or button label while editing one element.
- Show original flips between the variant and the untouched page, so you always know what you’re testing against.
The full AI roster is on AI in Personyze.
Reading the results
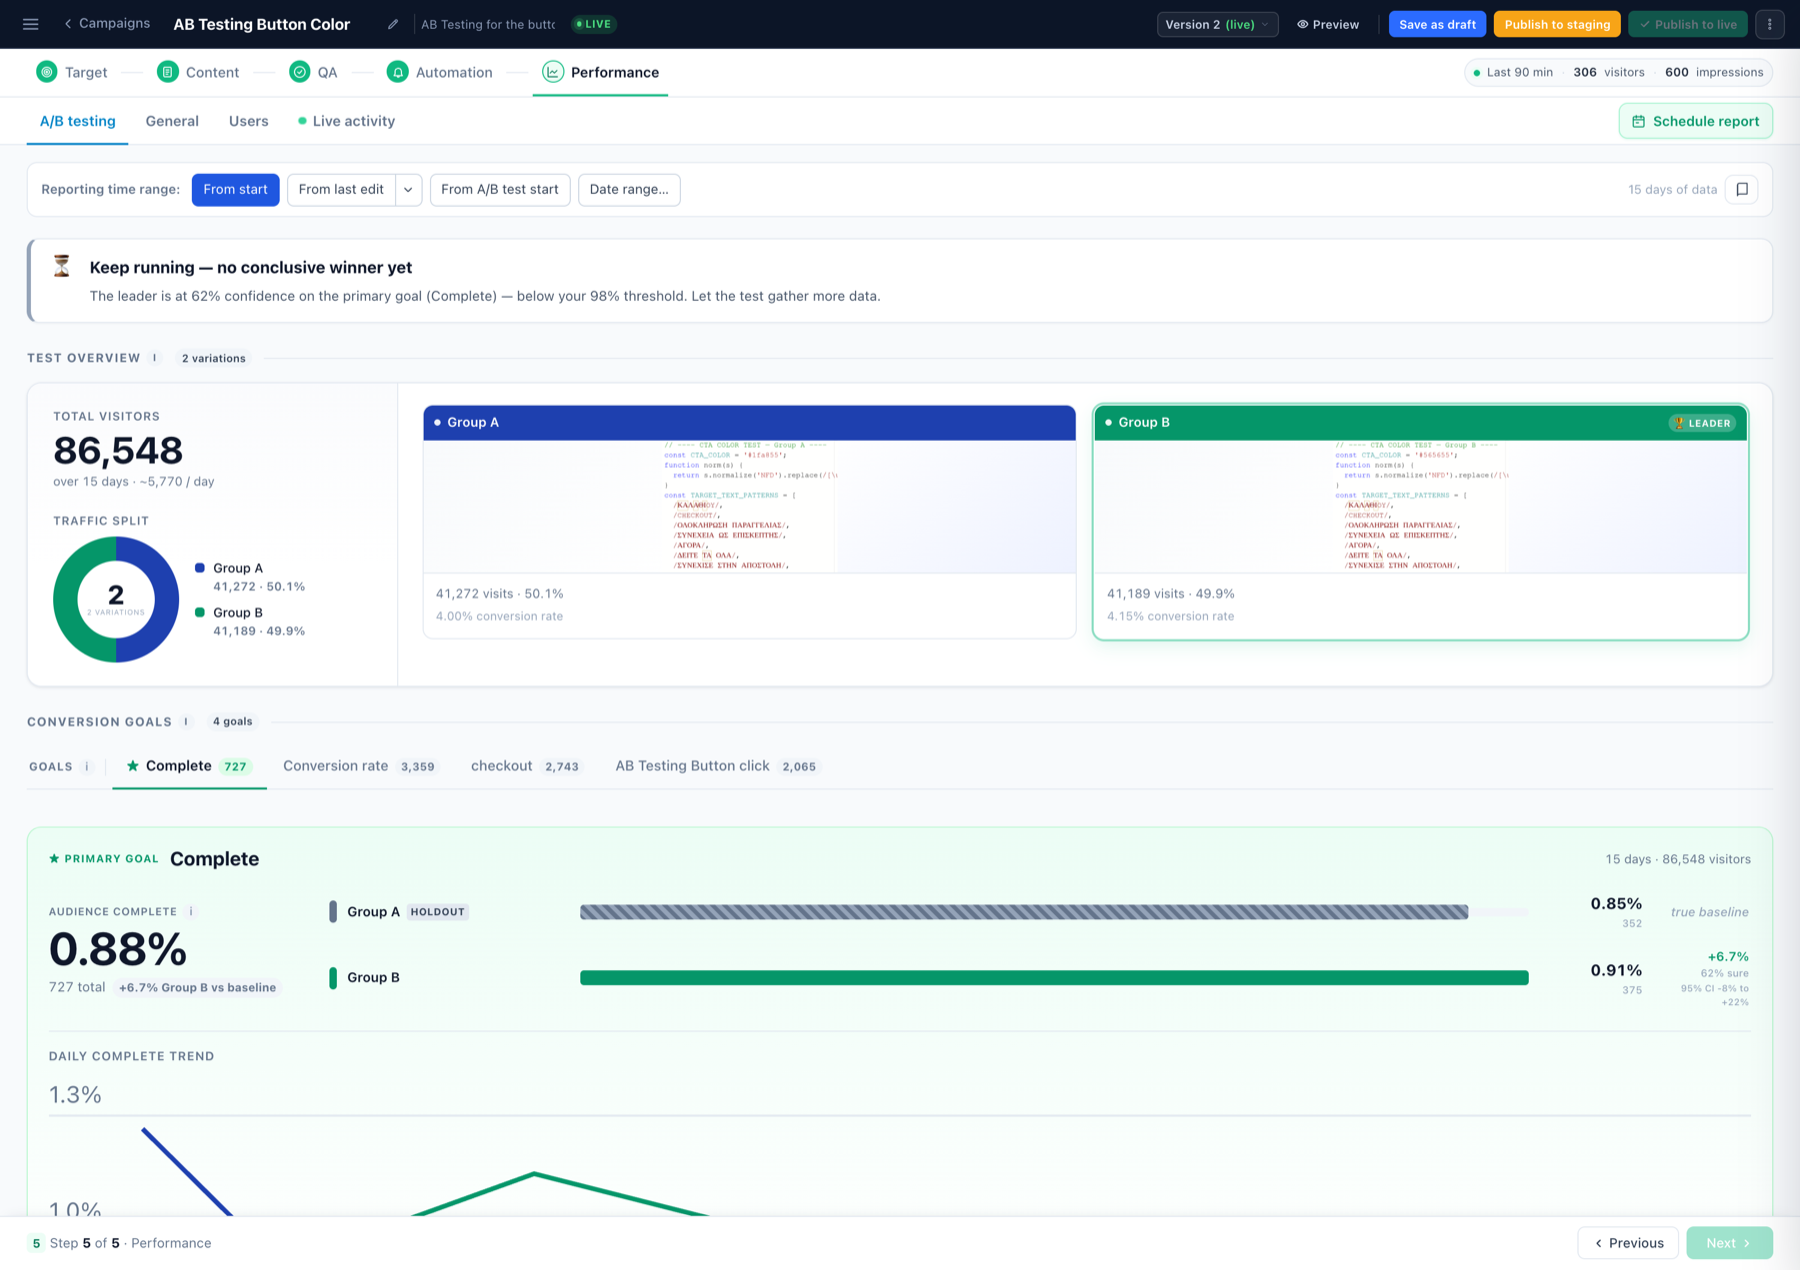
The campaign’s Performance → A/B testing tab is where the test reports itself: total visitors and the live traffic split, each variation’s conversion rate, and per-goal bars comparing every group against the holdout baseline with lift and confidence intervals. The verdict banner says exactly where things stand — e.g. “Keep running — no conclusive winner yet: the leader is at 62% confidence on the primary goal, below your 98% threshold” — so you never have to eyeball significance yourself.