
What Are Content Placements?
UI path: Settings → Content Placement (or from inside an individual action).
Placeholders are named slots on your website where Personyze content appears — a banner in your header, recommendations on a product page, a message above the category grid, anything in between. You create a placeholder once, and from then on any campaign can target it.
That’s the whole point: a placeholder is a named anchor Personyze renders into the page, rather than floating over it as a popup or overlay. Set the slot once, then swap different content through it for different audiences without touching your site again.
Prefer to click through it? Use the interactive walkthrough below, then scroll down for the detailed reference.
Open Content Placement
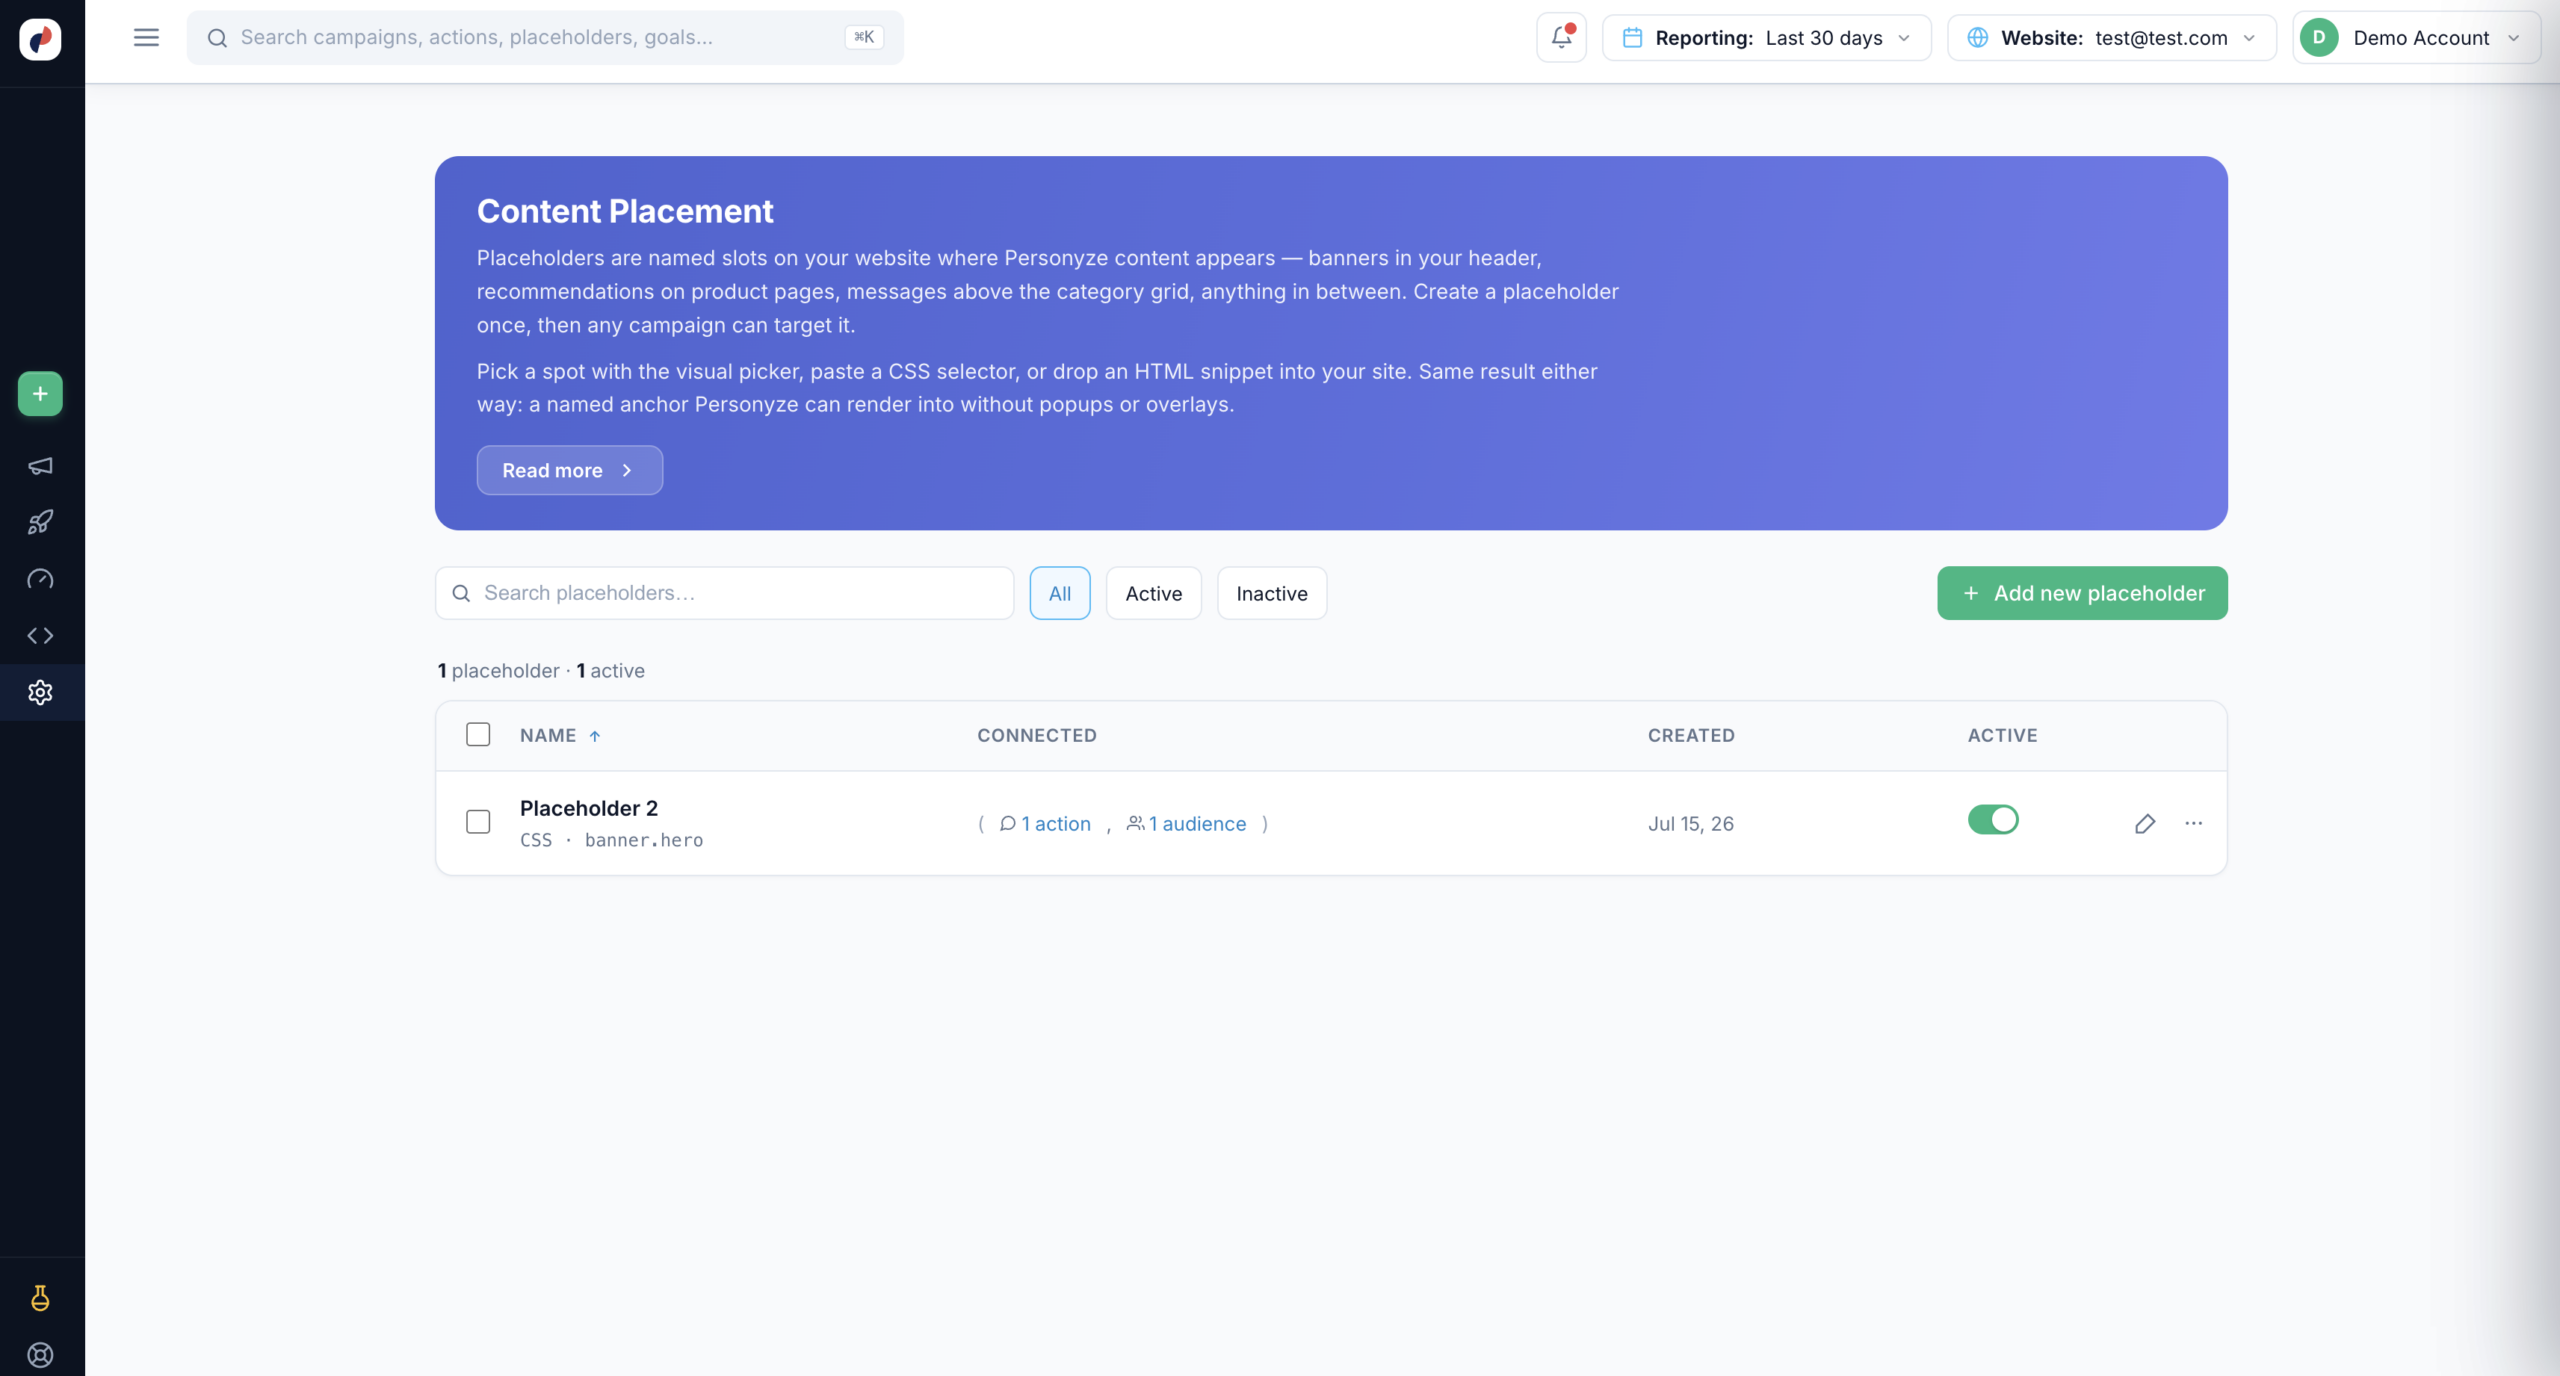
Go to Settings → Content Placement. Every placeholder is listed with its selector and what it’s connected to. Click + Add new placeholder.
Choose a method
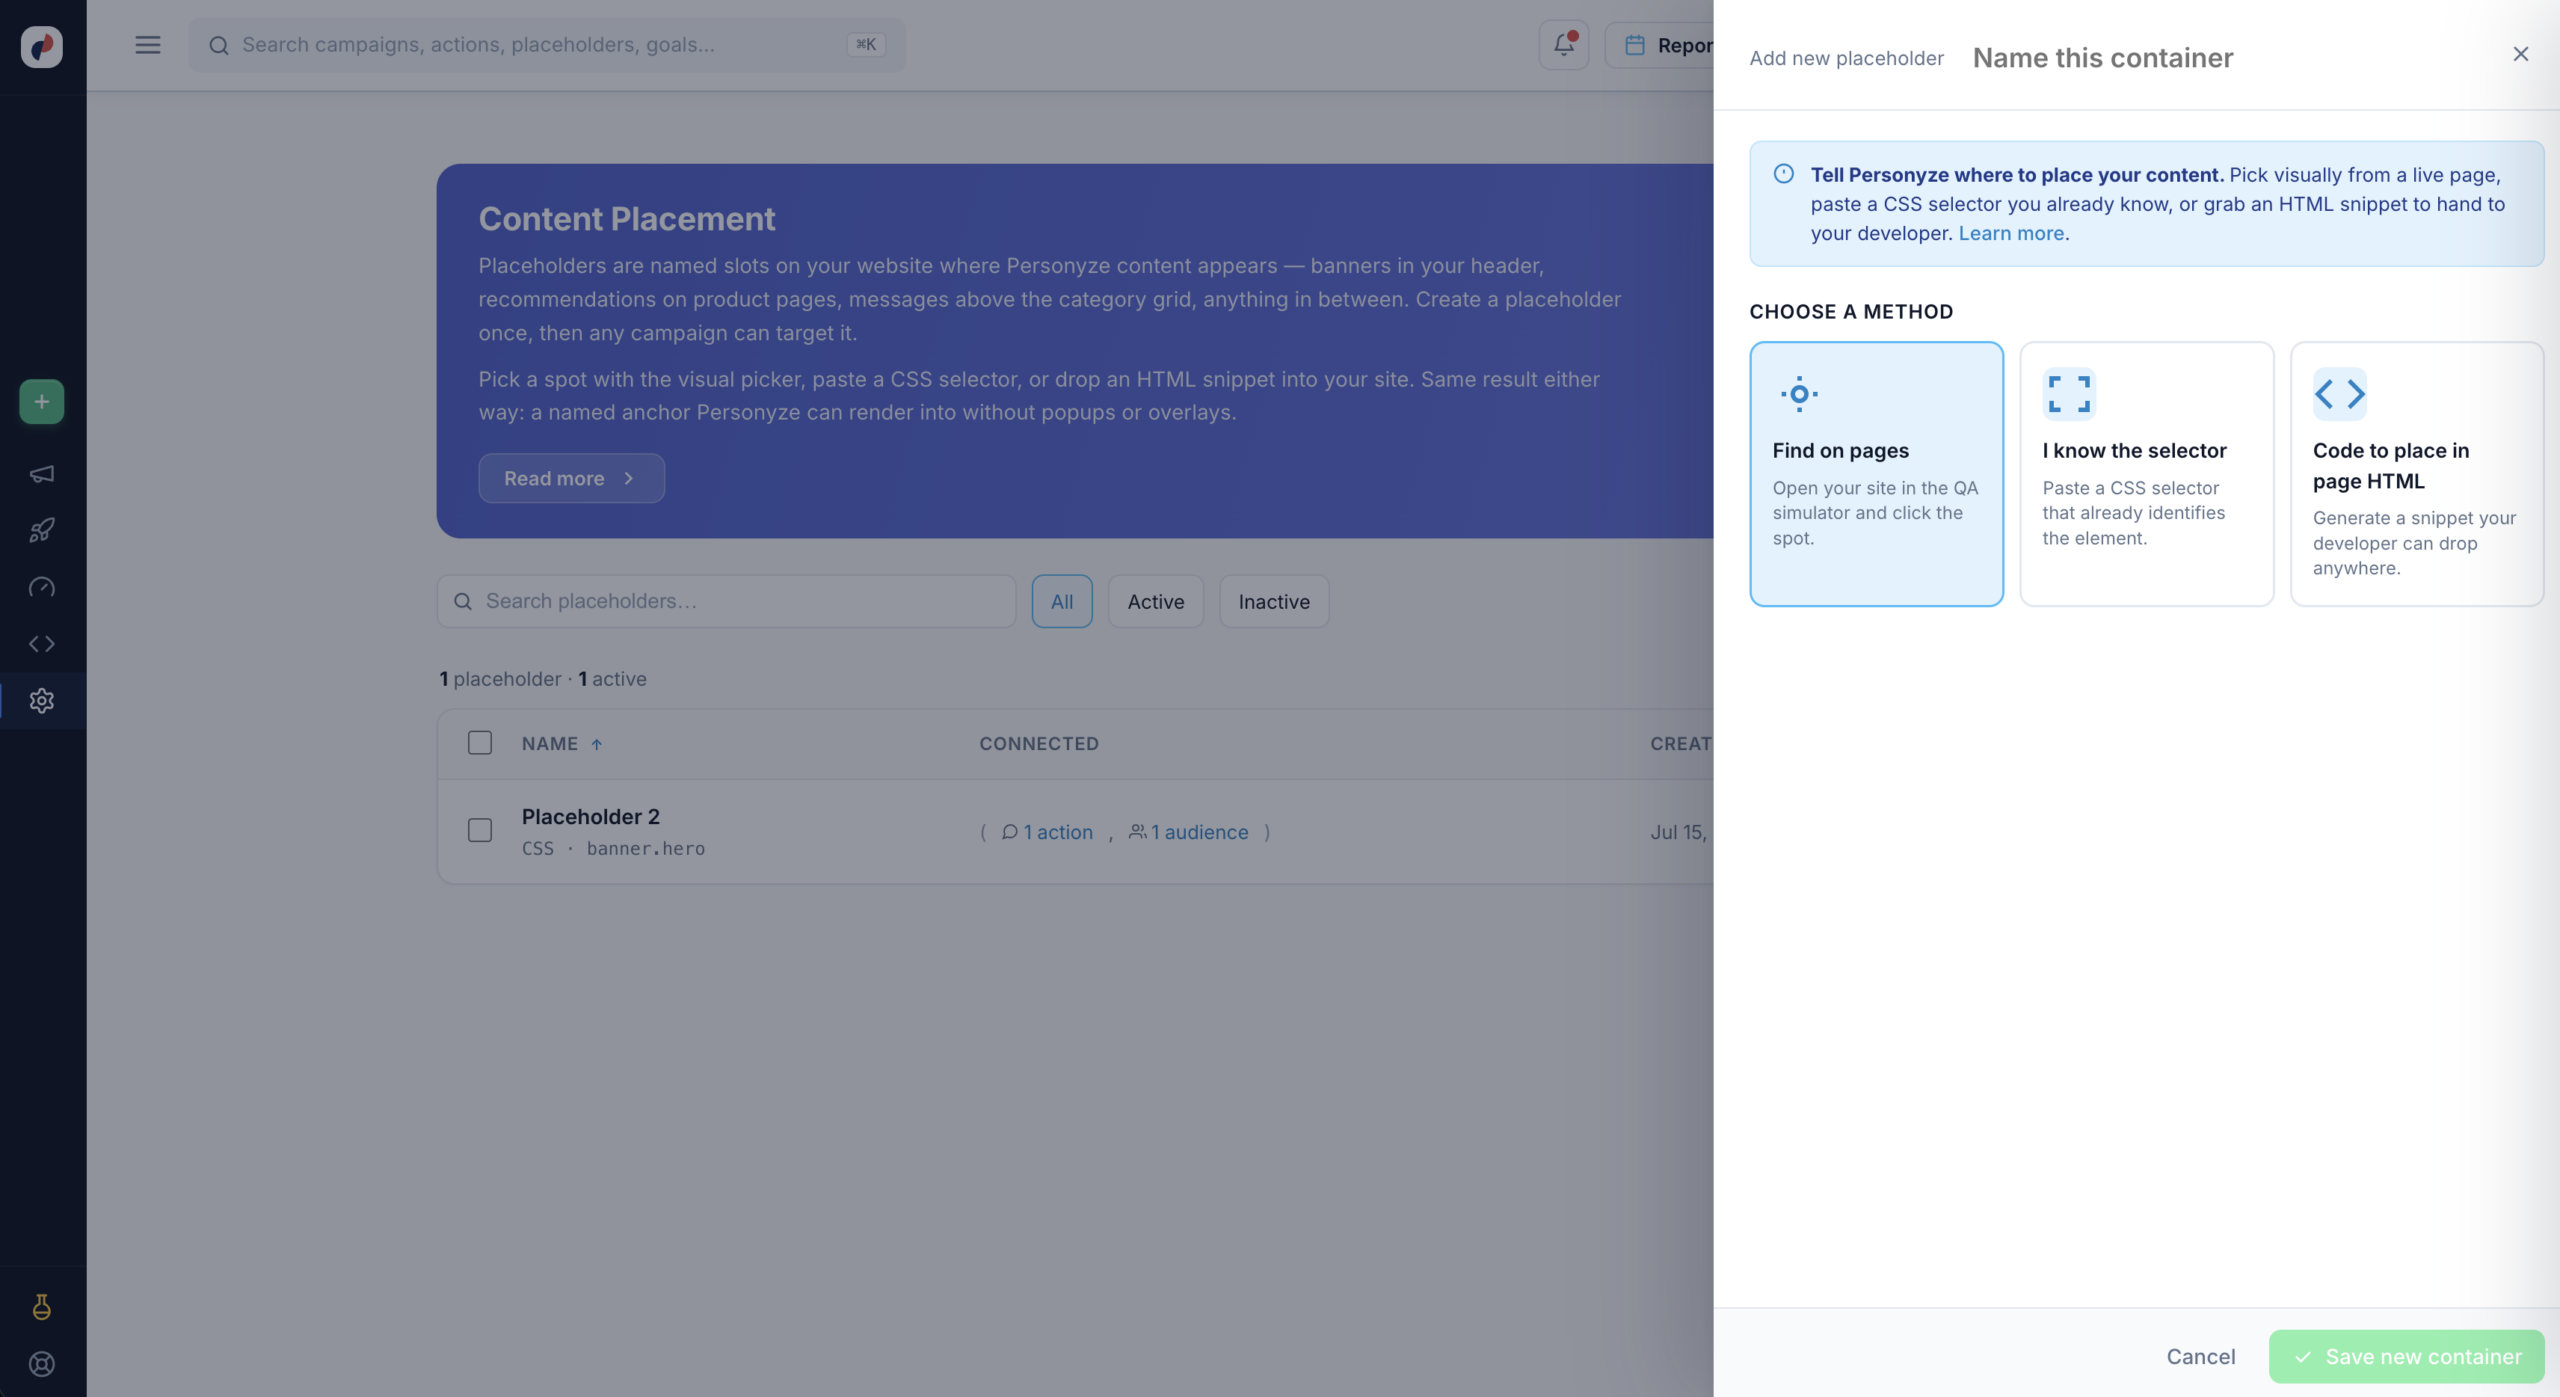
Three ways to tell Personyze where content goes: Find on pages (click it on your site), I know the selector (paste CSS), or Code to place in page HTML (a div for your developer). Same result — this walkthrough follows the picker.
Open the picker
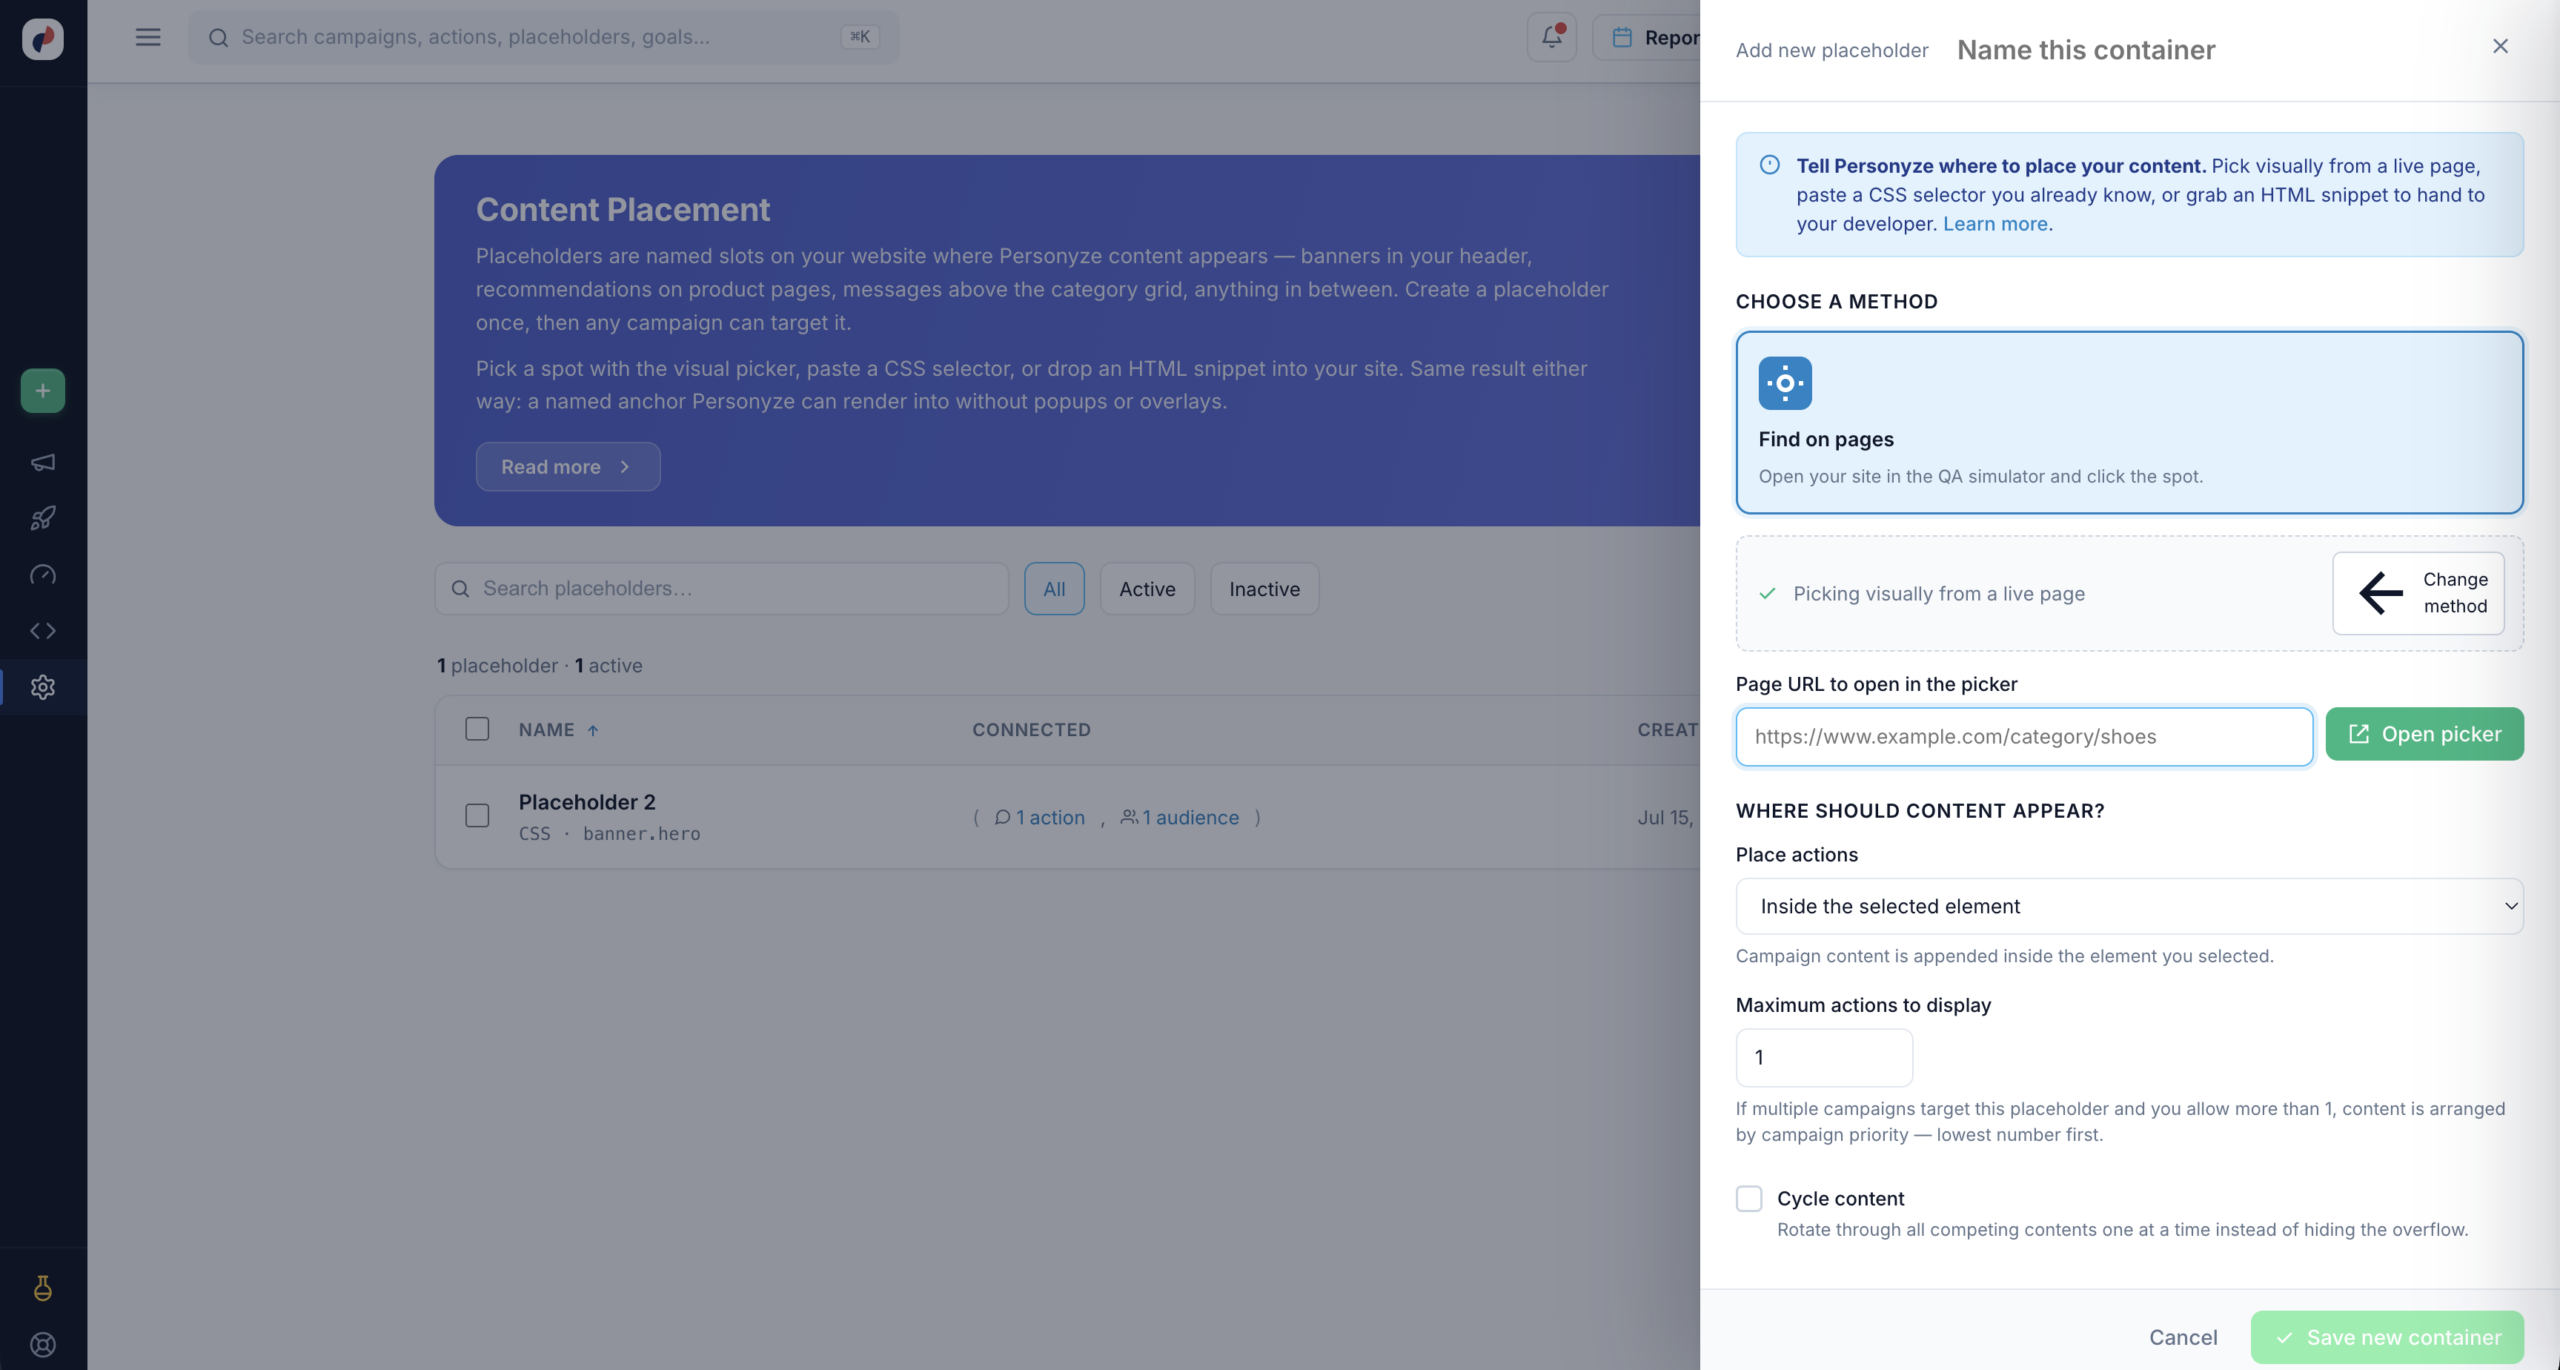
Choose Find on pages, enter the URL of a page on your site, and click Open picker. Personyze loads that page in the QA simulator with the placeholder panel alongside it.
Point and click the element
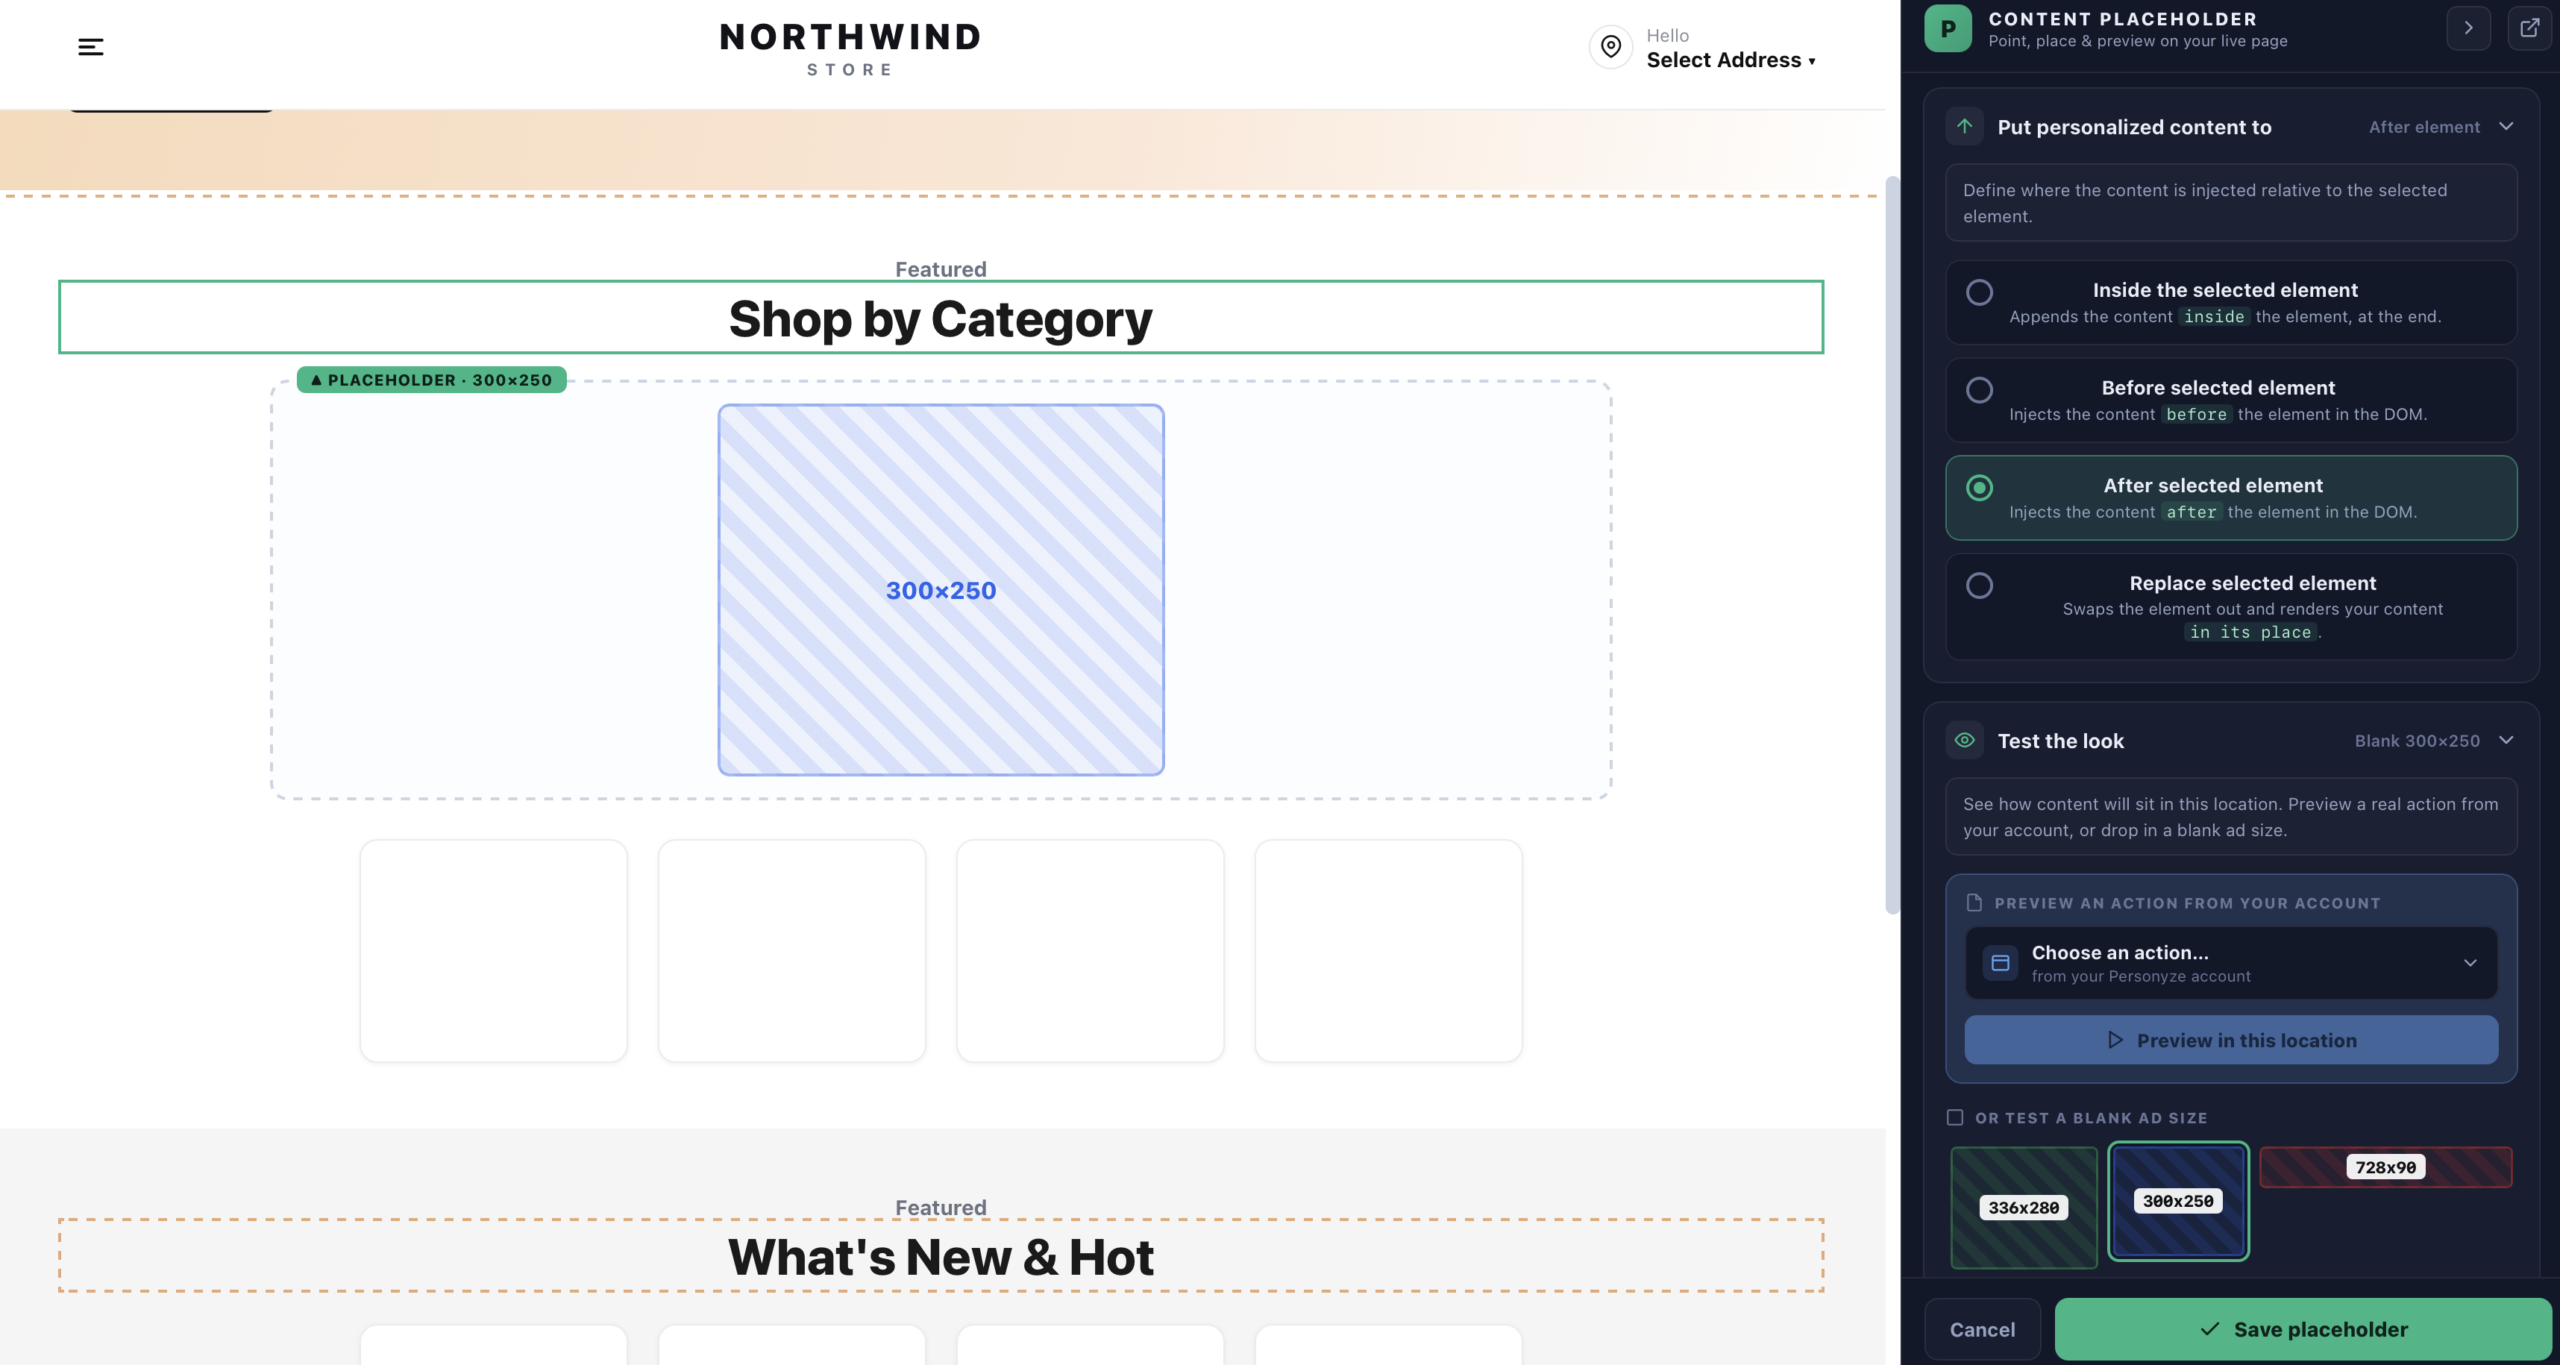
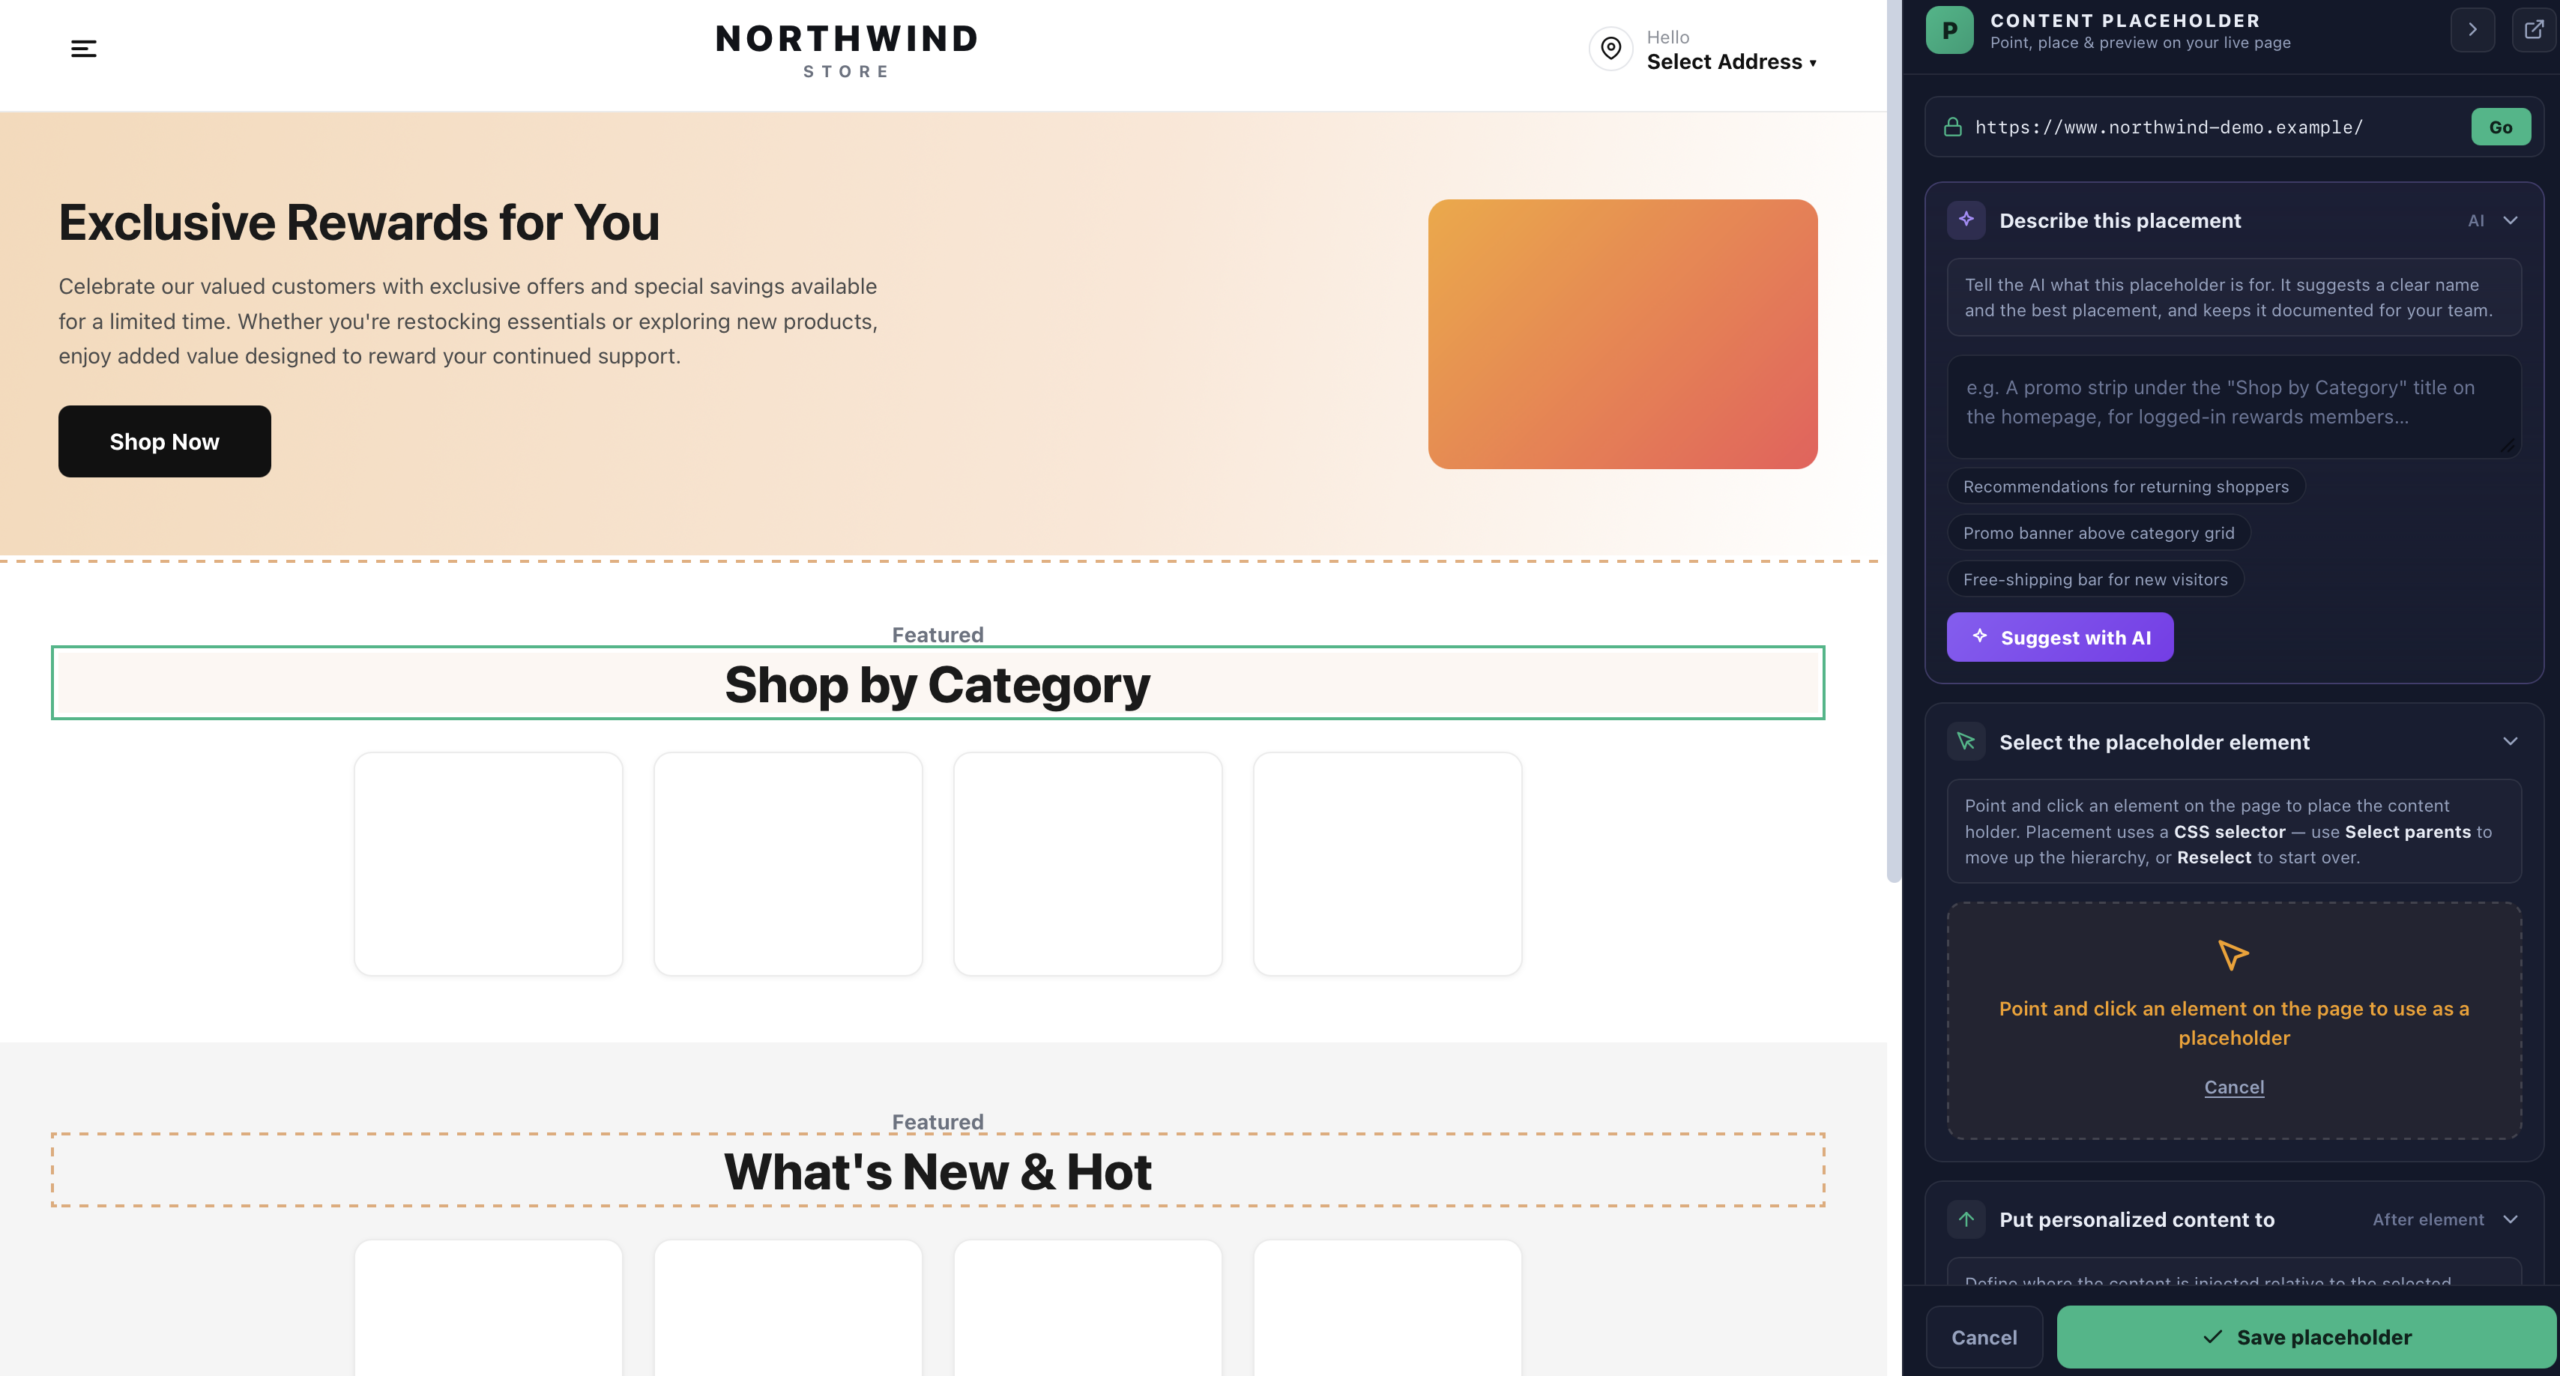
Under Select the placeholder element, click any element on the live page to anchor to it. Placement uses a CSS selector — use Select parents to move up the hierarchy, or Reselect to start over.
#cart-SS4443? Use Select parents to climb to a stabler element.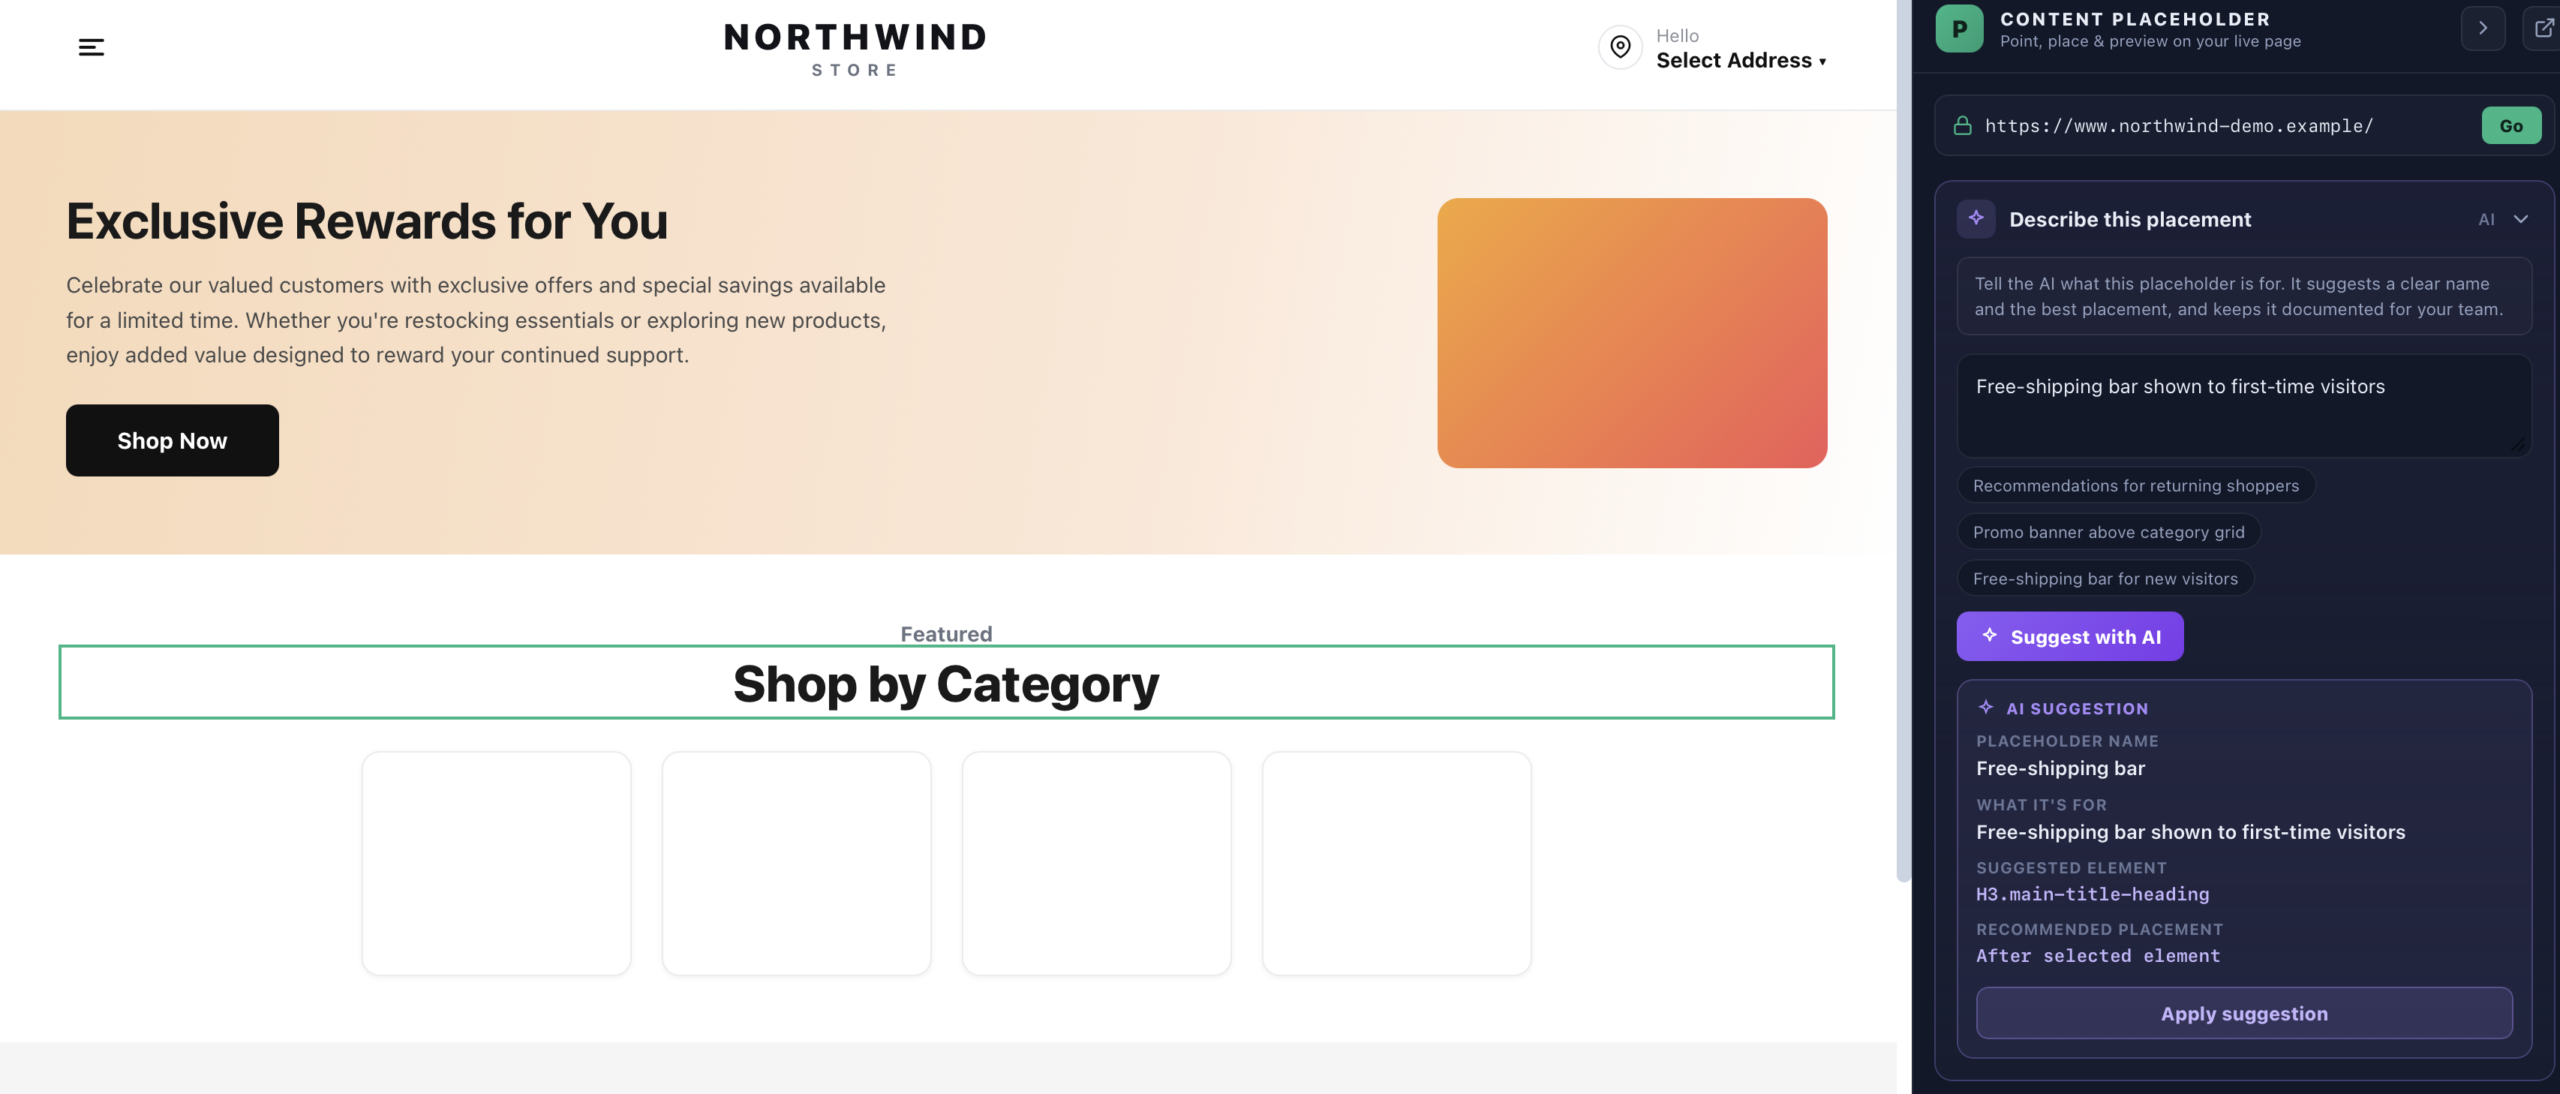
Describe it (and let AI name it)
Type what the placeholder is for — “free-shipping bar shown to first-time visitors.” Suggest with AI proposes a clear name, the element to target, and the recommended placement. Apply suggestion fills it all in.
Place it and test the look
Put personalized content to sets injection relative to your element: Inside, Before, After, or Replace. Then Test the look renders something in the spot — preview a real action from your account, or drop in a blank ad size (336×280, 300×250, 728×90) to check it fits.
Use it in an action
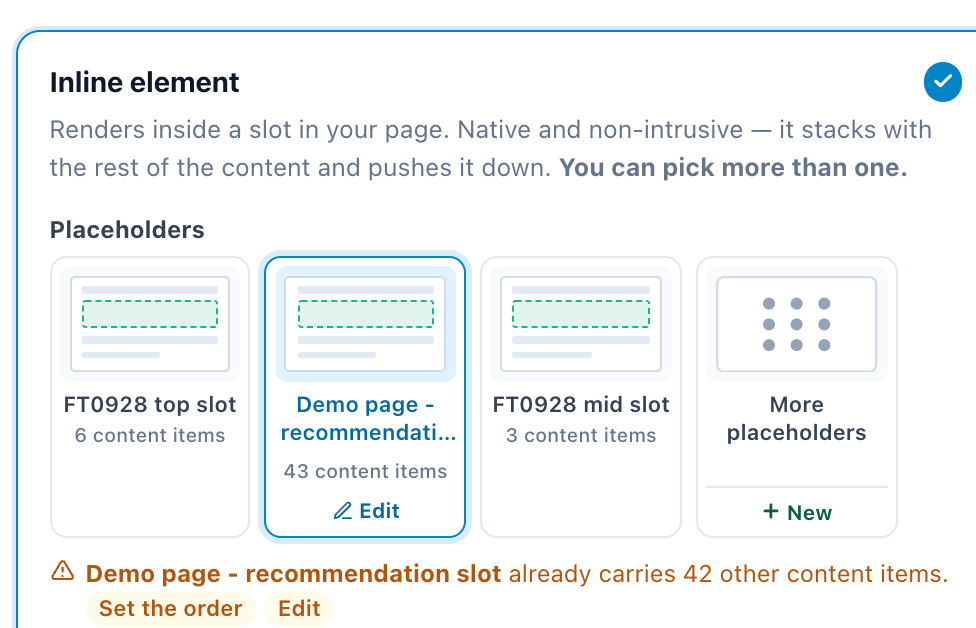
Save the placeholder, then in the builder’s Placement, Trigger & Frequency step choose Inline element and press its tile — or More placeholders to find it. + New there makes one without leaving the action, and picks it when you save it. If another content item already uses that slot, set priority — lowest number displays first.
Open Content Placement
Go to Settings → Content Placement. Every placeholder is listed with its selector and what it’s connected to. Click + Add new placeholder.
Choose a method
Three ways to tell Personyze where content goes: Find on pages (click it on your site), I know the selector (paste CSS), or Code to place in page HTML (a div for your developer). Same result — this walkthrough follows the picker.
Open the picker
Choose Find on pages, enter the URL of a page on your site, and click Open picker. Personyze loads that page in the QA simulator with the placeholder panel alongside it.
Point and click the element
Under Select the placeholder element, click any element on the live page to anchor to it. Placement uses a CSS selector — use Select parents to move up the hierarchy, or Reselect to start over.
#cart-SS4443? Use Select parents to climb to a stabler element.Describe it (and let AI name it)
Type what the placeholder is for — “free-shipping bar shown to first-time visitors.” Suggest with AI proposes a clear name, the element to target, and the recommended placement. Apply suggestion fills it all in.
Place it and test the look
Put personalized content to sets injection relative to your element: Inside, Before, After, or Replace. Then Test the look renders something in the spot — preview a real action from your account, or drop in a blank ad size (336×280, 300×250, 728×90) to check it fits.
Use it in an action
Save the placeholder, then in the builder’s Placement, Trigger & Frequency step choose Inline element and press its tile — or More placeholders to find it. + New there makes one without leaving the action, and picks it when you save it. If another content item already uses that slot, set priority — lowest number displays first.
The Content Placement List
Every placeholder in the account is listed with the method and selector it uses (for example CSS · banner.hero), what it’s connected to — how many actions and audiences currently rely on it — when it was created, and an Active toggle. Search by name, or filter to All / Active / Inactive. The pencil edits a placeholder; the … menu holds the rest.
Click + Add new placeholder to create one. Give it a name you’ll recognize later — you’ll be picking it from a dropdown when you build campaigns.
Choose a Method
Personyze needs to know where on the page to place your content. There are three ways to tell it, and the result is identical — pick whichever suits how much you know about the page’s markup and whether you can edit it.
Find on Pages
The visual picker, and the option to reach for when you don’t know the markup — or don’t want to go digging for it. Enter the URL of a page on your site and click Open picker: Personyze loads that page in the QA simulator with a placeholder panel docked beside it, so you’re choosing the spot on the real page rather than guessing at a selector.
Point and Click the Element
Under Select the placeholder element, click any element on the page to anchor to it. Personyze works out the CSS selector for you — for a page title, for instance, it’ll pick H1. Two controls matter here:
- Select parents — walks up the DOM hierarchy from what you clicked. This is your escape hatch when you land on an element with a dynamic ID (see the warning below).
- Reselect — starts the pick over.
Describe It — and Let AI Name It
Describe this placement is where you say what the slot is for in plain language: “free-shipping bar shown to first-time visitors”. Click Suggest with AI and Personyze proposes a clear placeholder name, the element to target, and a recommended placement relative to it. Apply suggestion fills those in.
This is worth doing even when you already know the answer. The description stays attached to the placeholder, so six months later your team can tell what H3.main-title-heading was actually meant for.
Place It and Test the Look
Put personalized content to is the picker’s version of Place actions — it defines where content is injected relative to the element you selected: Inside (appended within, at the end), Before, After, or Replace.
Test the look is the part worth not skipping. It renders something into the spot so you can see how content will actually sit there before you commit:
- Preview an action from your account — pick a real action and click Preview in this location to see the genuine content in place.
- Or test a blank ad size — drop in a placeholder block at 336×280, 300×250, or 728×90 to check the slot can take those dimensions without breaking the layout.
Click Save placeholder when the spot looks right.
I Know the Selector
Paste a CSS selector that already identifies the element — .hero-banner, #product-grid, [data-slot='recommendations'].
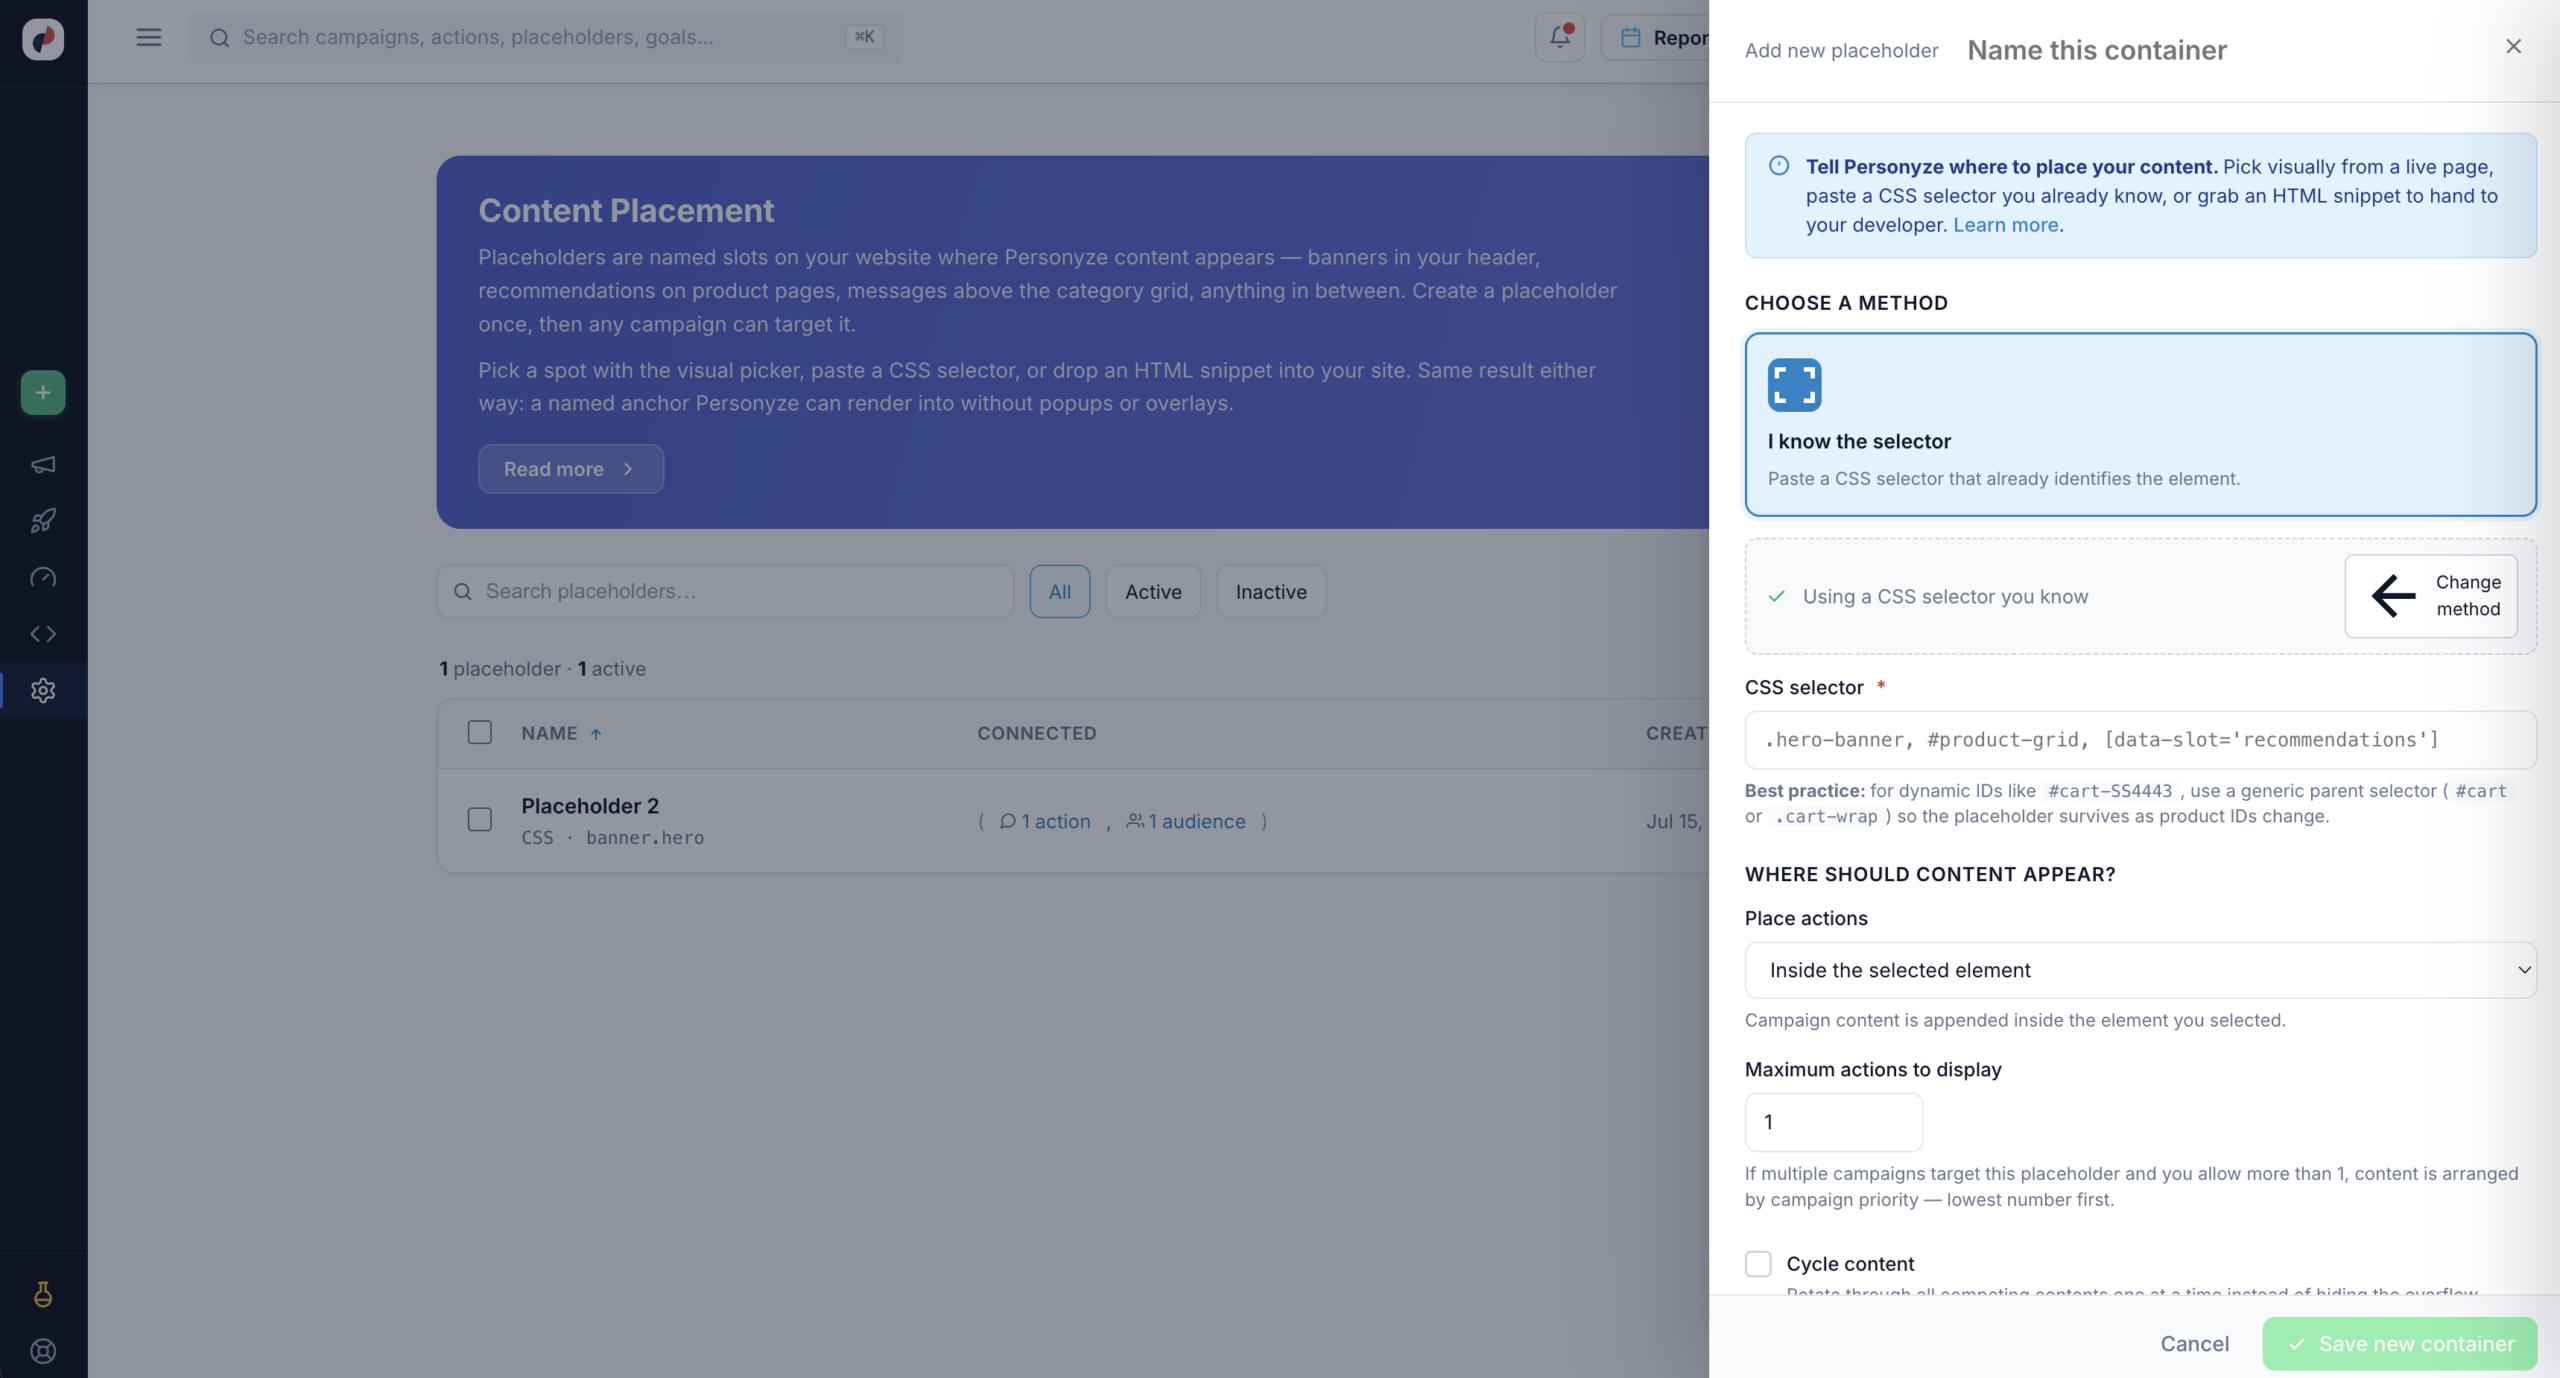
Watch out for dynamic IDs. Many sites generate selectors containing an ID that changes per visitor or per product — #cart-SS4443. A placeholder built on one of those works for you and nobody else, because that exact selector doesn’t exist on anyone else’s page. Use a generic parent instead (#cart or .cart-wrap) so the placeholder survives as those IDs change. In the visual picker, the select parents option walks you up to a stabler element.
Finding a Selector Yourself
Right-click the element on your page and choose Inspect to open your browser’s dev tools with that element highlighted. Right-click the highlighted element in the inspector and copy the selector path. If your browser words it differently, search “how to find HTML selector in [your browser]”. Trim whatever you get back to the shortest stable form — long auto-generated paths break the moment the page’s structure shifts.
Code to Place in Page HTML
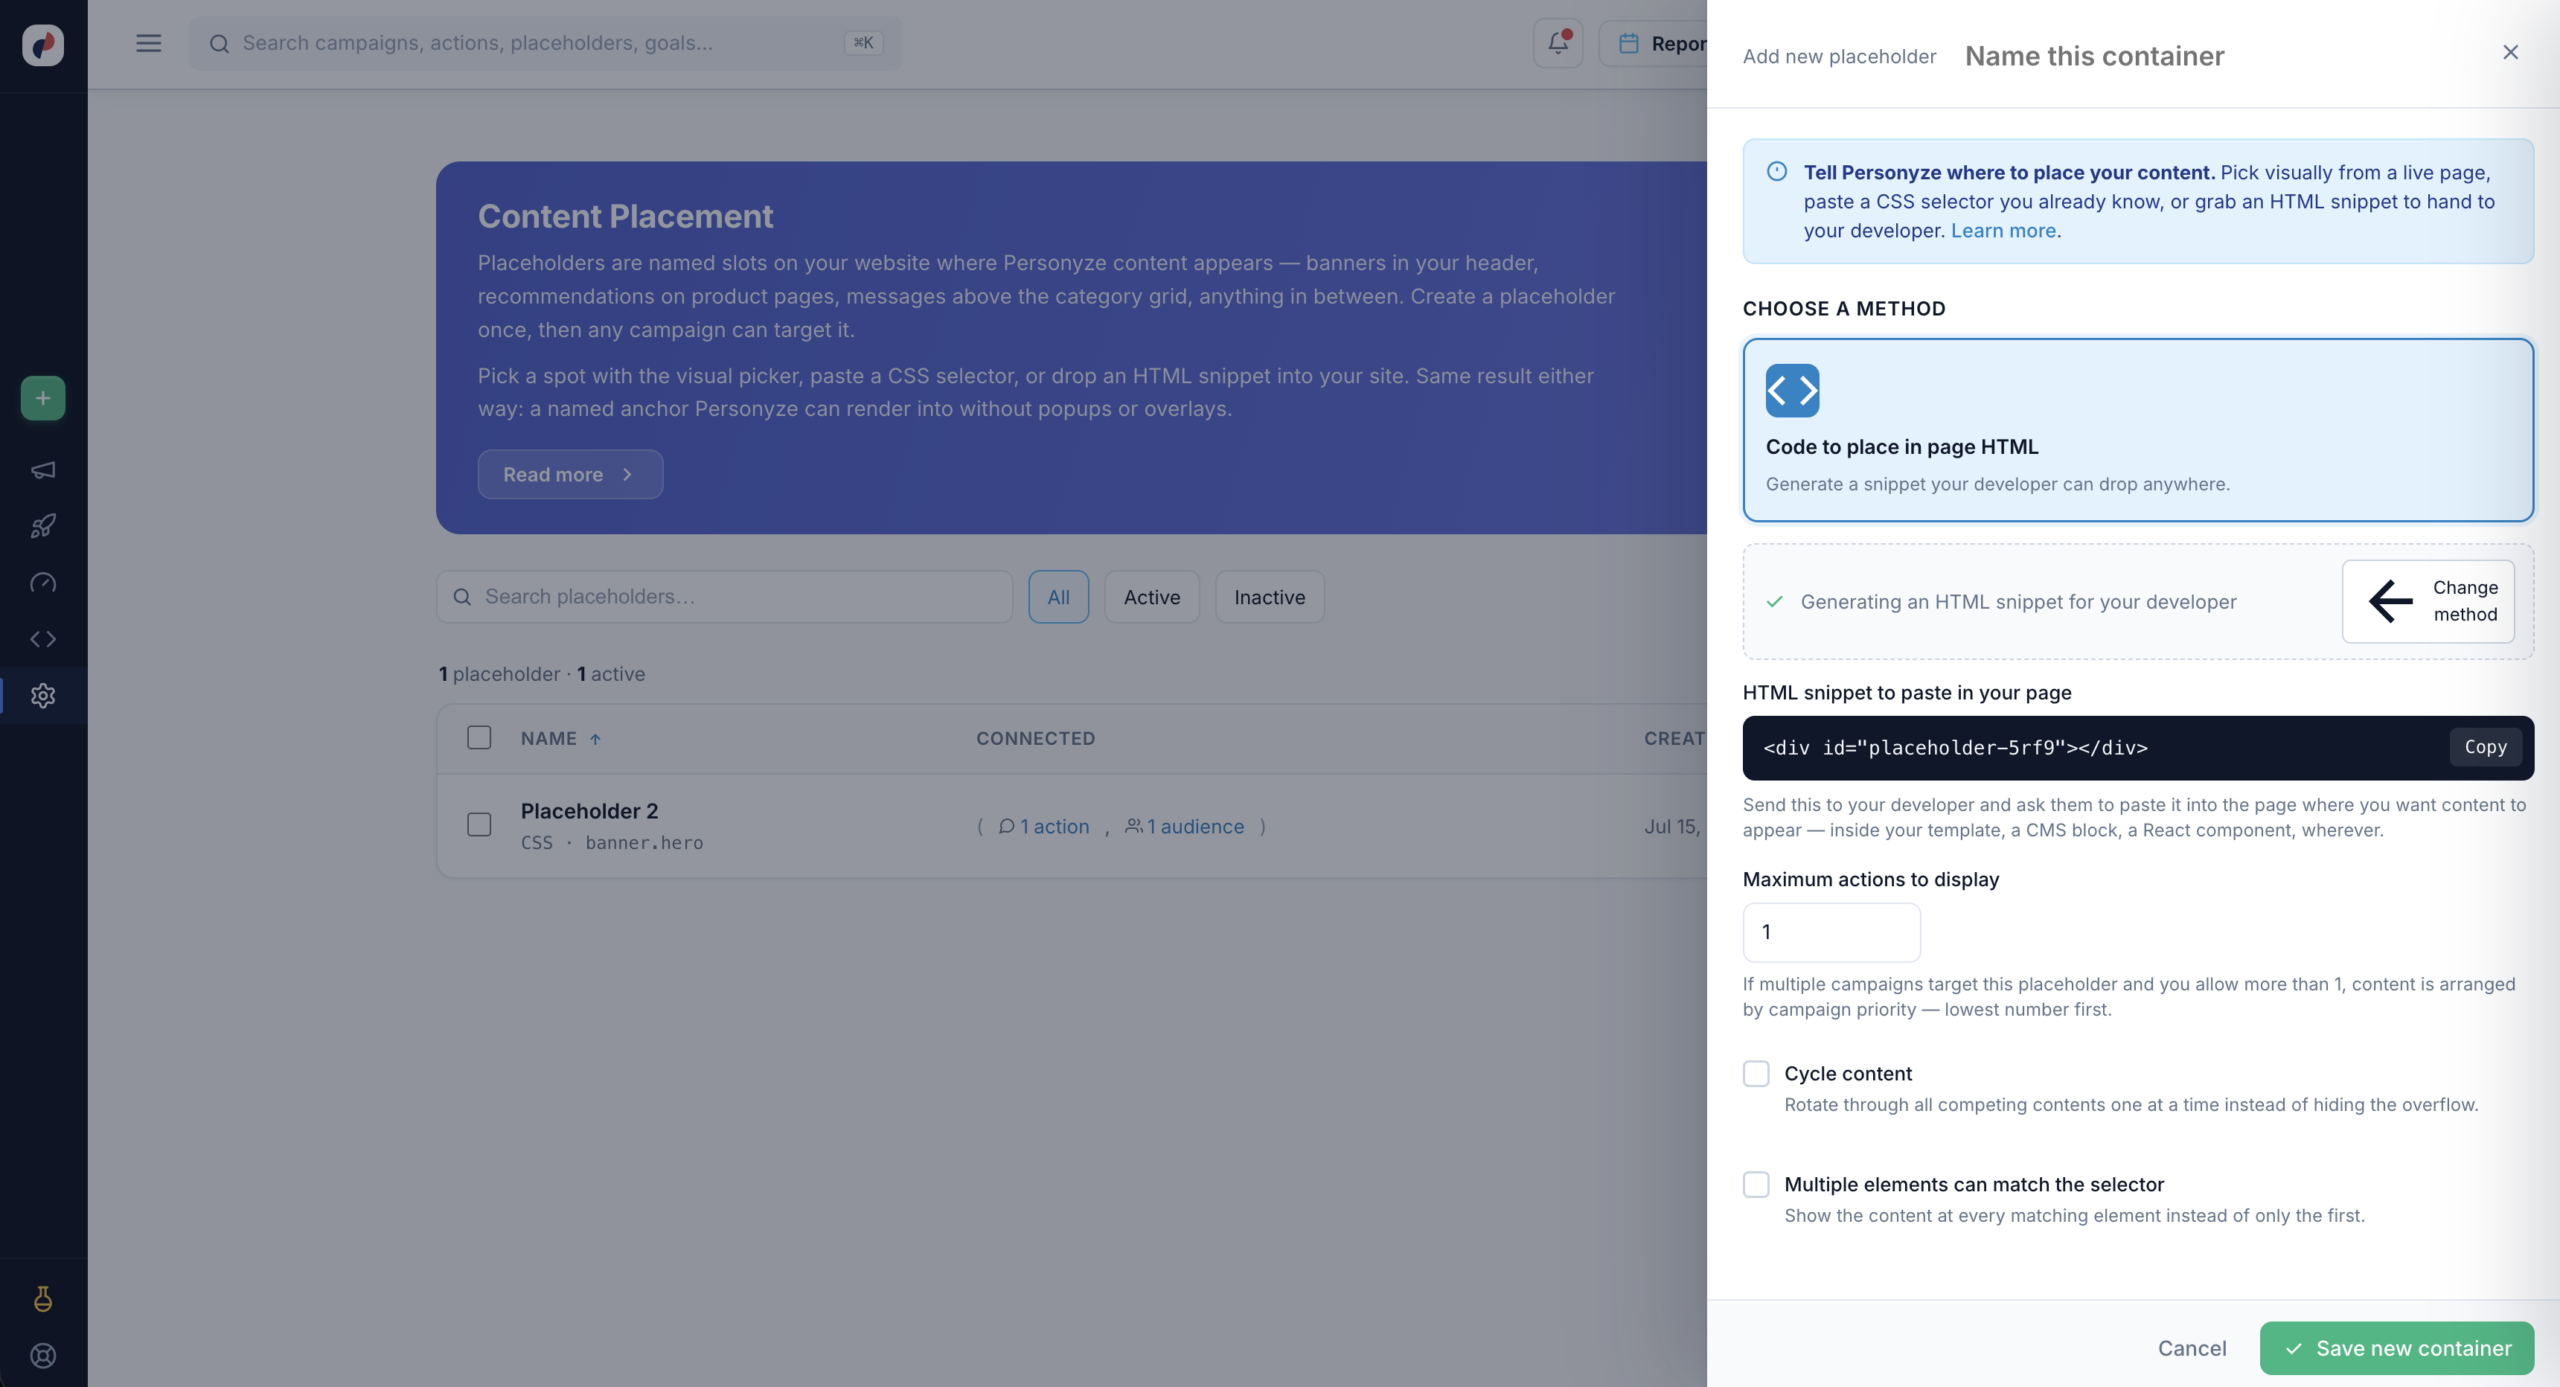
Personyze generates an empty anchor div — <div id="placeholder-5rf9"></div> — and you (or your developer) paste it wherever the content should appear: inside a template, a CMS block, a React component, wherever.
This is the most robust of the three, because the anchor is yours and doesn’t depend on the page’s existing structure — no selector to break when the site is redesigned. The trade-off is that it needs a code change on your side.
Where Should Content Appear?
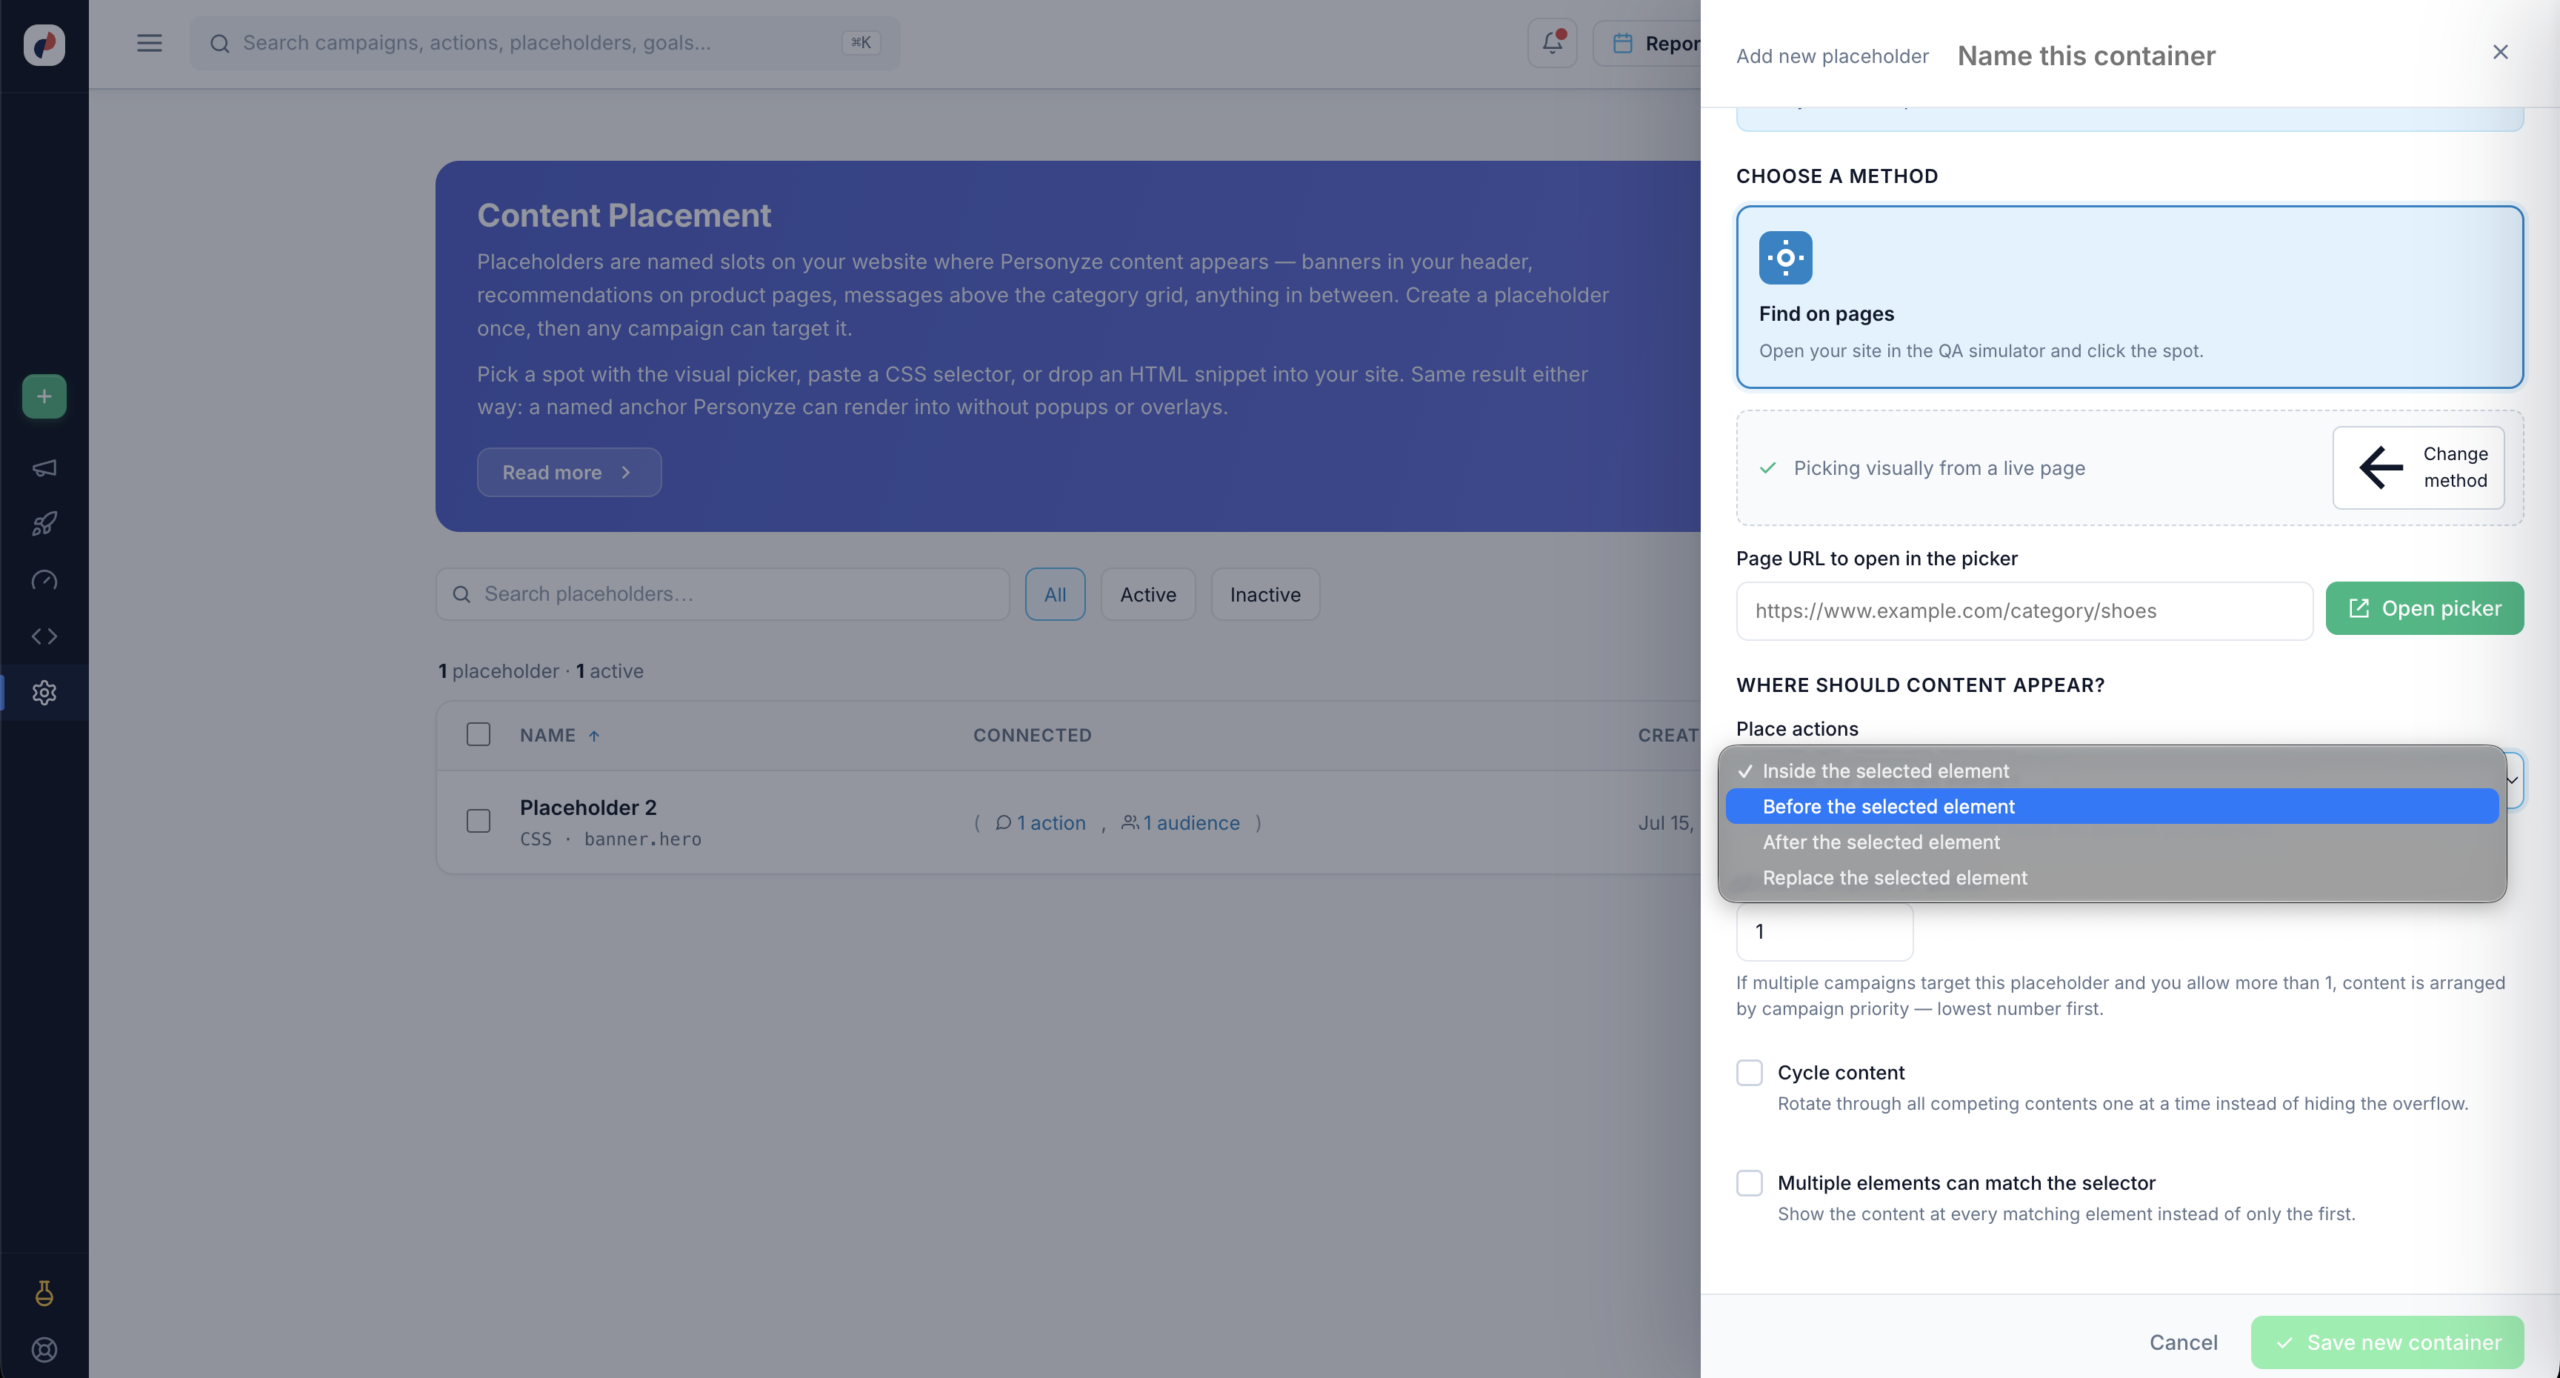
For the selector-based methods, Place actions controls the position relative to the element you chose:
- Inside the selected element — content is appended inside it (the default).
- Before the selected element — content is inserted just above it.
- After the selected element — content is inserted just below it.
- Replace the selected element — the original element is swapped out for your content.
Handling Multiple Campaigns
Several campaigns can compete for the same placeholder. Three settings decide what happens:
- Maximum actions to display — how many actions may render here at once. If you allow more than one, content is arranged by campaign priority — lowest number first.
- Cycle content — rotate through all competing contents one at a time, instead of hiding the overflow. Use it when you’d rather show everything in turn than drop the losers.
- Multiple elements can match the selector — render at every matching element instead of only the first. This is what you want for a selector like
.product-cardthat legitimately matches many elements; leave it off when the selector should resolve to exactly one spot.
Click Save new container when you’re done.
Choosing a Placeholder Inside an Action
You don’t have to create placeholders up front. When you build an action — in the Popup, Banner & HTML Builder, at step 3, Placement, Trigger & Frequency — you choose Where on the page the content goes:
- Inline element — renders inside a section of your page. Native and non-intrusive: it stacks with your other content. This is the option that uses a placeholder — press one of its placeholder tiles to pick it.
- Floating popup — overlays the page with an optional dimmed backdrop. No placeholder needed; you set a screen position instead.
The card shows up to three placeholders as tiles — this action’s own first, then your most used — each with how many content items use it, so you can tell whether you’re about to share a slot before you commit to it. More placeholders opens the full list, and + New creates one on the spot: the one you save is picked for the action. A picked tile has ✎ Edit, which opens that placeholder’s editor. See Picking placeholders.
Sharing a Placeholder Across Campaigns
A placeholder isn’t owned by one campaign. Any number of actions can point at the same slot, which is exactly what makes it useful: the same spot on the page shows a different message to each audience.
When you pick a placeholder that another content item already uses, Personyze warns you in amber under the tiles — with Set the order and Edit — and shows the list of all content items using this placeholder. If two of them can fire at the same time, you decide the order with priority — lowest number first. Drag the items, or use the Position arrows, to move the action you’re editing up or down the queue.
Two things worth keeping straight here:
- Priority only matters when items compete. If the audiences never overlap, only one action can ever match a given visitor and the ordering is moot. It’s the simultaneous-match case that priority resolves.
- Priority orders; it doesn’t multiply. By default the placeholder shows one item — the highest-priority match — and the rest are dropped. To show several at once when the layout allows, the placeholder itself has to permit more than one item; that’s the Maximum actions to display setting covered above (the panel refers to it as show multiple items).
To see which campaigns are actually competing for a slot on live traffic, the QA Campaigns tab lists placeholder overlaps and shows your priority against theirs before you launch.
Using a Placement in a Campaign
Once saved, the placeholder is available to any action that renders visually — banners, recommendations, forms. It won’t appear for JavaScript or email actions, which don’t render into the page this way.
Because the slot is decoupled from the content, you can point several campaigns at the same placeholder and show each audience something different in the same spot on the page.