
Upgrade or Downgrade Your Plan
Each website in your Personyze account has its own subscription plan. You can move that site up or down a tier at any time from Billing & plan → Upgrade or downgrade plan. The change takes effect immediately, and your account balance is updated accordingly — charged for an upgrade, credited for a downgrade.
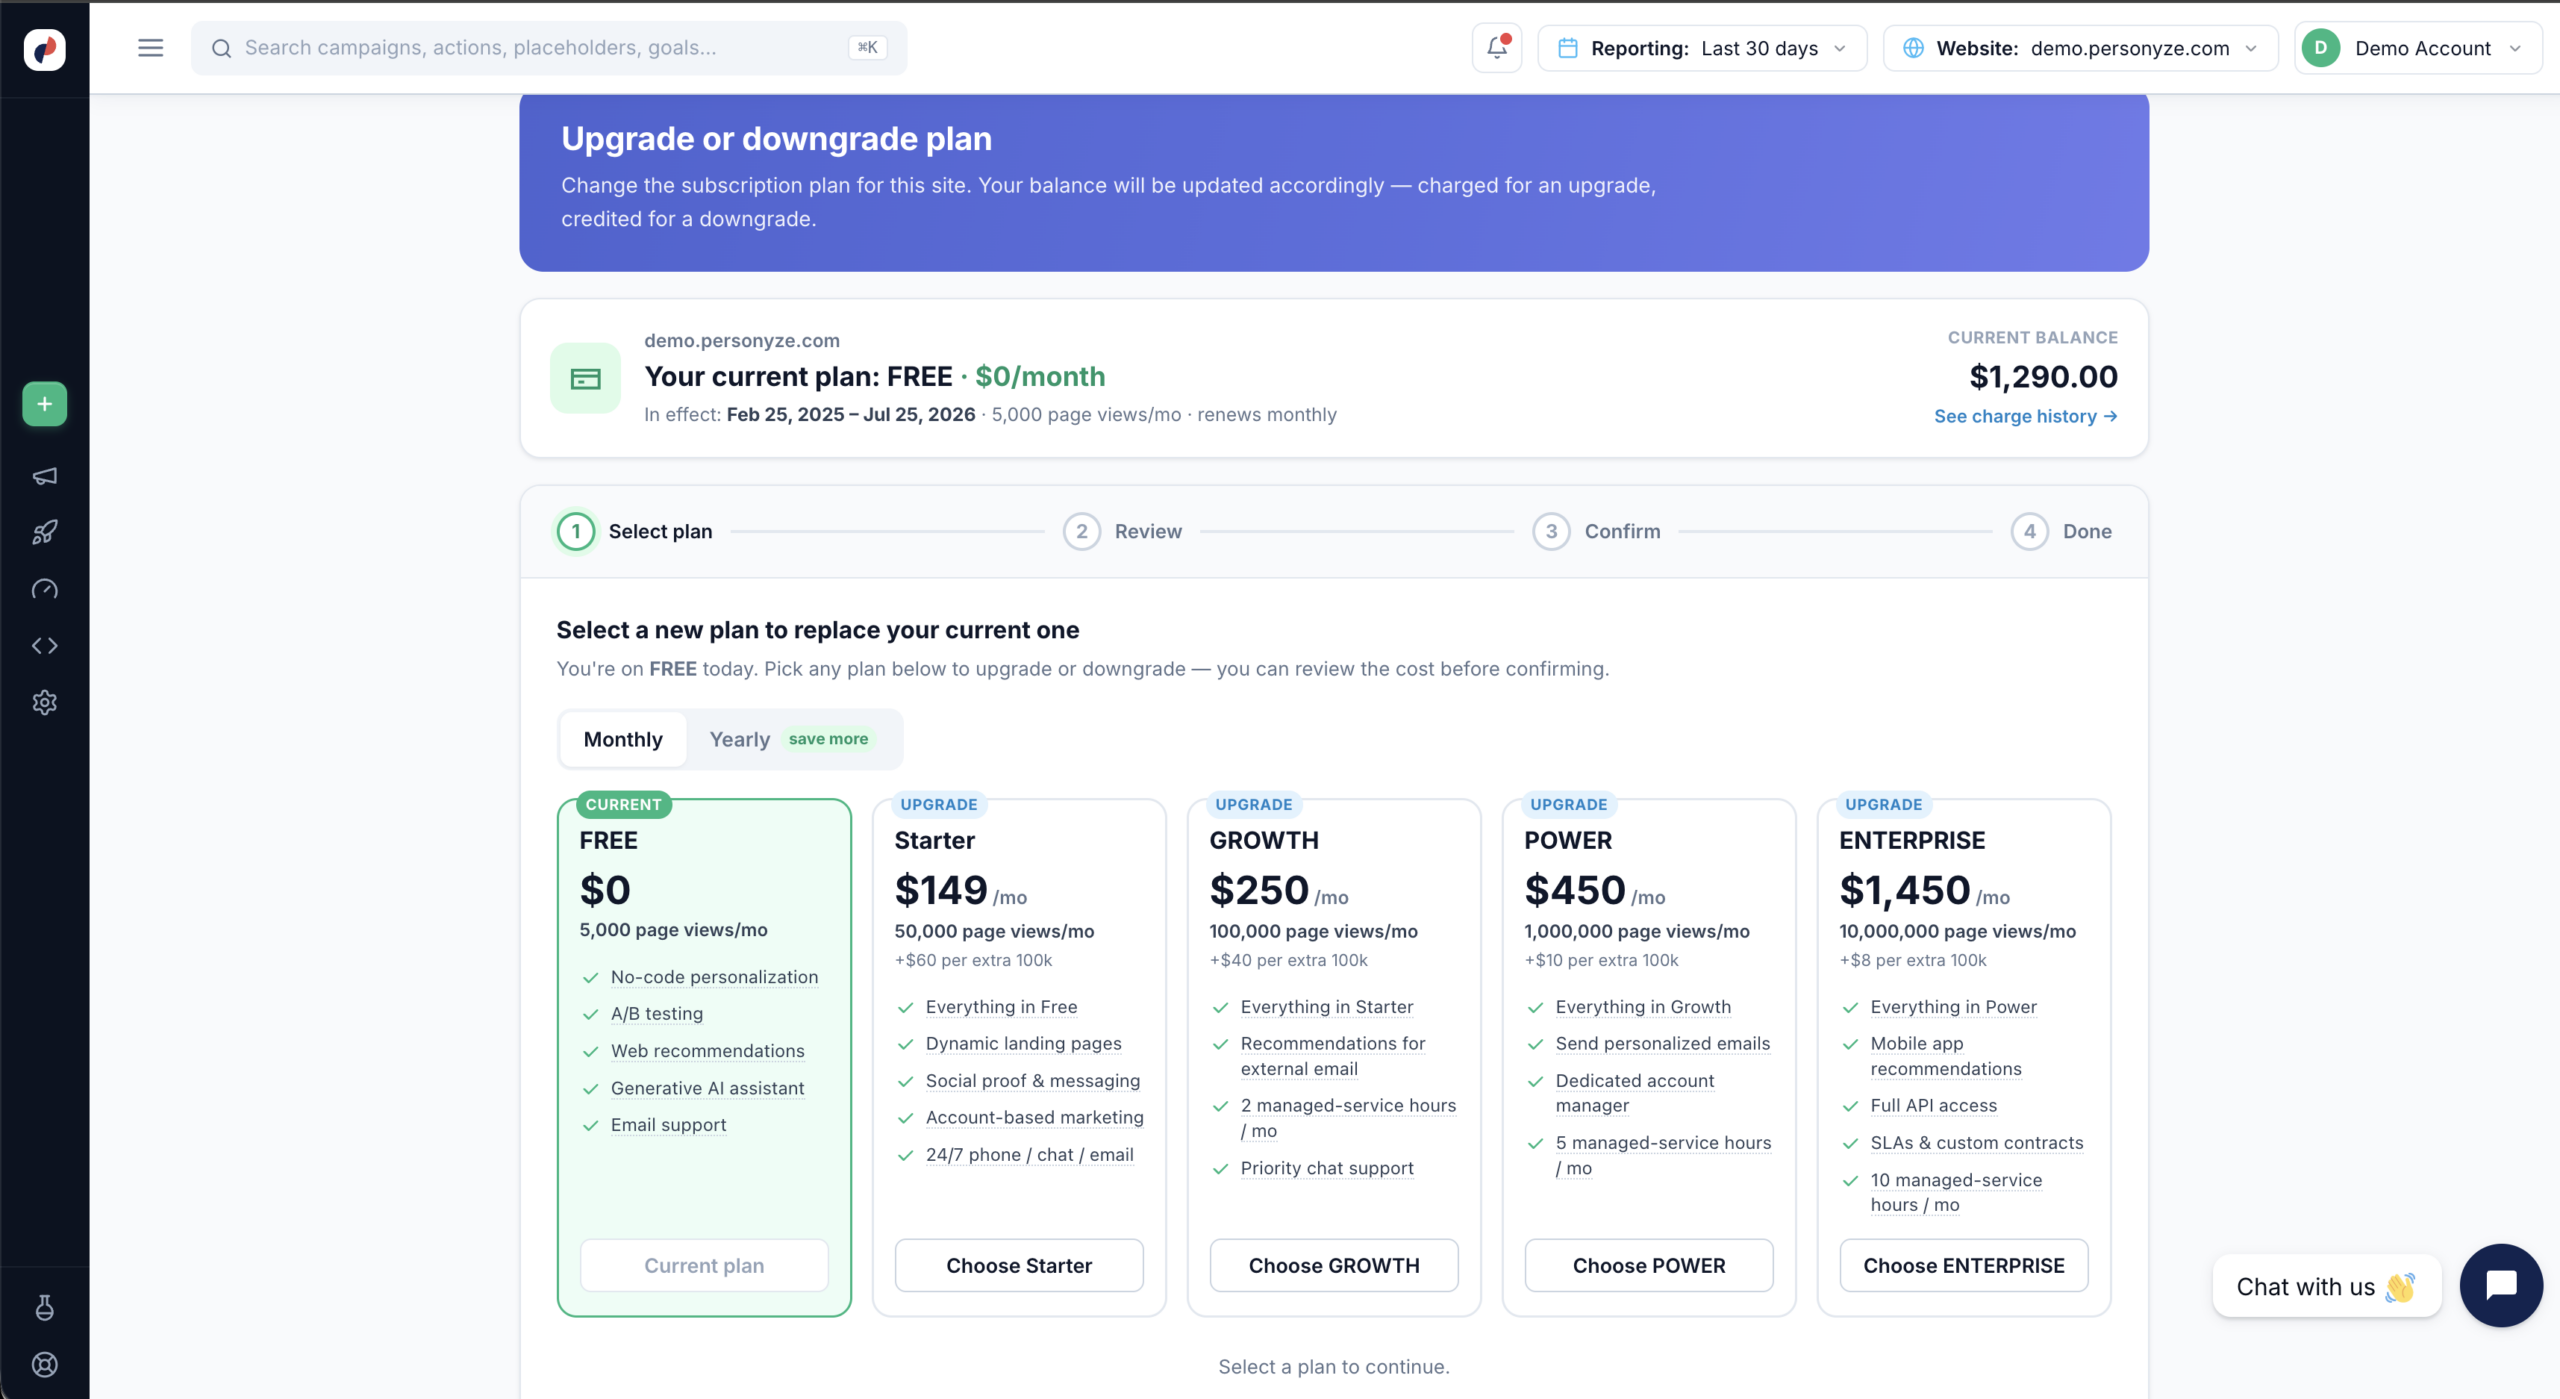
At the top of the page, a card summarizes the site’s current subscription: the plan and its monthly price, the dates the current term is in effect, the page-view allowance, the renewal cycle, and your current balance. Use See charge history to review past charges and credits.
The change itself runs through a four-step wizard — Select plan → Review → Confirm → Done — and nothing is charged until you reach the Confirm step and approve it.
Finding the Plan Wizard
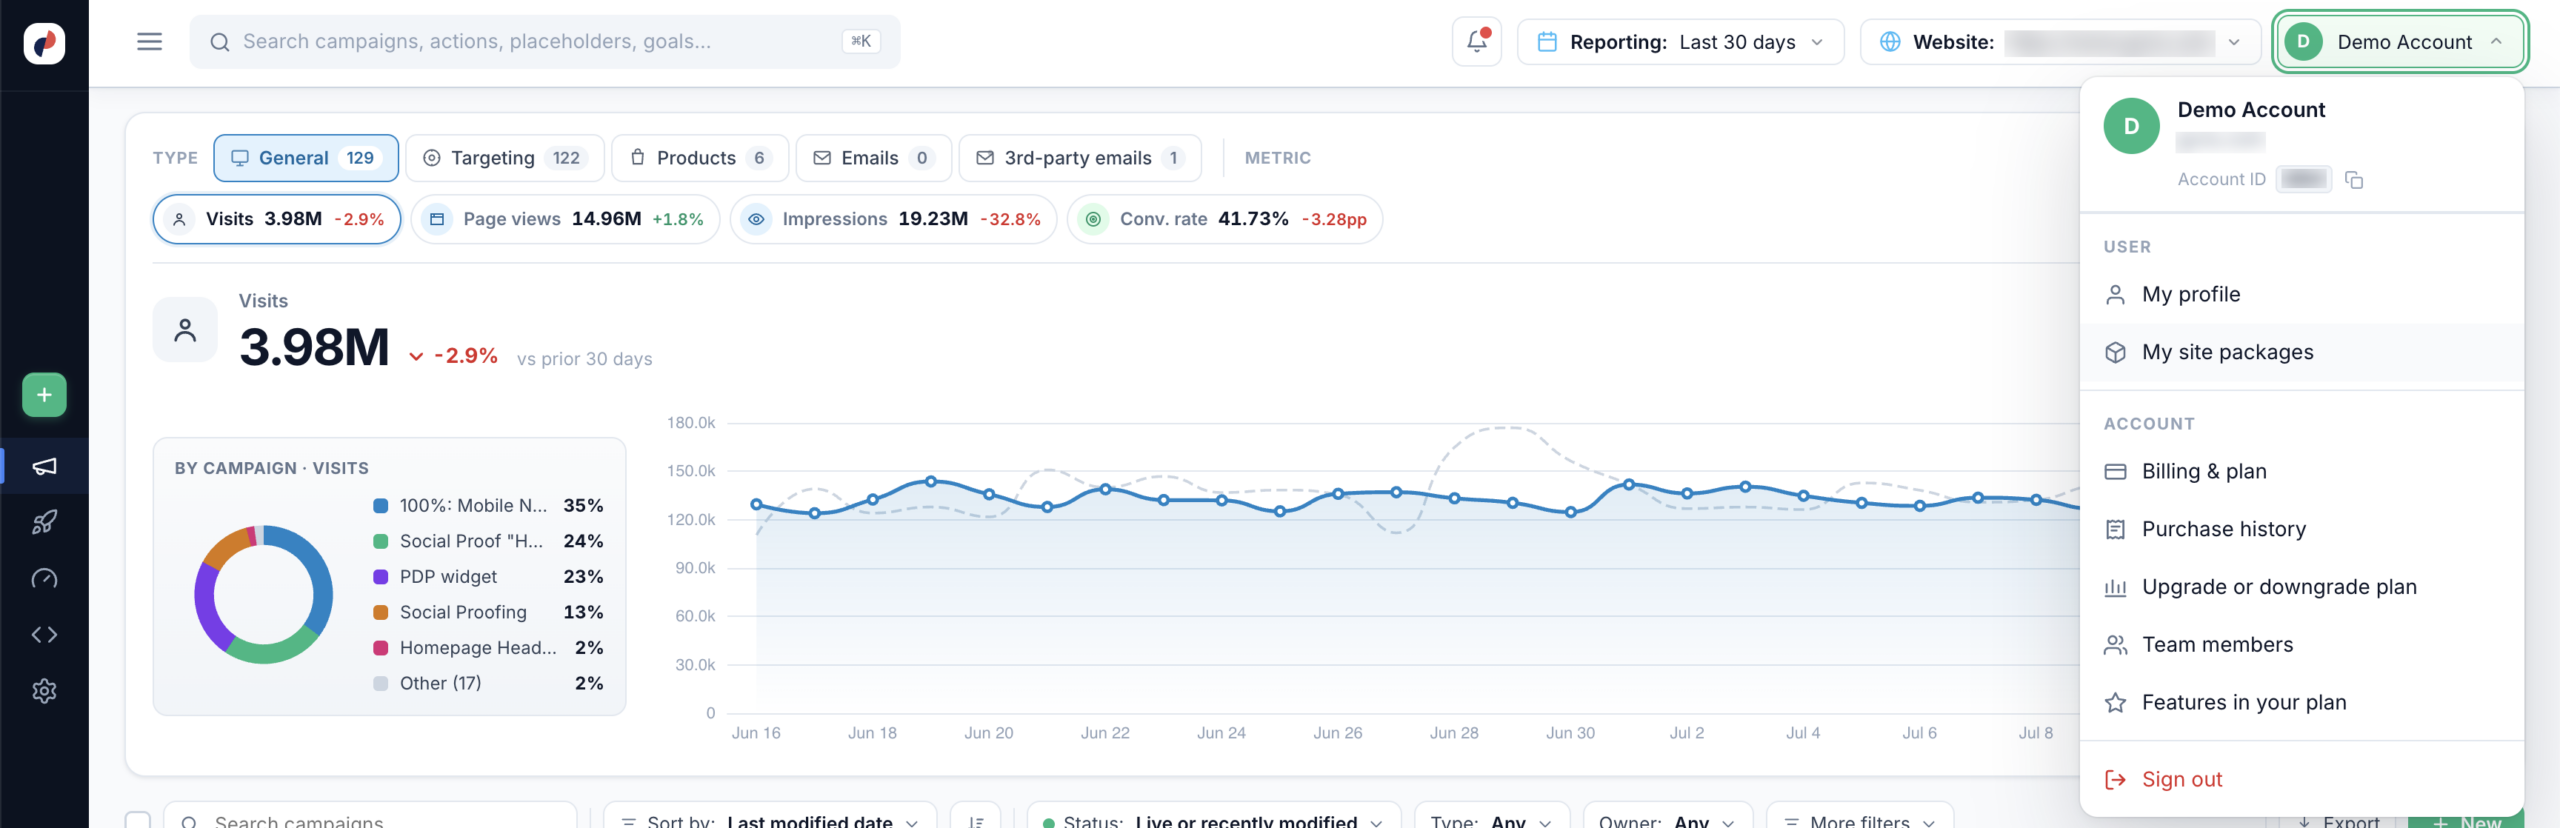
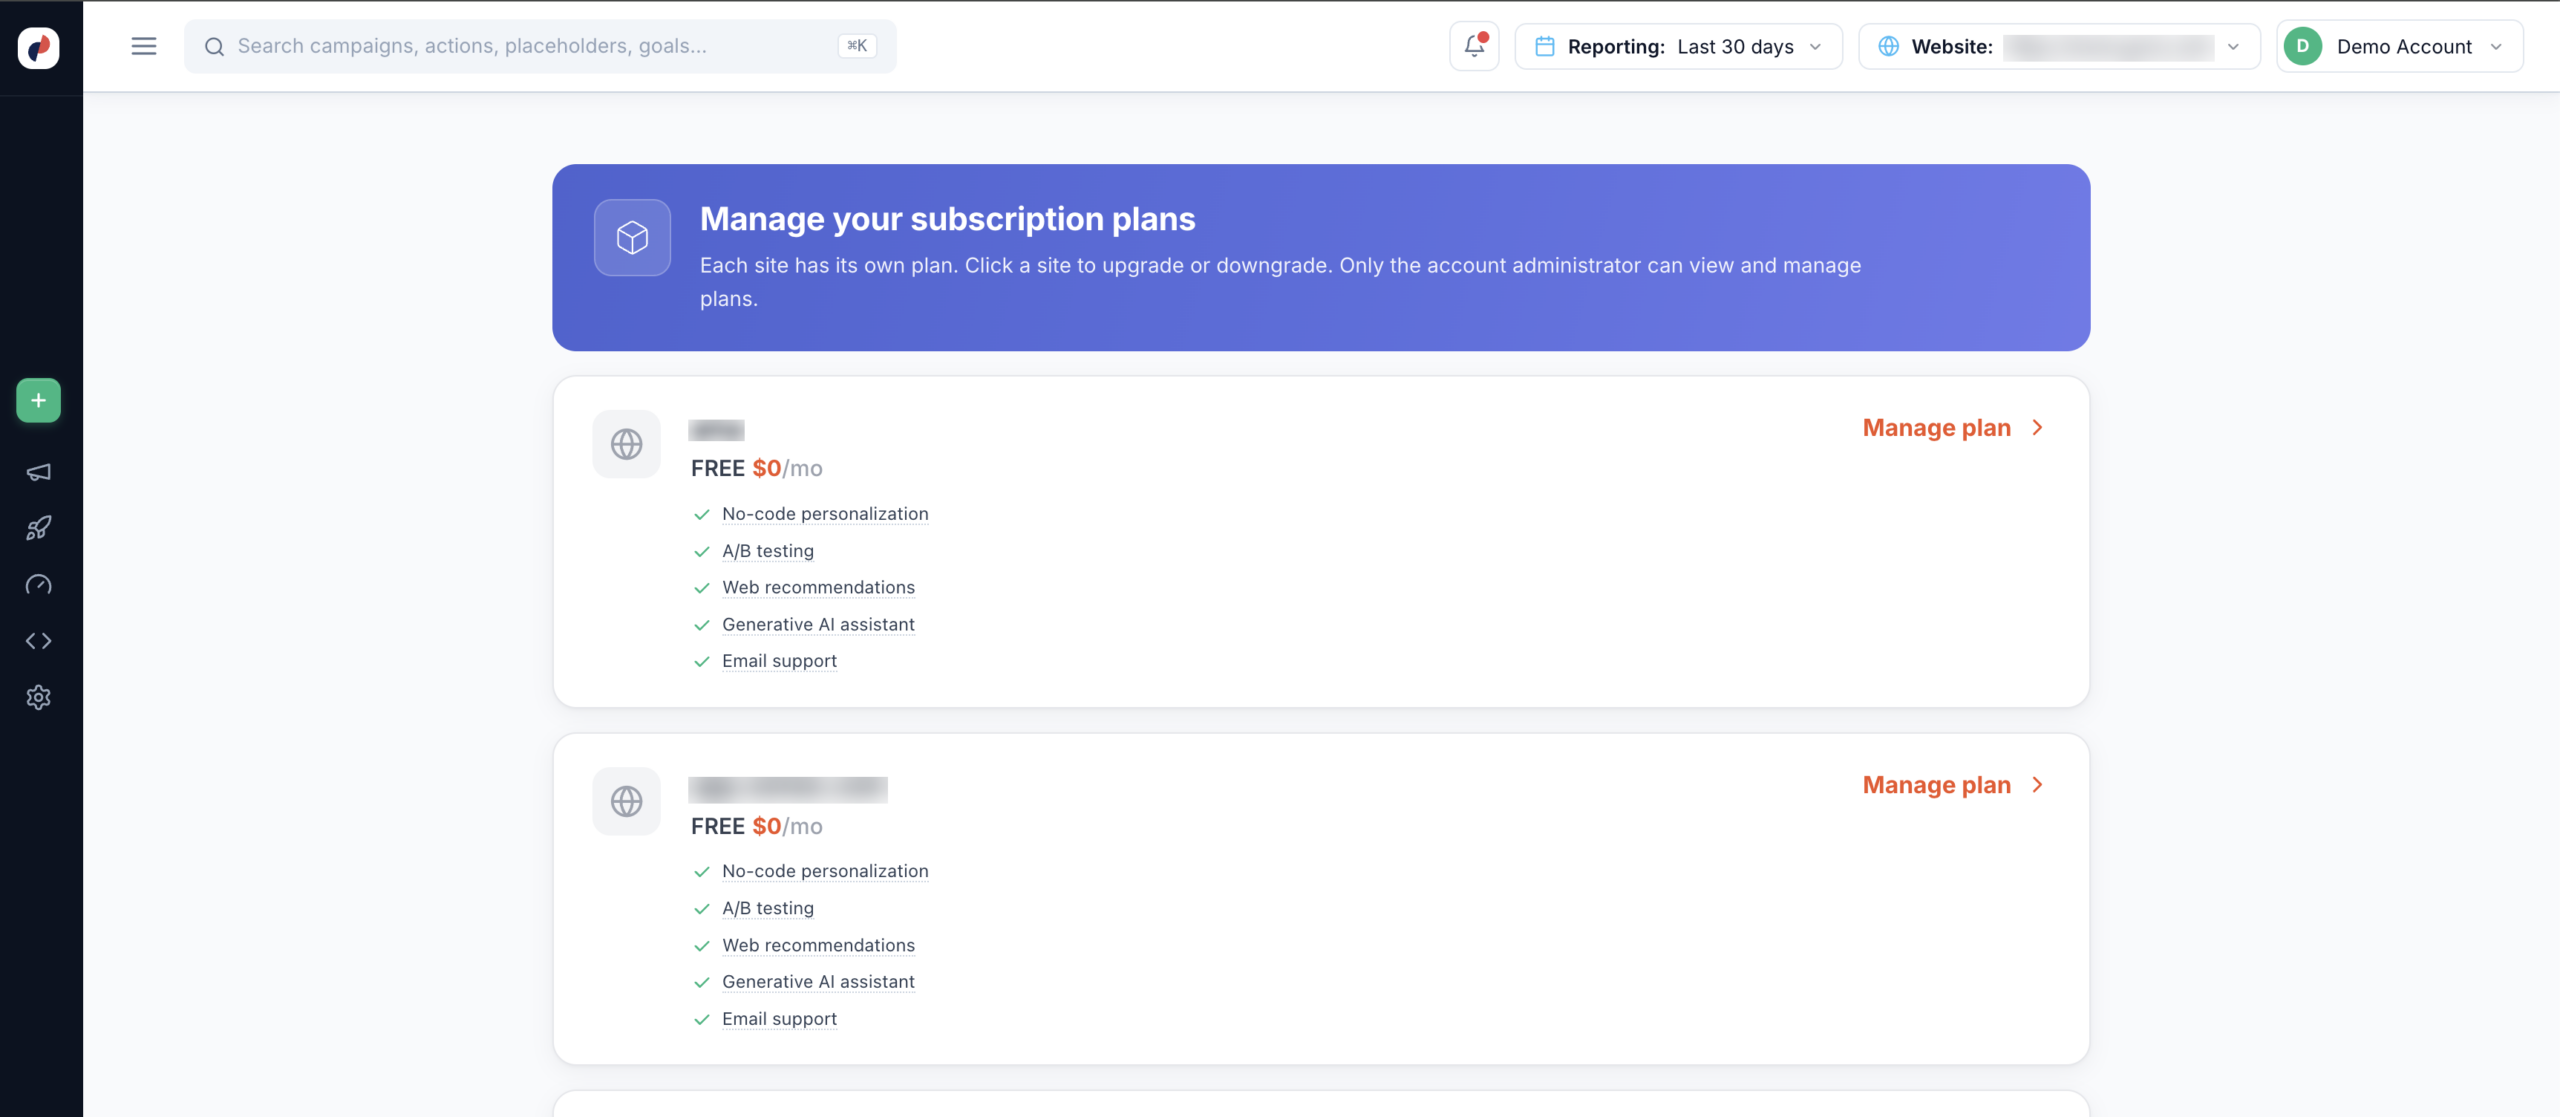
Plans are managed from the account menu at the top right of Personyze. Two routes get you there:
- Account → Upgrade or downgrade plan — opens the wizard directly for the site currently selected in the Website picker.
- User → My site packages — lists every site in the account with its current plan, so you can pick the right one first. Handy when you manage several sites.
Note that only the account administrator can view and manage plans.
Prefer to click through it? Use the interactive walkthroughs below, then scroll down for the detailed reference.
Walkthrough: upgrading
Open the account menu
Click your account name at the top right of Personyze. Under Account, choose Upgrade or downgrade plan to jump straight to the wizard for the site currently selected.
Or pick a site from My site packages
If you manage several sites, choose My site packages instead. Each site is listed with its current plan and what that plan includes — click Manage plan on the one you want to change.
Select a plan
Every tier is shown side by side. Your current plan is marked CURRENT; the others are labeled UPGRADE or DOWNGRADE. Each card lists its price, page-view allowance, overage rate, and added features. Use the Monthly / Yearly toggle to switch billing cycles.
Confirm your choice
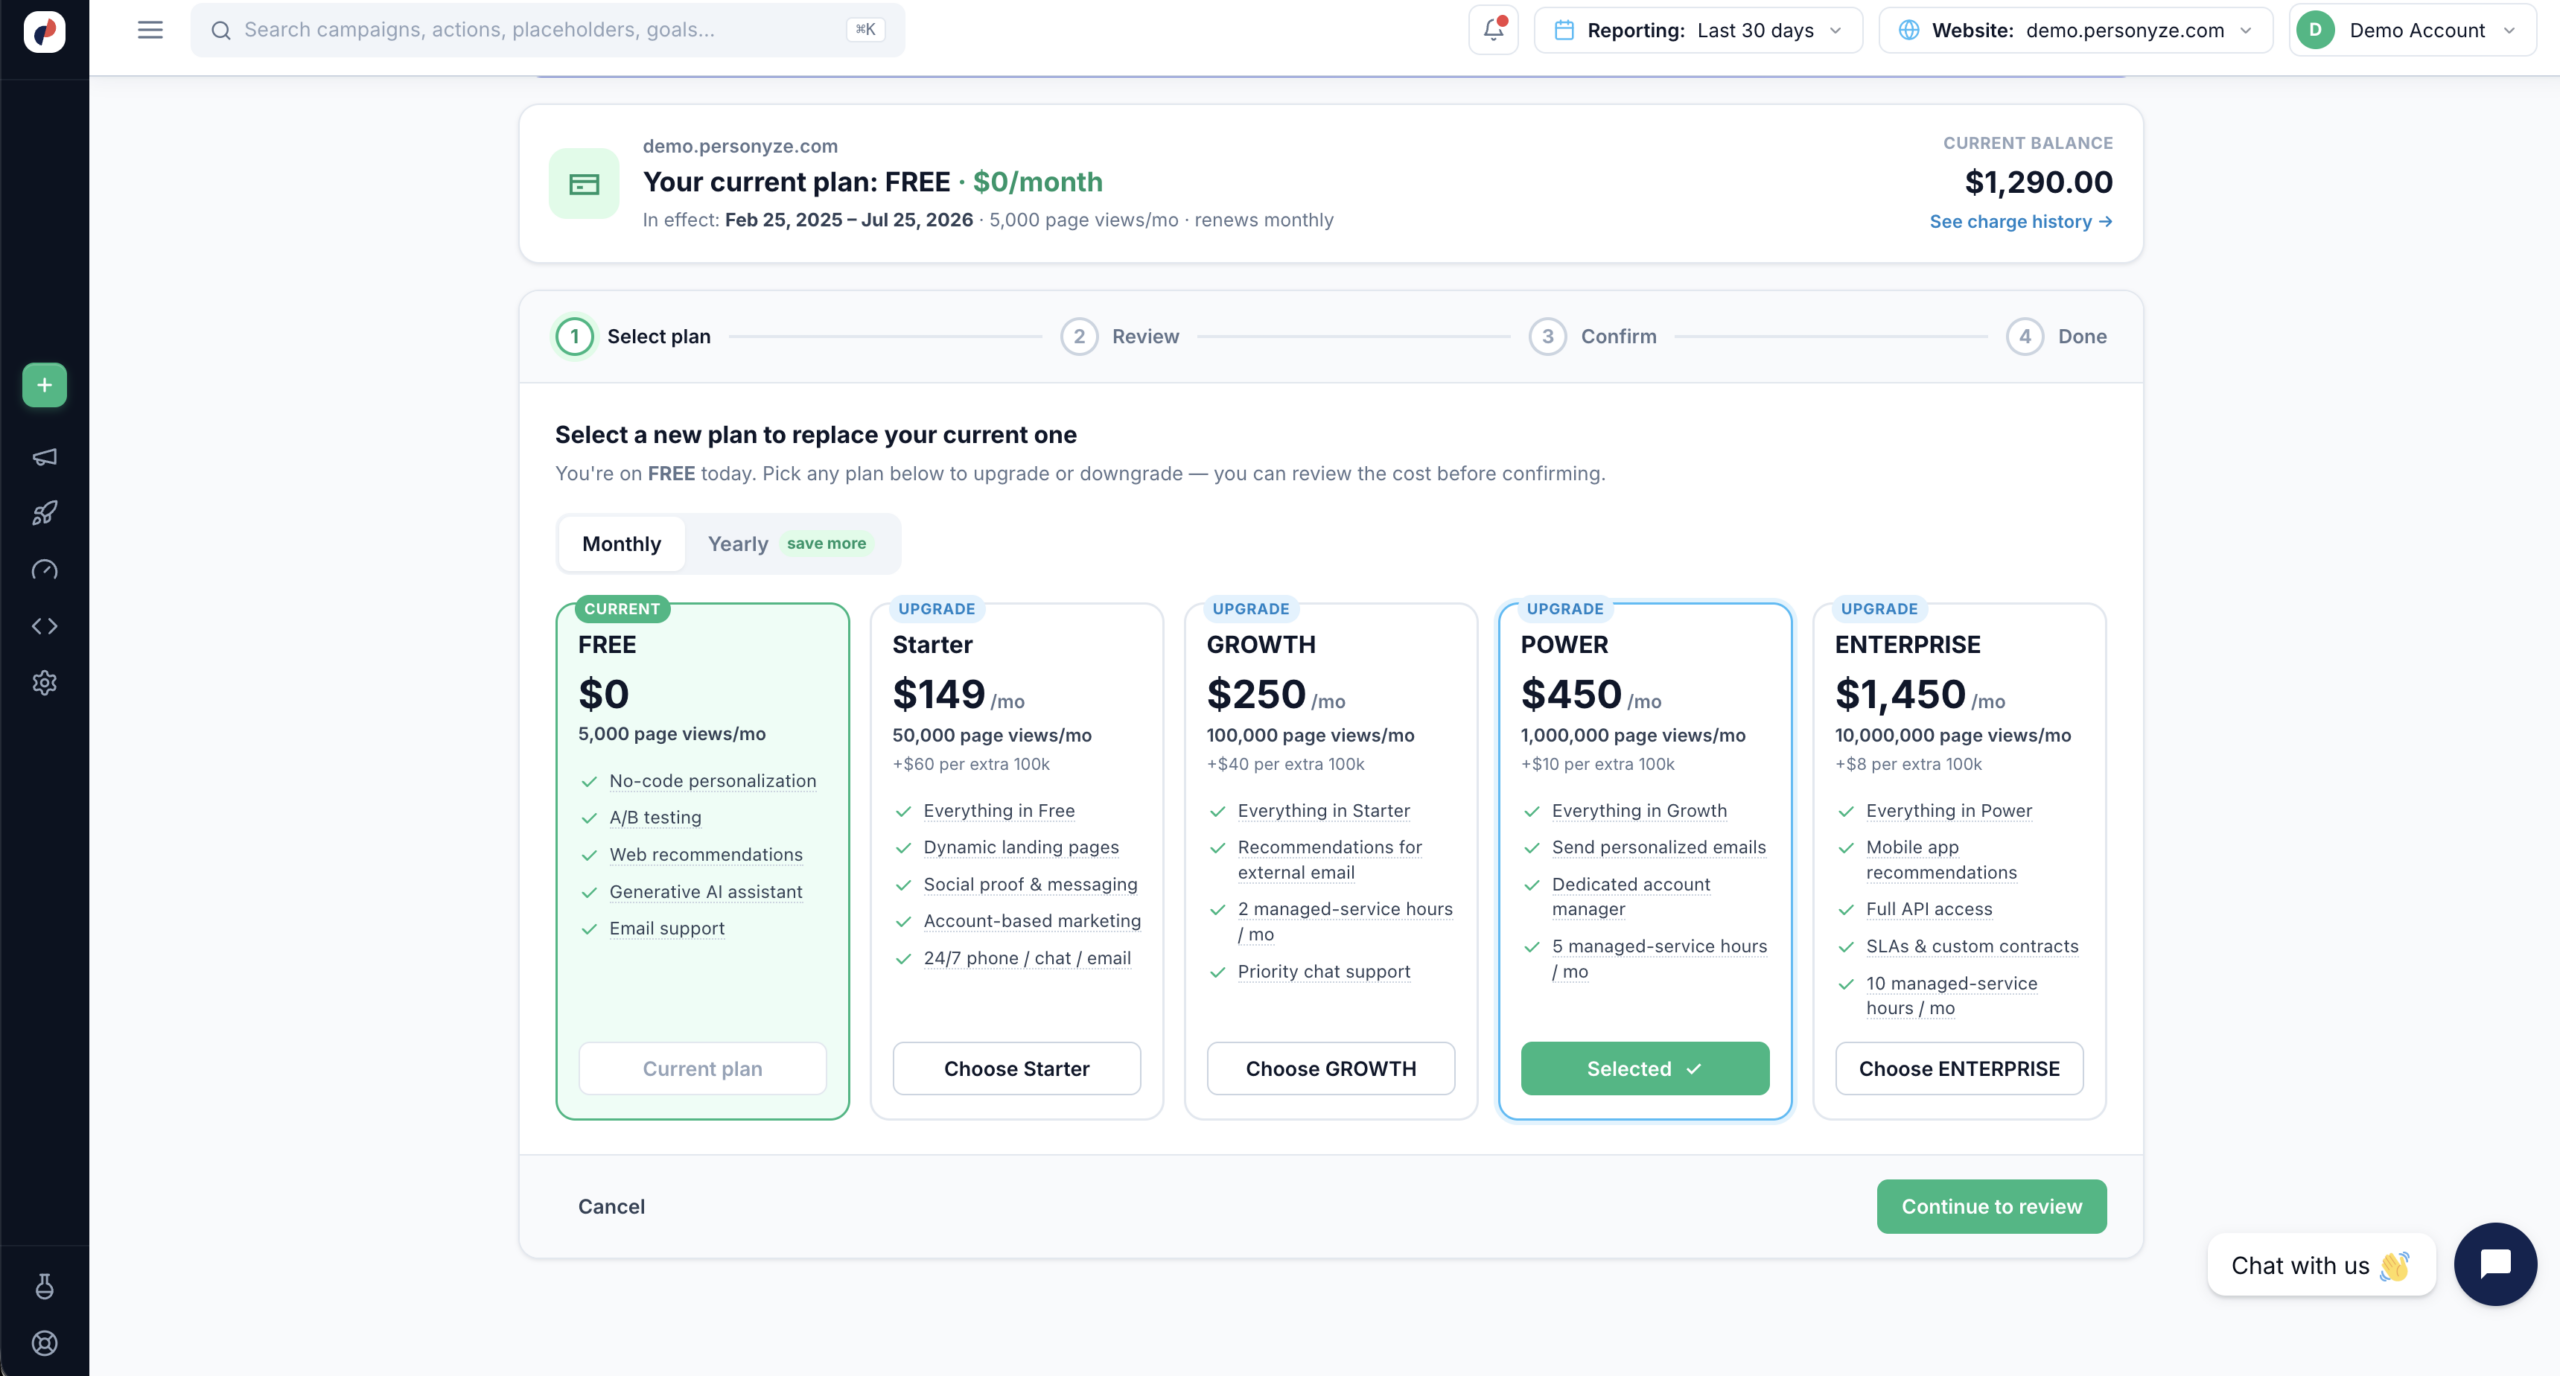
Click Choose [plan] on the tier you want. The card is highlighted, its button reads Selected, and Continue to review becomes available.
Review your change
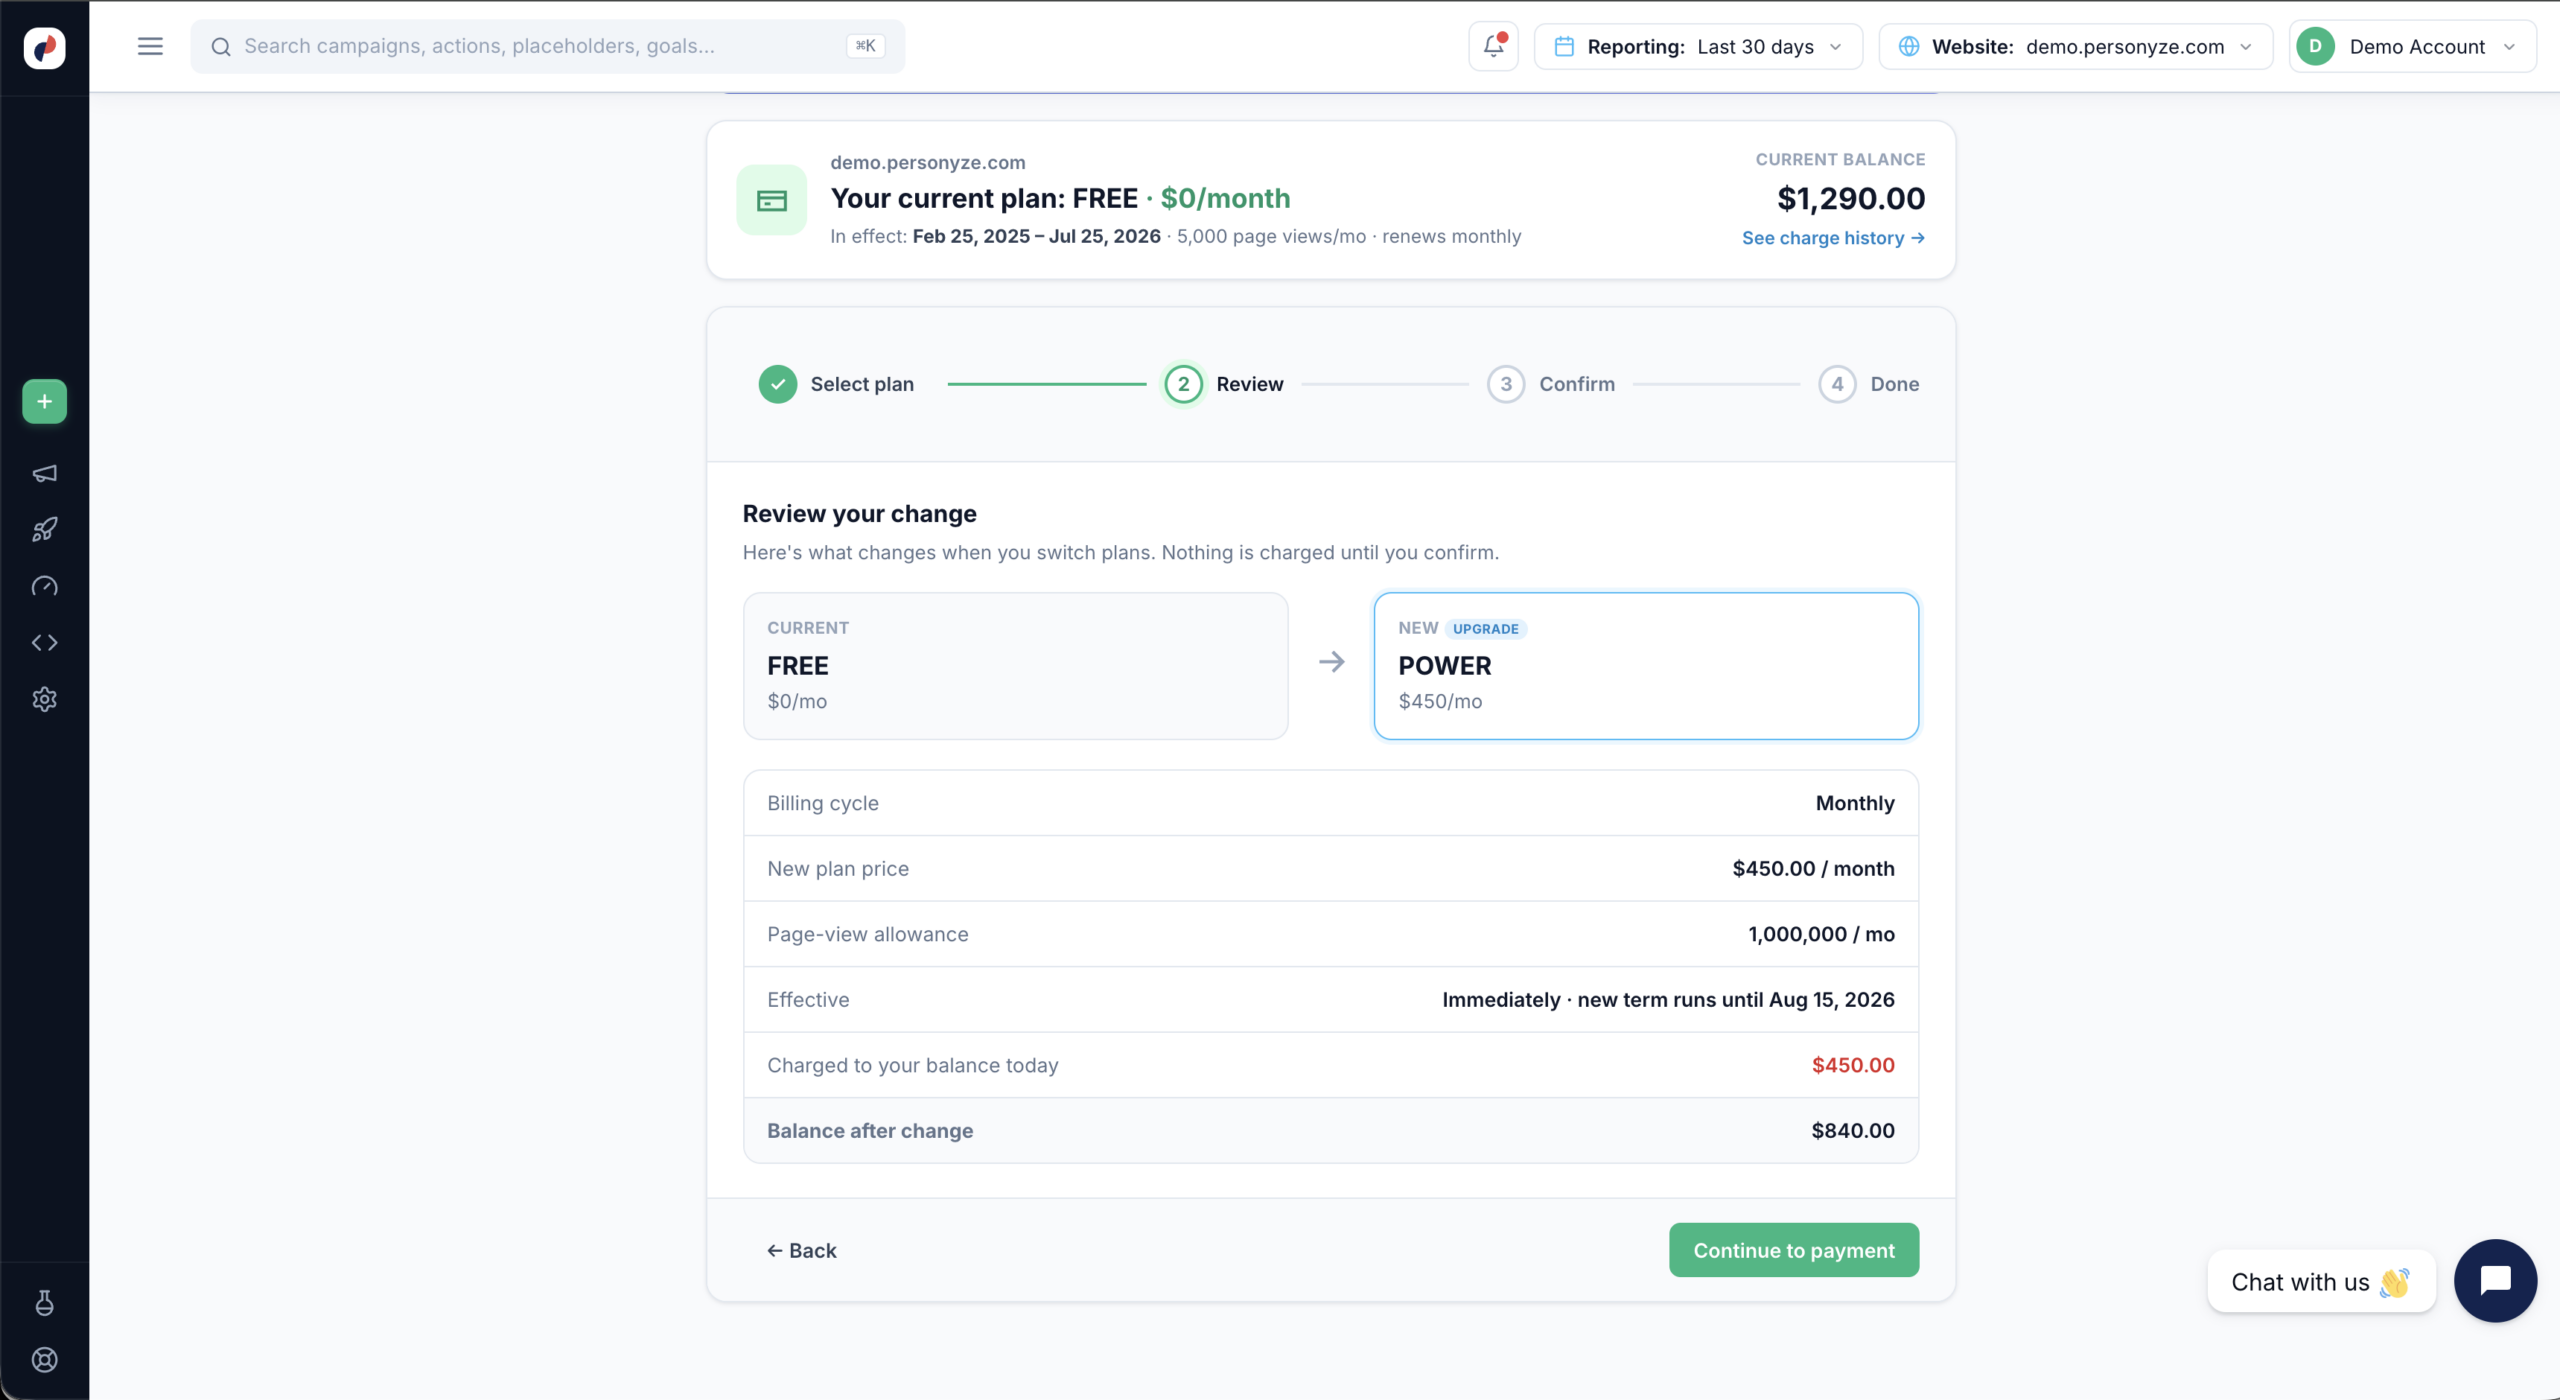
See the current and new plans side by side, with the billing cycle, new price, page-view allowance, effective date, the amount charged to your balance today, and your balance after change.
Confirm & pay
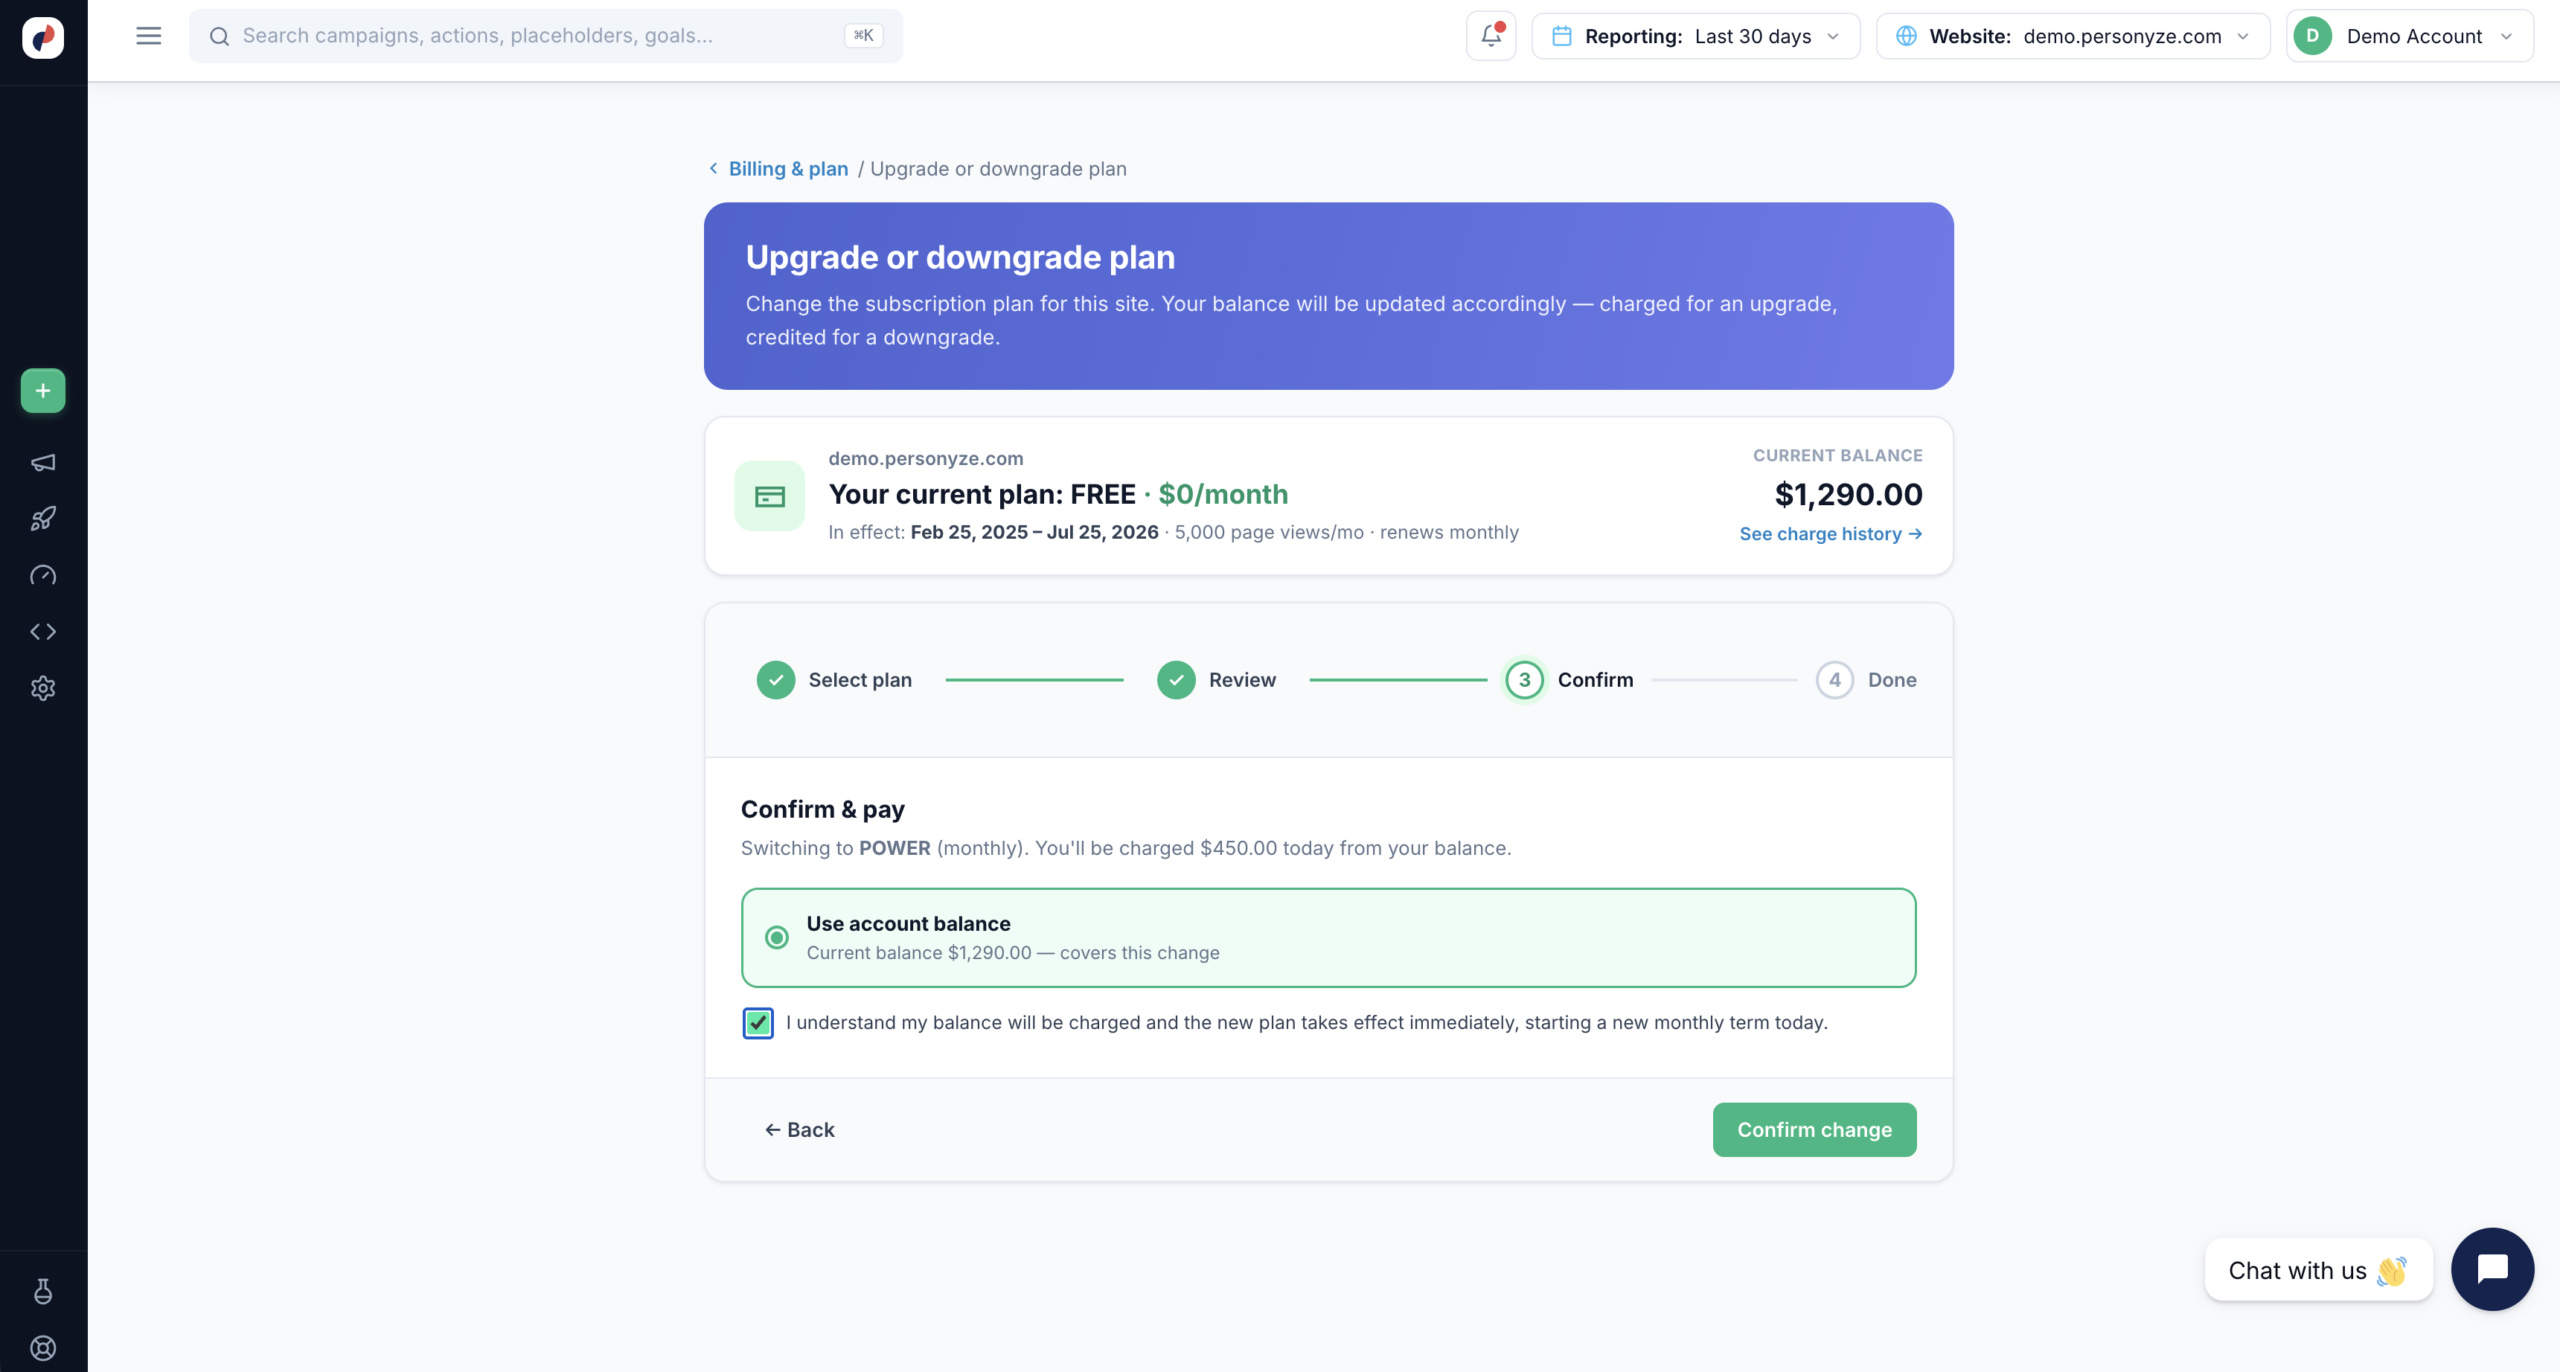
Plan changes settle against your account balance. Tick the acknowledgement checkbox — confirming your balance will be charged and the plan takes effect immediately — to enable Confirm change.
Done
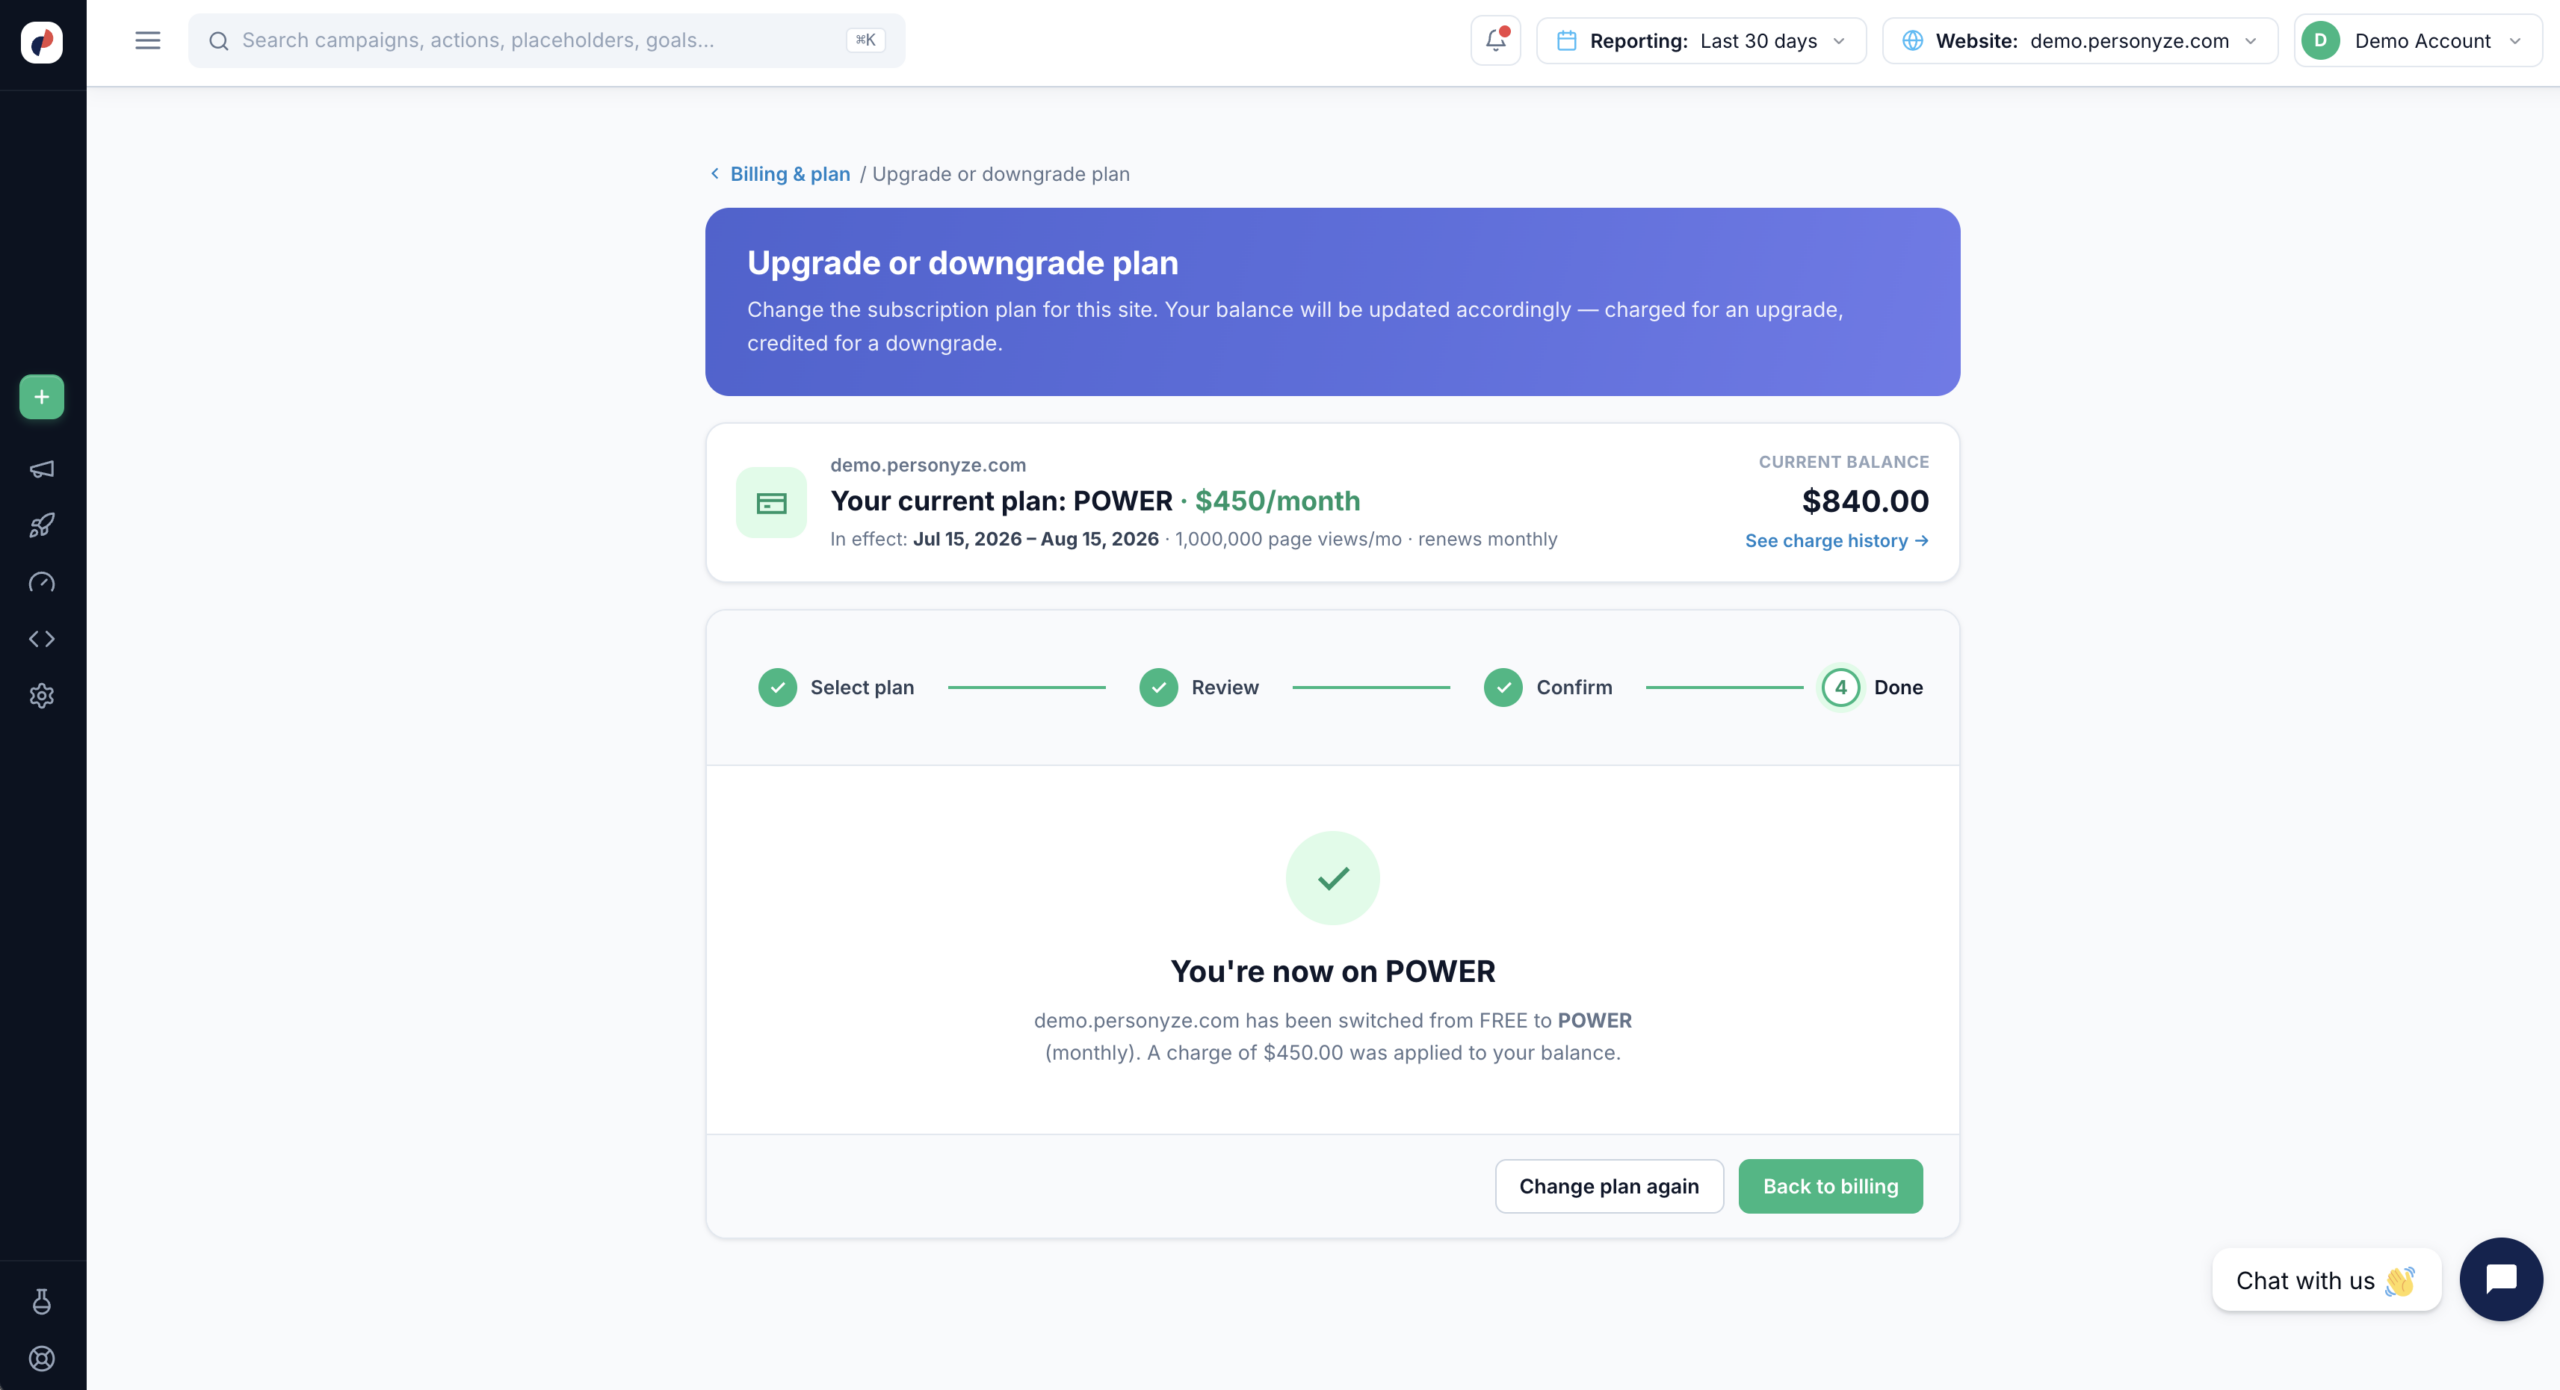
Personyze confirms the switch and the amount charged. The plan card at the top updates immediately with the new plan, allowance, term dates, and balance.
Open the account menu
Click your account name at the top right of Personyze. Under Account, choose Upgrade or downgrade plan to jump straight to the wizard for the site currently selected.
Or pick a site from My site packages
If you manage several sites, choose My site packages instead. Each site is listed with its current plan and what that plan includes — click Manage plan on the one you want to change.
Select a plan
Every tier is shown side by side. Your current plan is marked CURRENT; the others are labeled UPGRADE or DOWNGRADE. Each card lists its price, page-view allowance, overage rate, and added features. Use the Monthly / Yearly toggle to switch billing cycles.
Confirm your choice
Click Choose [plan] on the tier you want. The card is highlighted, its button reads Selected, and Continue to review becomes available.
Review your change
See the current and new plans side by side, with the billing cycle, new price, page-view allowance, effective date, the amount charged to your balance today, and your balance after change.
Confirm & pay
Plan changes settle against your account balance. Tick the acknowledgement checkbox — confirming your balance will be charged and the plan takes effect immediately — to enable Confirm change.
Done
Personyze confirms the switch and the amount charged. The plan card at the top updates immediately with the new plan, allowance, term dates, and balance.
Walkthrough: downgrading
Pick a lower tier
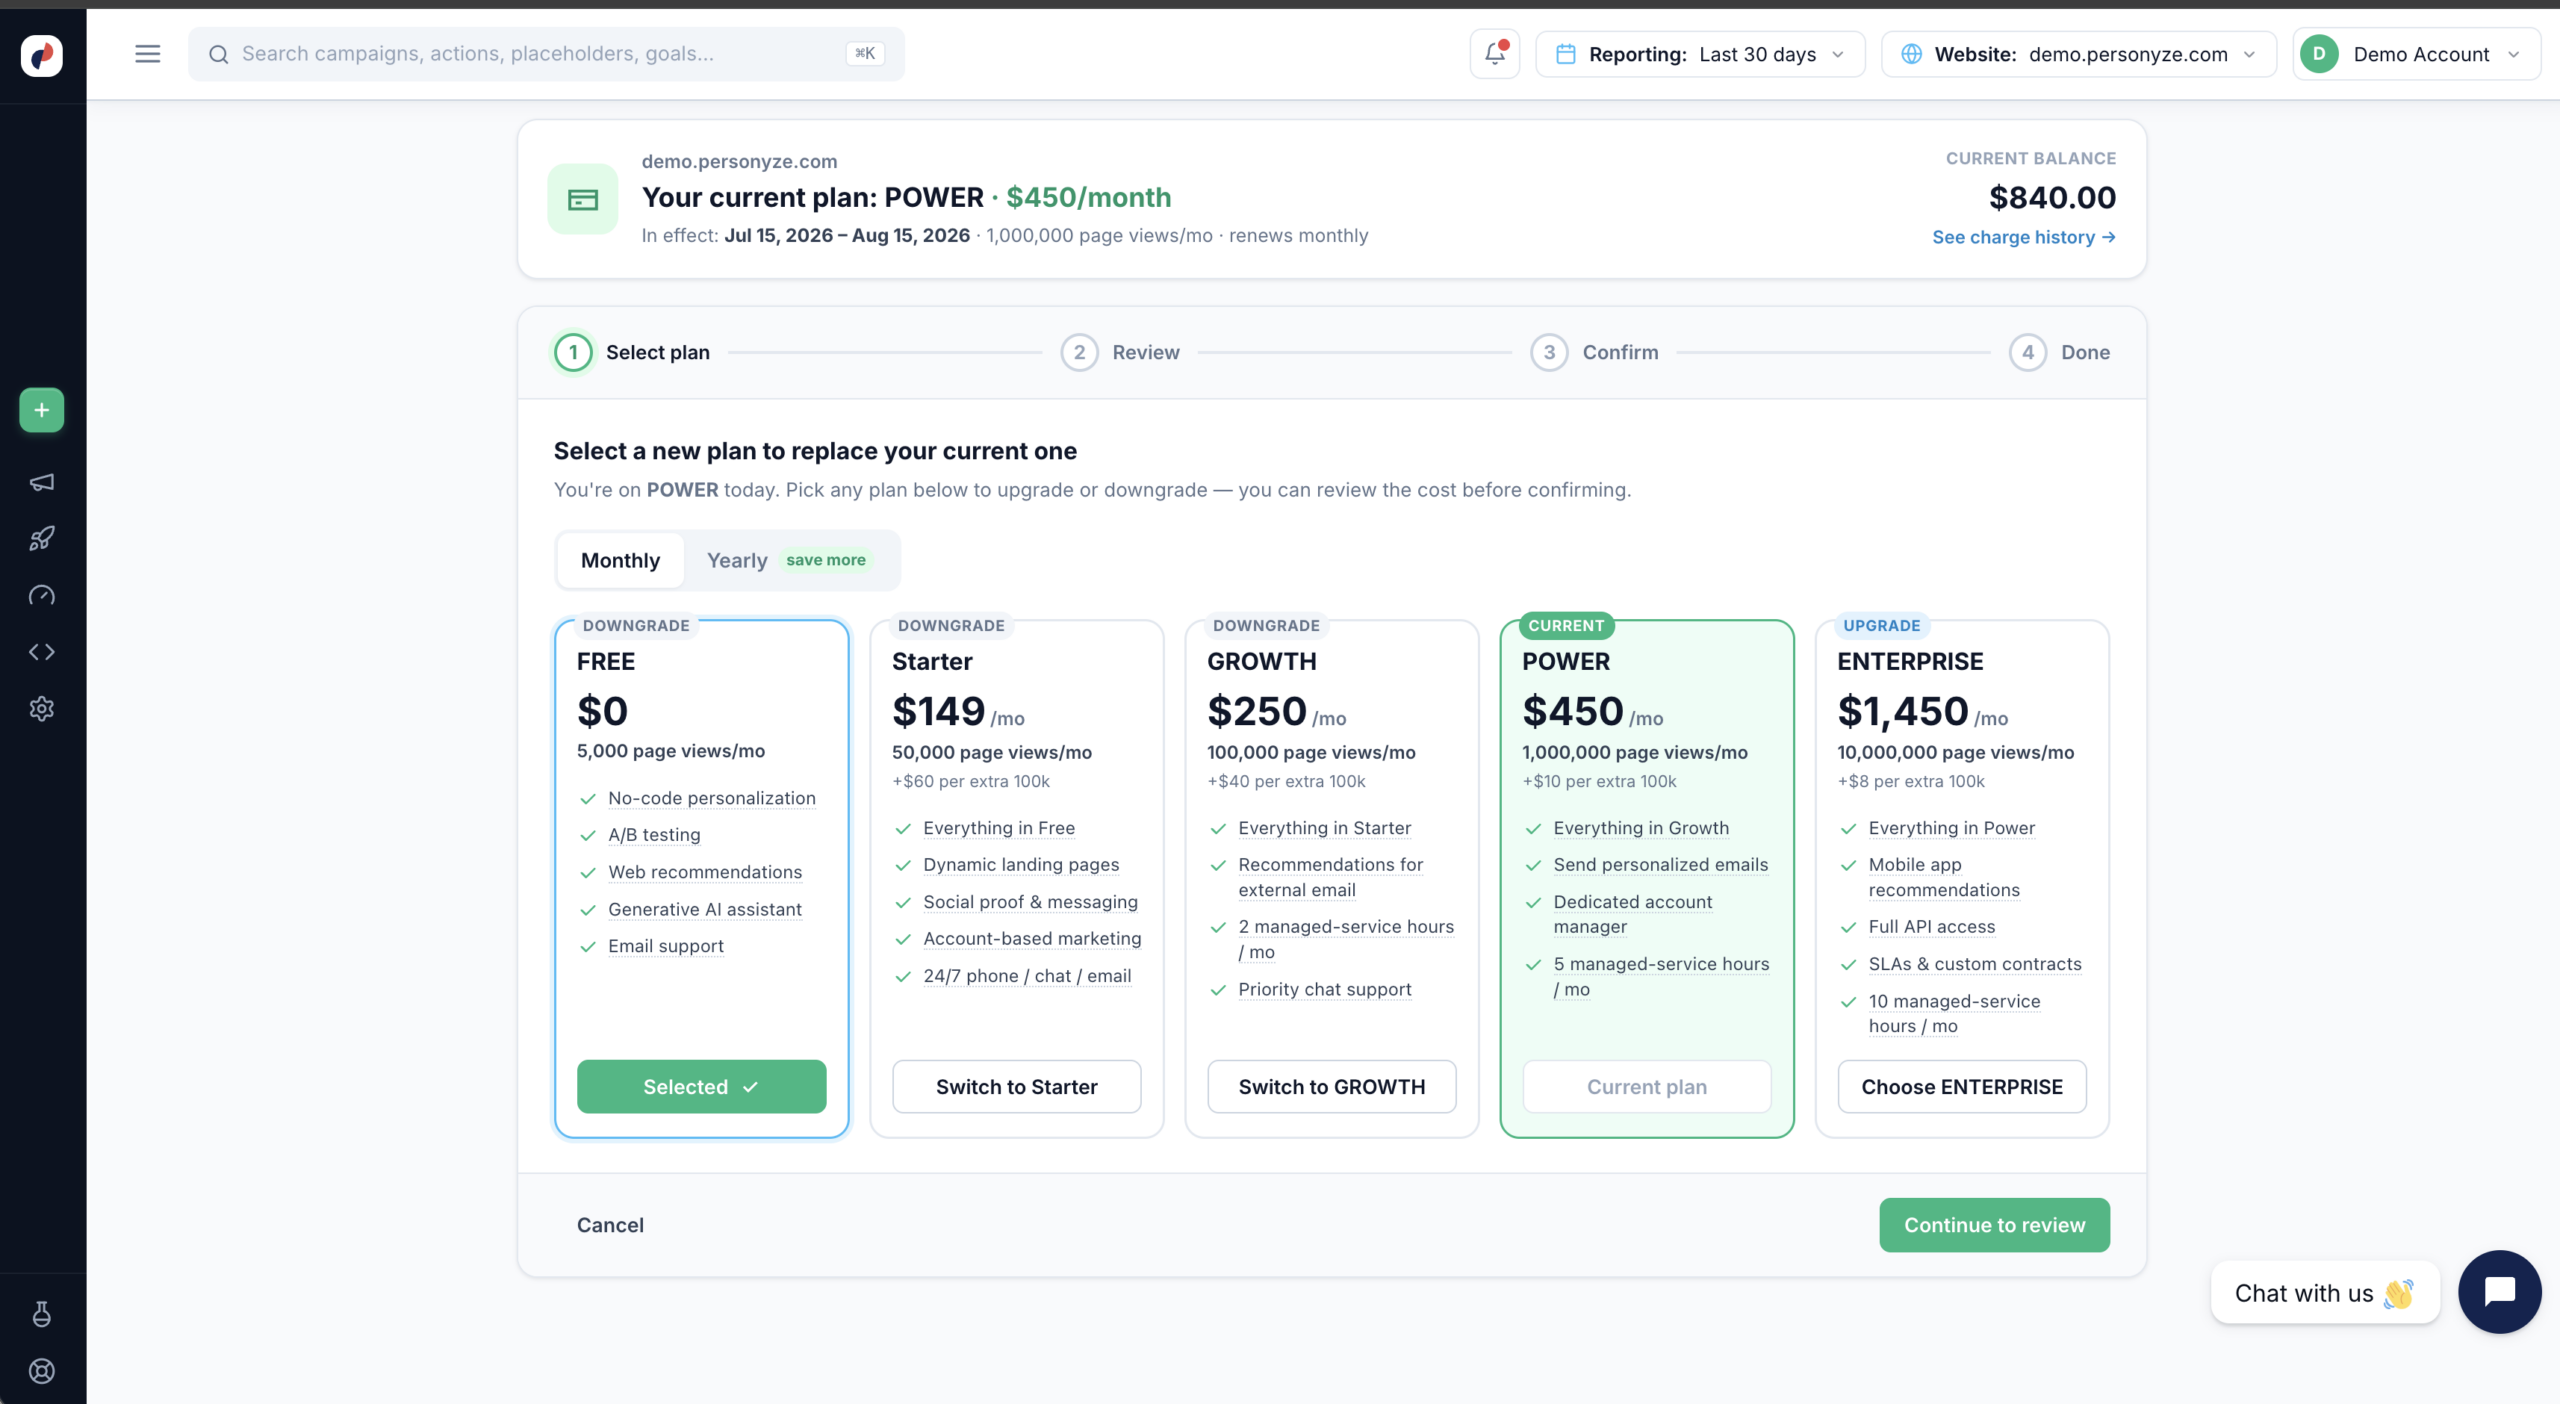
In the plan grid, tiers below your current plan are labeled DOWNGRADE and their buttons read Switch to [plan]. Select one and click Continue to review.
Review the credit
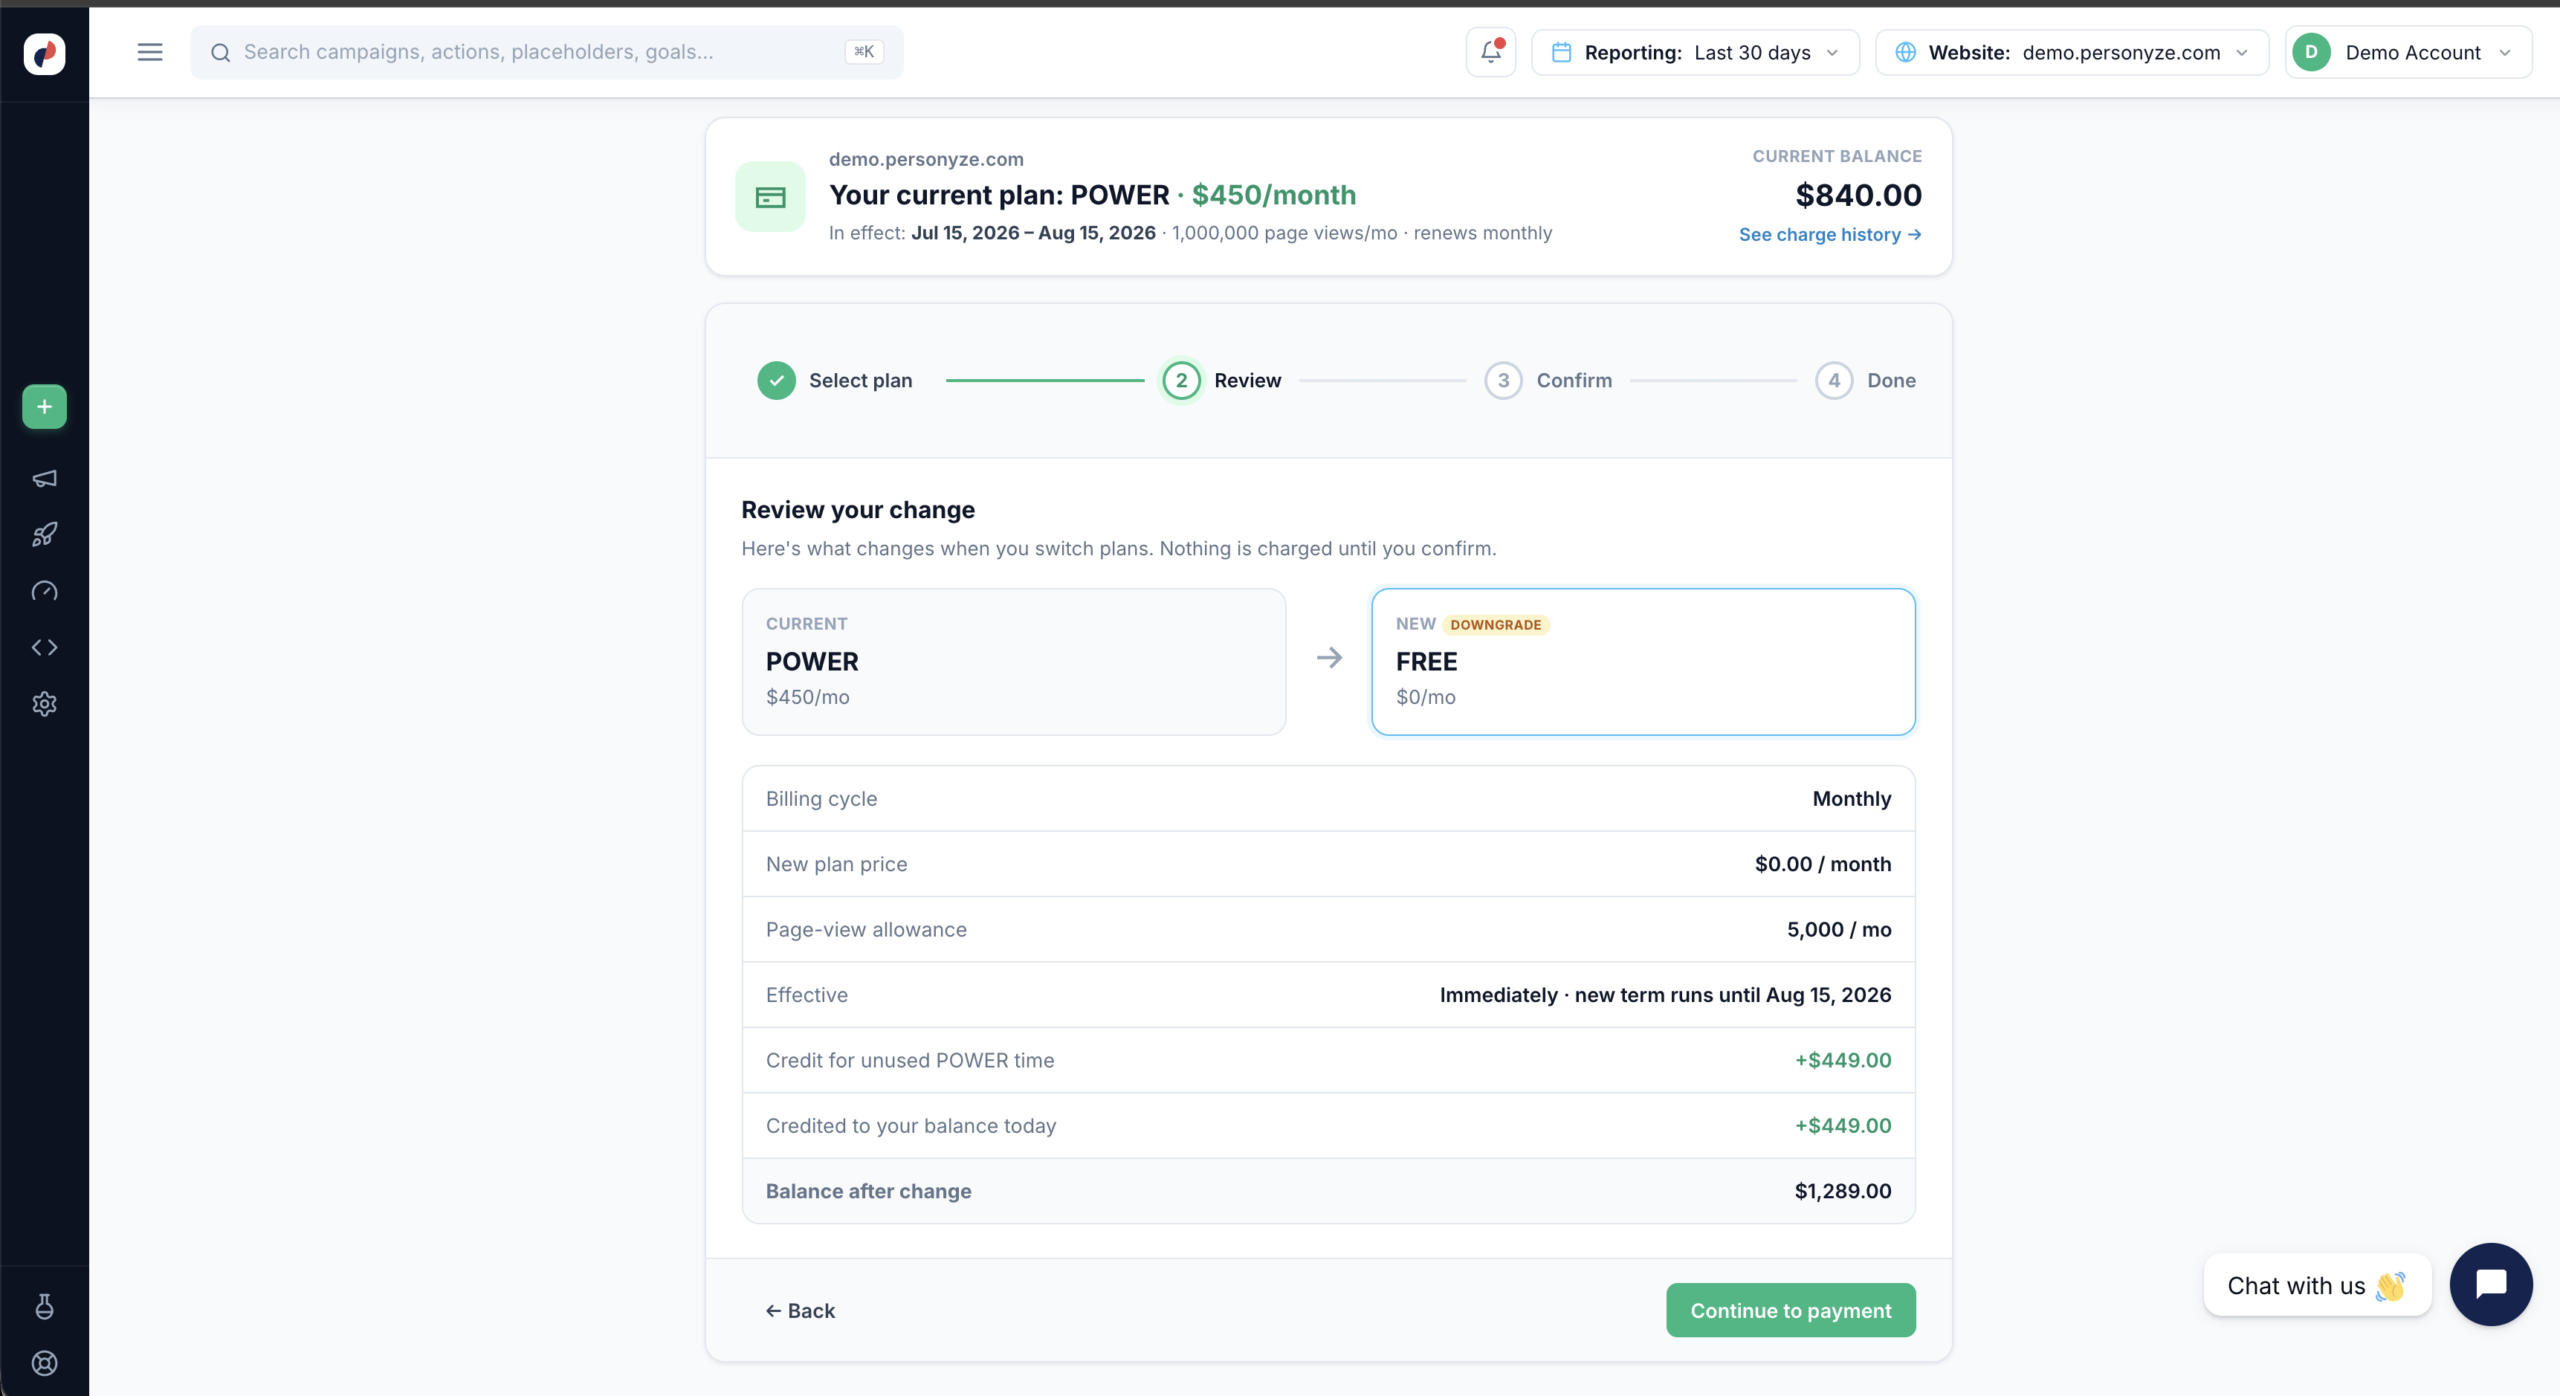
Instead of a charge, you’re credited for the unused time on your old plan. The review shows a Credit for unused [plan] time line, the total credited to your balance today, and your higher balance after change.
Confirm the downgrade
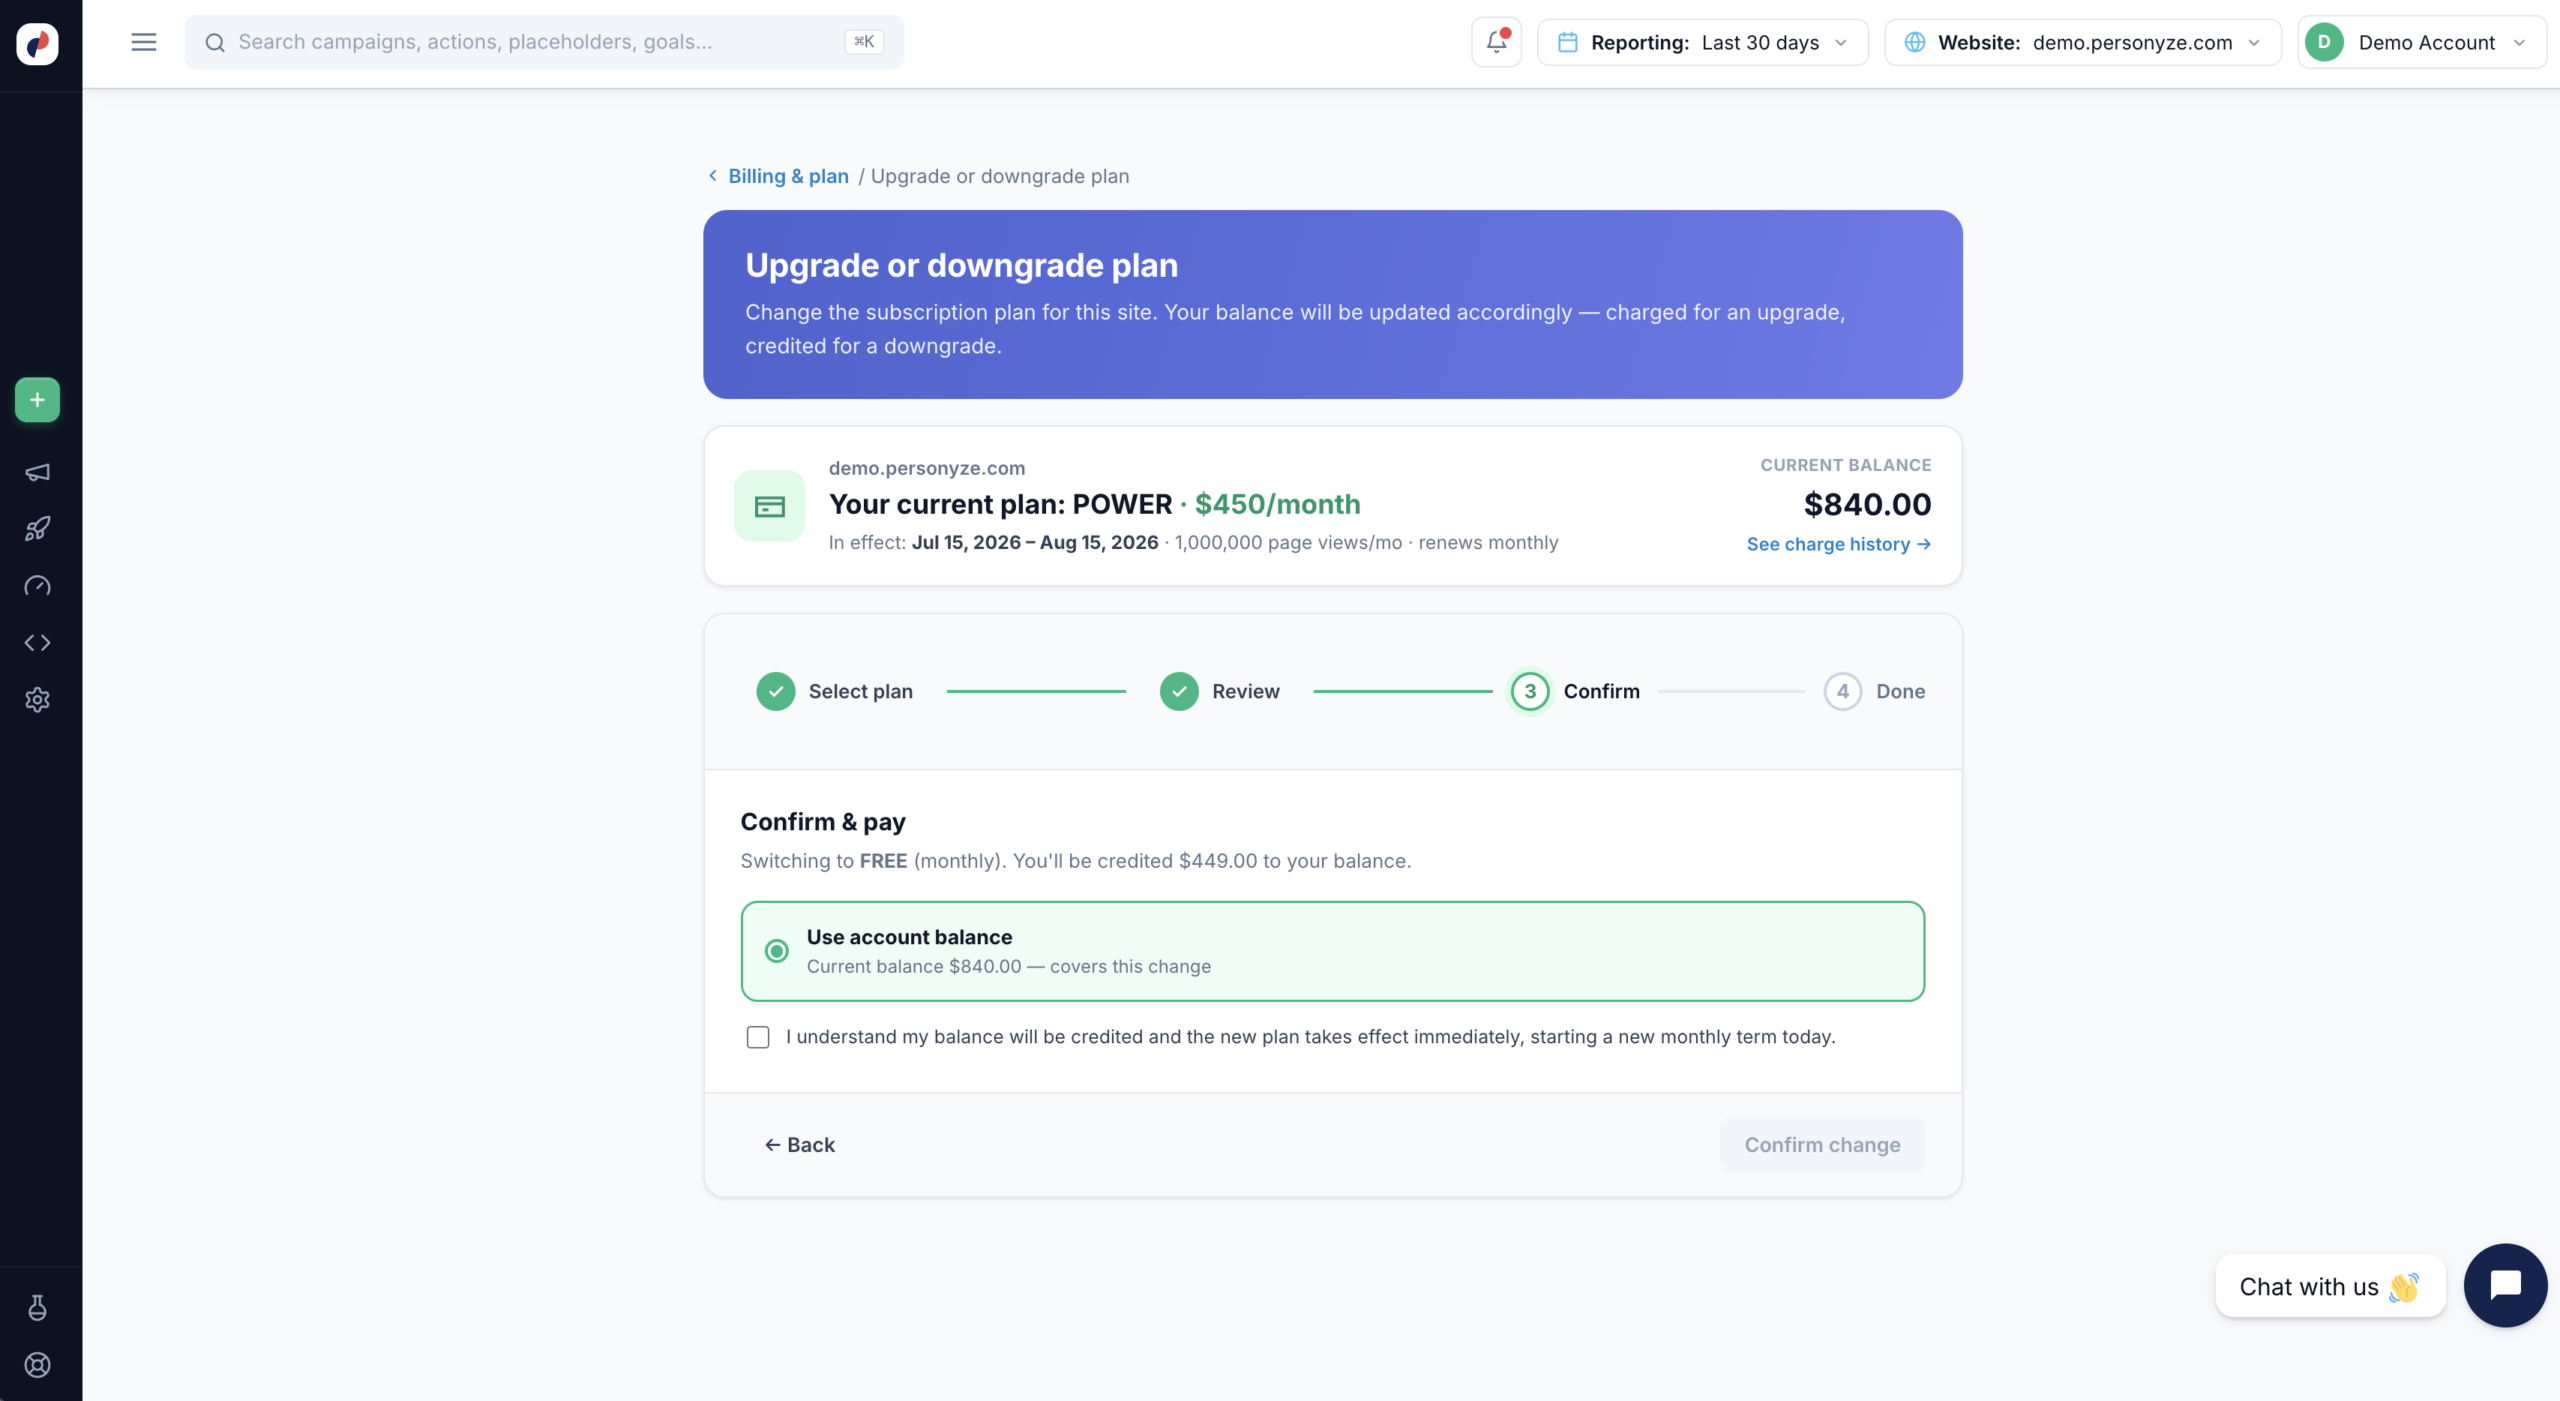
The wording changes to reflect a credit rather than a charge. Confirm change stays greyed out until you tick the acknowledgement checkbox.
Done
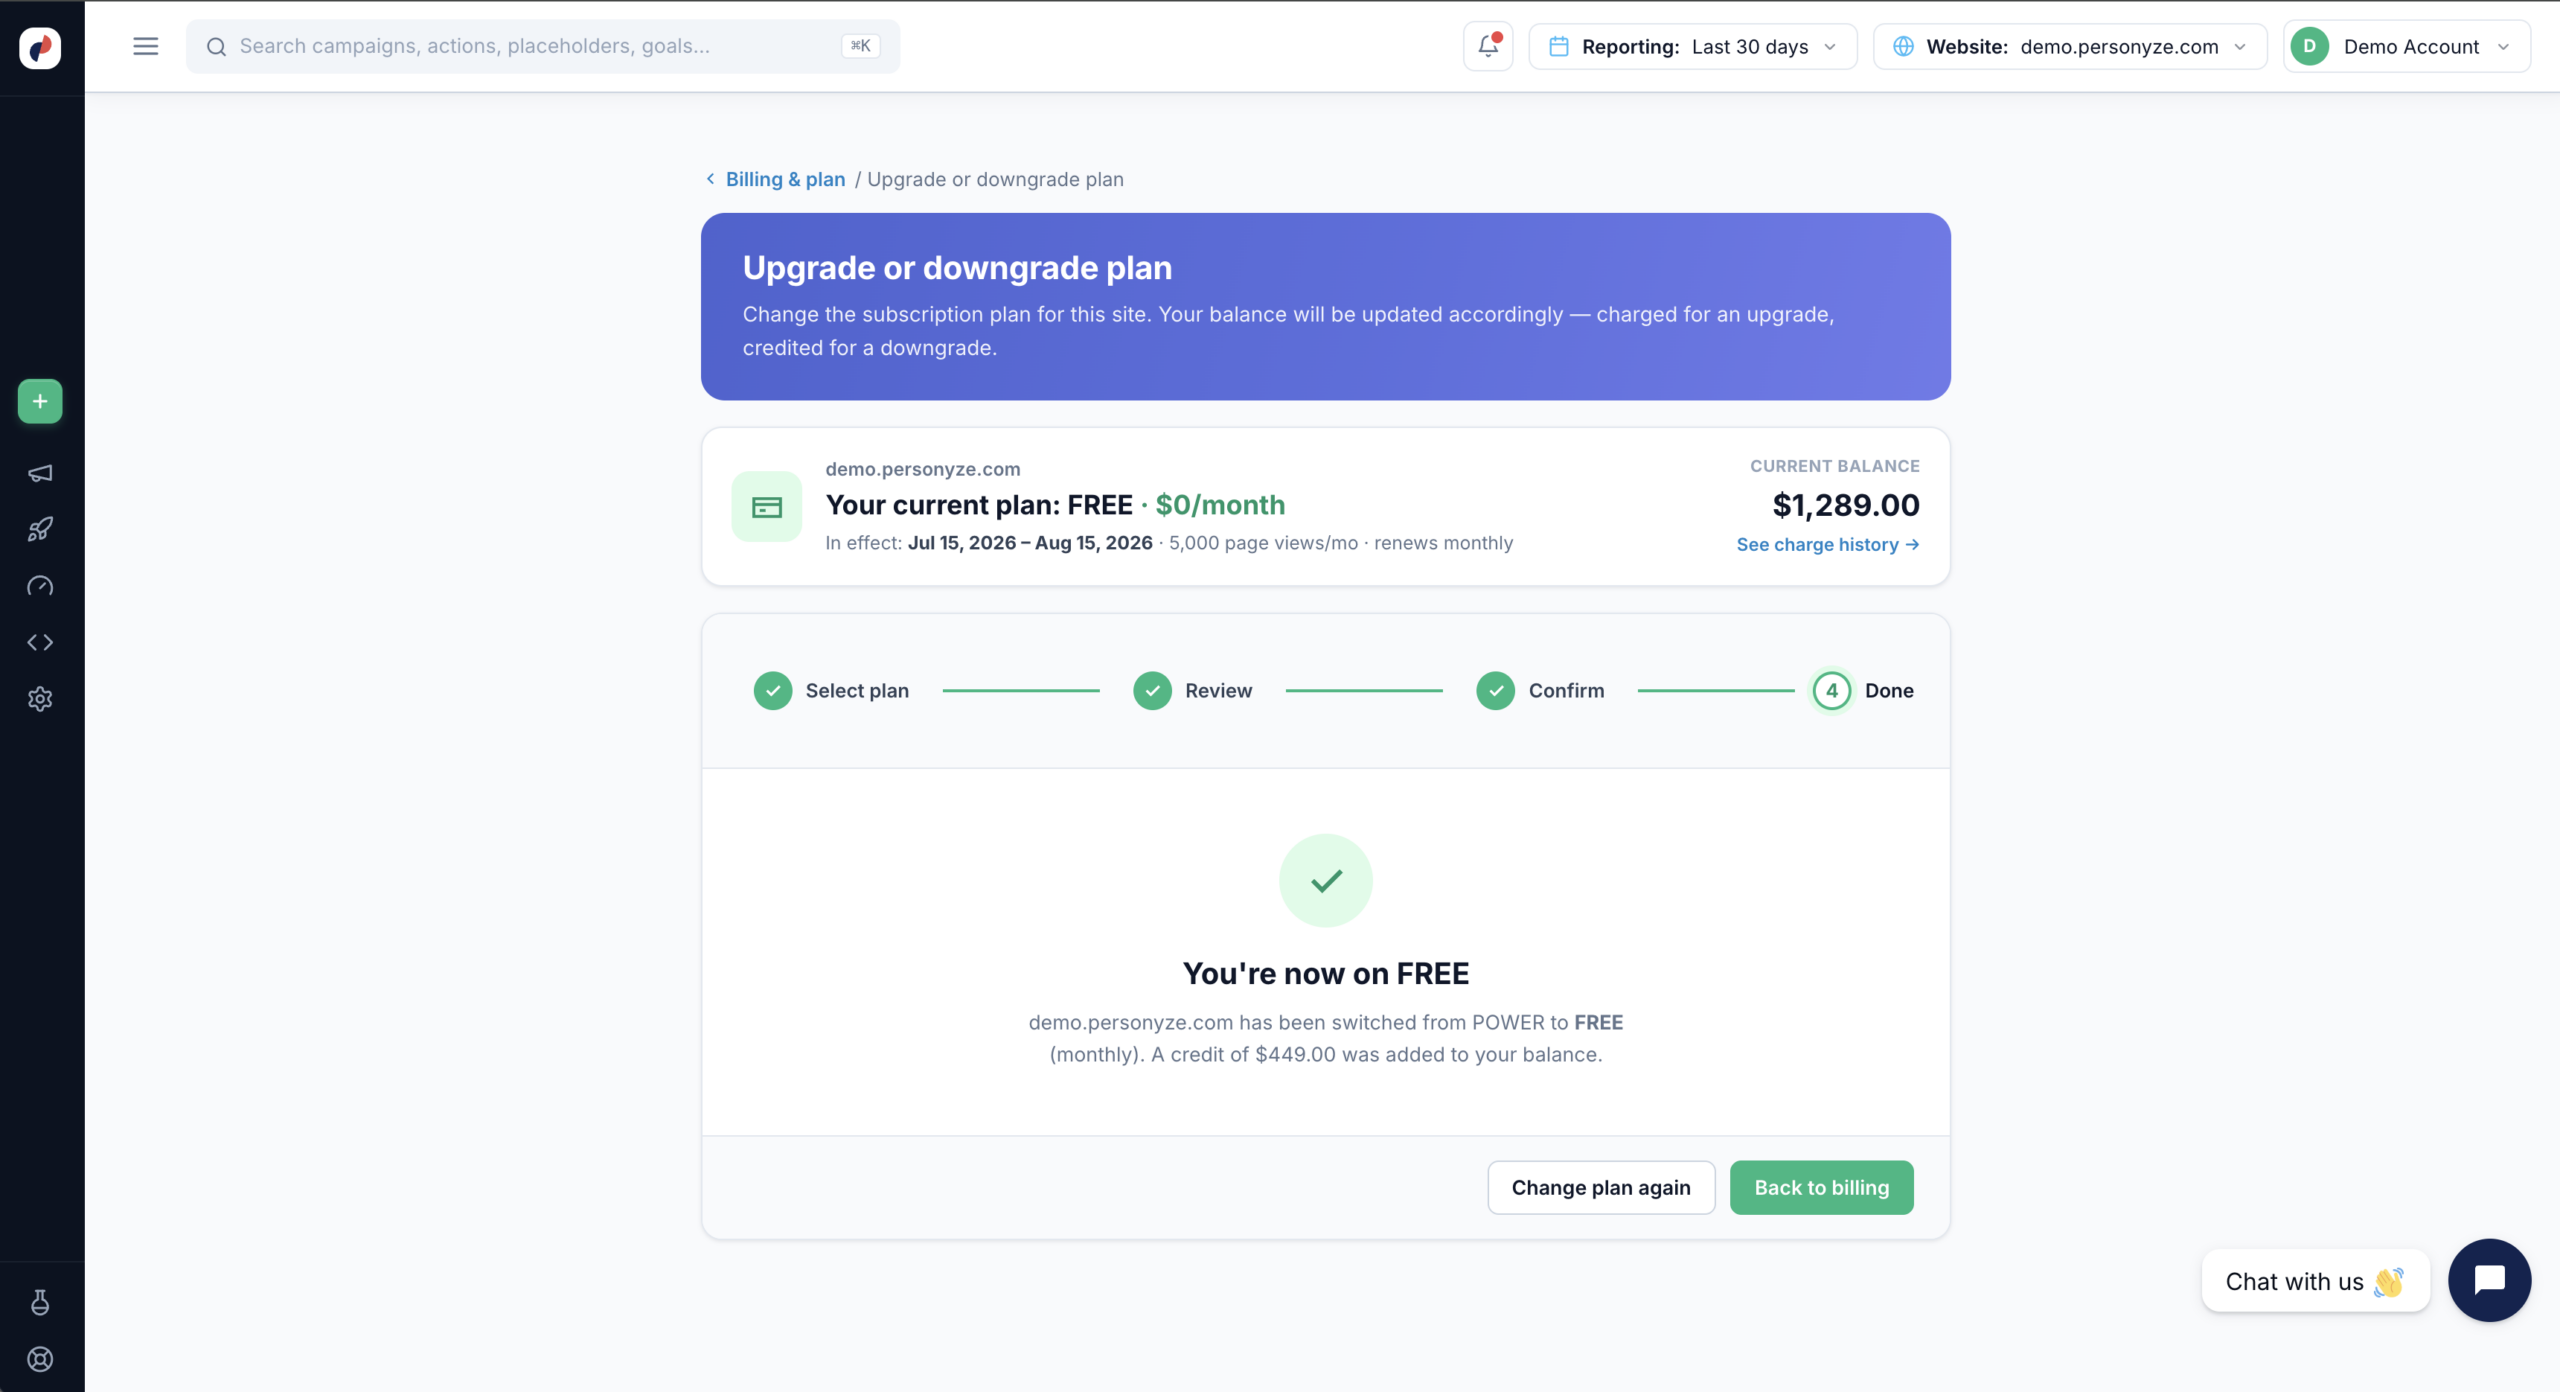
The switch is confirmed with the credit added to your balance, and the plan card reflects the new, lower allowance and new term dates.
Pick a lower tier
In the plan grid, tiers below your current plan are labeled DOWNGRADE and their buttons read Switch to [plan]. Select one and click Continue to review.
Review the credit
Instead of a charge, you’re credited for the unused time on your old plan. The review shows a Credit for unused [plan] time line, the total credited to your balance today, and your higher balance after change.
Confirm the downgrade
The wording changes to reflect a credit rather than a charge. Confirm change stays greyed out until you tick the acknowledgement checkbox.
Done
The switch is confirmed with the credit added to your balance, and the plan card reflects the new, lower allowance and new term dates.
Step 1 — Select a Plan
All plans are shown side by side, with your current one marked CURRENT and every other tier labeled UPGRADE or DOWNGRADE relative to it. Each card lists the monthly price, the included page-view allowance, the overage rate per extra 100k page views, and the features that tier adds on top of the one below it.
Use the Monthly / Yearly toggle above the cards to switch billing cycles — yearly billing costs less per month.
Click Choose [plan] on the tier you want. The card is highlighted and its button changes to Selected, and the Continue to review button becomes available.
Step 2 — Review Your Change
The Review step spells out exactly what changes before any money moves. It shows your current plan and the new one side by side, then breaks down:
- Billing cycle — monthly or yearly.
- New plan price — what you’ll pay per period going forward.
- Page-view allowance — the new monthly quota.
- Effective — when the change applies and when the new term runs to. Plan changes take effect immediately and start a fresh term from today.
- Charged to your balance today — the amount deducted for an upgrade.
- Balance after change — what your account balance will be once it’s done.
Free days from a billing coupon that were waiting on a free plan are added to the new paid term: the summary shows Free days from your coupon, +N days — see Billing.
Step 3 — Confirm & Pay
The Confirm step restates the change in one sentence and shows how it will be paid. Plan changes are settled against your account balance — if the balance covers the amount, Use account balance is preselected and confirms that it covers this change.
You must tick the acknowledgement checkbox — confirming that your balance will be charged and that the new plan takes effect immediately, starting a new term today — before Confirm change becomes clickable.
Step 4 — Done
Personyze confirms the switch, names the old and new plan, and states the amount charged. The current-plan card at the top updates right away — new plan, new price, new page-view allowance, new term dates, and the adjusted balance.
From here you can Change plan again or head Back to billing.
Downgrading to a Lower Plan
Downgrading follows the same four steps, with one important difference: instead of being charged, you’re credited for the unused time on your old plan, and that credit is added to your account balance.
In Step 1, tiers below your current plan are labeled DOWNGRADE, and their buttons read Switch to [plan].
Step 2 shows the credit rather than a charge. Alongside the new price and allowance you’ll see a Credit for unused [plan] time line, the total credited to your balance today, and your higher balance after change.
Step 3 works the same way — the acknowledgement checkbox gates the Confirm change button, which stays disabled until you tick it.
What to Know Before You Switch
- Changes are immediate. A plan change applies right away and starts a new billing term from that day — it doesn’t wait for your current term to end.
- Everything settles against your balance. Upgrades deduct from it, downgrades credit back the unused time on the old plan. Check the balance shown on the Confirm step before approving.
- Nothing is charged until Step 3. You can Cancel or go Back at any point in Steps 1 and 2 without any effect.
- Plans are per site. The wizard changes the plan for the website shown in the card at the top — check the Website selector before you start if you manage several.
- Watch your page-view allowance. Each tier includes a monthly quota, with a per-100k overage rate beyond it. If you regularly exceed your allowance, the next tier up is often cheaper than the overage.
- Emails through your own mail server count as page views. Marketing emails sent through your own SMTP, SendGrid or Mailgun count as one page view each, toward the same allowance and the same extra page-view billing as your site’s traffic. Emails through the Personyze mail server count on the Email sending add-on’s email allowance instead, never on both.
- Downgrades reduce features. Compare the feature lists on the plan cards before switching down — capabilities included in your current tier may not be available on the lower one.
The Add-ons page names the plans that include each add-on free — Included free on …, or Included free on every plan — and marks the ones your plan includes Included in your plan at no extra charge. Audience Discovery is included in every plan.
Prices, allowances, and features shown in the wizard are always current for your account. For the full plan comparison, see the Personyze pricing page.