
Feeding Data into Personyze
Where data lives now. Each kind of data has its own screen in the panel, and every one of them opens the same Import Data from a File or Feed wizard (on a catalog screen, Import products / Import articles or Add a feed opens it). Go to the screen for what you’re loading:
| What you’re uploading | Where to upload it |
|---|---|
| Product catalog (for product recommendations) — incl. product interests / affinity tags as columns | Settings → Recommendation setup → Product Catalog |
| Content / article catalog (for content recommendations) | Settings → Recommendation setup → Article Catalog |
| Past / offline transactions (purchase history) | Settings → Recommendation setup → Product Tracking |
| Past content interactions (reads / views history) | Settings → Recommendation setup → Article Tracking |
| User lists / CRM records, profile fields, session attributes | Settings → Imported user data (the lists and their imports) · Settings → Visitor Attributes (the profile fields they fill) |
The Recommendation setup screens appear once your account has products or articles enabled. The wizard, the delivery methods, and the format rules are identical on every screen — this page is the shared reference; only the columns differ.
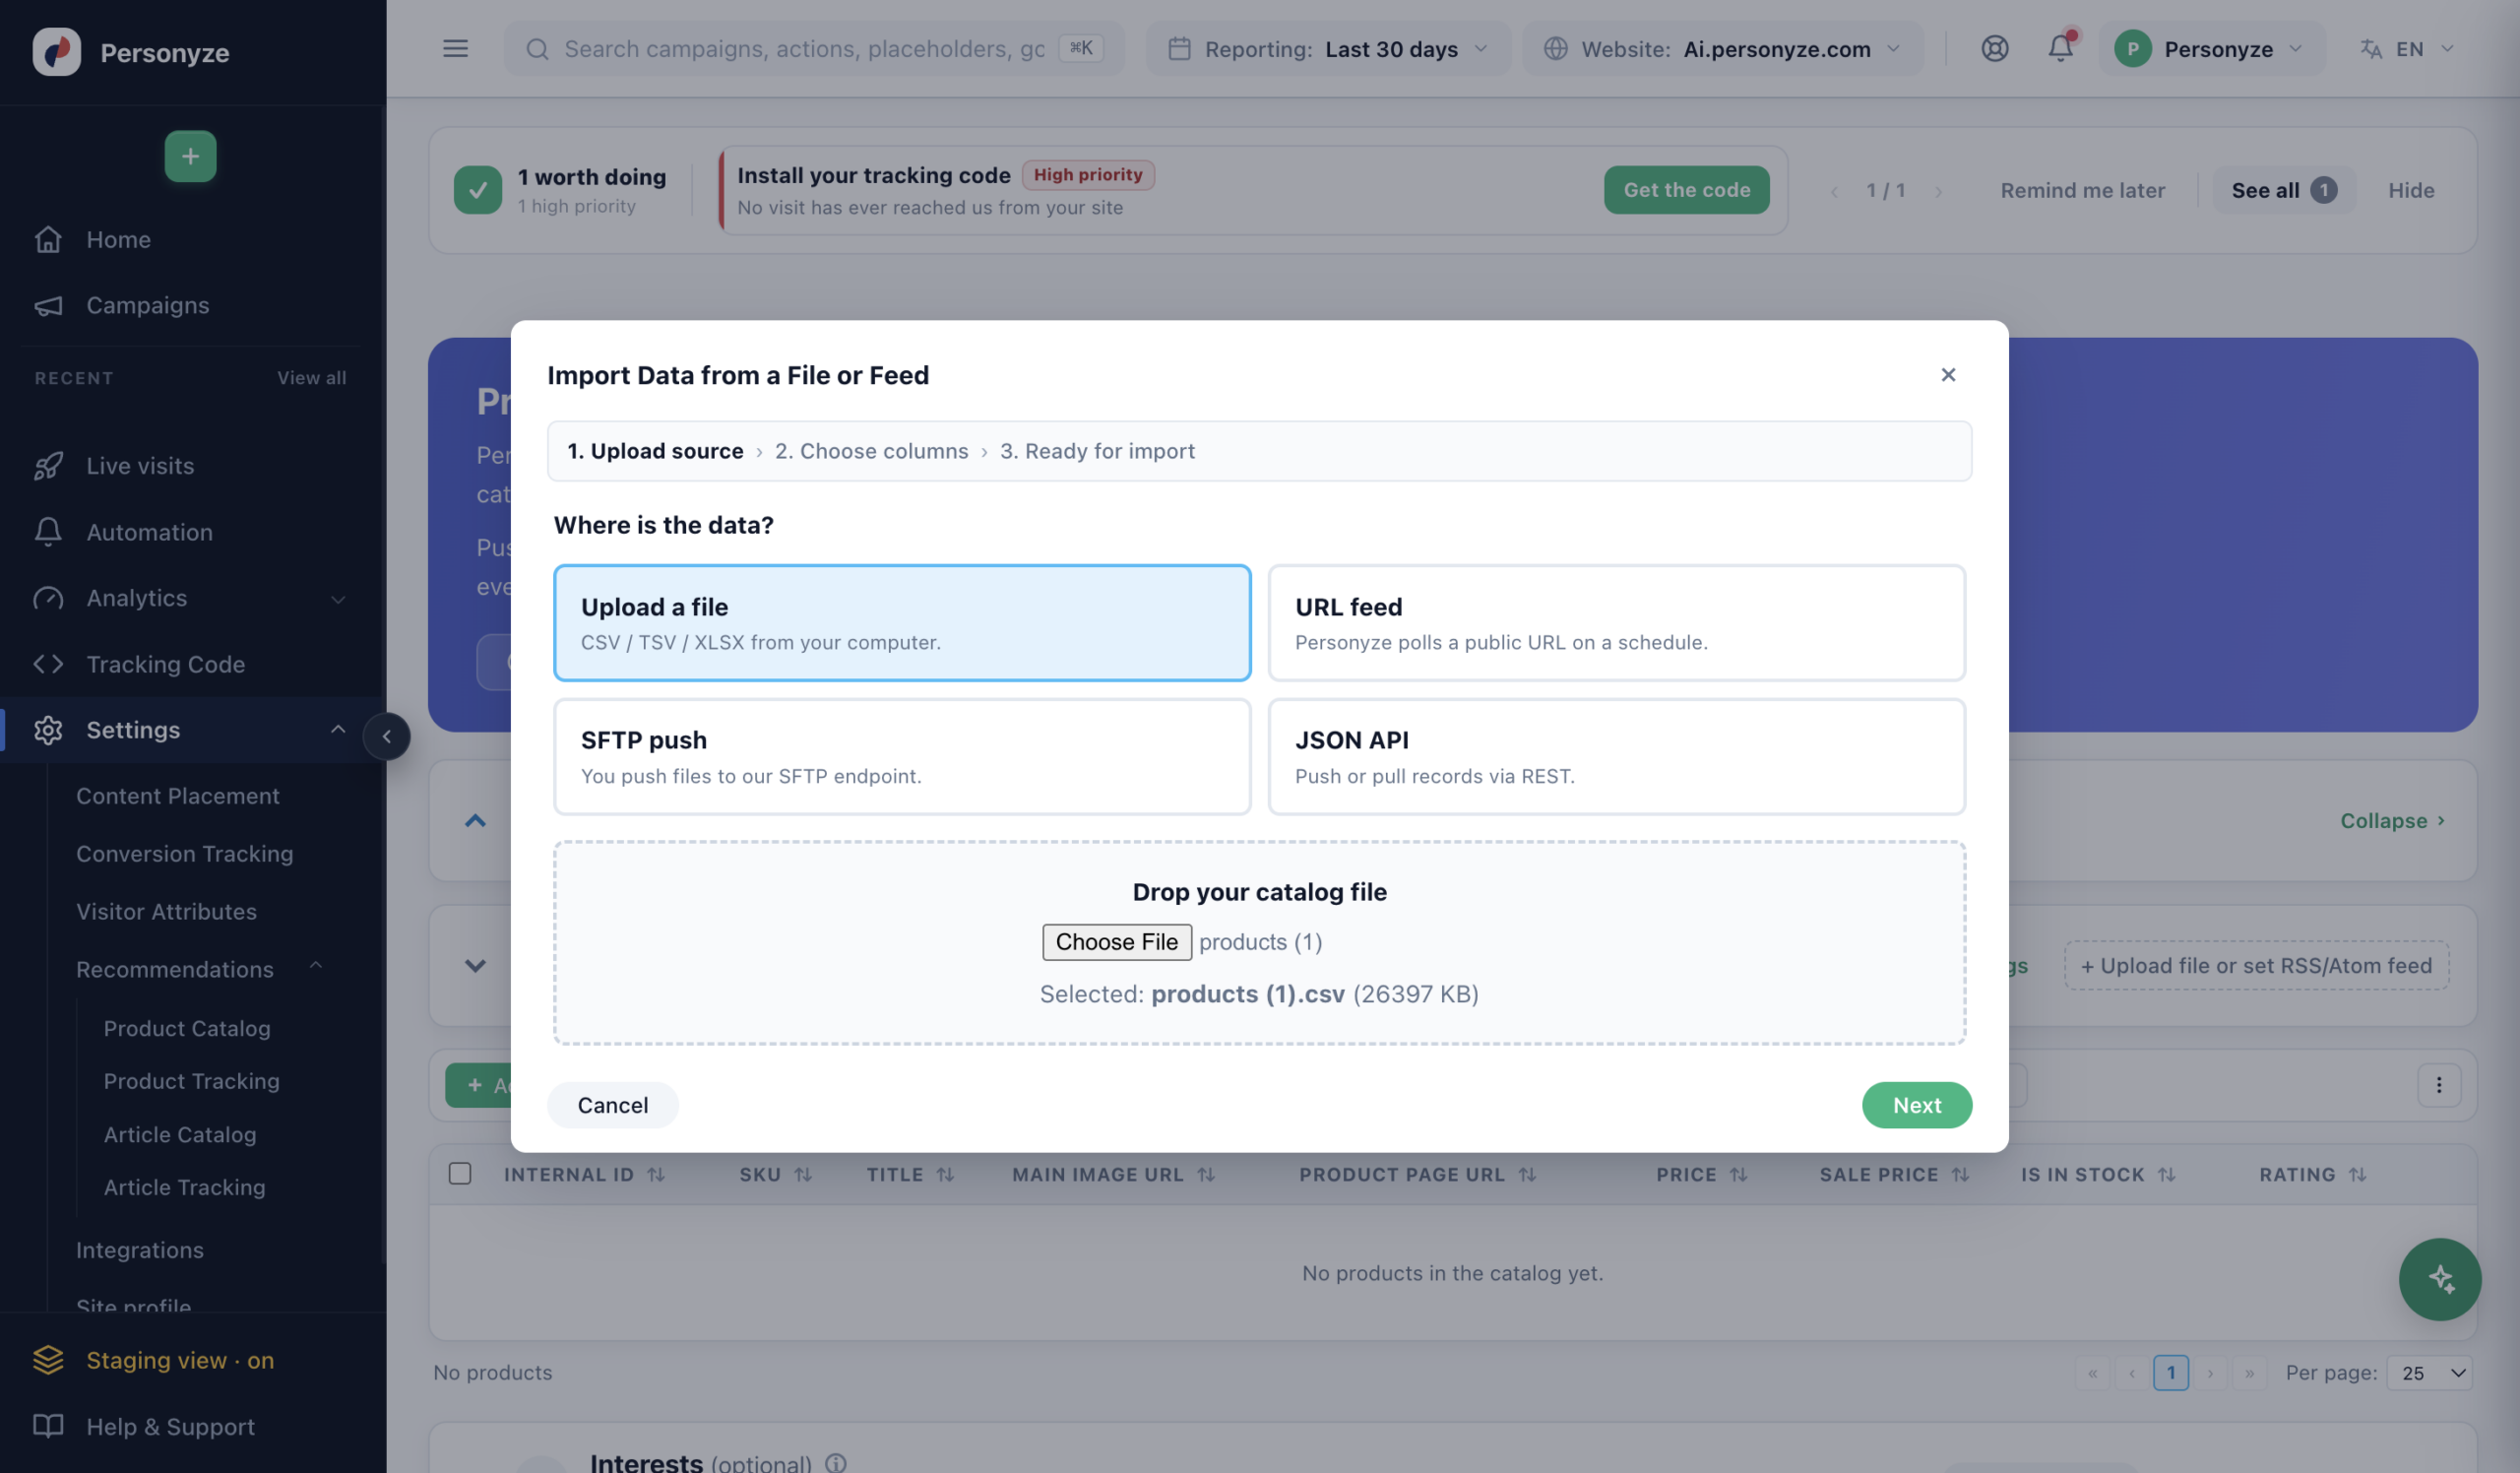
Almost everything Personyze personalizes on can be fed to it as a data file — a product catalog for recommendations, a content catalog for article recommendations, product interests for cross-sell and affinity targeting, user lists from your CRM, and more. They all travel the same Import Data from a File or Feed wizard; only the columns differ.
This page covers how to get the file in — the delivery methods, the format rules that trip people up, and the mapping step — using real, field-tested examples.
Download a Template Feed
Start from a ready-made file rather than a blank page. Each template has the correct headers, the right quoting, and a few example rows in the exact format the importer expects — replace the sample rows with your own data and upload. All use placeholder example.com URLs and generic demo products.
| Feed | Columns | Download |
|---|---|---|
| Product catalog For product recommendations — the core columns. |
Internal ID, SKU, Title, Product Page URL, Main Image URL, Price, Sale Price, Is in Stock, Rating, Category, Brand |
📥 Download CSV |
| Product feed (Google / TSV) Google-Shopping-style feed — drop-in for a URL feed. |
id, title, link, image_link, price, sale_price, availability, brand, product_type, gtin |
📥 Download TSV |
| Content catalog For article / video recommendations. |
Internal ID, Title, Content Page URL, Main Image URL, Content Type, Category, Author, Published Date |
📥 Download CSV |
| Product interests Affinity tags per product for cross-sell & targeting. |
Id, Interest (quoted, comma-separated), Category |
📥 Download CSV |
| Past transactions Purchase history — ties users to products they bought. |
Order Date, Email, Customer Id, Product Id, SKU, Quantity, Amount |
📥 Download CSV |
| User list / CRM Profile fields keyed on email or a user ID. |
User Id, Email, First Name, Last Name, Account Type, Industry, Lifetime Value, Signup Date |
📥 Download CSV |
The .tsv template downloads as .txt (tabs preserved) — rename to .tsv if your tools expect it, or upload as-is.
Prefer to click through it? Here’s the whole flow — choose a source, format the file, map the columns, import. Detailed reference below.
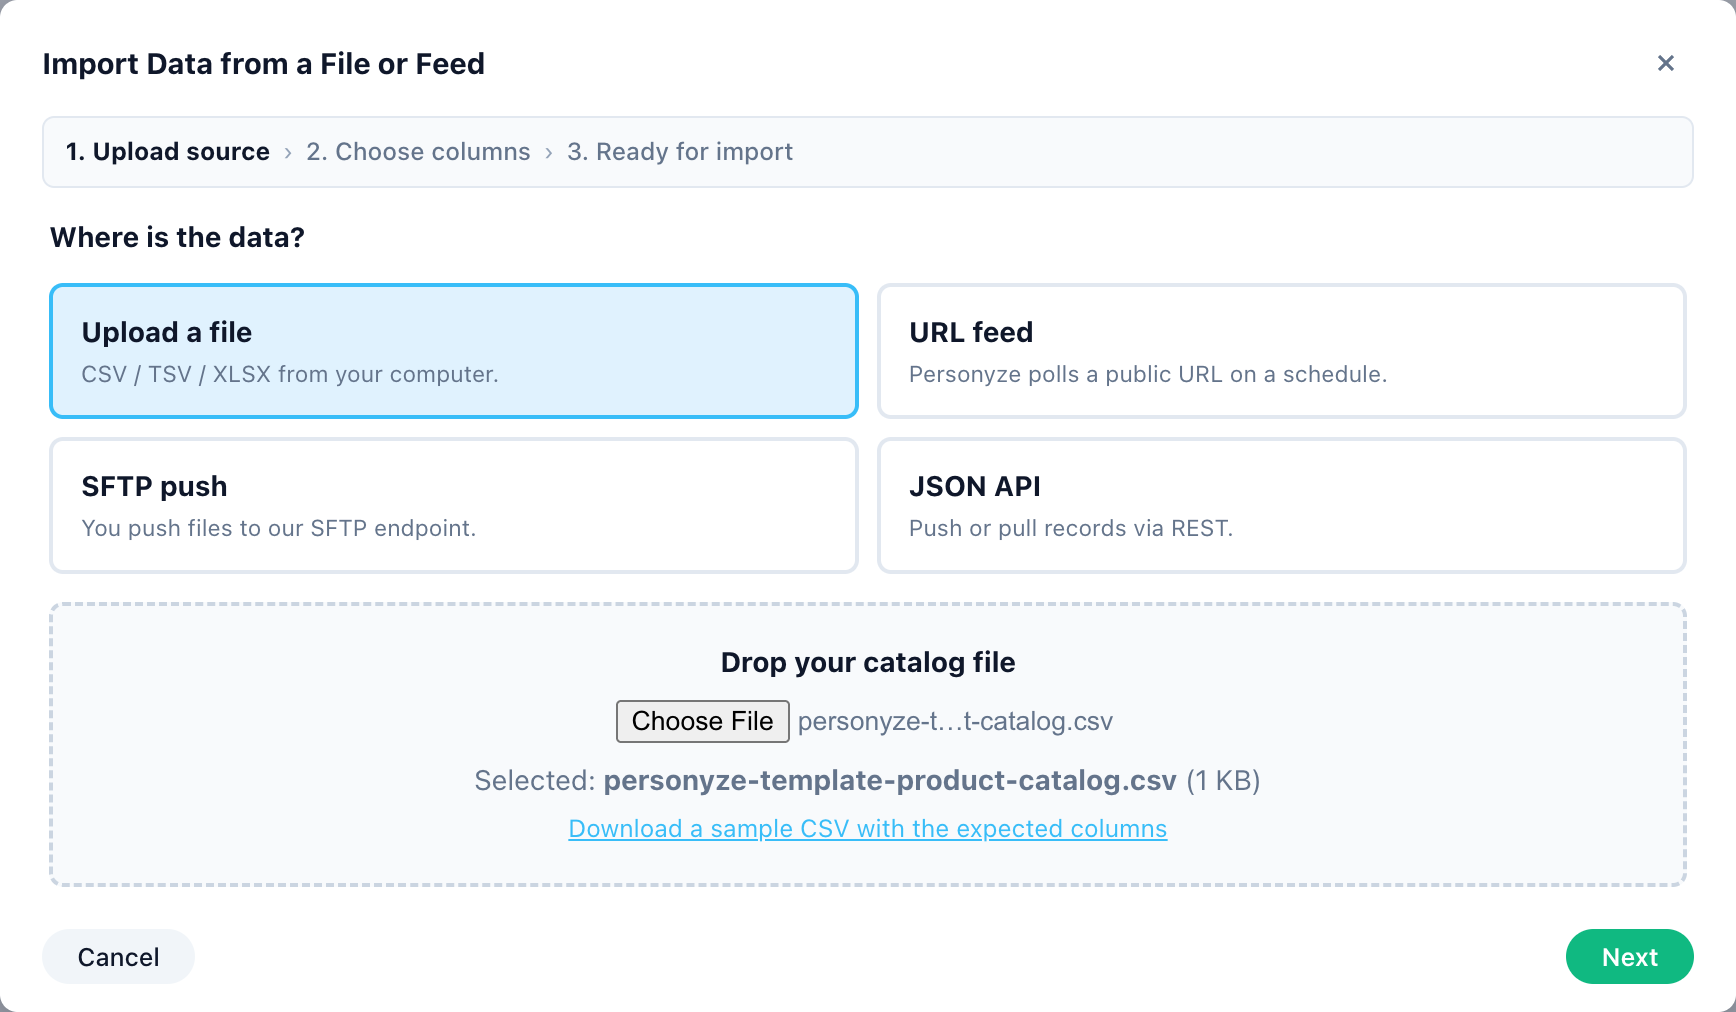
Choose how the data arrives
Go to the screen for what you’re loading — Settings → Recommendation setup → Product Catalog / Article Catalog / Product Tracking, or Settings → Imported user data — and open Import Data from a File or Feed. Pick a source: upload a file (one-off), a URL / RSS / Atom feed or SFTP (kept in sync), or the JSON API (real-time). Same wizard everywhere — only the fields differ.
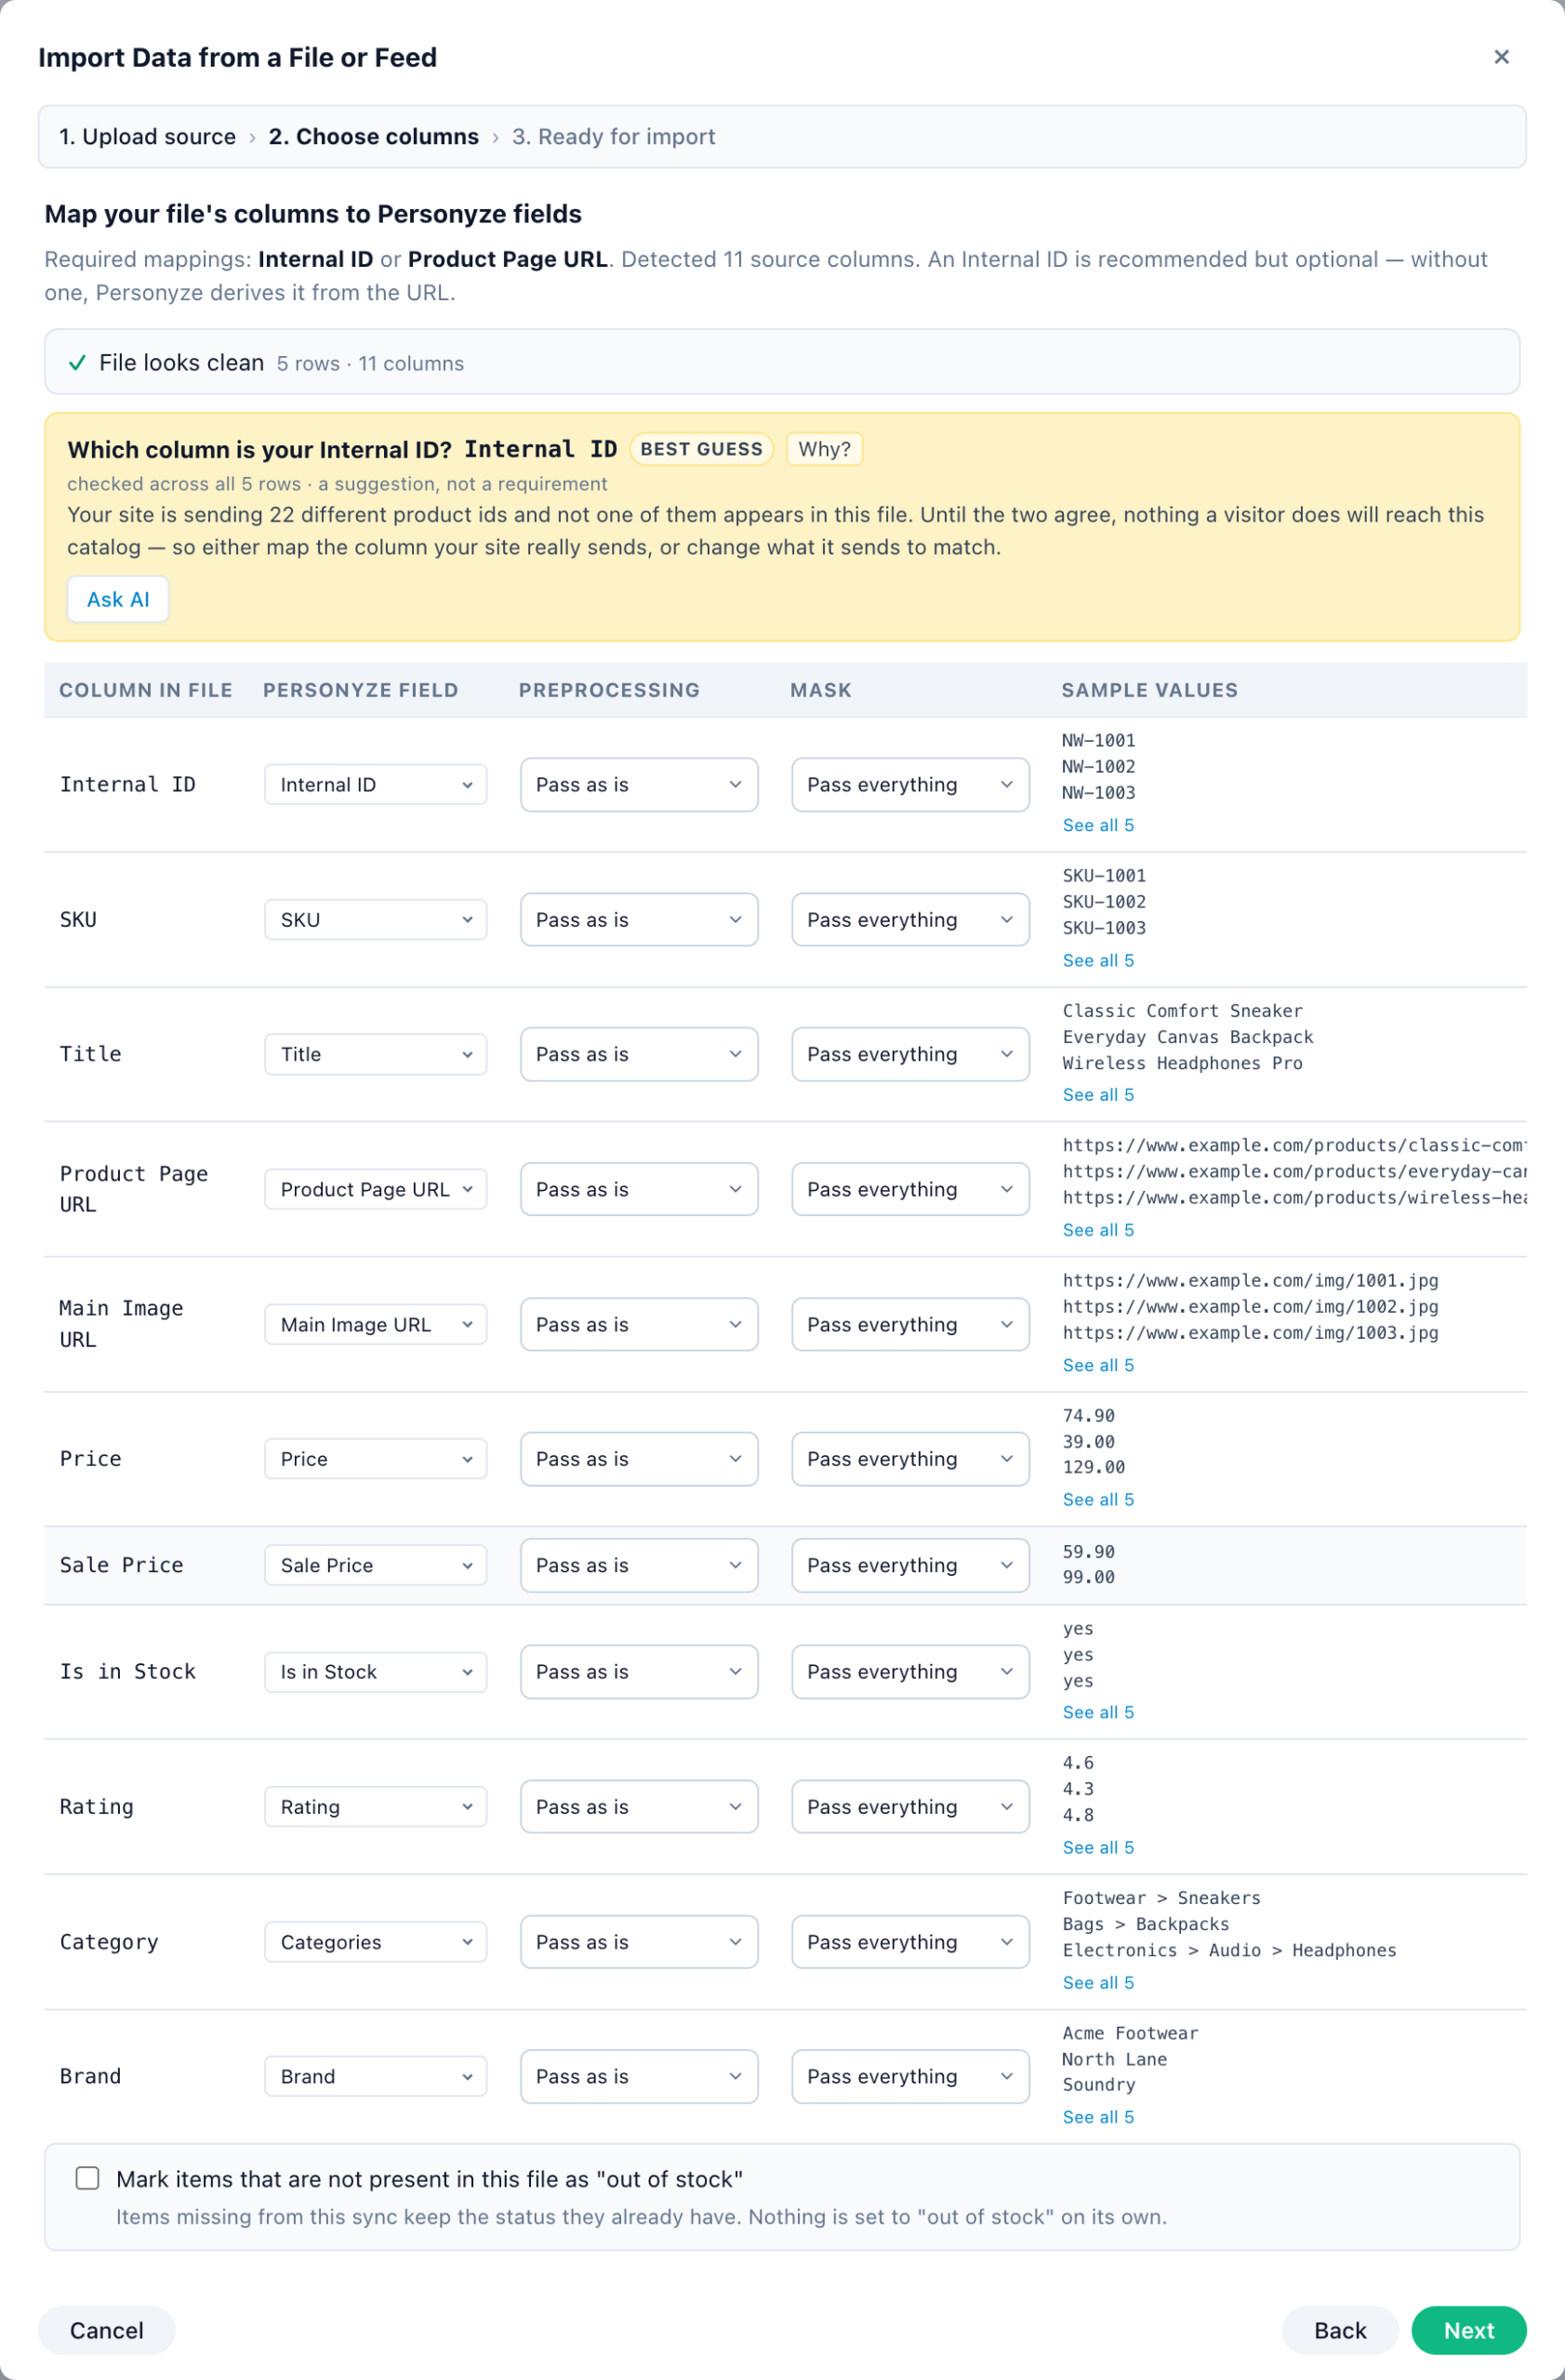
Format the file
The importer is comma-delimited. Any cell that itself contains a comma — a list of interests, multiple categories — must be wrapped in double quotes, or it splits into extra columns. Everything else is plain CSV.
Map the columns
Match each detected column to a Personyze field. One key is mandatory — an Internal ID (or the Product Page URL). Map the rest to their fields; add optional Preprocessing or a Mask to clean a value on the way in.
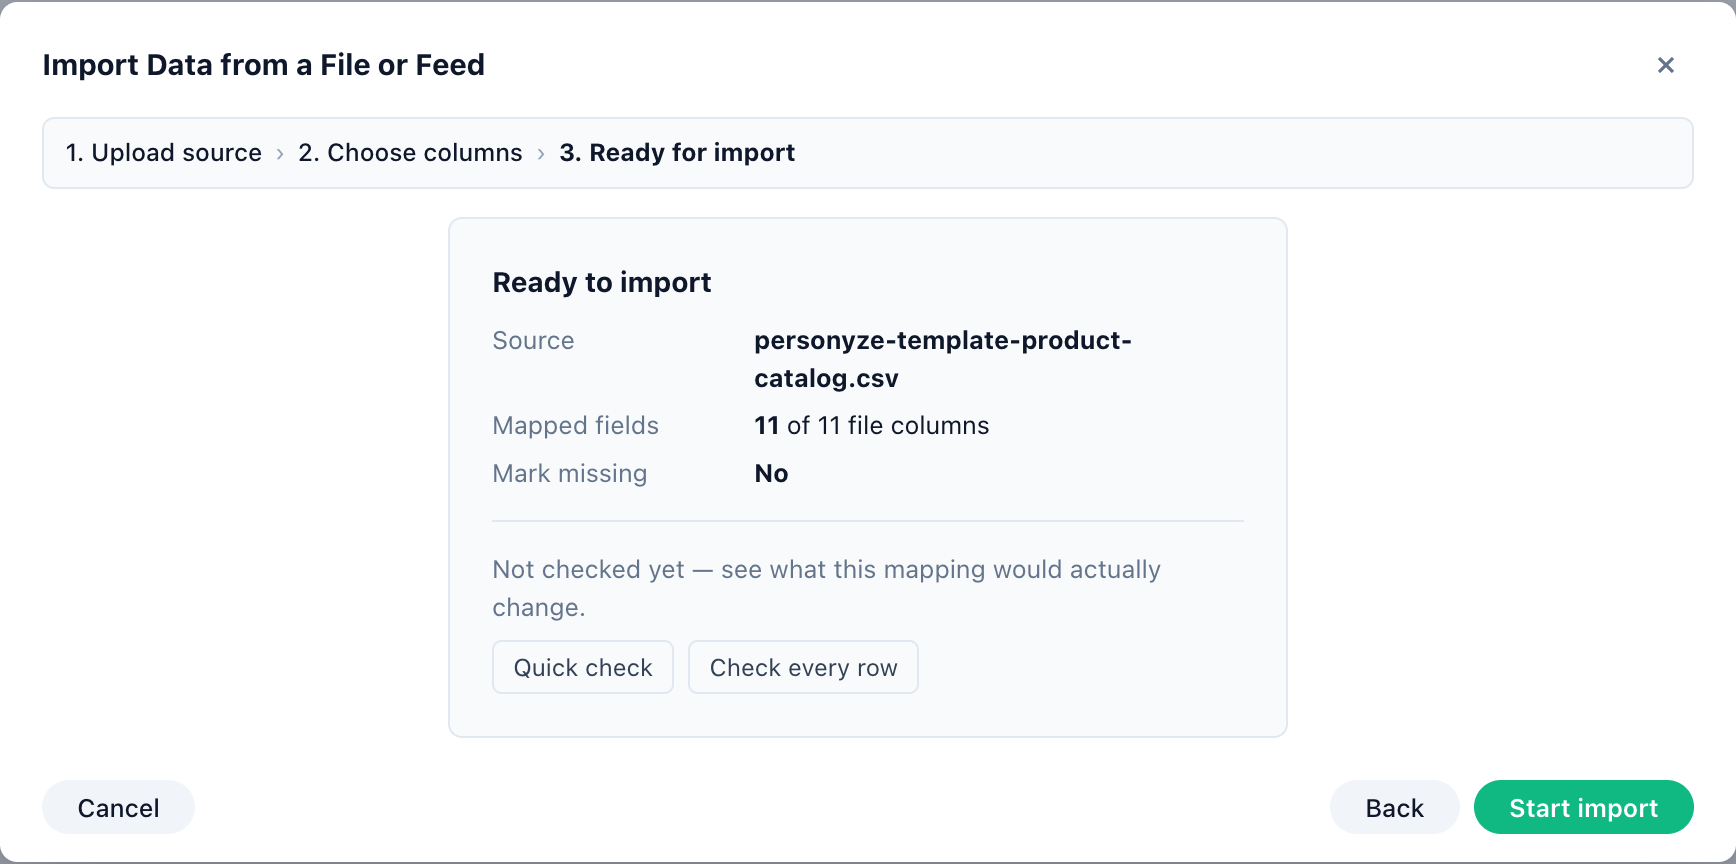
Review & import
Confirm the mapping and start the import. A file loads once; a URL, SFTP, or API feed keeps syncing from here — re-reading on the schedule you set so stock, prices, and new records stay current.
Choose how the data arrives
Go to the screen for what you’re loading — Settings → Recommendation setup → Product Catalog / Article Catalog / Product Tracking, or Settings → Imported user data — and open Import Data from a File or Feed. Pick a source: upload a file (one-off), a URL / RSS / Atom feed or SFTP (kept in sync), or the JSON API (real-time). Same wizard everywhere — only the fields differ.
Format the file
The importer is comma-delimited. Any cell that itself contains a comma — a list of interests, multiple categories — must be wrapped in double quotes, or it splits into extra columns. Everything else is plain CSV.
Map the columns
Match each detected column to a Personyze field. One key is mandatory — an Internal ID (or the Product Page URL). Map the rest to their fields; add optional Preprocessing or a Mask to clean a value on the way in.
Review & import
Confirm the mapping and start the import. A file loads once; a URL, SFTP, or API feed keeps syncing from here — re-reading on the schedule you set so stock, prices, and new records stay current.
The catalog screen
What the Product Catalog and Article Catalog screens show — the feeds and their
health, the fields the engine uses, categories, interests and the manual rules — is described on
Setting the Product / Content Feed.
Data reaches a catalog the four ways below — a file upload, a URL feed, SFTP, or the REST API —
or by a crawl of your site (⋯ → Crawl my site — see Crawl Your Site).
Two keys, not one
Products can be mapped to up to two keys — Internal ID and SKU — so on-site events tie
back whichever identifier your site happens to emit. Custom fields can be added at any time; nothing has to be declared
up front.
Which column is your Internal ID?
Getting this wrong is the single most expensive mistake in a feed: the catalog fills, the recommendations render,
and nothing matches what visitors actually viewed. So the importer answers it with evidence rather than a guess.
It compares each candidate column against the ids your site is already sending and reports what it
measured — “matches 96% of the ids your site already sends”, “none of these values
appear in what your site sends”, “checked across the first 500 rows”. Columns that cannot
be a key at all — empty in every sampled row, missing from some rows, identical to another column — are
marked as such.
Where it cannot measure a match it falls back, and a label beside the answer says which rung it is standing on:
- measured — checked against real events; the answer you can trust.
- from your site — “No product events have arrived yet, so we read one of your item
pages instead”. - best guess — from the shape of the file alone, and it says so: “check it against
what your site sends”.
Preview before you import
The Ready to import summary can run a dry run that writes nothing and tells you what the real run would
do. On the catalog screens it is Quick check (the first 500 rows) or Check every row; the
tracking and user-data import wizards call it Preview changes. It reports:
- How many rows are new, changed and unchanged. These counts ride on every run, not just the
preview. - Which columns would change — so a mapping mistake shows up as “every row’s price
would change” rather than as a silent overwrite. - Up to five before-and-after examples, and up to five of the new keys. Capped
deliberately: previewing a whole catalog should not ship a megabyte of values back to the browser.
A product or article row that ends up with neither an Internal ID nor a link — including a link with no path, just the site’s address — is left out rather than added as a blank item, and both the preview and the finished import count it: “12 rows left out — they have neither an Internal ID nor a link”.
Four Ways to Deliver a Feed
On the first step of the wizard (Upload source) you pick how the data reaches Personyze. The choice is really about how often it changes.
URL / RSS / Atom feed — enter a public URL; Personyze polls it on the schedule you choose (every day or every week). Best for a catalog or list kept fresh by your platform or a feed service.
SFTP push — you drop files at a configured SFTP endpoint. Best for large nightly exports from a data warehouse.
JSON API push — POST records from your backend in real time.
- One-off or small → upload a file. Fastest way to load a list once.
- Kept fresh automatically → URL feed. Point Personyze at a live feed URL — a Google Shopping feed, a feed-service export, your platform’s product feed — and it re-reads it on a schedule, so stock, prices, and new products stay current without you re-uploading. This is the usual choice for a product catalog.
- Large & scheduled → SFTP. For big nightly dumps where a public URL isn’t appropriate. You can set your own SFTP account up in a couple of clicks — no need to ask anyone.
- Real-time & you own the backend → API push. POST records as they change.
A live URL, SFTP, or API feed keeps syncing after the first import; a file upload is a point-in-time snapshot you re-upload to refresh.
SFTP File Drop — Push Files and Forget
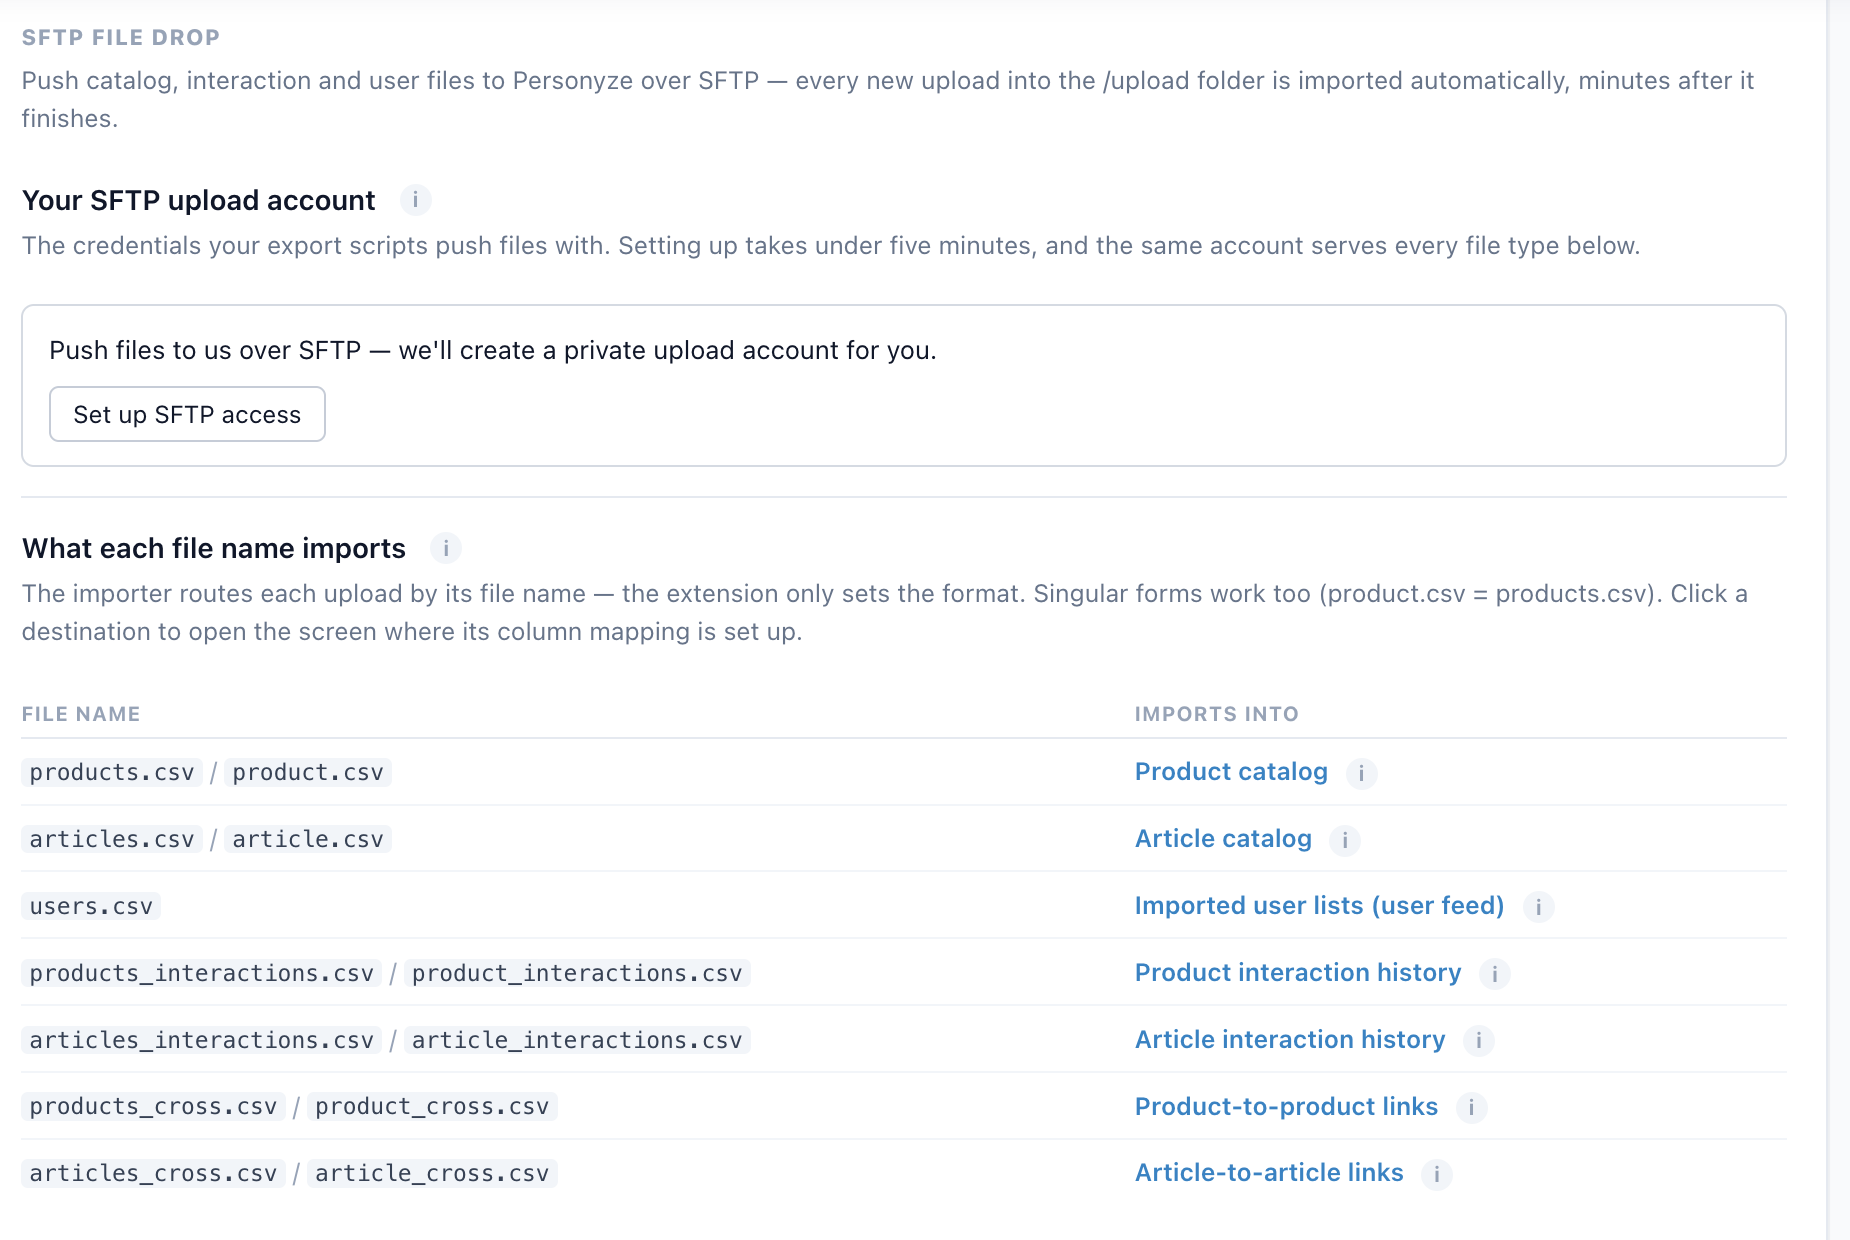
SFTP is the hands-off option. You get a private upload account, your export script drops files into its /upload folder, and every new upload is imported automatically a few minutes after it finishes. No one clicks anything in the panel.
Where to find it: your SFTP credentials live under Settings → Site profile → Advanced settings, in the SFTP file drop section — that is the page to open whenever you need the host, the username, or a fresh password. The same credentials card also appears wherever the import wizard offers SFTP as a source: Product and Article Tracking, the Product and Article catalog screens, and Imported user data.
Setting up the account
- Click Set up SFTP access.
- Personyze creates a private account for you. It says “Setting up your SFTP account — usually under 5 minutes” while it works, and fills itself in when ready. You can leave the page and come back.
- The card then shows your Host (
sftp://sftp.personyze.com), Username, and Password — with Show and Copy buttons.
One account serves every file type below, and it belongs to this site profile. Put all files in the /upload folder — nothing elsewhere is picked up.
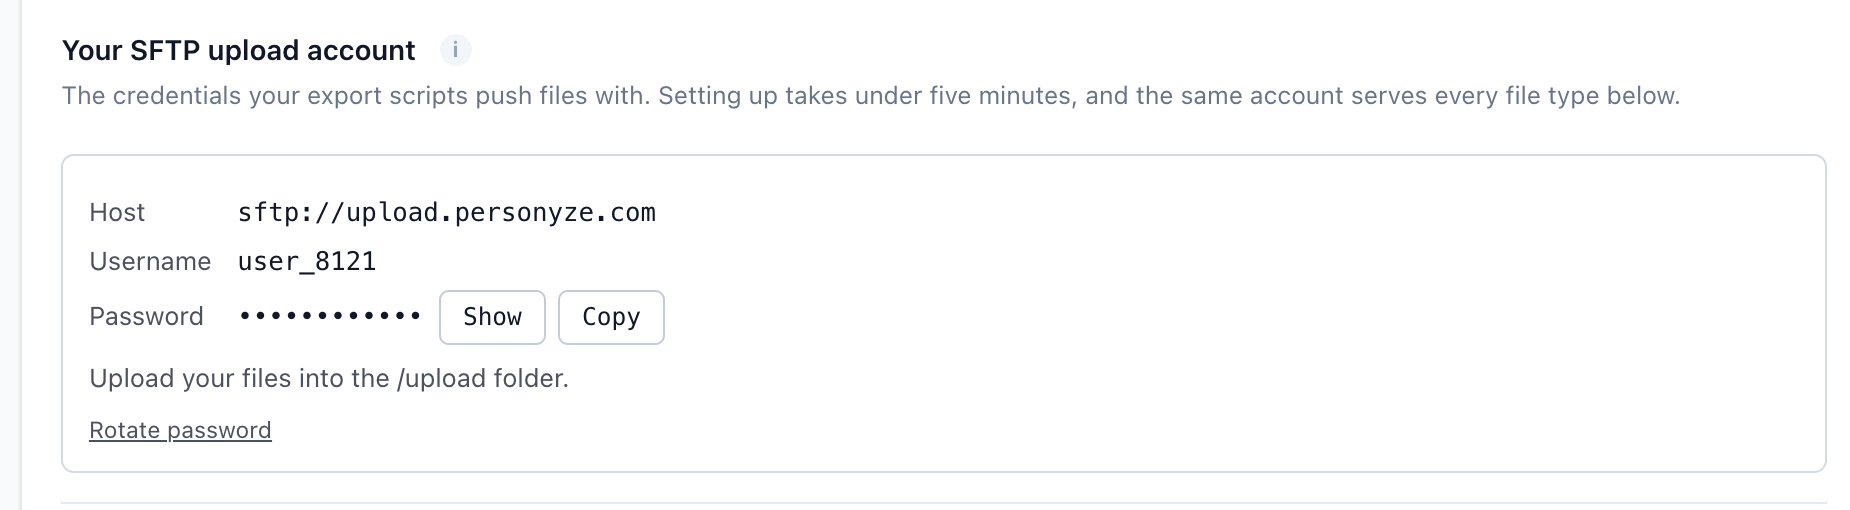
sftp://sftp.personyze.com). The password stays masked until you press Show or Copy. Click to enlarge.The file name decides what an upload is
There is no per-upload configuration. The importer routes each file by its name; the extension only tells it the format. Singular and plural both work — product.csv is the same as products.csv.
| File name | Imports into |
|---|---|
products.csv / product.csv |
Product catalog |
articles.csv / article.csv |
Article catalog |
users.csv |
Imported user lists (user feed) |
products_interactions.csv / product_interactions.csv |
Product interaction history |
articles_interactions.csv / article_interactions.csv |
Article interaction history |
products_cross.csv / product_cross.csv |
Product-to-product links |
articles_cross.csv / article_cross.csv |
Article-to-article links |
Accepted extensions: .csv, .json, .xml, .xls, .xlsx. Re-uploading a newer file re-imports it — the newest matching file wins — so a nightly job can simply overwrite the same name every time.
The first upload: map it once
A file has to be mapped before anything is imported from it — Personyze has to be told which column holds what. You do not set this up in advance: drop the file first, and the panel comes to you.
Within a few minutes of the upload finishing, a banner appears on the destination screen — for users.csv that is Settings → Imported user data:
In your SFTP folder:
users.csv
1 KB · uploaded 36 min ago
Not mapped yet, so nothing is being imported from it: Personyze has not been told which column of the file holds what.
Two buttons sit beside it: Check again, which re-scans the folder, and Map this file, which opens the mapping.
The mapping dialog
Map “users.csv” from your SFTP folder shows everything it worked out from the file itself:
- List name (user feeds only) — everyone in the file joins this list, and the list is what your campaigns target. You do not have to create it beforehand; naming it here creates it.
- A row per column, with the column in file, the profile field it maps to, and sample values read from your actual file — so you can see at a glance that CRM ID really did land on
SFTP-TEST-1and not on something else. - A summary line: how many columns were found, how many are mapped, and how many rows the file holds. Anything left on Ignore is not imported.
Click Save the mapping and the file imports. That is a one-time step per file name — from then on, every upload of users.csv imports by itself with the same mapping.
The Format Rule That Matters Most
Personyze’s file importer is comma-delimited, and that can’t be changed on the upload step. That one fact drives every formatting decision:
- Columns are separated by commas. Not semicolons, not pipes, not tabs (for a genuine tab-separated feed, see the TSV note below).
- If a value inside a cell contains a comma, that cell must be wrapped in double quotes, or the importer splits it into extra columns.
This is standard CSV, but it’s the single most common reason an import misbehaves, so it’s worth stating plainly.
Worked Example: Product Interests
Interests are a list of tags per product — used for cross-sell, affinity segments, and interest-based recommendations. The format that works is two columns, Id and Interest, with the interests comma-separated inside a quoted cell:
Id,Interest
NW-1001,"Sneakers,Footwear,Casual,Running"
NW-1002,"Backpack,Bags,Commuting,Canvas"
NW-1003,"Headphones,Audio,Wireless,Electronics"
Each product’s Interest cell holds a different set of tags. The quotes are what let the interior commas survive. Without them, NW-1001,"Sneakers,Footwear,Casual,Running" becomes five columns instead of two, and the import breaks.
📥 Download the sample interests file — open it in a plain text editor (not a spreadsheet) to see the quoting exactly as the importer needs it.
Separators — What Works and What Doesn’t
| Goal | Works? | How |
|---|---|---|
| Interests comma-separated in one cell | Yes | Quote the cell: "Sneakers,Footwear,Running" |
| Interests split into one column each | Yes | Map every interest column to the same Interests field |
| Pipe / slash / semicolon between interests | No | The Interests field accepts commas only |
| Semicolon as the column delimiter | No | The upload step is locked to comma |
| Unquoted commas inside a cell | No | The importer splits them into new columns |
TSV note: the wizard accepts .tsv, and a genuine tab-separated feed (like a Google Shopping feed) imports cleanly — tabs are the delimiter, so commas inside descriptions are just text. The comma rule above is about comma-separated files specifically.
The Same Idea for a Category Field
The comma-in-a-quoted-cell pattern isn’t only for interests — any field that holds more than one value works the same way. A category field is the common second case. Two ways to represent it, both valid:
- A hierarchical path in one cell — the Google-feed convention, using
>between levels. No commas, so no quoting needed:Category Footwear > Sneakers Electronics > Audio > Headphones - Multiple categories in one cell — if a product belongs to several, comma-separate them inside quotes, exactly like interests:
Category
"Sneakers,Footwear,Running"
The rule is always the same: a comma inside a value means the cell must be quoted. A >-delimited path or a /-delimited one has no commas, so it rides along unquoted.
Carrying Extra Fields in the Same File
You don’t need a separate file per attribute. One row can carry the key plus interests plus category plus anything else you want on the record — brand, availability, a custom tag — and you map each column on the Choose columns step:
Id,Interest,Category,Brand,Availability
NW-1001,"Sneakers,Footwear,Casual,Running",Footwear > Sneakers,Acme Footwear,in stock
NW-1003,"Headphones,Audio,Wireless,Electronics",Electronics > Audio > Headphones,Soundry,in stock
Only the quoted Interest cells contain commas, so only they are quoted; the rest ride along as plain columns. Map Id → Internal ID, Interest → Interests, and each remaining column to its Personyze field.
📥 Download the extended sample (Id + Interest + Category + Brand + Availability) alongside the two-column interests sample.
Required Mapping
Every import needs one key column, or Next stays disabled with a red “Missing required mapping”:
- Internal ID — the record’s key (product ID, user ID).
- Product Page URL — the full page URL, as an alternative key.
The key must match what the catalog is already keyed on. If your catalog is keyed on SKU, the file’s Id column must contain that same SKU. An import that completes but “matches no products” is almost always a key mismatch — the IDs loaded fine, they just don’t line up.
Mapping the Columns
On the Choose columns step, Personyze shows each detected column and lets you map it to a Personyze field, with optional per-column Preprocessing and Mask.
The column count on this step is your parse check. For the two-column interests file it must read Detected 2 source columns. If it says 6, the quoting was lost in export — fix and re-upload. Judge by what this step reports, not by how the file looks in Excel or Numbers.
For interests: map Id → Internal ID (clears the red error), map Interest → Interests, leave Preprocessing = Pass as is and Mask = Pass everything, then continue to Ready for import.
Building the File (Repeatable Recipe)
If you have a source export with one comma-joined interests column, emit the two-column quoted file with a few lines of Python — csv.writer adds the quotes around any field containing a comma automatically:
import csv
rows = list(csv.DictReader(open('source.csv', encoding='utf-8-sig')))
with open('Id_Interest.csv', 'w', newline='', encoding='utf-8-sig') as f:
    w = csv.writer(f)                 # quotes cells with commas automatically
    w.writerow(['Id', 'Interest'])
    for r in rows:
        ints = ','.join(x.strip() for x in r['Interests'].split(',') if x.strip())
        w.writerow([r['Product ID'], ints])
Product Catalog Feeds
A product catalog is keyed on a product identifier — and you can supply Internal ID, SKU, or both. Only one key is mandatory.
When You Don’t Have a Product ID
If your catalog has no stable ID, Personyze can auto-generate one from a hash of the product-page URL. That’s enough to recognize a product for page views and add-to-cart — the URL is the same each time, so the hash is stable.
Purchase tracking is where a URL hash gets awkward. A thank-you or order-confirmation page usually doesn’t carry the product URLs of what was bought, so there’s nothing to hash. Tracking purchases against hashed IDs is possible but the setup is fiddly. It’s far simpler when you have a real product ID that Personyze can pick up automatically from a page variable — a data-layer value, a tag-manager variable, or a field in the DOM — because the same ID then ties the catalog, the on-site behavior, and the purchase together. If you sell, use a real ID. The URL-hash fallback is for view/click personalization when no ID exists.
The Catalog File
A product catalog uses more columns but the same rules. A typical layout:
Internal ID, SKU, Title, Product Page URL, Main Image URL,
Price, Sale Price, Is in Stock, Rating
Map Internal ID as the key, Main Image URL and Product Page URL so cards render and link, and Price / Sale Price / Is in Stock so widgets can show pricing, discounts, and stock badges. Empty cells are fine — a blank Sale Price just means no discount.
📥 Download the sample product-catalog file — the real column layout used by a live store.
For a live catalog, the practical setup is a URL feed: point Personyze at a feed your platform or a feed service already produces. A standard Google Shopping / Merchant feed (TSV, with id, title, link, price, availability, image_link, product_type, etc.) works directly — Personyze reads those columns and re-polls the URL so stock and prices stay current. If you don’t have a feed yet, tools like Feedoptimise, DataFeedWatch, or your platform’s native export produce one.
The recommendation logic — best sellers, viewed-together, cart-based, interest-based — is set in the action’s algorithm configuration and reads from whatever catalog you feed here. See Setting the Product / Content Feed and Recommendation Algorithms.
Images: One Required, More Optional
Each product needs one main image so recommendation cards can render. You can add more image columns beyond that — the extra images feed widgets that rotate or swap the photo on mouse-hover. Map the first to Main Image URL and the rest to the additional image fields.
Carry as Many Custom Fields as You Want
Beyond the standard columns, a feed row can hold any extra data you have — shipping price, quantity-break pricing, per-customer-type prices, tags, brand, color, anything. Three things you can do with a custom field:
- Print it — show it on the recommendation card (a “Free shipping” flag, a member price).
- Filter on it — restrict a recommendation to a brand, color, or category.
- Train the AI on it — give the recommendation model more signal about each product so it ranks better.
Most of the time it’s simple attributes like brand or color; there’s no limit, and unmapped columns are simply ignored.
Bundle Prices
The prices and bundle total a Buy Together widget shows come from the catalog’s price fields. A discount for buying items together has to be applied by your store.
Content Catalog Feeds
A content catalog (articles, videos, guides) drives content recommendations. The lightest version is just the content URL — Personyze auto-generates an ID and tracks engagement by the URL or URL path, so views and reads attribute correctly without you supplying a key. You can also provide your own Internal ID if you have one.
Everything else works like the product catalog: one main image (more optional for hover widgets), plus any custom columns you want to print, filter, or train on — content type, category, author, publish date, tags.
📥 Download the content-catalog template
User List Feeds (CRM Enrichment for Targeting)
Where: Settings → Imported user data. The profile fields a list fills are defined under Settings → Visitor Attributes.
Once a list is in, open it there to see who it carries, take someone off it, export it or look one person up — see Imported user data.
A user list attaches CRM data to your visitors. The minimum is a key plus one attribute:
- Email (or an Internal / CRM ID) as the key, and
- at least one additional column — first name, account type, anything.
You can add as many attribute columns as you like. The important part: whatever you populate here becomes available in targeting, not only inside the action that uses the list. Load a visitor’s first name or account type and you can later build an audience that targets on it — “Account Type is VIP”, “Industry is Retail” — exactly like any other profile field. Deliver it as a file, or keep it in sync via SFTP or a feed URL.
📥 Download the minimal user-list template (Email + First Name) · extended version (with account type, industry).
Cross-Sell & Up-Sell Pairs
Pairs you state yourself — manual cross-sell and up-sell links, and the seed sets that prime the engine — live on Settings → Recommendation setup → Product Catalog → Manual recommendation rules. A links file is two columns, Subject Internal ID,Linked Internal ID (📥 template). What they do and which algorithms use them: Managed Cross-Sells & Up-Sells.
Historical Transaction Feeds
Past and offline purchases — who bought what, when — load from Settings → Recommendation setup → Product Tracking: the Upload past orders button on the Product Purchased row, or an SFTP drop named products_interactions.csv. The columns, the template and the three-step wizard: Uploading Past / Offline Transactions.
Content Catalogs and Other Feeds
Beyond the types above, the same wizard loads any tabular data — affinity tables, segment lists, custom attribute sets. Choose the delivery method, get the format right, map a key, map the rest.
A content catalog (articles, videos, guides) works identically — the key columns become the content ID and URL, with title, image, and any attributes you want to recommend or target on. The same holds for cross-sell tables, affinity data, and CRM user lists: choose the delivery method, get the format right, map a key, map the rest.
Finishing the Import
Troubleshooting
| Symptom | Cause | Fix |
|---|---|---|
| “Detected 6 source columns” (expected 2) | The interests cell wasn’t quoted, or quotes were stripped on export | Re-export with the cell quoted; confirm the raw file shows "Sneakers,Footwear,..." |
| The whole row lands in one column | You’re judging by a spreadsheet, not the importer | Go by what step 2/3 reports, not by Excel or Numbers |
| “Missing required mapping” (red) | No Internal ID / Product Page URL is mapped | Map your key column to Internal ID (or Product Page URL) |
| Interests import as one long string | The separator isn’t a comma | Use commas between interests, nothing else |
| Imports fine but matches no products | The Id doesn’t match the catalog key | Use the identifier the catalog is keyed on (often SKU) |
Reading a Value Live from the Page Instead
Separate from file import: Personyze can also read a value live from a product page as visitors browse — useful when the data isn’t in a feed. That path uses a CSS selector or JavaScript rather than a file, covered in Grab Data from Your Site. Two field notes worth carrying over:
- Meta tags can’t be clicked with the on-page picker — they live in
<head>and aren’t rendered. Type the selector by hand, e.g.meta[property="og:type"]. - On JS-rendered stores (VTEX, React), meta/og tags may be empty at page load and only fill in after hydration, or are served only to search-engine bots via prerender. A selector returning nothing is usually this timing/prerender gap, not a wrong selector. A server-rendered element is more reliable. The GTM dataLayer also carries the reference — but on single-page stores read it carefully, since the dataLayer accumulates across products and an early entry can be the previously-viewed item.
The Short Version
Comma-delimited file; quote any cell containing a comma; map one key column (Internal ID or Product Page URL) that matches how your catalog is keyed; map the rest. Upload a file for a one-off, or point Personyze at a URL / SFTP / API feed to keep it syncing.
Related
- User Profile Data & Bulk Import — the wizard in the context of user/CRM data and keys.
- Grab Data from Your Site — capturing values live from the page instead of a file.
- Setting the Product / Content Feed