
Every way to check a campaign before visitors see it, in one place. What you get depends on the campaign
type — a recommendation widget, an email and a web push notification are checked in genuinely different ways
— so find your type below.
Three short videos: checking a campaign before it goes live, the QA simulator in depth, and checking a recommendation.
The QA summary, the audience forecast, testing on your own session, and sending a colleague the same view.
The verdict and its reason, every rule, the AI assistant, highlight on page, and changing who you are.
A product page opened as a real visitor, which algorithm filled each slot, and what the engine would pick for one product or one visitor.
First: what is previewable, and when
Two different rules, and mixing them up is the usual confusion:
- The QA step appears once the campaign is saved — in draft, staging or production. Before
that there is nothing to point at, and the step says so: “Preview options will be available after saving the
campaign.” - The preview links need something published. A draft has never reached the CDN, so a preview link
opens your ordinary page with nothing on it — which reads as a broken preview rather than as a campaign that is
not out yet. Publishing to staging is enough, and that is exactly what staging is for.
the campaign is not still a draft before looking for anything else. Preview is offered wherever a campaign is listed or edited — the campaigns-list row, the Content step’s own card and the editor’s top bar — and all of them are locked until then.
The QA step: is it ready?
A campaign on your site opens its QA step on one card with the answer: Ready, or
Almost ready with how many things to look at (2 things to look at). Under it are four lines.
Each has a ✓ or a ! and one line of data, and Details opens the numbers behind it.
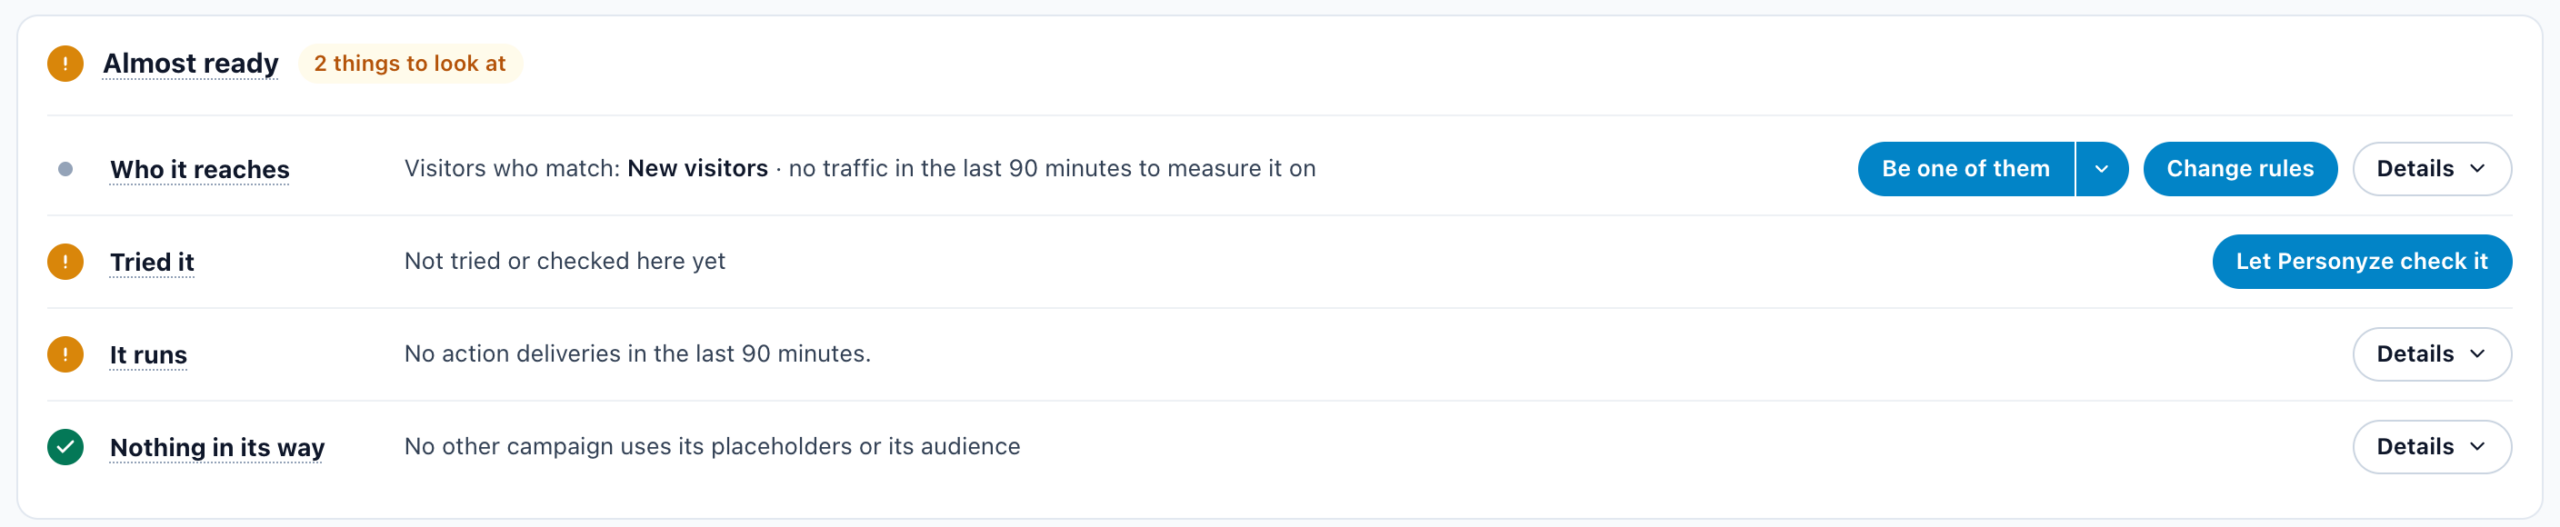
| Line | What it says | Details and buttons |
|---|---|---|
| Who it reaches | The audience in one sentence, Visitors who match: …, and the share of your traffic in the last 90 minutes that matched it, for example about 12% of your traffic in the last 90 minutes. With no rules it reads All visitors (no audience rules — everyone matches). | Details: the actions it shows, how its traffic is split between test versions, and the audience forecast. Change rules opens the Target step. Be one of them opens the Simulator as a visitor who matches. |
| Tried it | Whether it was tried from this screen: Opened from this screen: In the Simulator, or Not tried or checked here yet. After a check of your pages, the line is Looks right, with the pages checked and nothing to look at or 2 to look at. | Let Personyze check it picks that way of trying it, below. |
| It runs | What its actions did on the page in the last 90 minutes: your own previews, staging visits and, once it is live, real visitors. A campaign not published yet reads Not published yet: only your own previews count here. | Details: Action delivery. |
| Nothing in its way | Whether another live campaign uses its placeholders or its audience. When none does, it reads No other campaign uses its placeholders or its audience. | Details: the overlaps by audience, by action and by placeholder. |
Edits not saved yet, and edits saved on a live campaign but not published, show as notices on the card:
Unsaved changes and Pending changes. The lines read the saved campaign.
Be one of them
On a saved campaign for your site that has audience rules, Be one of them sits beside Change
rules. It opens the QA Simulator already set up as a visitor these rules match.
It changes as few rules as it can: a place, a visit number, a language, a time zone or where the visitor came from is
set at once. A rule on a profile field, such as an email address, waits for you. The Simulator says Your profile would
also need Email → … – nothing is written to it until you press Apply, with Apply and
Not now. A rule nobody can fake there, such as a page or a device, is named with what to do. When it is
done, the Simulator says Set up as one of them: … and shows its verdict.
Its tooltip names the page it opens: the page in the page field below, or else the page the rule names, on the
site your visitors are on. Where there is more than one page to choose from, an arrow (▾) beside it lists
Pages this campaign’s rule names, You tested recently and Known entry
pages of each of your domains. Picking a page opens the Simulator on it at once. Another
page… takes you to the page field to type any address.
If the Simulator window does not take the request in time, Who it reaches says the Simulator did
not pick it up – press again.
Does it look right? Four ways to try it
The second card opens a page of your site with the campaign. First, the page: Choose a page to open, or type its
URL…. Where the campaign’s rule names a page, Use this page fills it in. Then pick how
to try it:
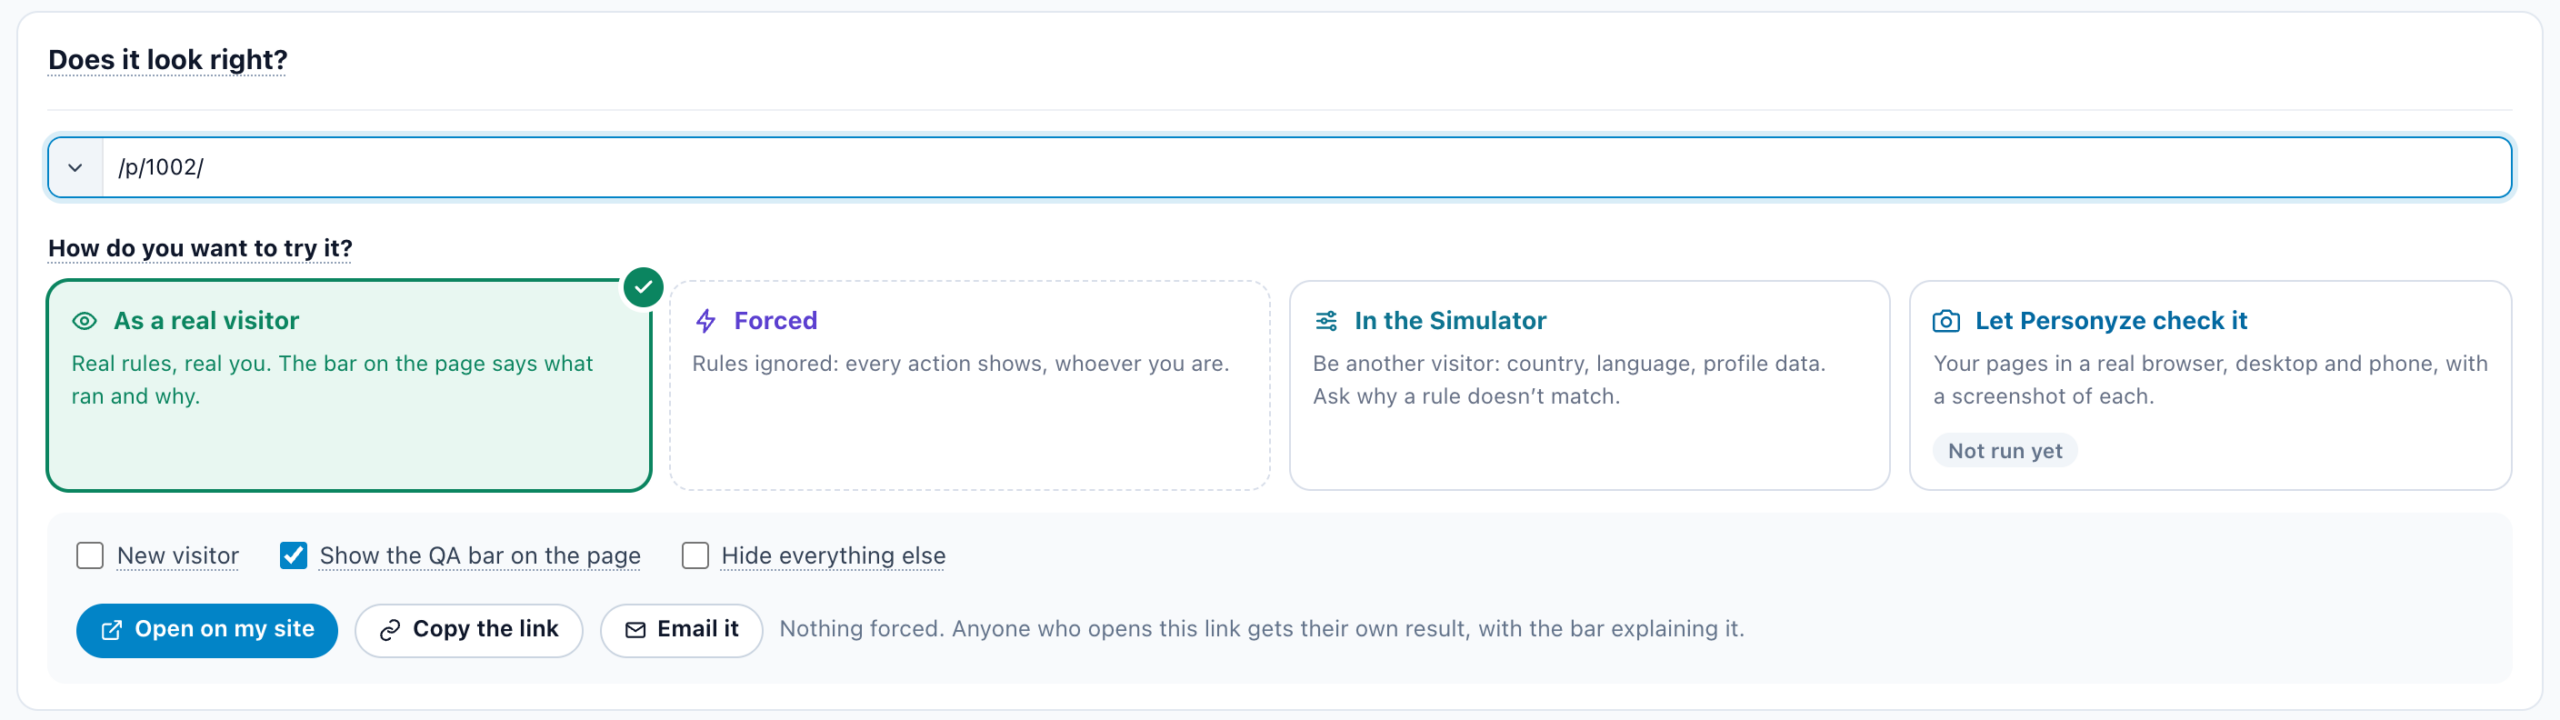
| Way | What it does |
|---|---|
| As a real visitor | Nothing is forced. Audience rules, view limits and rotation all apply, so it is the only way that shows what a visitor gets. The QA bar on the page says what ran and why. |
| Forced | Rules are ignored and every action shows, whoever you are. Good for looking at the content, but it proves nothing about who would see it. Force these actions lists the actions, with All and None, so you can force only some. |
| In the Simulator | Opens the page in a new window with the QA Simulator beside it. You can be another visitor (country, language, profile data), see each rule with the value it read, and Ask why. Your real session is untouched. |
| Let Personyze check it | Opens your pages in a real browser, on a desktop and a phone, with a screenshot of each. See below. |
Under the boxes are the options of the picked way:
- New visitor (As a real visitor only): nothing is remembered, so you get the same result every run.
Leave it off to reproduce “it stopped appearing for me”: view limits and A/B rotation then still count against you. - Show the QA bar on the page: off gives a clean page, with no bar and no console report, for showing the
campaign to somebody else. - Hide everything else: only this campaign shows on the page. None of your other live or staging campaigns
show, so nothing covers it or takes its place. It holds for the pages you go on to in that visit, and nothing it hides is
counted in your reports.
Then Open on my site (Open forced for Forced), Copy the link or
Email it. The line after the buttons says what whoever opens the link will get. The Simulator has
Open the Simulator instead: there is no link to share.
Let Personyze check it
Personyze opens pages of your site with this campaign the way a first-time visitor gets them, and shows what each action
did there, with a picture of the page. It checks the published version: the live one if the campaign is live,
otherwise staging. Changes you have not saved or published are not in it, and a campaign that is only a draft cannot be
checked.
- Devices: Desktop, Phone or both.
- Follow the campaign’s rules: on, each page gets what a first-time visitor would get. Off, every
action is forced on, to see how each one sits on every page. - Actions: All, Changed since live or Edited this
week. - Pages: the page in the field first, then pages from the campaign’s rules, your home, product,
category, article, search and cart pages, and pages checked before. A page the rules leave out is marked Not in its
rules. Add a page of your site adds any other. Only pages of your own sites can be checked.
Check pages starts it. Each page and device takes about a minute, and two run at a time. Each page then
lists its actions: Shown, On the page but not visible, No placeholder on this
page, Waiting for its trigger, Held back, Not sent to this
page and others. It also flags broken pictures, a page wider than the screen and errors from the tag.
Open it yourself opens the page. The result stays on the box, and the Tried it line
becomes Looks right.
Starting a QA session
Wherever a campaign is listed or edited, Preview opens the same dialog: Start a QA
session. It asks two questions and then opens your own site in a new tab.

1 — Which page? Pre-filled with a page Personyze already knows about; type any address on
your site over it. A landing page has one address, so for those it is fixed.
2 — How should it behave? Three modes, and the labels tell you which one is a test:
| Mode | What it forces | Use it for |
|---|---|---|
| Open it as a visitor — the real test | Nothing. Audience rules, view limits and A/B rotation all apply, so what you see is what a visitor in your position gets. | “Would a visitor see this — and if not, why not?” |
| Force the whole campaign on — not a test | Every rule is ignored. | Checking how the content looks. Proves nothing about who would see it. |
| Force one action on — not a test | The same, for a single action. | Checking one piece of content. |
Start as a brand-new visitor is the checkbox underneath. View limits, “don’t show
again” and A/B rotation stick to you between sessions, so if you have looked at this campaign before, leaving it
off is the usual reason it does not appear.
Hide everything else, beside it, shows only what you are previewing. None of your other live or
staging campaigns show on the page, so nothing covers it or takes its place. It holds for the next pages of that visit,
and nothing it hides is counted. A playbook’s preview has the same box.
What appears on your page it shows the bar you are about to get — including
“Not showing to you · 1 rule not matched”. If the answer is already on screen, you may not
need to open the page at all.
preview yet — this campaign is a draft. Publish it to staging or to live first; the preview link shows the
published content, not the draft.”
The QA bar on your page
Your site opens with your own content and a bar pinned to the bottom of the window. One line answers the whole
question before you expand anything.

Reading it left to right: the STAGING badge if this browser is being served staging content, a
state dot, the campaign and its headline — “8 of 11 held back” — then chips
summarising what happened, then Diagnose and Your session.
The bar follows you as you click through the site. It is not a setting: it comes from the address
you opened and nothing else, nothing is saved, and visitors on that page see neither the bar nor anything it
changes.
The RECOMMENDS chip
Where the campaign contains recommendation widgets, the collapsed bar carries a RECOMMENDS chip
naming the algorithm chain, one chip per widget — Straight from the catalog → Best sellers. That is what the widget
can draw from, primary first, then each fallback in order.

Diagnose — what happened to every action
Diagnose lists the campaign’s actions grouped by what happened to them,
rather than one flat list — so five actions stopped by the same rule read as one sentence and five names, not
five repetitions.

Above the actions, Audience rules shows the campaign’s own targeting checked rule by rule against you — “0 of 1 matched”, the rule written out, and whether you pass it. That is usually the whole answer when a campaign is not showing and its actions look fine.
Each group carries its own action:
- Hide them on the group that did show — several actions can land in one spot and
stacked content cannot be judged, so taking them off is how you see what is underneath. - Run it now, or Run all 5 on a group — asks the server for those actions and
runs them on the page in front of you, so you can look at content a rule is currently holding back. - Force it on anyway at the top, when nothing is showing.
- Open QA Simulator for the deeper, rule-by-rule answer.
The reasons it gives, in its own words:
| What it says | What it means |
|---|---|
| shown on this page | It ran. |
| its placeholder … matches nothing on this page | The action is bound to a placeholder whose selector finds no element here. The selector is named, so you have somewhere to look. |
| never reached this page — usually a placeholder page group that excludes this URL, A/B rotation choosing another variant, or an action that is not published | The server refused it before it ever got here. The Simulator names the actual rule. |
| its recommendation came back with no items | The widget produced nothing — and the bar names the algorithm and what it feeds on. See below. |
| it had already run on this page view | Something ran it earlier in the same page view. |
| this browser was told not to show it again | The visitor dismissed it, or it is set to show once. |
| held back by a campaign frequency cap | A frequency cap stopped it. |
| its presenting rules skipped it this time | Rotation or presentation settings chose something else. |
| its content substituted to nothing on this page | The content is there, but every variable in it resolved to empty. |
| a setting it needs was never chosen | The action is unfinished — a required option was left blank. |
| it failed while rendering | The action errored on the page; the message follows. |
Where several actions of the campaign share a placeholder, each carries a priority badge. They run
in that order, lowest first — so a higher number lands after, and under, the others.
Which one served? — the algorithm actually filling each slot
The chain says what a widget can draw from. Which engine actually filled the slots is a different question,
because a union is usually a top-up rather than an only-when-empty fallback — several engines
routinely serve at once, so “which algorithm is showing” has no single answer. It has a breakdown.
Every recommendation group in Diagnose carries a Which one served? button. Pressing it compiles and
re-runs the widget’s own query on the tracker and reloads the page with the answer, so it costs nothing unless
you ask.

Each action then carries a SERVING chip: 12 × Straight from the catalog,
1 × What they looked at, or nothing right now when that widget produced no items at all.
And where a recommendation came back empty, the bar names the engine and what it needs — which turns
“no recommendations to show” into somewhere to go:

that outright rather than hinting — “and this account has no such set defined, so the primary can never
return anything until one exists.”
Your session — who the tracker thinks you are
Your session opens the same data the console prints, in tabs, with a count on each. A tab showing
(0) is itself an answer — “no product interactions” is exactly why a purchase-based
recommendation returned nothing — so empty tabs stay, greyed out, rather than disappearing.
| Tab | What it answers |
|---|---|
| This visit | Visitor id, visit id, tracker host, which page groups matched, how many campaigns matched. |
| Profile | What the account knows about this visitor, including any CRM fields it syncs. |
| Pages | The pages of this session, newest first — half of every page-group question. |
| Containers | What each container read or captured this session: the value a targeting rule or a template variable then sees. |
| Products | Product interactions recorded for this visitor. |
| Content | Article interactions — the content equivalent of Products. |
| Interests | The interests built from what this visitor read or viewed, strongest first. |
Seen it already? Reload as somebody else
A large share of “why is it not showing” is “because it already showed you”. Two buttons at
the foot of Diagnose deal with it:
- Reload as a new session — same visitor, brand new session. Anything counted per session
resets. Your history as a visitor is kept. - Reload as a new visitor — somebody who has never been here. Clears the visitor id, the
session, and the per-action display history behind frequency capping. Clearing cookies alone does not do this,
because that history lives in browser storage.
The STAGING badge, and the rest of the bar
- STAGING appears when this browser is being served the staging version of your content rather than
what the public gets. A campaign published only to staging appears here and nowhere else — and one published live
can look out of date here if staging holds an older save. - The arrow moves the bar to the other edge of the window — useful when the campaign you are
previewing puts its own content where the bar is. - × hides the bar for this page. Reload to bring it back; it comes from the link, not from
anything saved.?_S_T=offends the preview session altogether.
Behind each line: Details
The checks behind the verdict card. Each opens in place from its line’s Details.
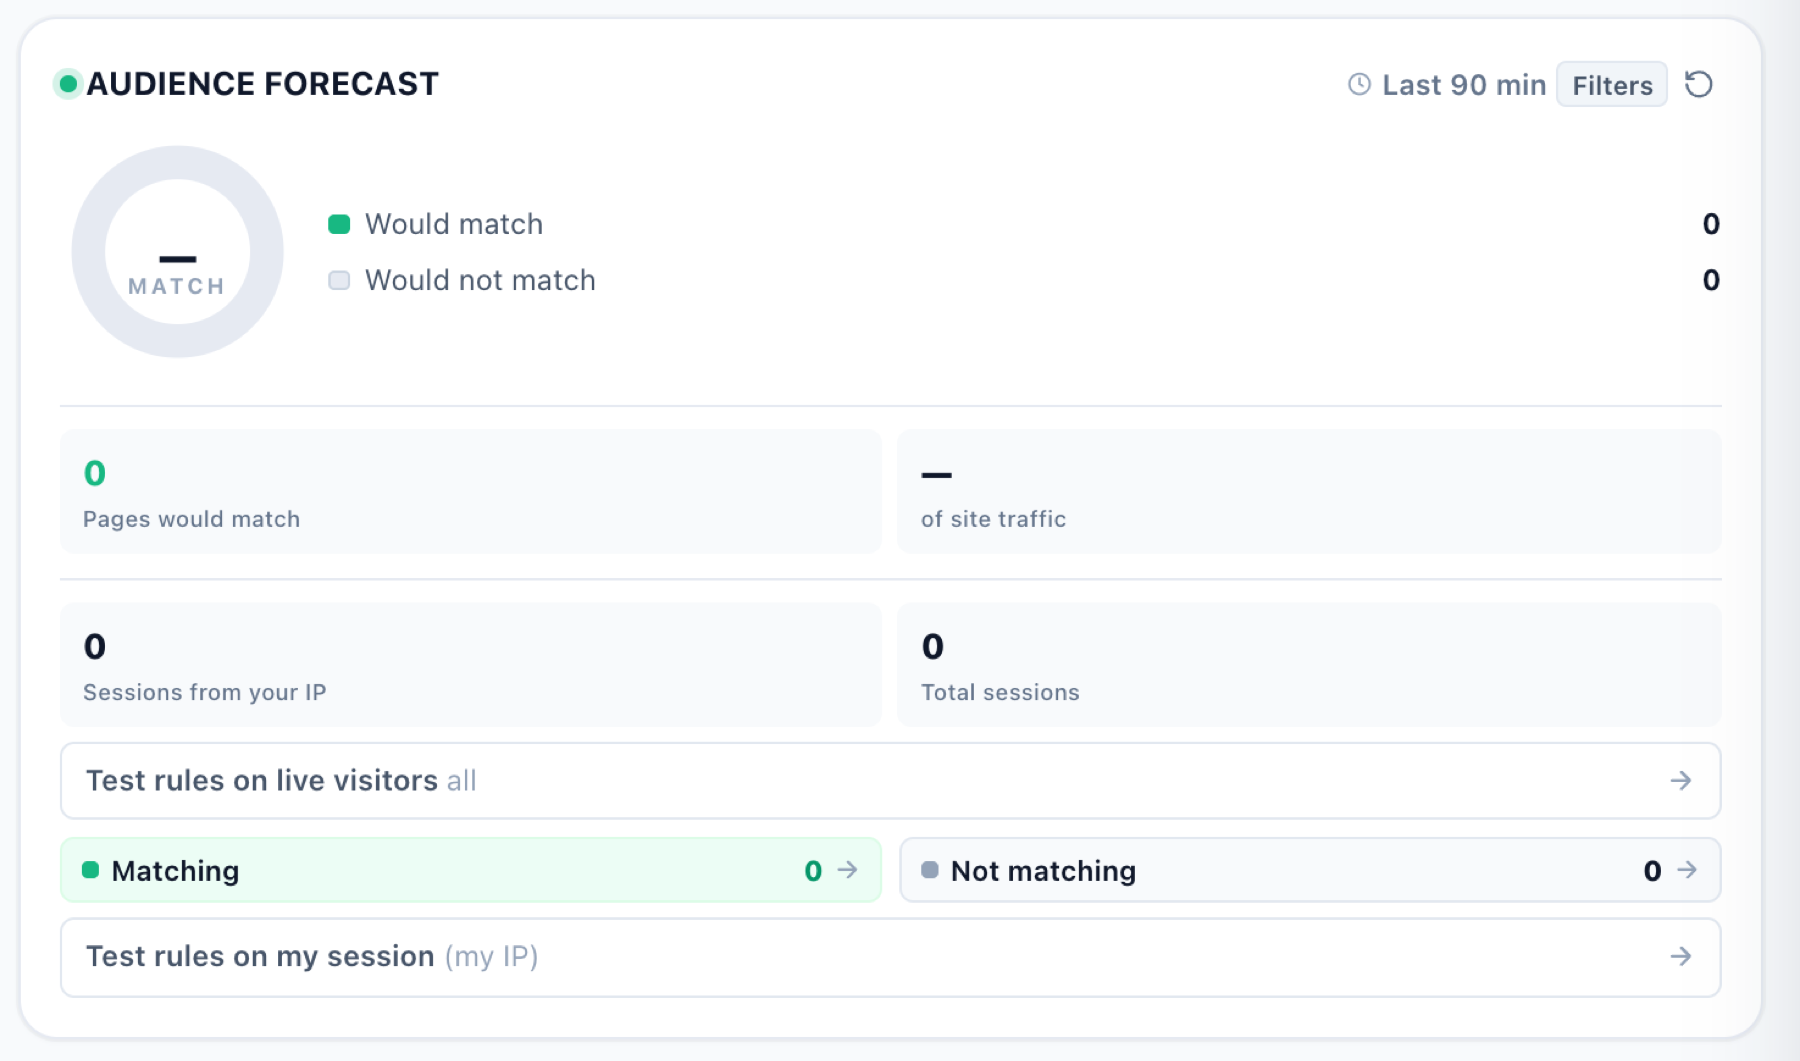
Audience forecast — who would match
Under Who it reaches. Would-match against would-not-match over recent sessions, so an audience that
turns out to be nobody is visible before launch rather than after a silent week. Beside it: how many actions the
campaign presents (and how many are switched off), how its traffic is split between test versions, and what decides a
winner.
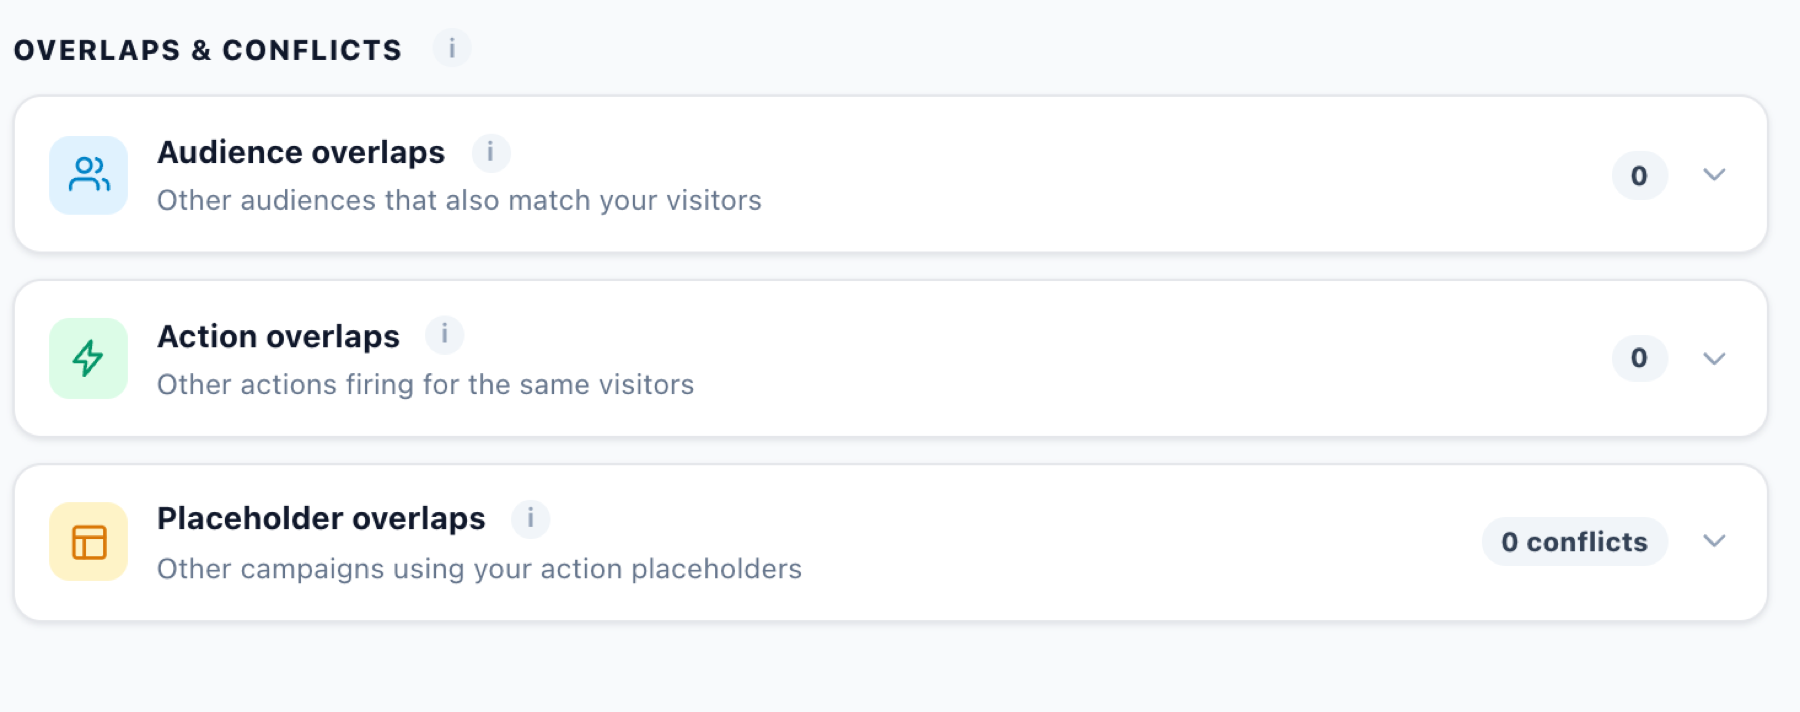
Overlaps & conflicts
Under Nothing in its way. Where this campaign collides with another — the same audience, the
same action, the same placeholder. Expand any row to see exactly what collides.
Action delivery
Under It runs. What each of the campaign’s actions did on the page in the last 90 minutes:
Sent to the page, Viewed on screen, Error (it could not run) and
Clicked. Click a number to see those sessions.
Recommendations — the Recommendation Simulator
A recommendation campaign gets a step of its own, next to QA: the Simulator runs the
campaign’s algorithm on its own and shows what it picks — for one real visitor, for one product, or for
somebody with no history at all.

- Who to simulate — a Visitor (search by the whole email or the whole user ID —
neither matches on part of one), a Product, or a New visitor with no history. - Or filter by behaviour — among visitors on the site now, who did some interaction at least
n times: list who matches, or pick one. - Widgets in this campaign — each with its slot count, its algorithm and whether it has a
fallback.
A Multi-Recommendation Widget is one card in the list, with its strip of tab names and how many of its tabs show items. Its product and article tabs run like any widget; a promotion or a banner tab says the Simulator covers recommendation tabs only — check it with Preview as instead. See Multi-Recommendation Widget.
Each item the Simulator shows says whether the algorithm, a fallback or the filler put it there, and the same person picker is in every personalization editor as Preview as — see Preview as a Visitor.
Content step and have not saved. So you can try an algorithm before committing to it.
It reports honestly when nothing comes back: “the algorithm found no candidates for this subject, and the
fallback produced nothing either”, and separately when the fallback did not fill the rest. Items no longer in
the catalog are marked rather than silently dropped.
Whether the campaign shows up at all — audience, page, placement — is the QA step next
door. The Simulator answers “what would it pick”, not “would it appear”.
Email sent by Personyze
The QA step of an Email & SMS or a Cart Abandonment Emails campaign opens on the
same kind of card as a site campaign: Ready, or Almost ready with the things to look at.
Under it are three tabs: Preview by user, Sample recipients and Staging
mode.
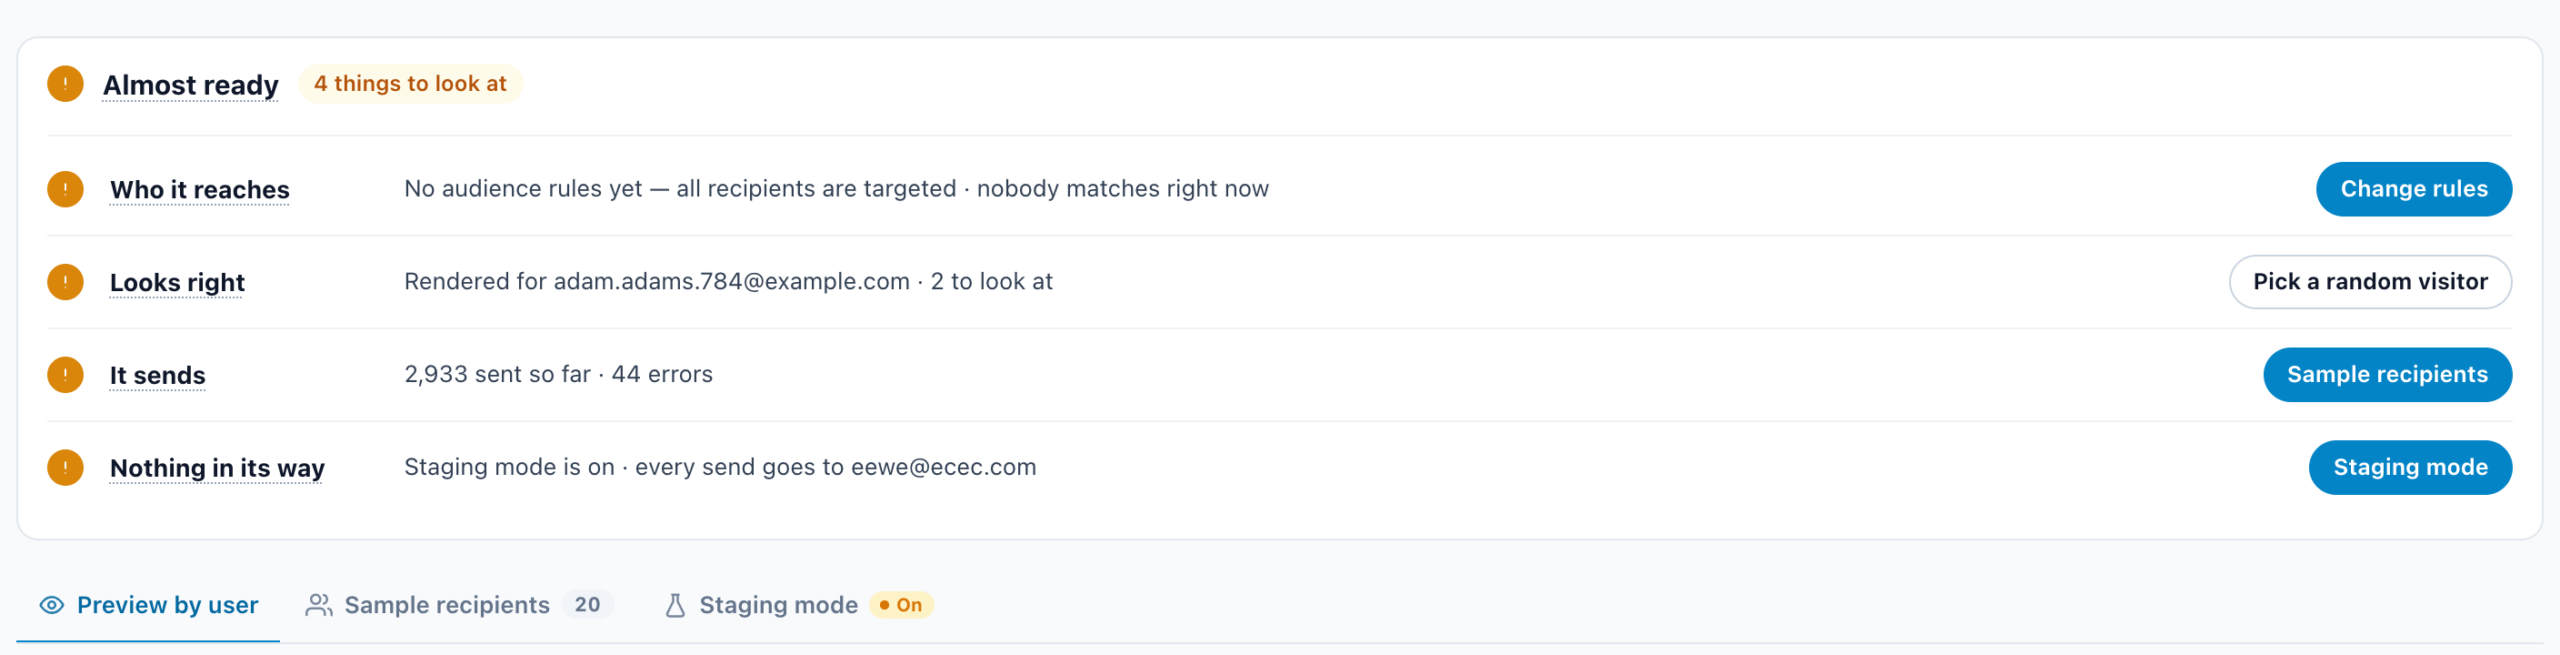
| Line | What it says | Button |
|---|---|---|
| Who it reaches | The audience rules in a sentence, Recipients who match: …, and how many people they match right now, as the last check of the rules found them. nobody matches right now is a thing to look at. | Change rules |
| Looks right | The email rendered here for one real person and its pre-flight checks: Rendered for … · nothing to look at. It adds a copy sent to … once you send yourself one. Before anything is rendered, it reads Tried it. | Pick a random visitor |
| It sends | What it has sent so far, what is waiting to send, and errors: 1,240 sent so far · no errors, or Not sent yet. Sends waiting for each person’s best time, or held by a new sending domain’s warm-up, are not a fault. | Sample recipients |
| Nothing in its way | Staging mode and the sender it needs: Staging mode is off · a sender is ready, Staging mode is on · every send goes to …, or what holds its sends back, such as no mail server to send with. | Staging mode |
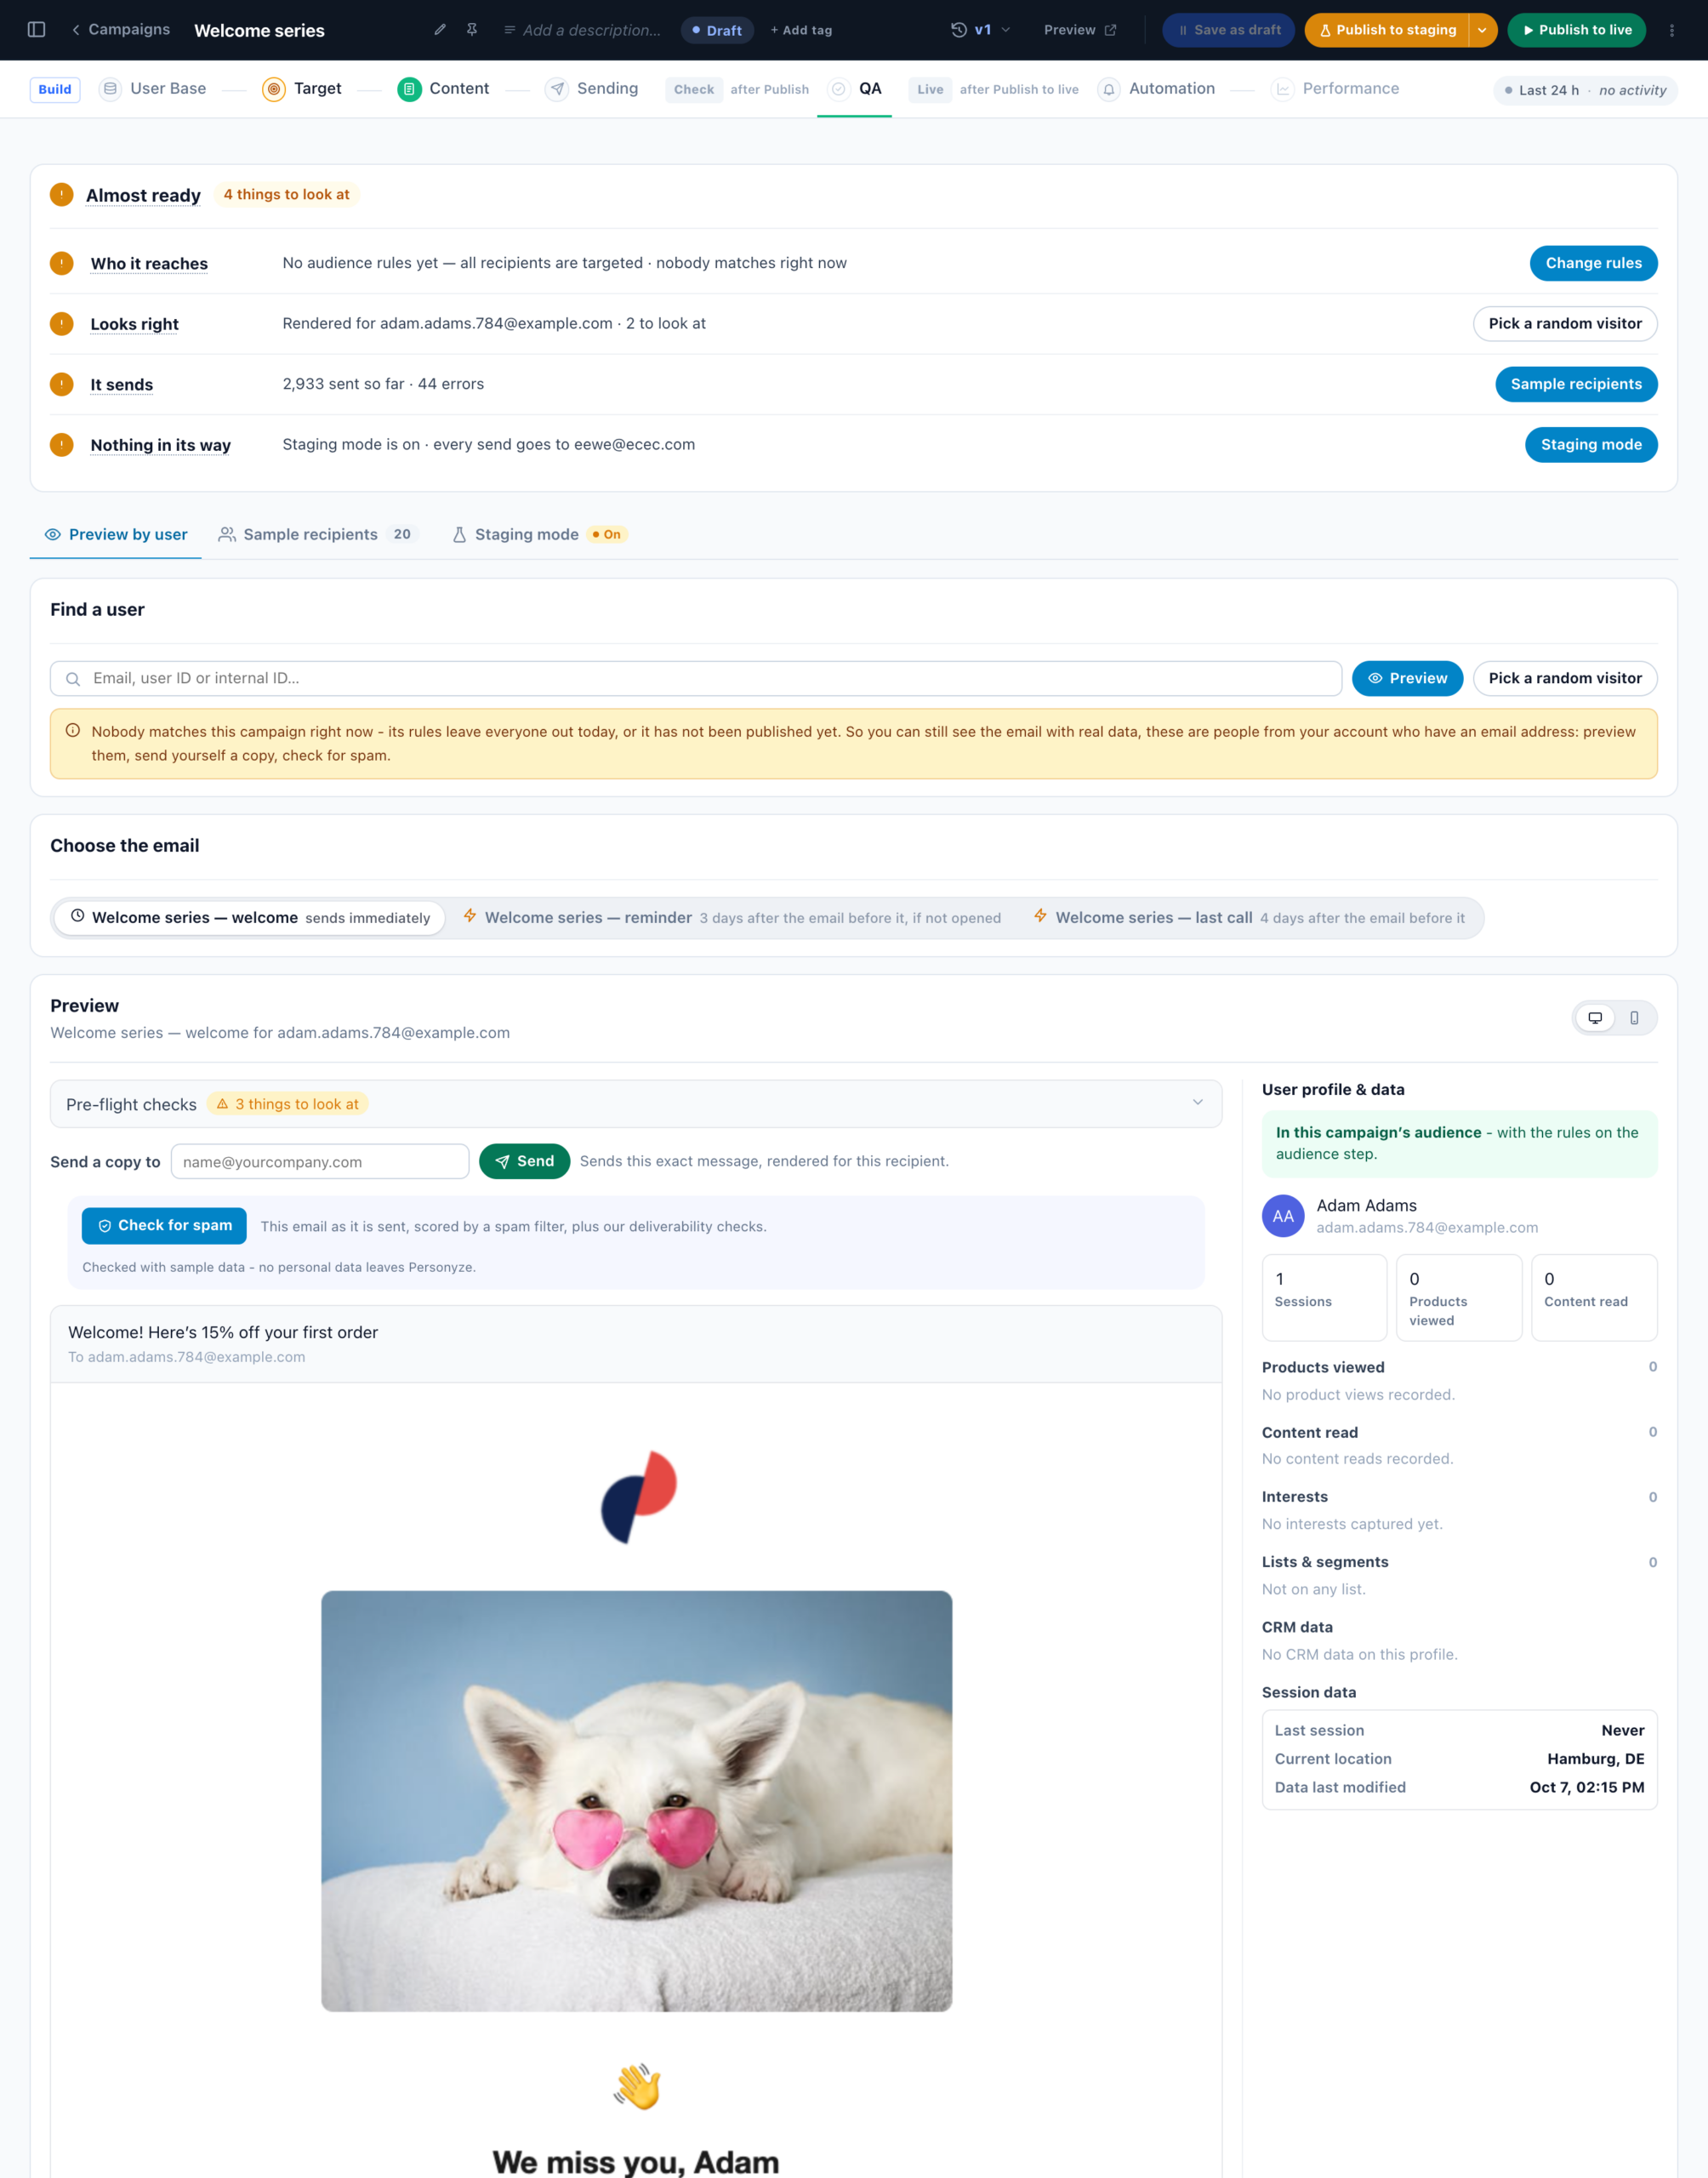
Preview by user
Renders any email in the campaign exactly as a chosen person would receive it, with their own
personalization. Find them by email, user ID or internal ID. Part of an address works too, and lists the
Addresses that contain it. Or press Pick a random visitor. Their profile and data sit beside the
preview, so you can see why it rendered that way.
Is this person in the audience? Beside the person, the campaign’s rules are
tested for them. It reads In this campaign’s audience, or Not in this campaign’s
audience — this email would not be sent to them — with the reason: the rule they do not meet
(Does not meet: …), the Exclude rule that rules them out, no email address, or unsubscribed from all email.
Change the rules opens the audience step. The same answer is a row of the Pre-flight
checks, and the email’s design editor shows it under Preview as.
Send a copy to any address sends that exact message, rendered for that recipient —
the way to check it in a real inbox rather than in a panel.
Sample recipients
Who matches the audience right now, and what has already been sent to each of them.
When nobody matches yet — a campaign never published, or rules that leave everyone out today,
such as a date range that has not started — the step still gives you real people to preview. It takes them from the
campaign’s own list, or, with no list, from everyone in your account who has an email address. A note says so:
Nobody matches this campaign right now…. The first tile then reads To preview with, and
the audience check beside each person says they are not in the audience yet. You can still preview them, send yourself a
copy and check for spam.
nobody to render for — the demo products show the layout a recommendation block will take, and real recipients
appear as soon as visitors are identified.
Staging mode
A campaign on staging sends only to one address. Type the address and press Activate staging
mode. An email campaign published to staging then sends every email to that address. That person must be in your
user base and match the audience rules. The campaign keeps running: rules are checked and triggers fire as usual, and only
the destination changes. The address is account-wide, so it applies to every email campaign of the account. It is the safe
way to watch a real send end to end.
A live campaign is not held back. Once a campaign has a live version, it sends to its real
recipients whatever staging mode says. The tab says so — This campaign is live, so it sends to its real
recipients. Staging mode holds back only campaigns published to staging. — and Nothing in its
way reads Live, so staging mode does not apply.
Banners and recommendations inside third-party email
These render per recipient too, and the important case is the one you cannot see from your own inbox: the
fallback an unidentified recipient gets. Switch to a new recipient to see it.
banner for that recipient — check the content rules on the Look step rather than the image hosting.

Web push
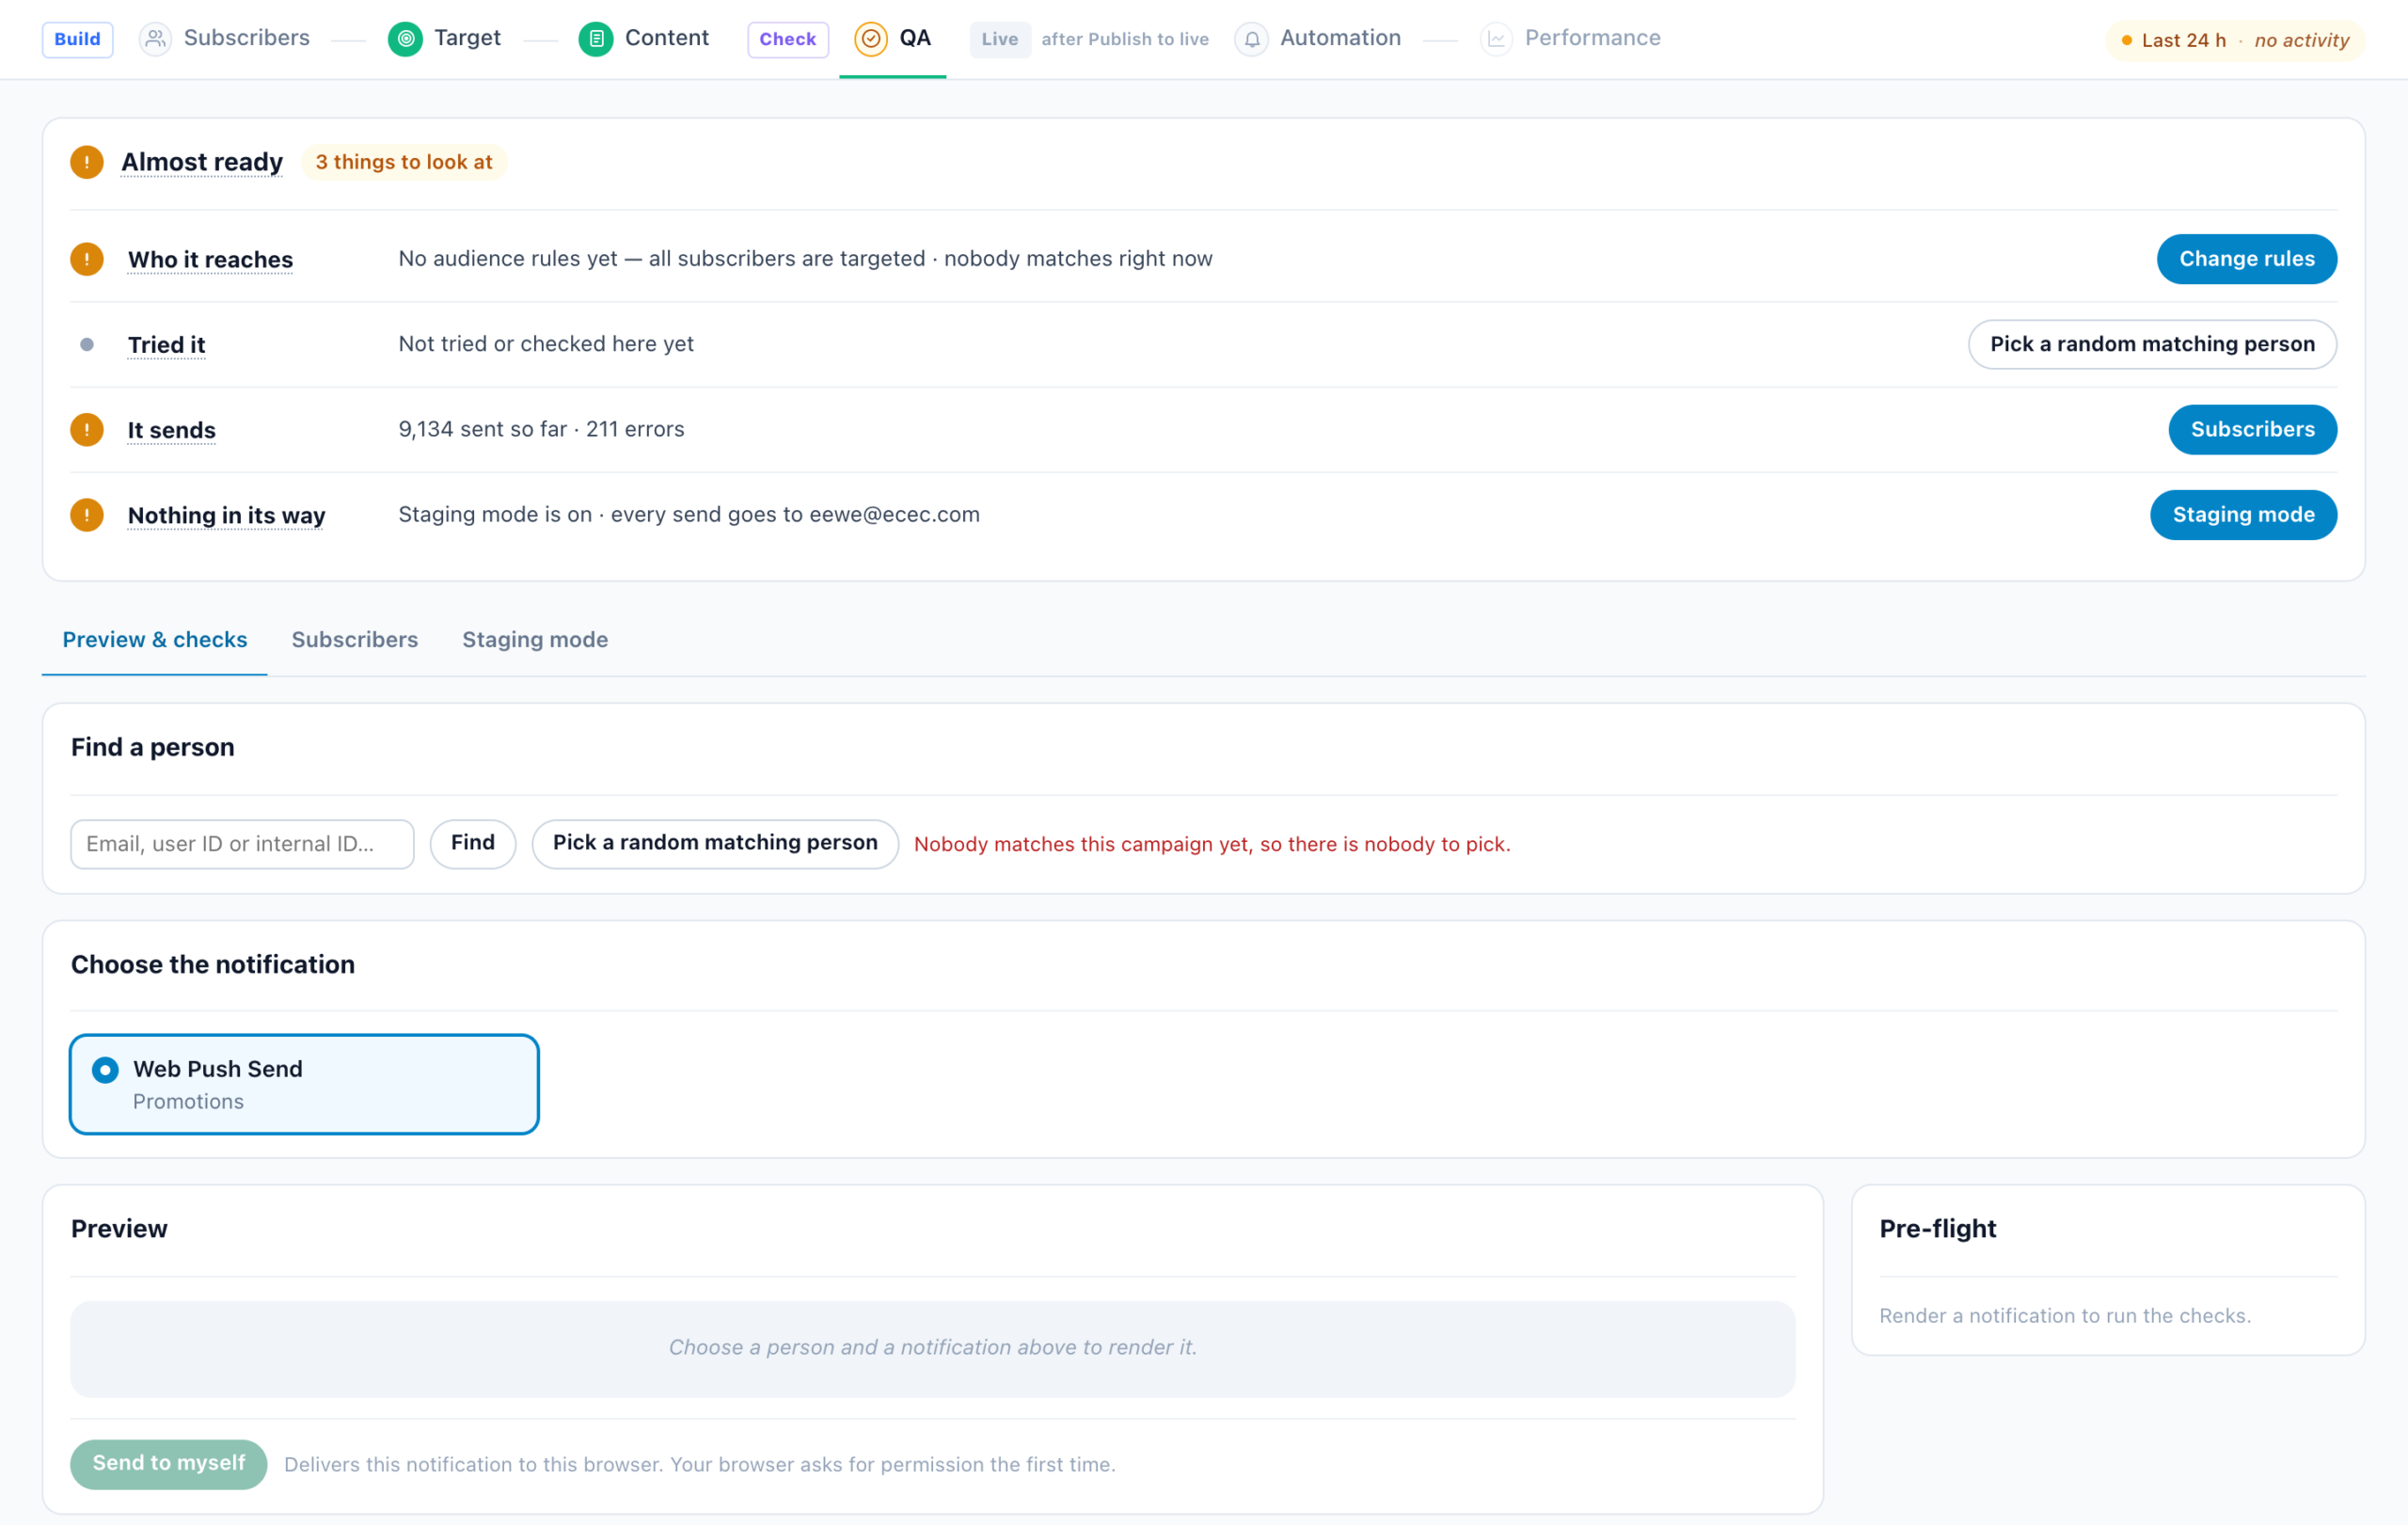
Find a person, choose the notification, and it renders as they would receive it — including whether the text
fits. You can then deliver it to your own browser to see the real thing; your browser asks permission
the first time. The step also re-checks the audience rules against your users on demand.
The same four-line card as for email sits above its tabs: Who it reaches (with
Subscribers), Looks right (Pick a random matching person), It
sends and Nothing in its way, which also says when the account has no web push sender yet.
Staging mode works as it does for email: while the campaign is on staging, it sends only to the person with the staging
address, in the browser they subscribed with. A live campaign reads Live, so staging mode does not apply and
sends to its real subscribers.
Landing pages
A readiness check rather than a preview, because a landing page either exists at an address or does not:
- Is there an address at all? “A landing page is its address — without one there is nothing to
open.” - Does DNS point at us? If not, “anyone opening the address right now gets ‘No such page’”.
- Is it held back by its own switch?
- Does every split have a destination — a control group with none is a dead end.
Checks run against what is stored, not against unsaved edits.

The QA Simulator
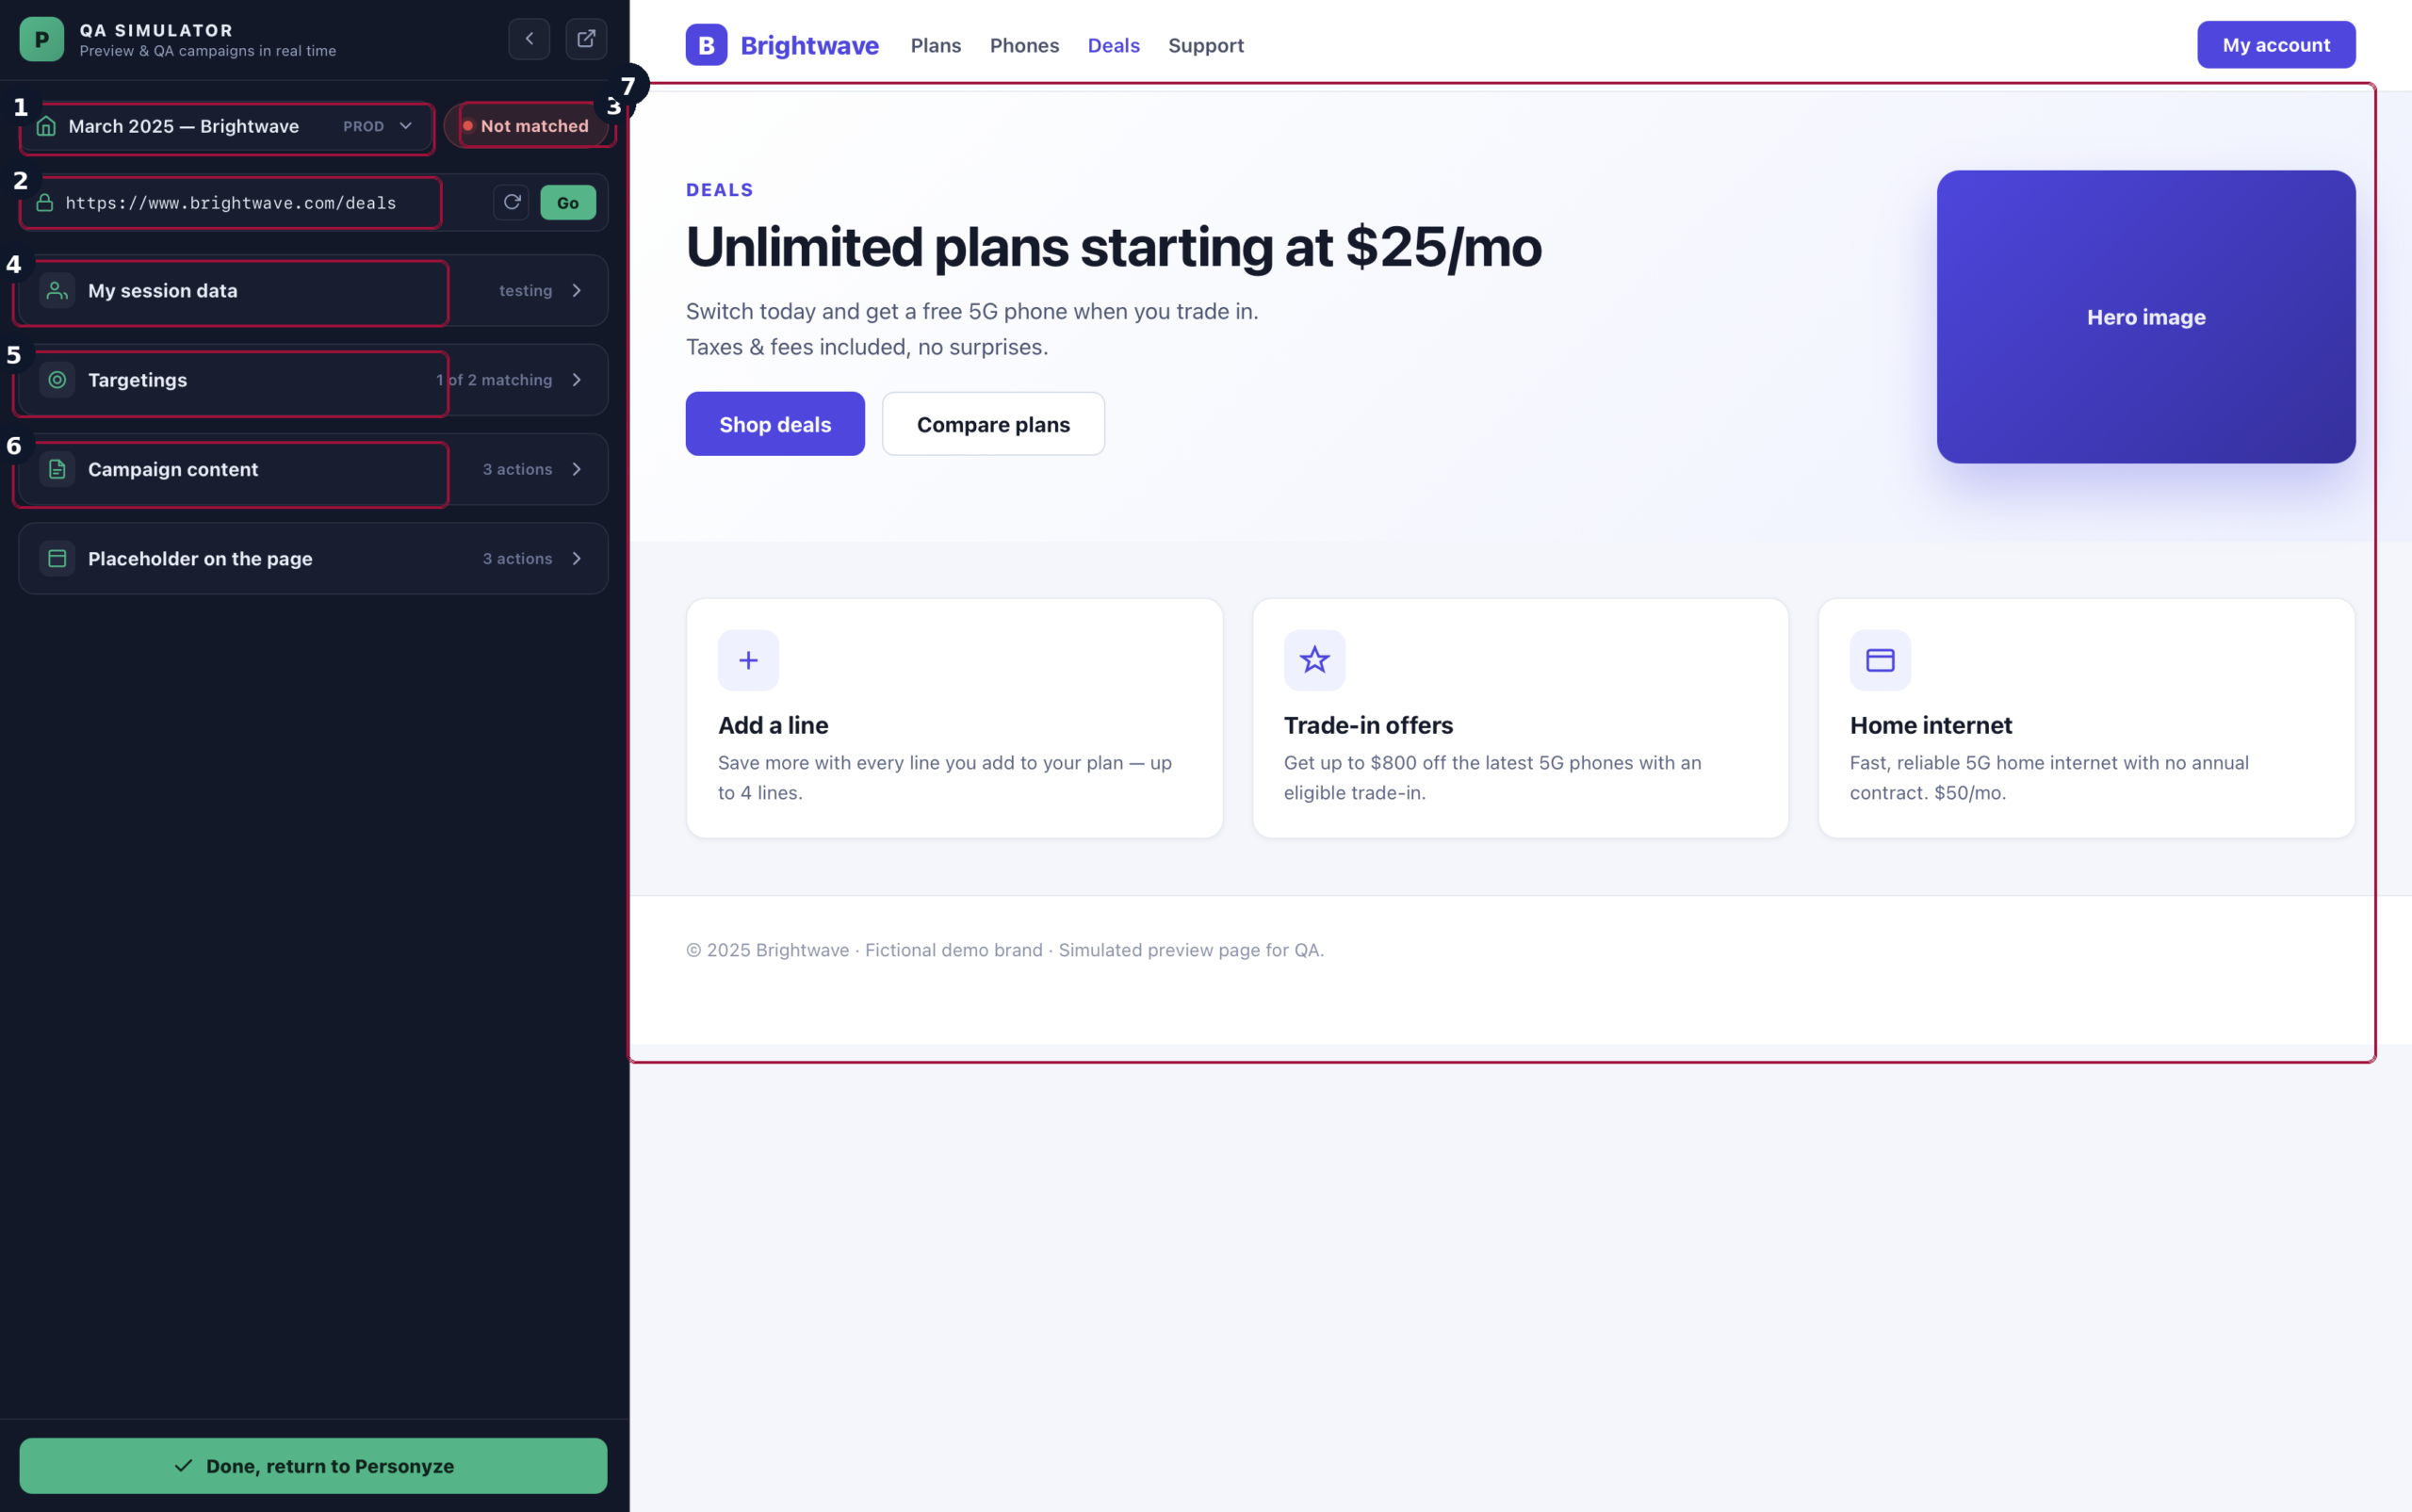
The simulator opens your own page in a new window and lets you be somebody else. It is the tool for
“this visitor should have matched and did not”.
Video: The QA simulator: test a campaign as any visitor, and ask the AI why (2:06) — it plays at the top of this article.
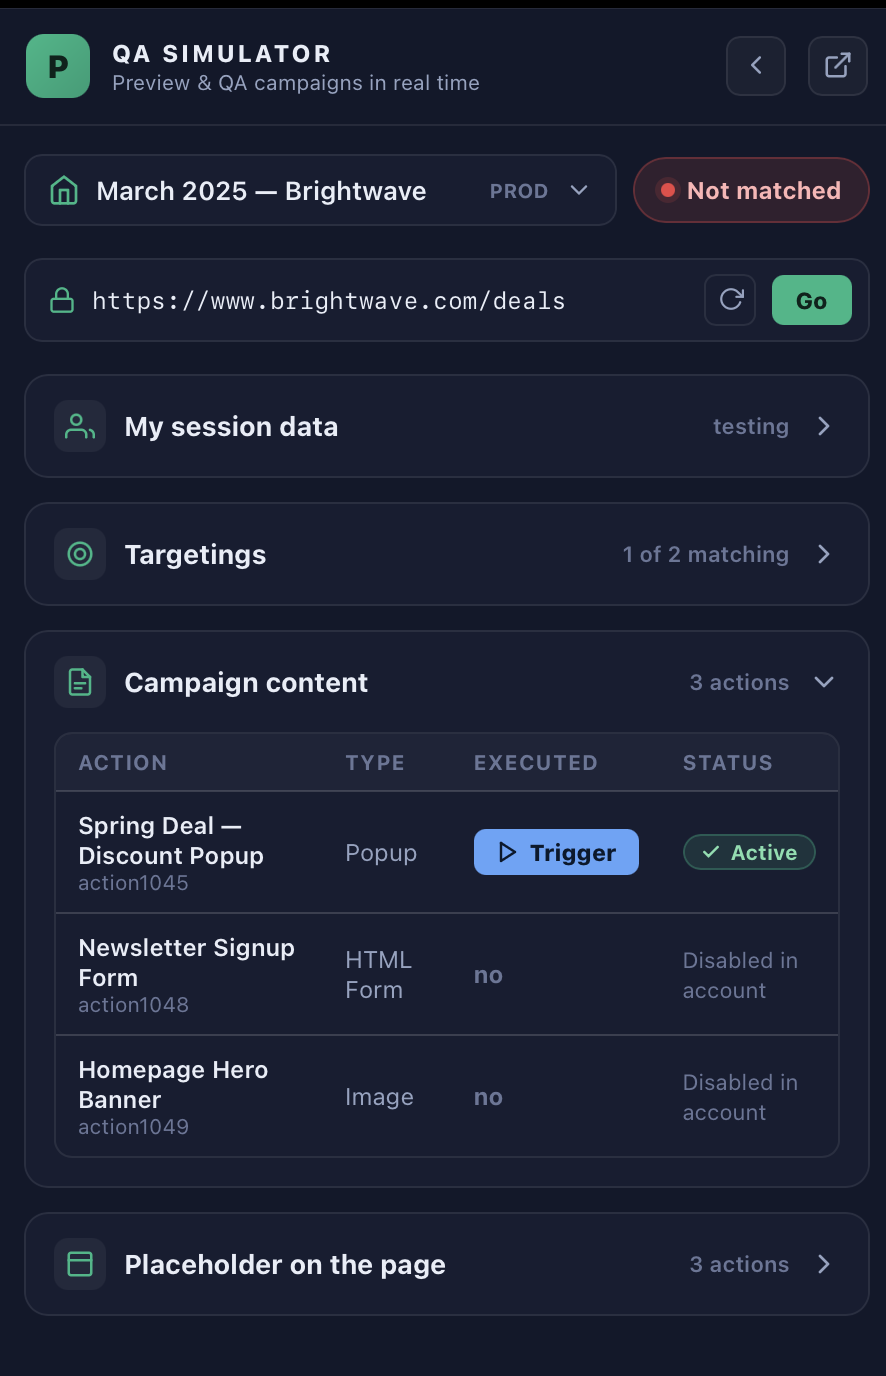
- Impersonate a visitor — switch identity to any user id and the page re-evaluates as them.
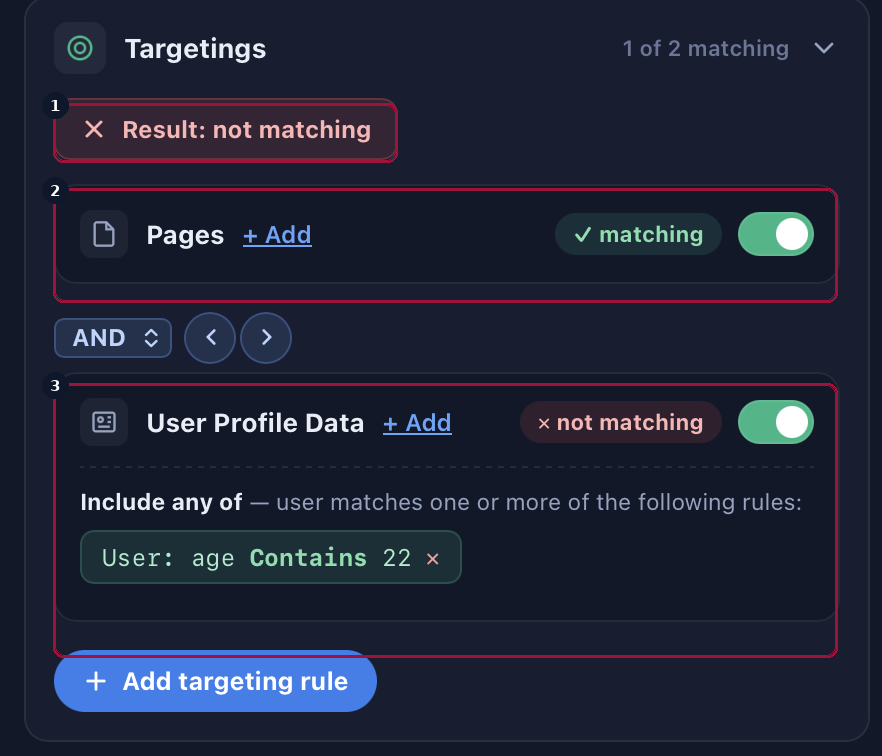
- See exactly why they match, or do not — the targeting check evaluates each rule against the
simulated visitor and shows which one failed. - Check the content that runs — every action, its type, whether it executed and its status.
- Choose the environment: test or production.
From the QA step, Be one of them opens it already set up as a visitor the campaign’s
rules match.
Staging mode, and reading the console
You are usually in staging already. Personyze remembers the three most recent IP addresses used to
save campaigns and puts visitors from them in staging by default — so the connection you build from is a tester
from the moment you save.
The control lives in the left menu, and it tells you where you stand: “your current IP is in staging”
or that it is not. From there you can enter or leave staging for this session, or register another IP by hand
— type it, or press Use my IP.
You can also flip it from the site itself, which is useful on a machine you cannot sign in from:
https://your-site.example/any-page?_S_T=testing     enter staging
https://your-site.example/any-page?_S_T=production  leave it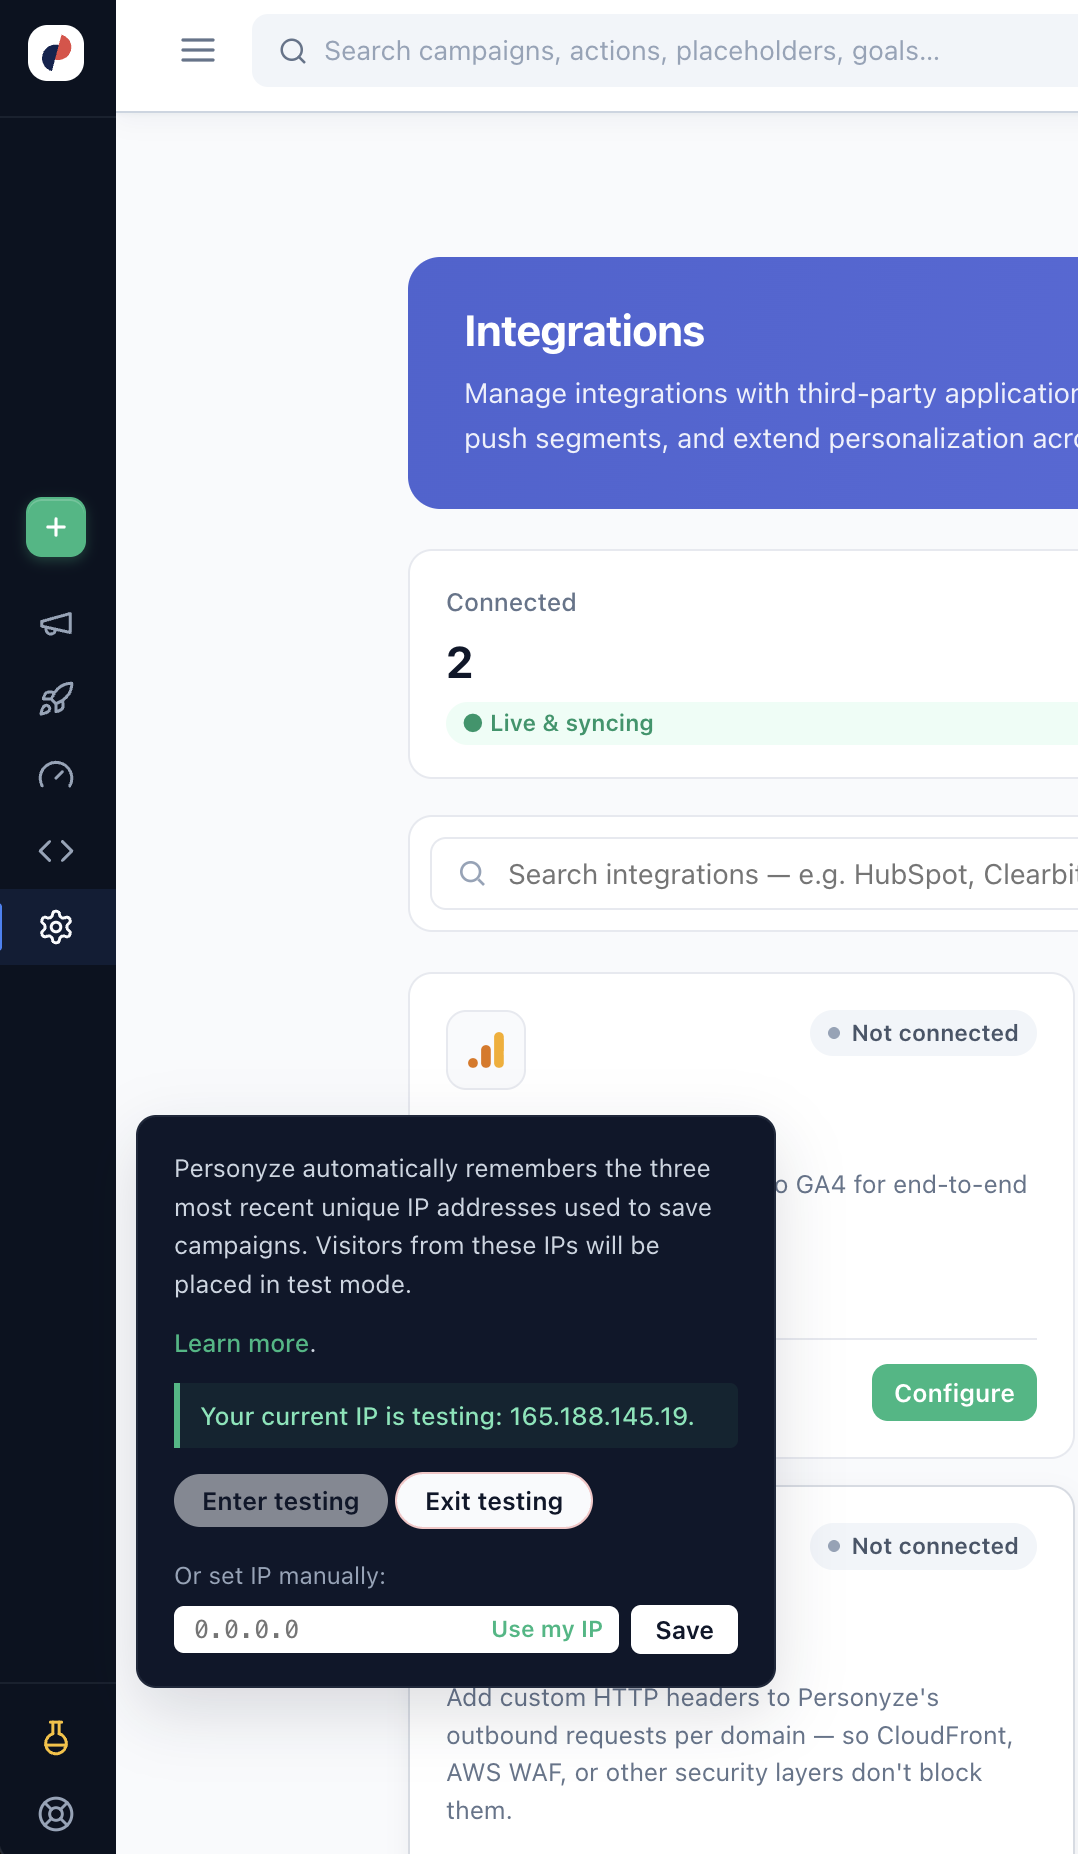
in staging mode, which is what makes it safe to test on the real site.
Console data
In staging, Personyze writes what it is doing to the browser console: the visitor data it holds, which campaigns
activated, and which actions it executed on the page. It is the fastest way to answer “did the tracker even see
this?” without leaving the page.
You can also switch staging on from the console:
_S_T.te(1)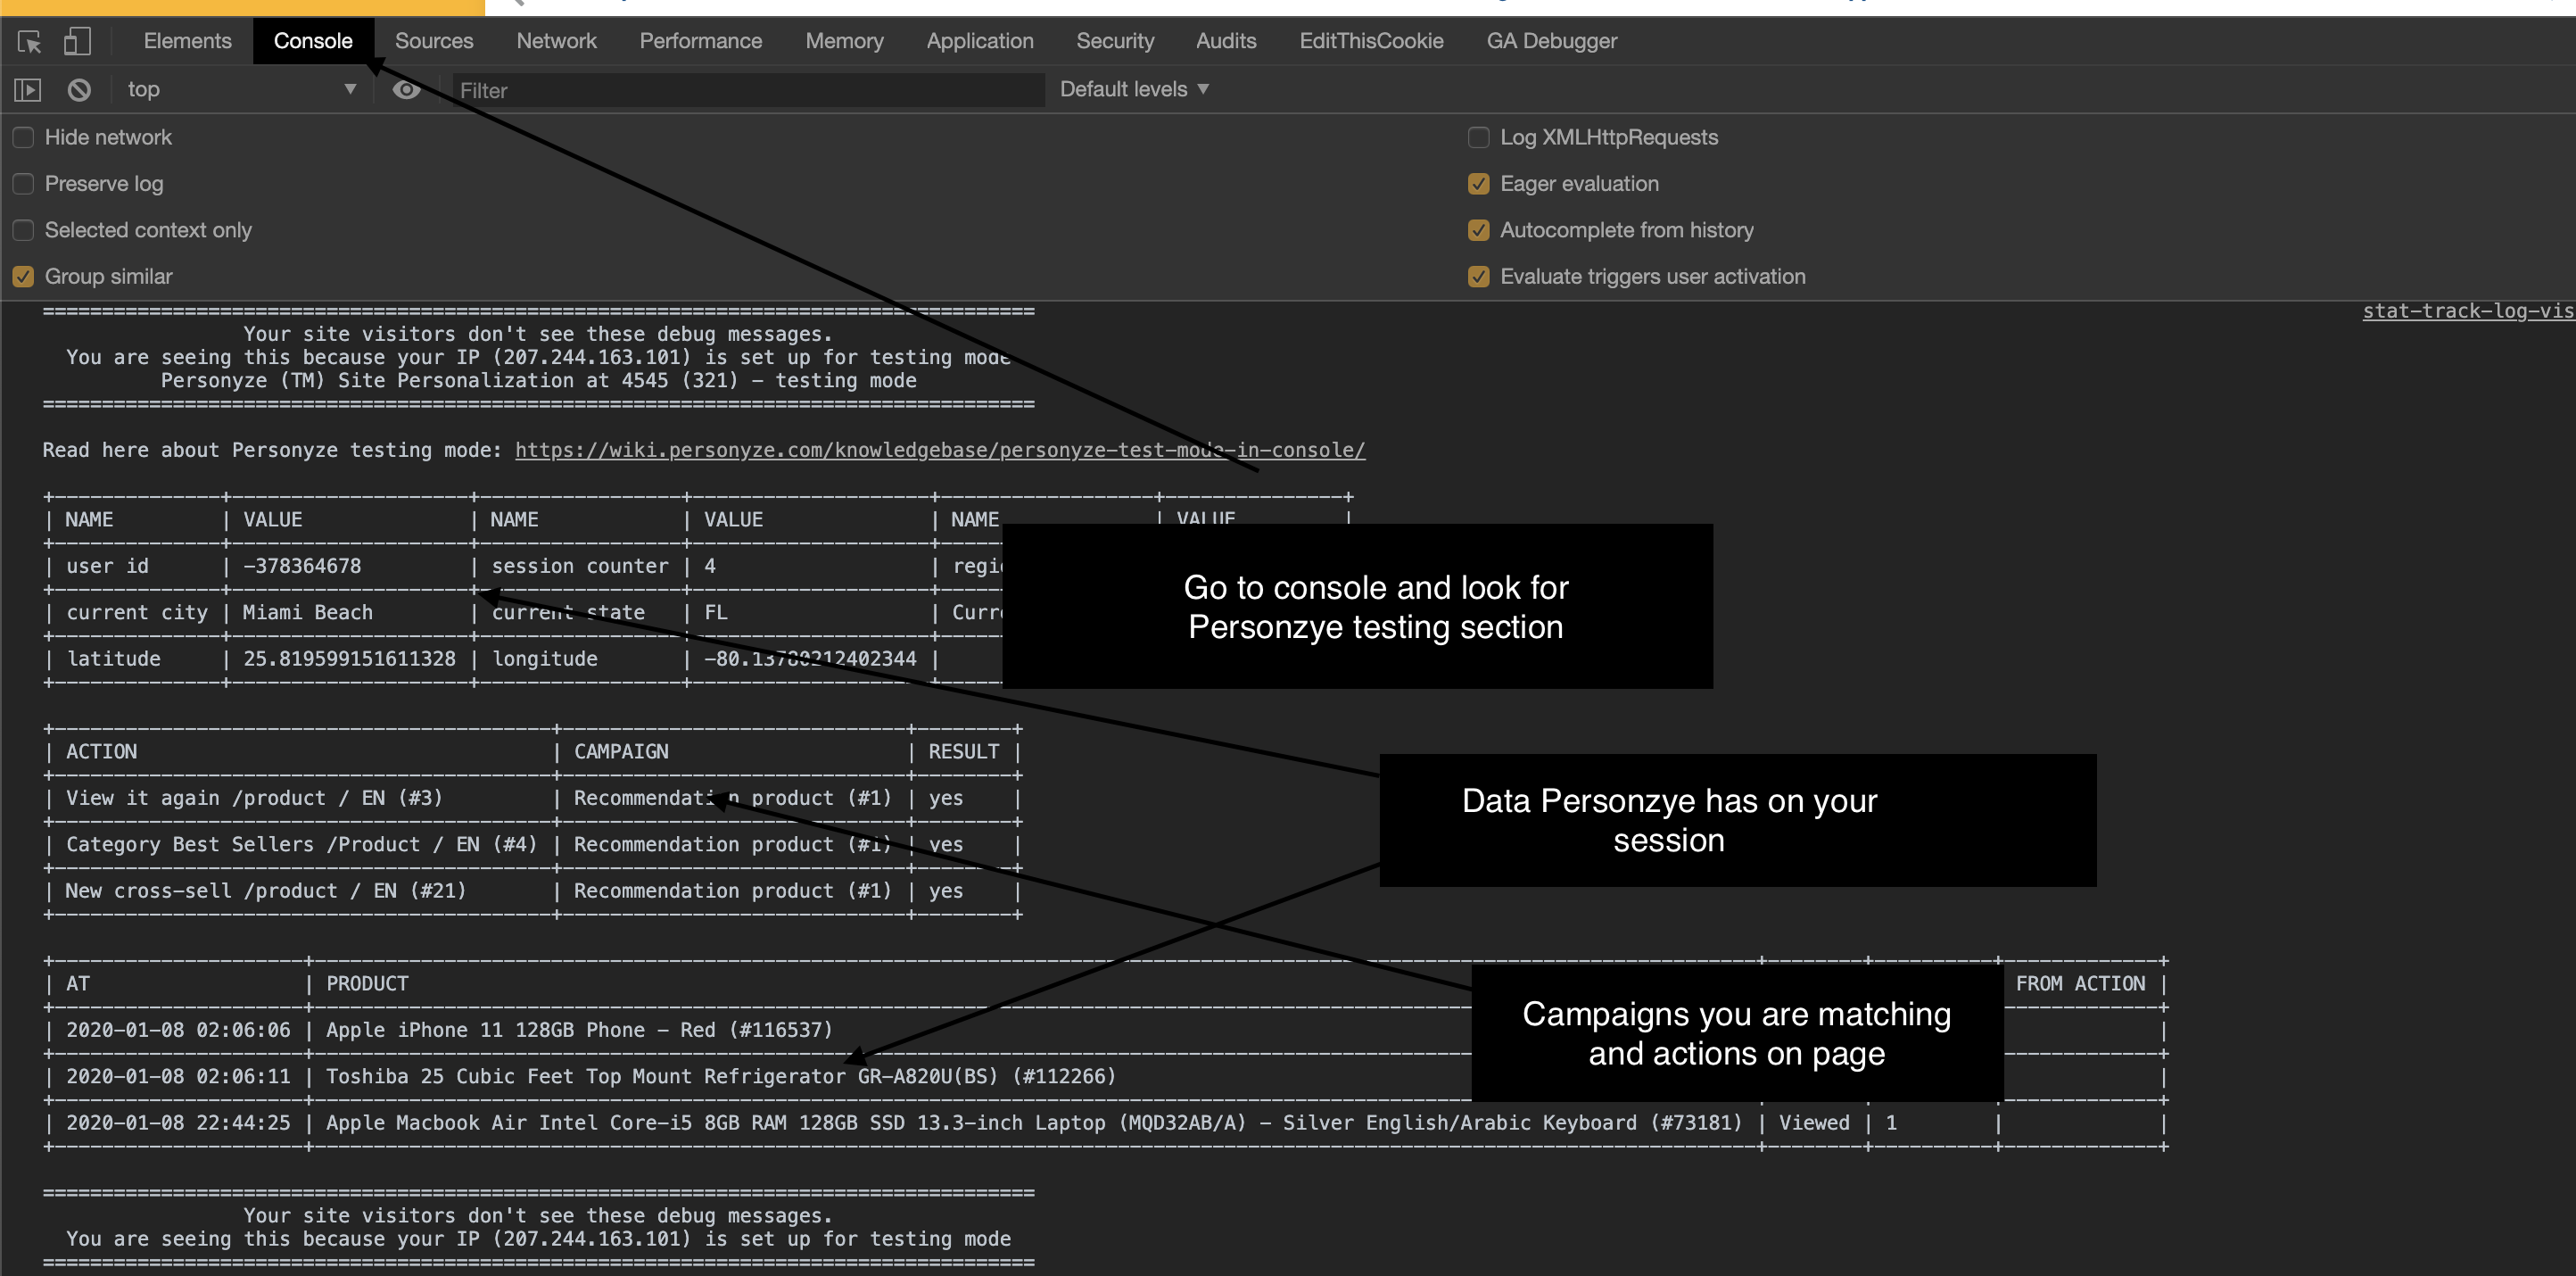
refresh or navigate to another page before newly saved campaign changes reach them — caching, not a broken
save.
Publish safely
The order that costs nothing: save → publish to staging → check it on the real site → publish
to live. A campaign in staging serves only to visitors recognised as testers, so it can sit on your production
site all day without a customer seeing it.
Still not working?
- A campaign is not showing — the tracker, the targeting,
the trigger, or a collision. - Recommendations are not appearing
- The tracker is not firing
- An integration stopped syncing
Related
- Campaigns — building the thing you are testing.
- A/B testing — when the question is which version wins rather than whether it works.
- Frequency caps — a campaign that shows once and then stops is often doing exactly what you told it.