
Before your email campaigns reach the inbox as your own, a few things are set once for the whole account: a verified sending domain, a sender with a name, your mailing address, your unsubscribe page and a test to yourself. The Set up email sending checklist lists them, says which are done, and opens the screen that does each one. This page covers the checklist, senders, verifying your domain, and the Email delivery (SMTP) drawer under Connected apps.
yourcompany.com once and any address at it sends through the Personyze mail server, signed for your domain — no confirmation email per address, and your customers see your address instead of the shared one. See Verify your sending domain.The “Set up email sending” checklist
The same checklist, with the same words, shows in three places:
- at the top of the Email delivery (SMTP) drawer under Settings › Connected apps (below), where its buttons scroll to the matching section;
- at the top of Analytics › Off-site campaigns › Email deliverability — see Email deliverability;
- as rows on the Sending step of an email campaign, where each item is done without leaving the campaign — see The Sending step of an email campaign.
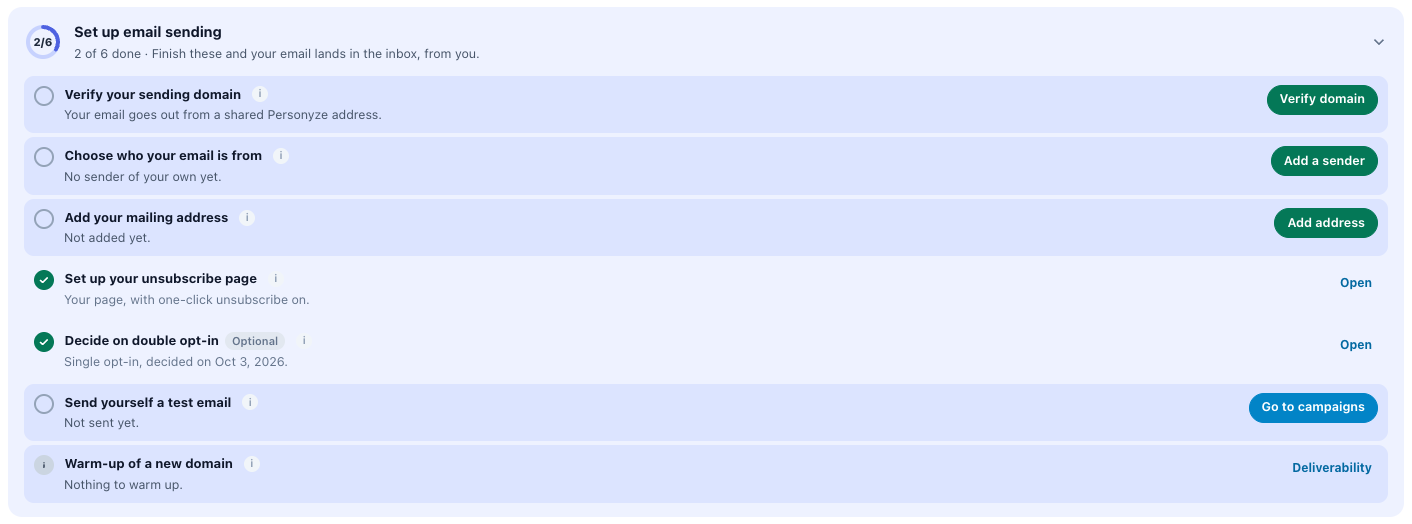
Its header is a progress ring (“4/6”), the title Set up email sending and {done} of {total} done, followed by Finish these and your email lands in the inbox, from you. while items are open. Once every required item is done, the title reads Email sending is set up and the checklist folds down to its header. Click the header to open it again.
| Item | Done when | Button |
|---|---|---|
| Verify your sending domain | The account has a verified sending domain, or an address verified for this account on the Personyze mail server, or an SMTP provider of its own. | Verify domain |
| Choose who your email is from | A saved sender has a name, at an address that is not the shared no-reply address. | Add a sender |
| Add your mailing address | A postal address of at least 8 characters is saved. | Add address |
| Set up your unsubscribe page | One-click unsubscribe is on, and at least one of logo, colour, heading, body text, button text or footer is set on the Unsubscribe page. | Set up page |
| Decide on double opt-in (Optional) | Double opt-in is on, or you pressed Keep single opt-in. | Keep single opt-in or Turn on double opt-in |
| Send yourself a test email | A test was sent: Send me a test on an email campaign’s Sending step, or Test on an SMTP provider. | Go to campaigns |
| Warm-up of a new domain | Never — this row only informs: how far a new domain’s warm-up is, or that it is paused for the day. | Deliverability |
Six items count toward the total. Decide on double opt-in is Optional: leaving it open does not stop the checklist from reading set up, and either answer is fine. The warm-up row is never counted. Once an item is done, its button turns into Open (Edit for the mailing address), which takes you back to it.
Where each button goes
- Verify domain and Add a sender — the matching section of the Email delivery drawer. From anywhere else, they open that drawer at that section.
- Add address — a text box inside the row (Company name, street, city, postal code, country) and Save. Beside it, In your email footer: shows the token
{{mailing_address}}; click it to copy it. Type that token in your email’s footer and each email gets the saved address when it is sent. An address under 8 characters is refused with That is too short to be a postal address. More in Your unsubscribe page, the suppression list and double opt-in. - Set up page — Settings › Unsubscribe page. Turn on double opt-in opens the same page on its Consent tab. Keep single opt-in records your decision without leaving the screen.
- Go to campaigns — your campaigns list. The test itself is sent from an email campaign’s Sending step (Send me a test), or with Test on an SMTP provider.
- Deliverability — the Email deliverability page.
What the line under an item tells you
Under each title is one line with the item’s state. The ones that call for something:
| Line | What to do |
|---|---|
| Your email goes out from a shared Personyze address. | Nothing of your own is set up, so email goes from the For testing address. Verify your domain. |
| {domain} is waiting for its DNS records. | The domain was added but not all of its records are found. Open it and look at each record — see Record and domain states. |
| {domain} failed its last check – look at its records. | Fix the records marked red, then contact support to restart the check. |
| {email} is waiting for its confirmation. | You added a Personyze-server sender; follow the verification email sent to that address, then save the sender again. |
| {email} has no name – the inbox shows the bare address. | Edit the sender and give it a name: Acme Team <hello@acme.com>. |
| One-click unsubscribe is off. | Turn it back on, on the Unsubscribe page. Gmail and Yahoo require it from bulk senders. |
| Still the plain default page. | Put at least your logo or your own words on the Unsubscribe page. |
| {domain} is paused for today: too many bounces. It resumes tomorrow. (or complaints) | A new domain’s warm-up stopped for the day — see Warm-up of a new sending domain. |
Senders, and the “For testing” sender
A sender is a saved From address with a sender name and the way the email leaves: through the Personyze mail server, through your own SMTP provider, or to a webhook. Every email picks one in its Sender field — on an email campaign, that is on its Sending step — and the same saved senders are offered on every campaign.
The sender picker
- The menu lists your senders under Personyze server, SMTP and Webhook.
- The shared address no-reply@personyze.com comes last in the Personyze server group, tagged Verified and For testing, with the line Personyze transactional infrastructure — no setup needed.
- Inside the menu are Send from your own domain (it opens the domain drawer) and Add a new sender.
- Under the picker: a green Send from your own domain button while the account has no domain. Once it has one: Sending domain and the domain, with Verified and Manage, or with how far it is ({found} of {total} records found, Pending or Failed) and Continue. A campaign’s Sending step leaves this line out, because the domain has its own row there.
- For a saved sender, Edit this sender appears under the picker.
The Personyze server choices are offered to accounts allowed to send through the Personyze mail server: a paid plan, or an account it was turned on for.
The “For testing” sender
The shared no-reply@personyze.com works with no setup, which makes it right for a first try and wrong for your customers. Its tooltip says why: “Fine for trying things out. Before you email customers, send from your own domain – it lands in the inbox more often and replies reach you.” Mail from a shared no-reply address lands in spam more often, and a reply to it reaches nobody.
Adding a sender
Add a new sender (or Edit this sender) opens a panel: Saved to your account’s email providers and reusable on any campaign. Choose one of three kinds:
| Kind | What it is | What it needs |
|---|---|---|
| Personyze mail server | Sends from a verified address on Personyze’s transactional infrastructure. The fastest setup, with no SMTP credentials. | Address verification required — a confirmation email to the address, or a verified domain |
| Your own SMTP | Your SendGrid, Mailgun, Postmark, Brevo or other provider, with its settings filled in. Sending reputation and bills stay with your account. | Host, port and auth required |
| Webhook (HTTP POST) | Posts the rendered email to your endpoint, for when your own stack handles delivery. | JSON or form-encoded |
A Personyze mail server sender has three fields:
| Field | What to enter |
|---|---|
| From email | The address, or Sender Name <you@yourdomain.com> so the inbox shows the name. It must be on a domain you can receive the verification email at. |
| Verify the whole domain instead | A link, not a field: it opens the domain drawer, so every address at the domain is covered at once. |
| Default Reply-To | Where replies go when an email does not set its own. Left empty, replies go to the From address. |
Press Save sender. An address that is not verified yet shows Not verified: We sent a verification email with further instructions to {addr}. When you are done, save again to re-check. Follow that email, save again, and the sender shows Verified: Thank you. Your email is verified successfully. An address at a domain you have verified needs no confirmation email. A saved sender also has Delete this sender.
When an address is not verified for your account
Through the Personyze mail server, an email whose From address is not verified for your account still goes out — from the platform’s no-reply address, named “your account via Personyze”. The address you asked for becomes the Reply-To, so replies still reach you.
One account cannot send as an address another account verified. If the address was first verified by another account, its owner gets an email that opens a page titled Allow sending from your address? with a Yes, allow it button. Senders on your own SMTP server or provider are not affected by any of this.
Verify your sending domain
Verify a domain once — yourcompany.com, say — and you can send from any address at it through the Personyze mail server, signed for your domain (DKIM). No confirmation email is needed per address, and every Personyze-server sender at that domain gets the Verified badge. It covers that exact domain: news.yourcompany.com is verified on its own.
The same section is in two places: Your sending domain at the bottom of the Email delivery drawer, and the right-side drawer Send from your own domain, which opens from the sender picker, from Verify the whole domain instead, and from the domain row of a campaign’s Sending step.
- Type the domain (yourcompany.com) and press Add domain.
- The domain opens with its records in a table: Type, Name, Value and Status. Each name and value has a Copy button. Copy all copies every record as a tab-separated list, ready to send to whoever runs your DNS.
- Add the records at your domain’s DNS host.
- Press Check now. Checked at {time} shows the last check. While the domain is open and still pending, the drawer checks again by itself every 30 seconds, for up to 20 minutes.
- Once the domain is Verified, send from any address at it.
Adding a domain can be refused with:
| Message | Why |
|---|---|
| That is not a valid domain. | The box holds something that is not a domain name. |
| You cannot verify a public mailbox domain like gmail.com – use your own domain. | Gmail, Outlook and other public mailbox domains cannot be verified. |
| That domain belongs to Personyze. | The platform’s own domains cannot be added. |
| This account has the maximum number of domains. Remove one first. | An account can hold 20 domains. |
| This account added the most domains allowed in one day. Try again tomorrow. | Up to 10 domains can be added a day. |
| Amazon SES did not accept the domain. Try again in a minute. | A passing error at the mail server. |
The DNS records
Each record has a purpose label, with a tooltip saying why it is there.
| Purpose | Record | Needed | What it does |
|---|---|---|---|
| Ownership | TXT on _personyze, value personyze-verification=… — unique to this account and this domain |
Required | Proves the domain is yours. Keep it after verifying. |
| DKIM | CNAME records on names ending in ._domainkey |
Required | Lets the Personyze mail server sign your mail for your domain, so inboxes trust it. |
| Bounces | MX and TXT records on bounce (the subdomain bounce.yourcompany.com) |
Recommended | Bounces return to a subdomain of yours, so SPF passes for your domain. Your existing records are not touched. |
| DMARC | TXT on _dmarc, value v=DMARC1; p=none; |
Optional | Shown only when your domain has no DMARC policy of its own or from a parent domain. Gmail and Yahoo expect one from bulk senders; p=none only reports — it blocks nothing. |
Your domain’s own SPF record is never read or changed. Without the bounce records your mail still sends; bounces then return through the mail server’s own domain instead of yours. The MX record’s priority is shown under its value.
Record and domain states
Each record has a status chip:
| Chip | Meaning |
|---|---|
| Found (green) | The record is in DNS as shown. |
| Missing (amber) | Not found yet. New records usually show up within minutes. |
| Not checked (amber) | Could not look this up – check again in a minute. |
| Wrong (red) | Something is there, but it does not match. The fix is written under the value. |
The fixes a Wrong record can show:
- Your DNS host adds “{domain}” itself – enter only “{host}” as the name.
- Your DNS host added your domain to the value – end the value with a dot: “{value}.”
- This record is proxied – set it to “DNS only” (in Cloudflare, the grey cloud).
- Two SPF records on one name cancel each other – merge them into one.
- This name already has an SPF record – add “include:amazonses.com” to it rather than a second one.
- This value belongs to another account – copy it again from here.
- Remove the quotes around the value.
- Two DMARC records cancel each other – keep only one.
- The value is different – replace it with the one shown.
Under the fix, Found instead: {values} shows what DNS has at that name today.
The domain as a whole has a chip and a line:
| Chip | Line | What it means |
|---|---|---|
| Pending | Add these records at your DNS host, then check. Once every required record is found: All records found – Amazon is confirming them. Usually minutes, at most 72 hours. | Waiting for your DNS, then for the mail server to confirm the DKIM records. |
| Verified | Verified – you can now send from any address @{domain}. | The ownership record is found and DKIM signing works. The domain stays verified as long as DKIM keeps working. |
| Failed | Amazon stopped checking. Fix the records marked red, then contact support to restart it. | The DKIM check gave up — for example, the records stayed wrong too long, or they were removed. |
| (unchanged) | Amazon SES did not answer. Try again in a minute. | A passing error. Nothing changed. |
The domain list shows each domain with its chip and Show records / Hide records. The ✕ (Remove) asks Remove {domain}? Senders at it will need their own verification again.
The Personyze mail server or your own provider
Most accounts verify their domain and send through the Personyze mail server. An account that already pays for an email provider can send through it instead, by adding it under Email delivery (SMTP). What changes:
| Personyze mail server | Your own SMTP provider | |
|---|---|---|
| Setup | Verify your domain, or one address | Host, username and password |
| Sending reputation | Shared by every account on the server, and guarded account by account | Yours alone |
| Warm-up of a new domain | Yes — warm-up | No |
| Paused for a high bounce or complaint rate | Yes — paused sending | Never by Personyze |
| Bounces and spam reports reach your suppression list | Automatically | SendGrid and Mailgun, once their Bounce webhook is set up; other SMTP providers send none back |
| Track replies | Offered | Not offered |
| Gmail’s and Yahoo’s one-click Unsubscribe button | Yes | Yes |
A Webhook (HTTP POST) sender hands the rendered email to your own system, which delivers it. It cannot carry the one-click unsubscribe headers.
Connected apps › Email delivery (SMTP)
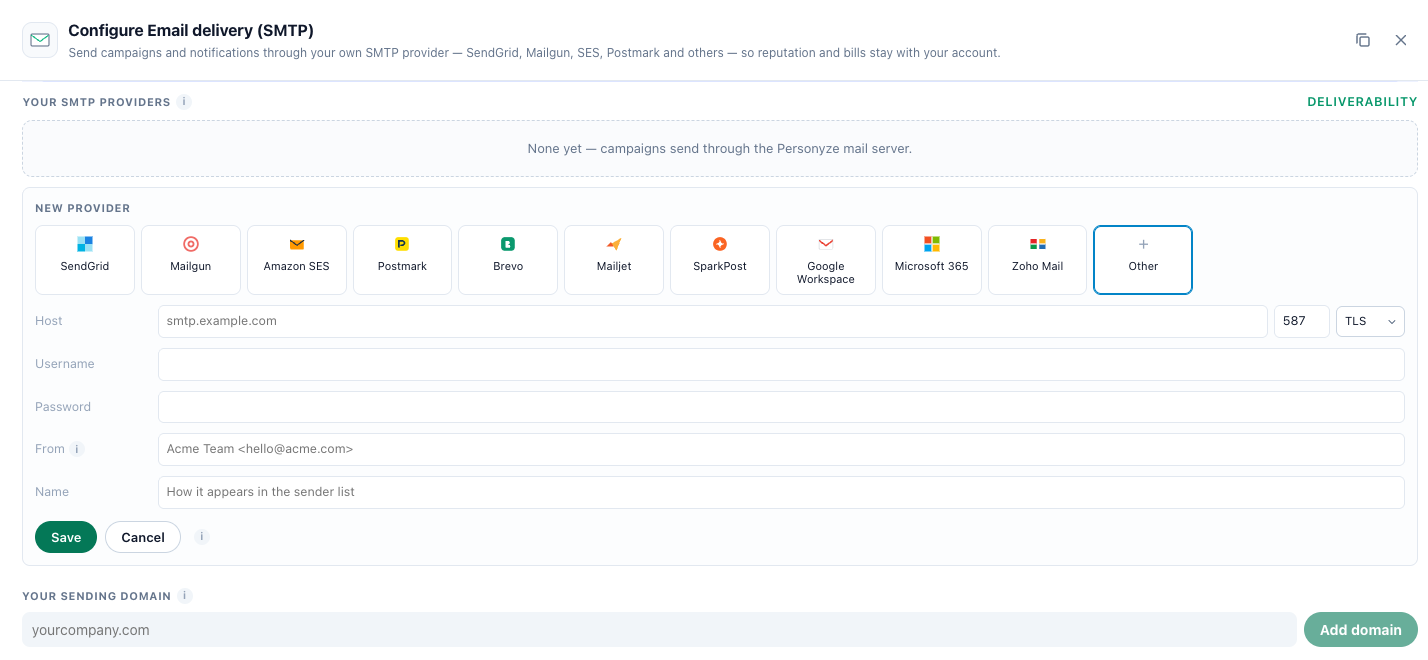
Settings › Connected apps holds the apps that bring data into Personyze and take it out. When any app is connected the page opens on the connected ones; All lists every app. The Email delivery (SMTP) card is for sending campaigns and notifications through your own SMTP provider, so reputation and bills stay with your account. Its Configure button (Manage once connected) opens the drawer Configure Email delivery (SMTP): your account’s email settings, in this order.
- Set up email sending — the checklist, whose buttons scroll to the sections below. The mailing address is edited inside its row.
- Your SMTP providers — with a Deliverability link to the Email deliverability page. With none: None yet — campaigns send through the Personyze mail server.
- Your sending domain — the domain section.
Adding an SMTP provider
Add a provider opens New provider. Pick your provider’s tile — SendGrid, Mailgun, Postmark, Brevo, Mailjet, SparkPost, Google Workspace, Microsoft 365, Zoho Mail and more, or Other — and its host, port and encryption are filled in. The heading’s tip and each box’s hint say what that provider expects, which is often not what you would guess: SendGrid’s username is the word apikey, and Google Workspace wants an app password, not your Google password.
| Field | What to enter |
|---|---|
| Host | The SMTP server, its port, and SSL, TLS or None. |
| Username | Your provider’s SMTP username. |
| Password | Your SMTP password or API key. It is kept safe and never shown again: when you edit the provider, leave the box empty to keep the one you entered. |
| From | The address it sends as, e.g. Acme Team <hello@acme.com>. It must be on a domain this provider is allowed to send for. |
| Name | How the provider appears in the sender list. |
Press Save. The provider is then a sender you can pick on any email.
Test, Edit and Delete
Each provider has Test, Edit and Delete. Test opens an address box: type your own address and press Send. A real message goes out through the provider, and the drawer says Sent to {address}. If it does not arrive, check the spam folder before changing anything. If the credentials are wrong you see the mail server’s own error instead — here, rather than as a campaign that never arrives. A test here also completes the checklist’s Send yourself a test email.
Delete asks first: Delete “{name}”? Any action still set to send through it will fall back to the account default.
The other email tools under Connected apps — Klaviyo, Mailchimp, HubSpot, Brevo — sync audiences, contacts and events. They do not deliver Personyze email campaigns; to send through Brevo, add it here as an SMTP provider. To put Personyze banners or recommendations inside the emails you send from one of those tools, see Personalized banners in 3rd-party emails and Open-time email recommendations.
If something does not work
| What you see | What to check |
|---|---|
| The domain stays at {domain} is waiting for its DNS records. | Open it with Show records and read each row. A Wrong record shows its fix; Missing means DNS does not have it yet. Most DNS hosts publish a record within minutes. |
| The domain is Failed. | Fix the records marked red, then contact support to restart the check. |
| Recipients see “your account via Personyze” as the sender. | The From address is not verified for your account. Verify it, or its domain. |
| An SMTP provider’s test fails. | The message is the mail server’s own. Check the username and password against that provider’s hint: SendGrid’s username is apikey, Google Workspace needs an app password, and Microsoft 365 needs SMTP AUTH turned on for the mailbox. |
| A test is refused with Sending through Personyze is paused for this account… | The account’s email through the Personyze mail server is paused — see Paused sending. |
More in Troubleshooting email campaigns.
Related
- The Sending step of an email campaign — the checklist’s rows, the sender and Reply-To of each email, and a test to yourself
- Email deliverability — bounces and complaints against the safe lines, warm-up, paused sending
- Your unsubscribe page, the suppression list and double opt-in — and the mailing address token
- Bounces and spam complaints — what happens automatically, and the Bounce webhook
- Reply tracking
- Writing the email — sender, subject tests, coupons and the spam check
- Email campaigns — one email, a sequence or text messages
- The thank-you email for reviews, feedback and surveys — picks its sender the same way
- Troubleshooting email campaigns